Audio Compose
Cover Page
DUE Wed, 02/12, 2 pm
We have the following objectives in this lab:
- to add audio support to
Chatter, - to learn about property delegate,
- to use enums and sealed classes,
- to learn about handling side-effect in composables, and finally
- to introduce you to the use of finite state machine to control UI transitions..
If you’re using the Android emulator to complete this lab, beware that the audio on some Windows machines has been reported to be very soft or unreliable.
Expected behavior
Post chatts with/without audio:
DISCLAIMER: the video demo shows you one aspect of the app’s behavior. It is not a substitute for the spec. If there are any discrepancies between the demo and the spec, please follow the spec. The spec is the single source of truth. If the spec is ambiguous, please consult the teaching staff for clarification.
Setting up the back end
If you haven’t modified your back end to handle audio, please go ahead and do so now:
Once you’ve updated your back end, return here to continue work on your front end.
Preparing your GitHub repo
- On your laptop, navigate to
YOUR_LABSFOLDER/ - Create a zip of your
chatterfolder - Rename your
chatterfolder audio - Push your local
YOUR_LABSFOLDER/repo to GitHub and make sure there’re no git issues:<summary>git push</summary>- Open GitHub Desktop and click on
Current Repositoryon the top left of the interface - Click on your
441GitHub repo - Add Summary to your changes and click
Commit to master(orCommit to main) - Since you have pushed your back end code, you’ll have to click
Pull Originto synch up the repo on your laptop - Finally click on
Push Originto push changes to GitHub
- Open GitHub Desktop and click on
![]() Go to the GitHub website to confirm that your folders follow this structure outline:
Go to the GitHub website to confirm that your folders follow this structure outline:
  441
    |-- audio
        |-- composeChatter
            |-- app
            |-- gradle
    |-- chatter.zip
    |-- # files and folders from other labs . . .
If the folders in your GitHub repo does not have the above structure, we will not be able to grade your labs and you will get a ZERO.
Open YOUR_LABSFOLDER/audio/composeChatter in Android Studio.
We now go through the details about how to record, playback, pause, fast forward, rewind, stop, and upload audio. We will use the Android’s MediaRecorder to record from the device’s microphone and save to local file, and MediaPlayer to play back audio on the device’s speakers.
Requesting permission
To record audio, we need user’s permission to access the device’s microphone. Add this permission request to your AndroidManifest.xml file, right under the uses-permission request for the INTERNET:
<uses-permission android:name="android.permission.RECORD_AUDIO" />
This permission tag enables us to prompt users for permission to record audio later.
Inside the <application block, above android:networkSecurityConfig line, add:
android:enableOnBackInvokedCallback="true"
This allows us to specify BackHandler() later.
Overview
To add support for audio in our app, we need to accomplish three things on the front end.
- Work with Android’s audio subsystem to record and play back audio.
- Manage the transition of our audio frontend between recording, playback, and the various modes of the playback state: play, pause, stop, etc. We will use a state machine to track these transitions.
- Update the UI elements to reflect the current state of the audio player, to control UX flow.
The first two tasks we will put in an AudioPlayer class, while the last task we will implement in AudioView, a composable.
Before we start implementing the AudioPlayer, let’s add some resources we will be using in this app.
First, add some string constants to /app/res/values/strings.xml:
    <string name="audio">Audio</string>
    <string name="doneButton">done</string>
    <string name="rwndButton">rwnd</string>
    <string name="ffwdButton">ffwd</string>
    <string name="playButton">play</string>
    <string name="stopButton">stop</string>
    <string name="recButton">rec</string>
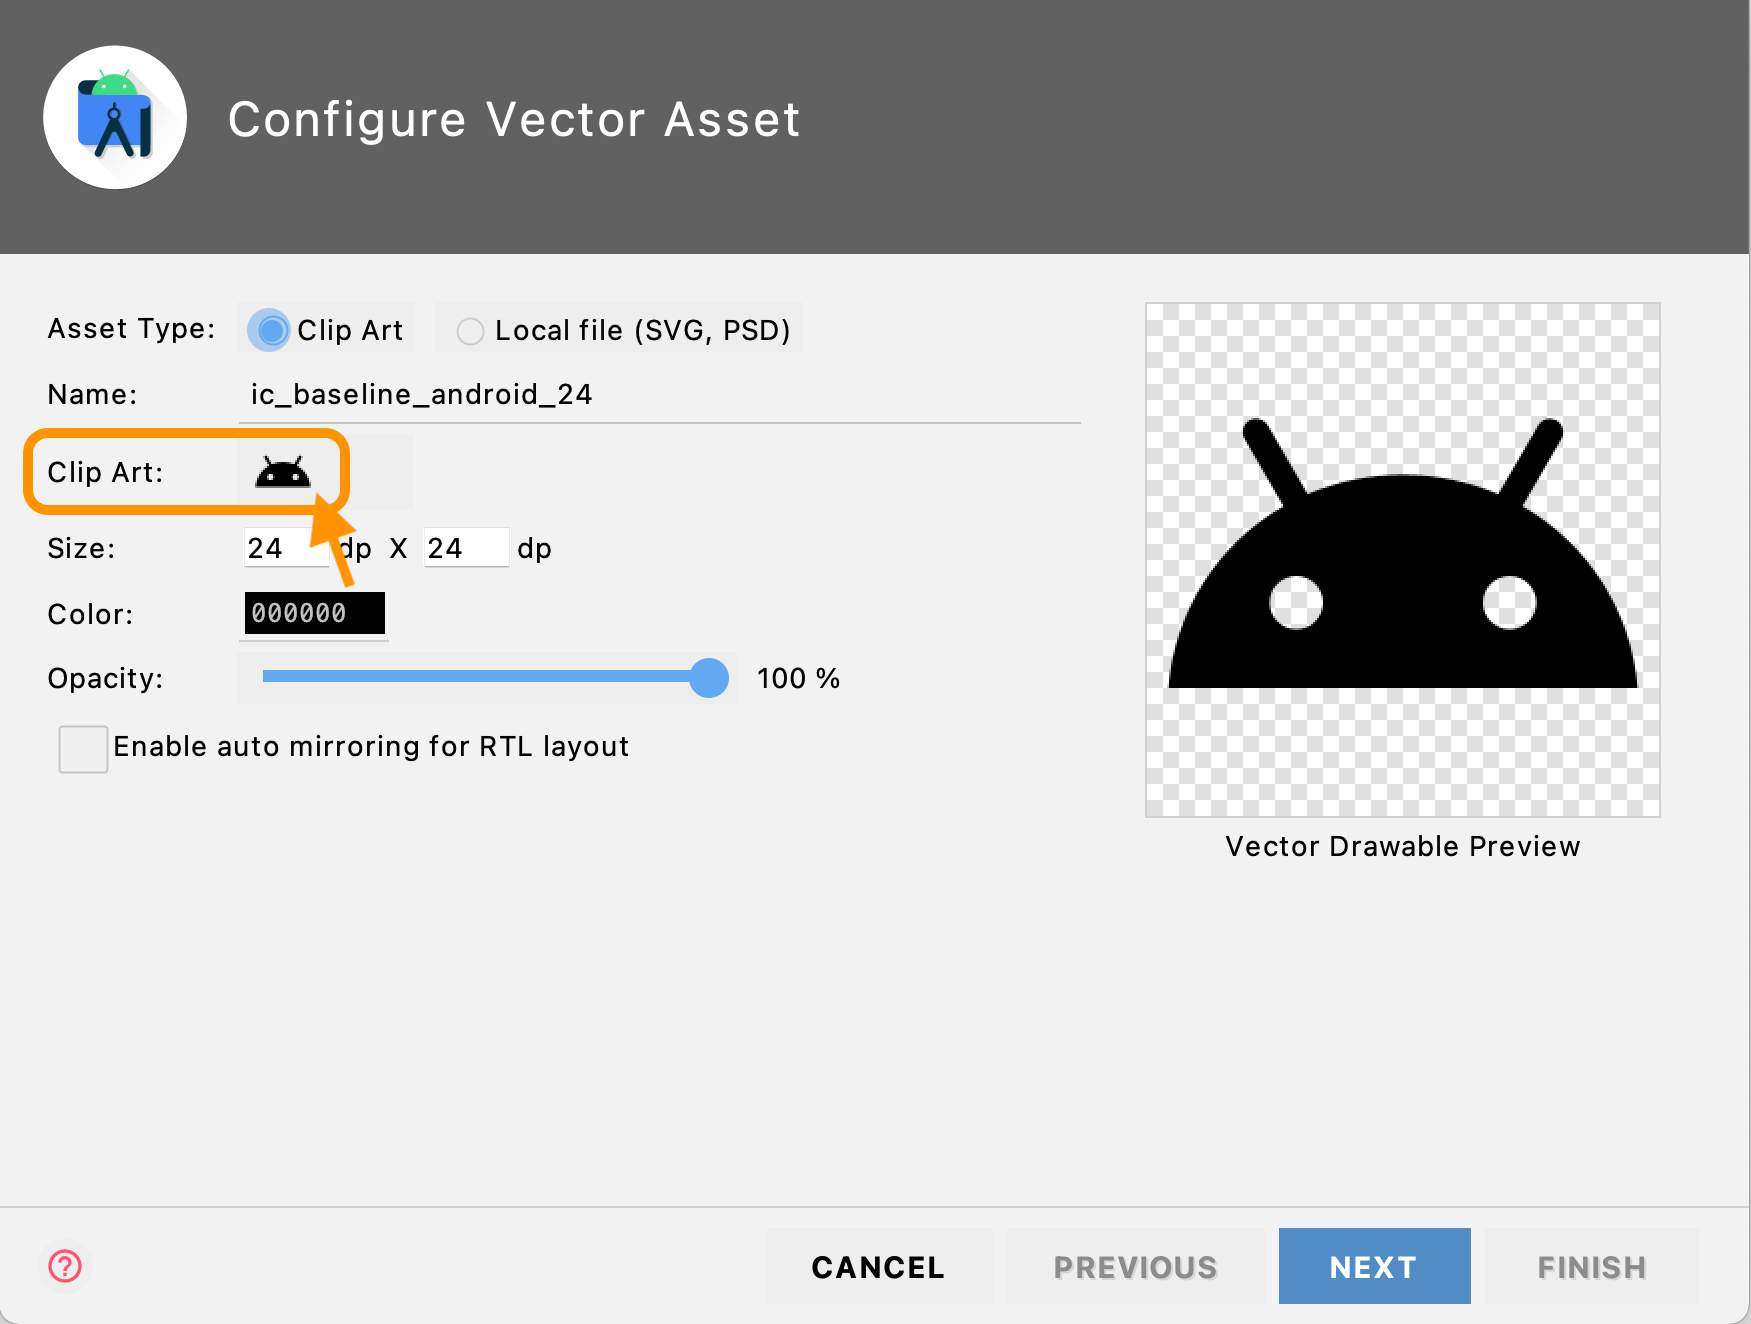
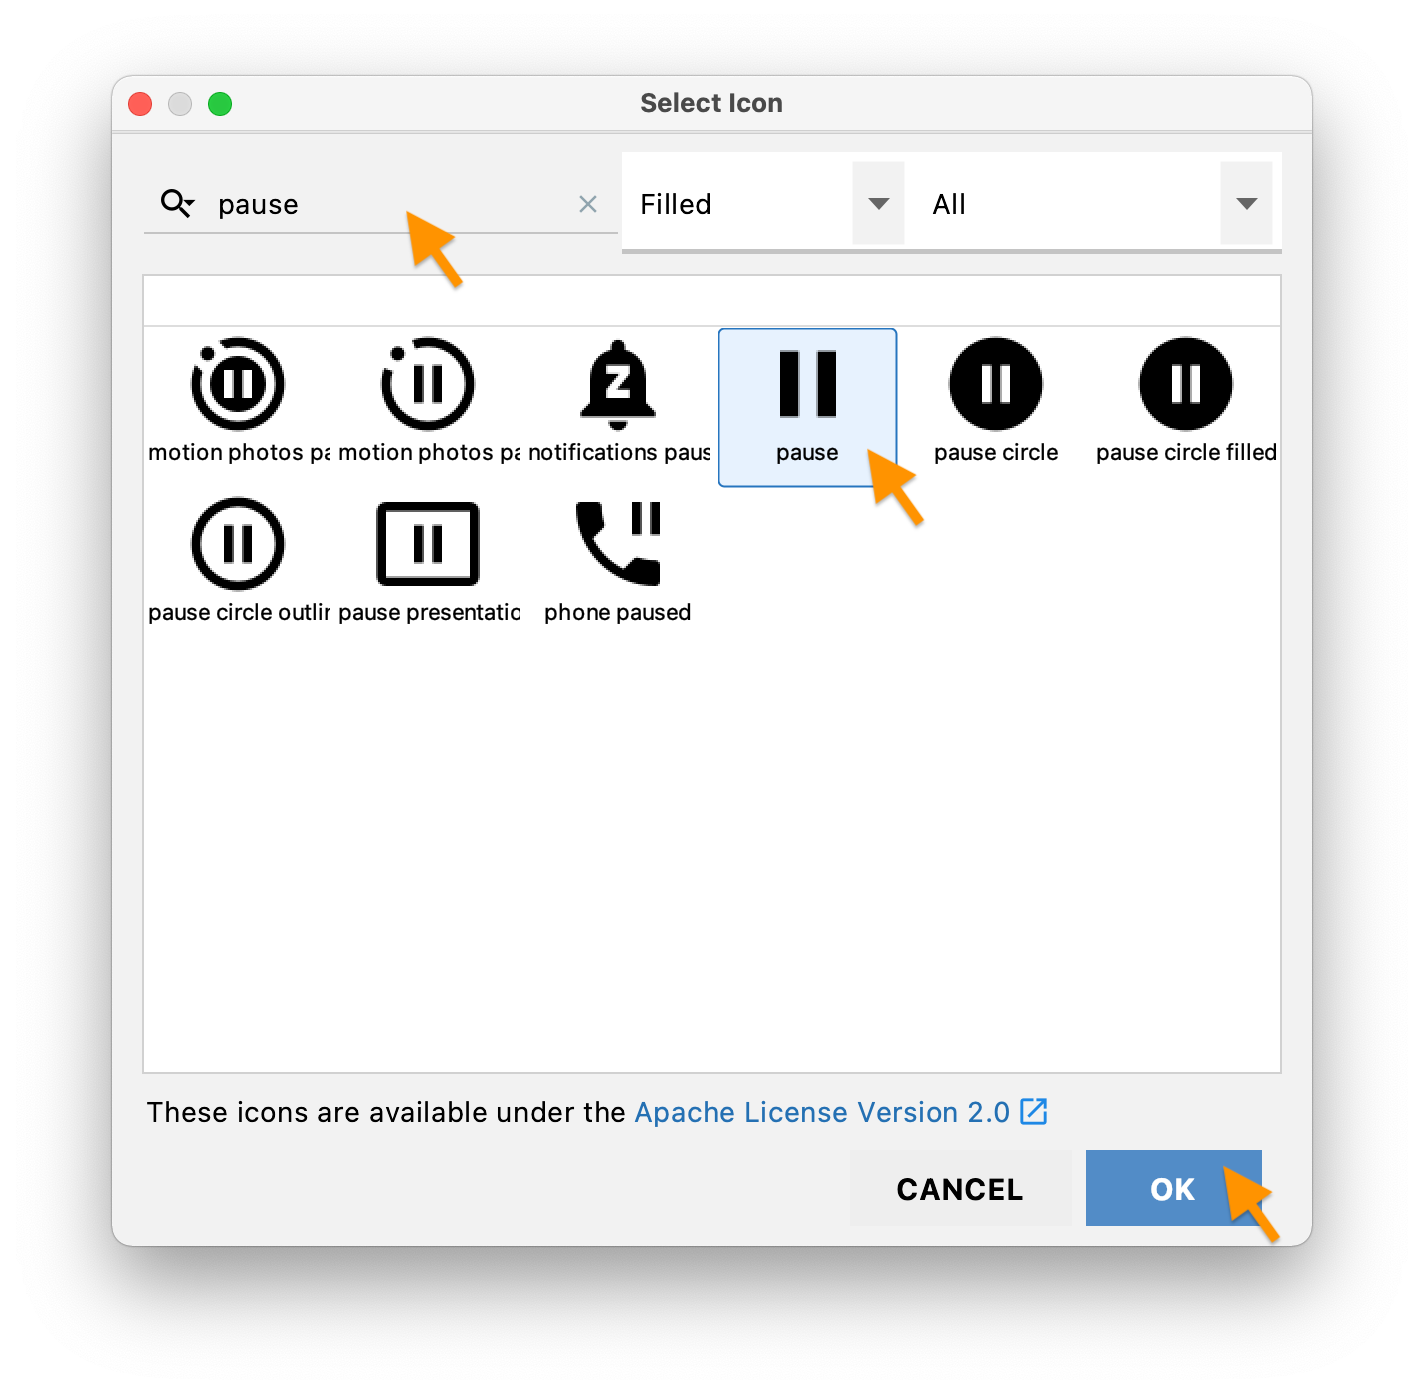
Next add some icons to /app/res/drawable/. Choose File > New > Vector Asset on Android Studio’s top menu bar (or right click on /app/res/drawable and on the drop down menu select New > Vector Asset). When the Asset Studio opens, click on the icon next to the Clip Art: field (screenshot) to bring up the Selection Icon window. In the Selection Icon window, search for “pause”, click on the resulting pause icon, and click OK
(screenshot). In the Confirm Icon Path screen, click FINISH. Repeat the process to add the following vector assets:
- exit to app
- forward 10
- mic
- mic none
- play arrow
- radio button checked
- replay 10
- share
- stop
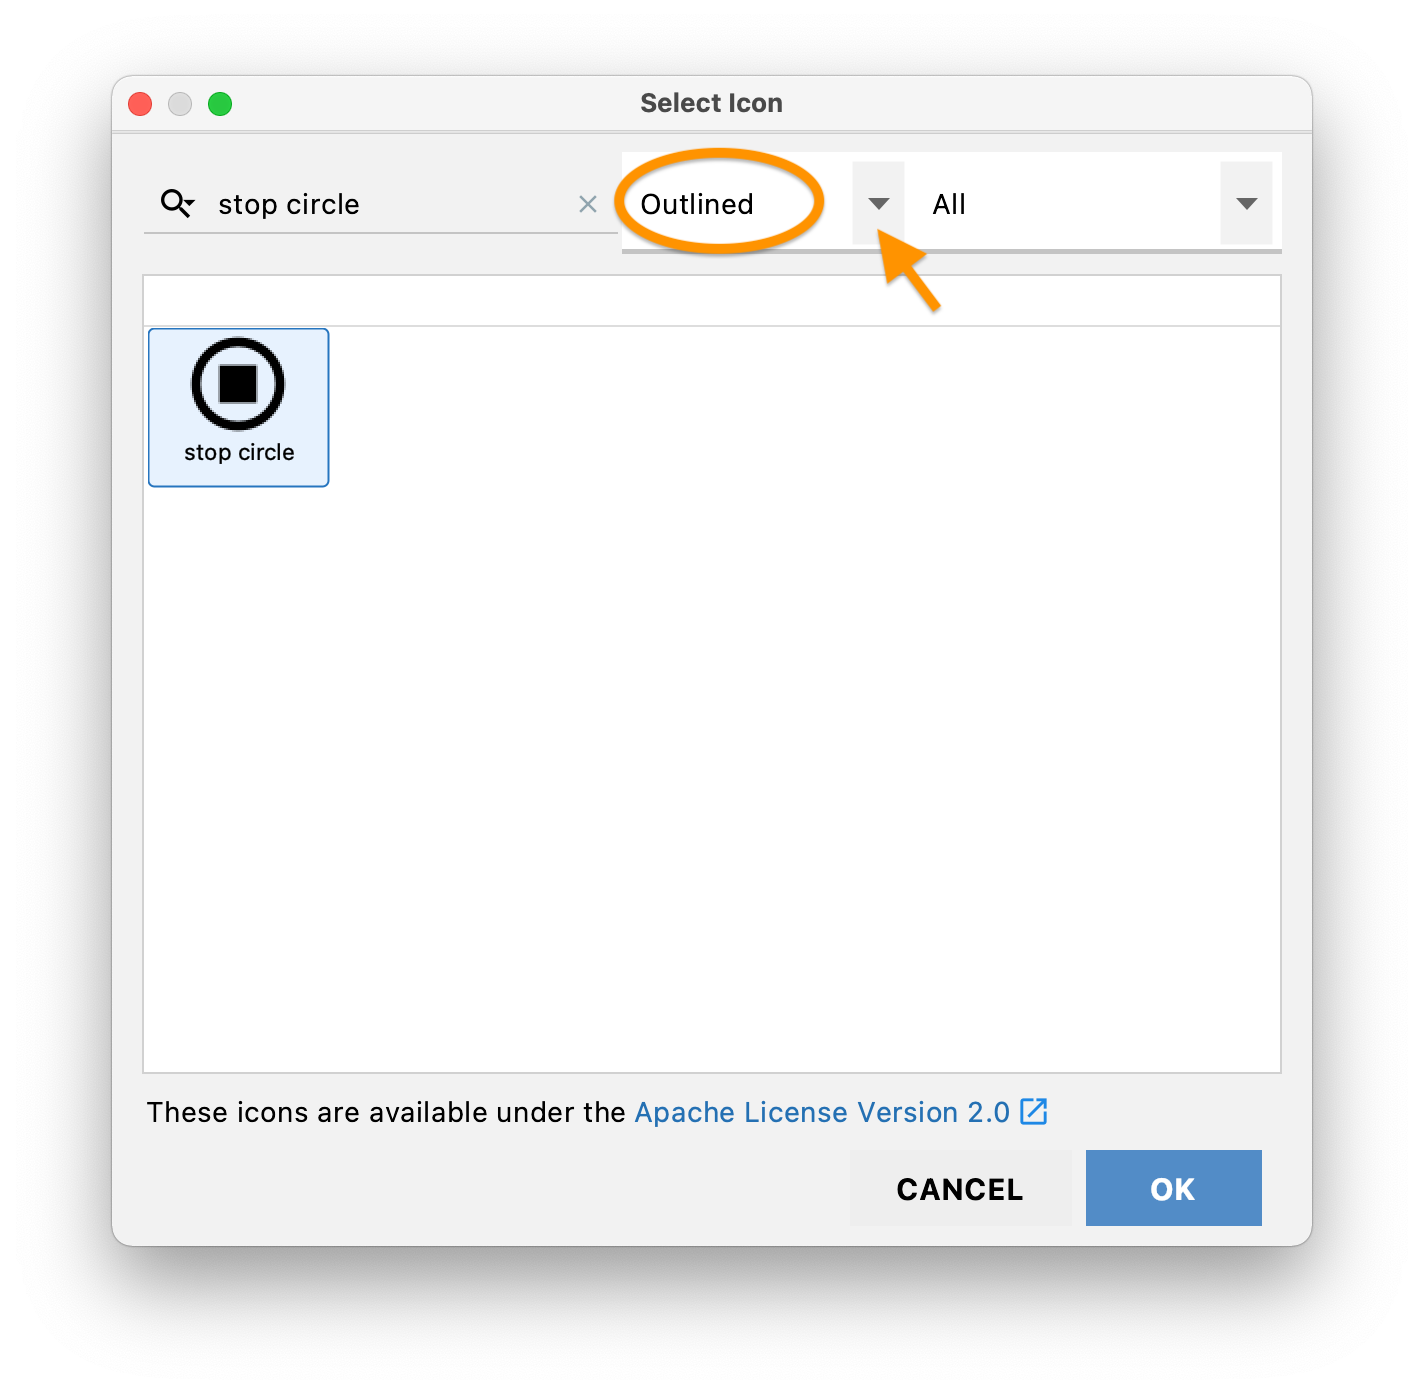
- stop circle (Outlined)
not “Filled” (screenshot)
- voicemail
AudioPlayer
Chatter UI’s appearance and behavior will change in reaction to changes in the underlying Audio Player’s state, following a state machine.
We will create an AudioPlayer class to interface with Android’s MediaPlayer and MediaRecorder subsystems. As the user uses the player to record or play audio, rewind and fast forward, pause and stop playback, we need to keep track of the state the player currently is at, to enable or disable some player control buttons. For example, we don’t want the user to be able to press the play button in the middle of recording. The deterministic finite state machine (FSM) capturing all the states of the player and the events triggering transition between states is shown in Figure 1:
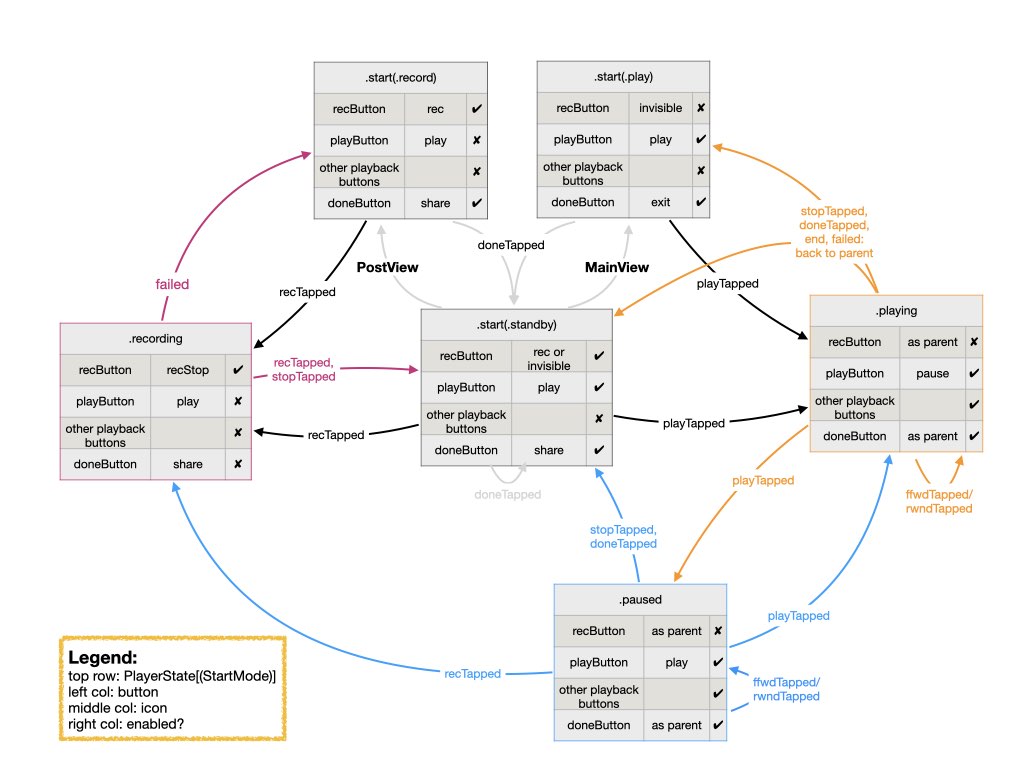
Figure 1: AudioPlayer’s deterministic finite state machine
We implement the FSM as two eponymous data structures: PlayerState and PlayerUIState. This separation allows us to reason about player state transitions with no regard to the UI states. Only once player state transitions are completed do we update the UI states to match the current player state.
Create a new Kotlin file and call it AudioPlayer. We first define the PlayerStates:
enum class StartMode {
    standby, record, play
}
sealed class PlayerState {
    class start(val mode: StartMode): PlayerState()
    object recording: PlayerState()
    class playing(val parent: StartMode): PlayerState()
    class paused(val grand: StartMode): PlayerState()
}
As shown in Figure 1, the start state consists of three modes, which we have implemented using an enum. The PlayerState itself is implemented as a sealed class to give us more flexibility in defining the possible cases. (For further explanation, please see lecture on enums and sealed classes.)
To implement the transition between states as shown in Figure 1, we enumerate the possible transition events (we don’t include ffwdTapped and rwndTapped since they don’t transition the state machine):
enum class TransEvent {
    recTapped, playTapped, stopTapped, doneTapped, failed
}
and encode the state transitions in a transition() method of PlayerState:
    fun transition(event: TransEvent): PlayerState {
        if (event == TransEvent.doneTapped) {
            return start(StartMode.standby)
        }
        return when (this) {
            is start -> when (mode) {
                StartMode.record -> if (event == TransEvent.recTapped) recording else this
                StartMode.play -> if (event == TransEvent.playTapped) playing(StartMode.play) else this
                StartMode.standby -> when (event) {
                    TransEvent.recTapped -> recording
                    TransEvent.playTapped -> playing(StartMode.standby)
                    else -> this
                }
            }
            recording -> when (event) {
                TransEvent.recTapped, TransEvent.stopTapped -> start(StartMode.standby)
                TransEvent.failed -> start(StartMode.record)
                else -> this
            }
            is playing -> when (event) {
                TransEvent.playTapped -> paused(this.parent)
                TransEvent.stopTapped, TransEvent.failed -> start(this.parent)
                else -> this
            }
            is paused -> when (event) {
                TransEvent.recTapped -> recording
                TransEvent.playTapped -> playing(this.grand)
                TransEvent.stopTapped -> start(StartMode.standby)
                else -> this
            }
        }
    }
You can trace the transitions encoded in this method by following along the edges of the state machine diagram in Figure 1.
As for the AudioPlayer class, we start with the following declaration:
class AudioPlayer(context: Context) {
    var audio by mutableStateOf<ByteArray?>(null)
    private val audioFilePath = context.externalCacheDir?.let {
        "${it.absolutePath}/chatteraudio.m4a" }

    val playerUIState = PlayerUIState()
    var playerState: PlayerState by Delegates.observable(PlayerState.start(StartMode.standby)) { _, _, playerState ->
        playerUIState.propagate(playerState)
    }

    private val mediaRecorder = MediaRecorder(context)
    private val mediaPlayer = MediaPlayer()
}
The class property audio will hold either recorded audio or the audio to be played. The property audioFilePath must be initialized to point to a temporary audio file in Android’s external cache directory, accessible through the passed in context. Both the MediaRecorder and MediaPlayer require the audio data to be stored in a file. MediaRecorder also requires access to the provided context.
The property playerState holds the audio player’s state machine, as described above. We delegated playerState to a property observer set up to propagate changes to playerState along to playerUIState. Upon instantiation, AudioPlayer starts in the standby mode of its start state.
From the standby mode, the player can be put in record or play mode. Add the following AudioPlayer methods:
    fun setupRecorder() {
        mediaPlayer.reset()
        playerState = PlayerState.start(StartMode.record)
        audio = null
    }

    fun setupPlayer(audioStr: String) {
        mediaPlayer.reset()
        playerState = PlayerState.start(StartMode.play)
        audio = Base64.decode(audioStr, Base64.DEFAULT)
        preparePlayer()
    }
In both cases, we first reset the MediaPlayer to clear it of any audio clip from a previous use of AudioView. When the player is set to record mode, we always re-initialize audio to null so as to not accidentally carry over previously recorded or played audio (outside the MediaPlayer and MediaRecorder subsystems). When the player is set to play mode, we expect to be passed along a Base64-encoded string to be played back. This would normally be an audio clip associated with a posted chatt. We store the decoded string in the audio property and prepare the MediaPlayer for playback.
MediaPlayer
It may be useful to consult the MediaPlayer State Diagram found in Android’s MediaPlayer documentation as you implement the playback function.
Add the following preparePlayer() method to the AudioPlayer class:
    private fun preparePlayer() {
        mediaPlayer.setOnCompletionListener {
            playerState = playerState.transition(TransEvent.stopTapped)
        }

        val os: OutputStream = try { FileOutputStream(audioFilePath) } catch (e: IOException) {
            Log.e("preparePlayer: ", e.localizedMessage ?: "IOException")
            return
        }
        os.write(audio)
        os.close()

        with (mediaPlayer) {
            setDataSource(audioFilePath)
            setVolume(1.0f, 1.0f) // 0.0 to 1.0 raw scalar
            prepare()
        }
    }
In preparePlayer(), we provide a callback handler for when playback is done, setOnCompletionListener. In the handler, we call the transition() method of PlayerState to transition it as if the stop button has been pressed (see Figure 1).
We then write the audio clip to a temporary file stored in audioFilePath. We pass this file path to MediaPlayer to play back. We set the play back volume and call the prepare() method of MediaPlayer.
With the MediaPlayer set up, we now fill in the code to perform the action associated with playback buttons. Create a playTapped() method in AudioPlayer class as follows:
    fun playTapped() {
        with (mediaPlayer) {
            if (playerState is PlayerState.playing) {
                pause()
            } else {
                this.start()
            }
        }
        playerState = playerState.transition(TransEvent.playTapped)
    }
If the play button is tapped when the player is playing, the user wants to pause play, call MediaPlayer’s pause() method. Otherwise, if the player is not playing when the play button is tapped, call MediaPlayer’s start() method which will either start or resume play. According to Figure 1, if playback is paused by tapping the play button a second time, the state is changed to “paused”, tapping the play button again will then resume play. In all cases, we transition the playerState to the appropriate next state by calling the transition() method of PlayerState.
The fast-forward and rewind playback controls simply move the play head forward or backward by 10 seconds respectively, by seeking to mediaPlayer.currentPosition plus or minus 10000 msecs, without changing state in the FSM. Add these two methods to your AudioPlayer class:
    fun ffwdTapped() {
        mediaPlayer.seekTo(mediaPlayer.currentPosition+10000)
    }

    fun rwndTapped() {
        mediaPlayer.seekTo(mediaPlayer.currentPosition-10000)
    }
According to the MediaPlayer state diagram, once the MediaPlayer is stopped, we can not restart play back without preparing the player again (which could throw an IO exception that needs to be caught). So when the stop button is tapped, instead of stopping playback, we:
- pause the player,
- reset the play head to the beginning of the audio clip (by calling
seekTo()as we did in the rewind and fast-forward methods), and - call the
transition()method to transition theplayerStatefrom its current state given thestopTappedevent.
TODO 1/3: write the stopTapped() function and add it as a method to your AudioPlayer class.
MediaRecorder
It may be useful to consult the MediaRecorder State Diagram found in Android’s MediaRecorder documentation as you implement the recording function.
Earlier we have defined the method setupRecorder(). Once the recorder is set up, recording is initiated by the user tapping on a record button, which calls the recTapped() method of AudioPlayer:
    fun recTapped() {
        if (playerState == PlayerState.recording) {
            finishRecording()
        } else {
            startRecording()
        }
    }
When the recording button is tapped, if we are not currently recording, we start recording by calling the startRecording() method of the AudioPlayer class:
    private fun startRecording() {
        // reset player because we'll be re-using the output file that may have been primed at the player.
        mediaPlayer.reset()

        playerState = playerState.transition(TransEvent.recTapped)

        with (mediaRecorder) {
            setAudioSource(MediaRecorder.AudioSource.MIC)
            setOutputFormat(MediaRecorder.OutputFormat.MPEG_4)
            setAudioEncoder(MediaRecorder.AudioEncoder.AAC)
            setOutputFile(audioFilePath)
            try {
                prepare()
            } catch (e: IOException) {
                Log.e("startRecording: ", e.localizedMessage ?: "IOException")
                return
            }
            this.start()
        }
    }
To start recording, we first ensure that the MediaPlayer is not otherwise using the temporary audio file we will be using. We do this by calling the reset() method of the MediaPlayer. Next we call the transition() method of PlayerState to put the player in the correct state. Then we prepare the MediaRecorder: specifying the audio source (mic), output format (mpeg4), audio encoder (AAC), and output file (audioFilePath). Then we call the prepare() method of MediaRecorder and start recording by calling the start() method of MediaRecorder.
If recTapped() is called when recording is ongoing, we end recording by calling the finishRecording() method of AudioPlayer:
    private fun finishRecording() {
        mediaRecorder.stop()
        mediaRecorder.reset()
        try {
            val fis = FileInputStream(audioFilePath)
            val bos = ByteArrayOutputStream()
            var read: Int
            val audioBlock = ByteArray(65536)
            while (fis.read(audioBlock, 0, audioBlock.size).also { read = it } != -1) {
                bos.write(audioBlock, 0, read)
            }
            audio = bos.toByteArray()
            bos.close()
            fis.close()
        } catch (e: IOException) {
            Log.e("finishRecording: ", e.localizedMessage ?: "IOException")
            playerState = playerState.transition(TransEvent.failed)
            return
        }
        playerState = playerState.transition(TransEvent.recTapped)
        preparePlayer()
    }
The function stops the recording, load the recorded clip into the audio property (to be uploaded to the Chatter back end along with the posted chatt), calls the transition() method of PlayerState to perform the appropriate state transition, and prepare the MediaPlayer in case the user wants to play back the recorded audio before posting it.
Once the user is satisfied with the recording, they tap the done button, which calls the doneTapped() method to reset both the MediaPlayer and MediaRecorder:
    fun doneTapped() {
        if (playerState == PlayerState.recording) {
            finishRecording()
        } else {
            mediaRecorder.reset()
        }
        mediaPlayer.start() // so that playback works on revisit
        stopTapped()
        audio?.run {
            playerState = playerState.transition(TransEvent.doneTapped)
        }
    }
With that, we are done with the AudioPlayer!
MainActivity
MediaViewModel
Every time your device experience a configuration change, the currently visible Activity of your app is destroyed and re-created, so that it can redraw itself according to the new configuration. “Configuration change” includes orientation change, dark vs. light mode change, keyboard availability, etc. Since our app has only one Activity, the whole app practically gets re-created on every configuration change.
Android Jetpack ViewModel architecture component is intended to hold UI states (the “data model” used in rendering views). The most important characteristics of the ViewModel to us is that states stored in a ViewModel are not destroyed and recreated upon configuration change. To maintain our instance of AudioPlayer across configuration changes, we instantiate and store it in a ViewModel. Add the following code to your MainActivity.kt file, outside the MainActivity class:
class MediaViewModel(app: Application): AndroidViewModel(app) {
    val audioPlayer = AudioPlayer(app.applicationContext)
}
Next add the following property to your MainActivity class:
private val viewModel: MediaViewModel by viewModels()
Runtime permission request
Next, follow up on the permission tag added to AndroidManifest.xml above with code in onCreate() to prompt user for permission to access the mid to RECORD_AUDIO. We will be using Android’s ActivityResultContracts to request permission. The name of the contract is RequestPermission (singular):
        registerForActivityResult(ActivityResultContracts.RequestPermission()) { granted ->
            if (!granted) {
                toast("Audio access denied")
                finish()
            }
        }.launch(Manifest.permission.RECORD_AUDIO)
We did three things in the above code. First we created a “contract” that informs Android that a certain Activity will be started and the Activity will be expecting input of a certain type and will be returning output of other certain type. This ensures the type safety of starting an Activity for results. In this case, we specified that the Activity we want to start is to request permission, which is a standard Activity for which Android already provides a canned contract with baked-in input/output types.
The second thing we did after creating the “contract” was to register it with the Android OS by calling registerForActivityResult(). As part of the registration process, we provided a callback to handle results from starting the Activity, in the form of a trailing lambda expression. The callback handler will examine the result the permission request. If permission is denied, for the sake of expediency, we simply inform the user permission has been denied with a toast() and end MainActivity, closing the app. In a real app, you may want to be less draconian and let user continue to post text messages.
Since activities can be and are destroyed and re-created, for example everytime the screen orientation changes, if we register an activity result contract in an Activity, as we do here, the registration must be done in the Activity’s onCreate(). This way, every time the Activity is re-created, the contract is re-registered. Alternatively, in composables, we can register activity result contract using rememberLauncherForActivityResult(), which will take care of registering the contract correctly. We will use the compose version in the images lab.
The call to ActivityResultContracts() returns a contract that we can store in a local variable. In this case, since we have no further use of the contract, we didn’t store it in a variable. Instead, we use it directly in the call to registerForActivityResult().
The third thing we did in the above code, was to launch the registered contract to ask access permission to the mic (or rather, to RECORD_AUDIO). The call to registerForActivityResult() returns a registration handler that we are again not storing in a local variable, but have instead called its launch() method immediately. If we had stored both the contract and the registration handler in local variables, the code above would be the equivalent of:
        val contract = ActivityResultContracts.RequestMultiplePermissions()
        val launcher = registerForActivityResult(contract) { granted ->
            if (!granted) {
                toast("Audio access denied")
                finish()
            }
        }
        launcher.launch(Manifest.permission.RECORD_AUDIO)
Notice that we use a Toast to inform the user if permission has been denied. A Toast is a small pop-up that appears on screen. Toasts can be very helpful while debugging and to notify users of their current state in the app. Instead of using Toast directly however, we have added a toast() extension to the Context class. The extension allows us to use Toast with some boiler-plate arguments pre-set. By attaching the extension to Context, we can use it anywhere we have access to Context.
We’ll collect all the extensions we’ll be using globally into one file. Create a new Kotlin File (not Class) called Extensions.kt and put the following code in it:
fun Context.toast(message: String, short: Boolean = true) {
    Toast.makeText(this, message, if (short) Toast.LENGTH_SHORT else Toast.LENGTH_LONG).show()
}
Recall that if Android Studio prompts you with multiple possible imports and you’re not sure which one to import, you can consult the Appendix for a full list of imports each Activity needs.
Hoisting AudioPlayer
Prop drilling vs. State hoisting
Almost every composable in the app must access the instance of AudioPlayer to control playback. All of the composables rendering the player UI will also need to access the instance of PlayerUIState in AudioPlayer to determine how to render each UI element (the very definition of ViewModel!). We could pass AudioPlayer and PlayerUIState to every composables, their child-composables, and so on down the hierarchy of the composable tree. In React this is called “prop drilling” as the HTML properties needed to render the UI are passed down and down to the bottom of the UI hierarchy, even if some intermediate components do not need access to the properties.
As an alternative, we can “hoist” the needed state to the top of the UI sub-tree (which may be the root of the tree in the limit) and have each UI component needing the state data search up its UI sub-tree until it finds the state. The state is said to be “provided” to the sub-tree. The Provider usually maintains a look-up table of available states, identifiable by the type of the state. When the same data type is provided at different levels of the UI-tree, the one lowest in the hierarchy above the component searching for the state will match.
In your MainActivity.kt file, but outside the MainActivity class definition, add two global CompositionLocal keys below the existing LocalNavHostController definition:
lateinit var LocalAudioPlayer: ProvidableCompositionLocal<AudioPlayer>
We will provide audioPlayer from the viewModel as the default values of this CompositionLocal variable.
Inside the setContent{ } block, wrap the whole UI tree below the root inside a CompositionLocalProvider() that provides the audioPlayer to the CompositionLocal variable LocalAudioPlayer. All the composables in the whole UI tree below the root can now access the audioPlayer provided in the LocalAudioPlayer variable.
Replace your existing setContent{ } block with:
        // provide the *default* value:
        LocalAudioPlayer = staticCompositionLocalOf { viewModel.audioPlayer }

        setContent {
            val navController = rememberNavController()
            // provide the *current* values:
            CompositionLocalProvider(LocalNavHostController provides navController, LocalAudioPlayer provides viewModel.audioPlayer) {
                NavHost(navController, startDestination = "MainView") {
                    composable("MainView") {
                        MainView()
                    }
                    composable("PostView") {
                        PostView()
                    }
                    // passing an optional, nullable argument
                    composable(
                        "AudioView?autoPlay={autoPlay}",
                        arguments = listOf(navArgument("autoPlay") {
                            type = NavType.BoolType
                            //nullable = false  // BoolType is not nullable
                            defaultValue = false
                        })
                    ) {
                        AudioView(it.arguments?.getBoolean("autoPlay"))
                    }
                }
            }
        }
In the code, we use staticCompositionLocalOf() because while we will observe certain properties of the AudioPlayer, once initialized, the instance of audioPlayer itself never changes.
Why not just pass the ViewModel?
Since we are passing all the properties of the ViewModel, why don’t we just pass the ViewModel or
put the ViewModel itself up as a CompositionLocal variable? Google advises against both:
-
Passing
ViewModel: because it ties composables to theViewModel’s lifecycle, making them less reusable. It also exposes more data and logic to lower-level composables than necessary. -
Using
CompositionLocalto hold aViewModel: because not all child composables need to know about theViewModel.
“The good practice is to pass to composables only the information that they need following the pattern that state flows down and events flow up. This approach will make your composables more reusable and easier to test.”
To the existing NavHost, we have added a third route for AudioView. The “path” for AudioView says that it takes an optional (?) argument called autoPlay, of type NavType.BoolType, with default value set to false (incidentally, since the argument is optional and can be null, we must specify the corresponding AudioView parameter, autoPlay, to be of nullable type, Boolean?).
Now we declare the AudioView UI to go along with the audio player.
AudioView
The UI for our audio player consists of buttons one would expect to find in an audio player: record, play, stop, rewind, and fast forward. In addition, we also have a “done” button for when the user is done and wish to exit the audio player. As shown in Figure 1, the state the player is in determines whether the record button is shown, whether it is shown in red or black, whether the play button shows the “play” or “pause” icon, etc. In “playing” and “paused” states, whether the record button is shown further depends on the state the player was at prior to arriving in these states.
We will use PlayerUIState to hold the modifiers affecting the appearance of every UI element in AudioView. Whenever the audio player state changes, the playerState property observer will propagate the change to PlayerUIState by invoking its propagate() method. Each child composable of AudioView reads the PlayerUIState properties relevant to it, e.g., RecButton() reads recEnabled, recIcon, and recColor. Whenever propagate() updates a property of PlayerUIState, the composable(s) that read the property, and only those composables, will be recomposed.
Following the Unidirectional Data Flow (UDF) principle, no child composable of AudioView modifies playerUIState directly, all user interactions are routed to the appropriate audioPlayer actions, e.g., recTapped(), affecting changes to playerState, which in turn lead to playerUIState updates.
Design rationale and alternative
We could have each UI element (i.e., record button, play button, etc.) subscribe to the playerState maintained by AudioPlayer directly. Each UI element would then react to the observed playerState, e.g., when playerState is in start state, play mode, the record button would make itself invisible. This is the “object-oriented” way of programming the reactive UI.
Here we use the “functional” or “algebraic data type” way of data modeling: “separate behavior from data, by grouping behavior for all types together by operation.” This approach makes sense here because:
- it’s easier to reason with and maintain all variants of the same operation on all types centrally: for example, how each AudioPlayer state transitions when a button is tapped, and
- variations between operations on different types are more related to each other than to the types they’re operating on: how each button of the AudioView is affected by a transition in the AudioPlayer state.
We are still observing the reactive paradigm by hoisting the PlayerUIState above all the buttons. When a button is tapped, we update the PlayerUIState and not mutate the other buttons directly. Instead, we continue to rely on the Unidirectional Data Flow paradigm to update the UI.
Create a new Kotlin file, call it AudioView, and put the following PlayerUIState in it:
class PlayerUIState {
    private var recVisible = true
    var recEnabled by mutableStateOf(true)
    var recColor by mutableStateOf(Color.Black)
    var recIcon by mutableStateOf(R.drawable.baseline_radio_button_checked_24) // initial value

    var playCtlEnabled by mutableStateOf(false)
    var playCtlColor by mutableStateOf(Color.LightGray)

    var playEnabled by mutableStateOf(false)
    var playColor by mutableStateOf(Color.LightGray)
    var playIcon by mutableStateOf(R.drawable.baseline_play_arrow_24) // initial value

    var doneEnabled by mutableStateOf(true)
    var doneColor by mutableStateOf(Color.DarkGray)
    var doneIcon by mutableStateOf(R.drawable.baseline_share_24) // initial value

    private fun reset() {
        recVisible = true
        recEnabled = true
        recColor = Moss
        recIcon = R.drawable.baseline_radio_button_checked_24 // initial value

        playCtlEnabled = false
        playCtlColor = Color.LightGray

        playEnabled = false
        playColor = Color.LightGray
        playIcon = R.drawable.baseline_play_arrow_24 // initial value

        doneEnabled = true
        doneColor = Color.DarkGray
        doneIcon = R.drawable.baseline_share_24 // initial value
    }

    private fun playCtlEnabled(enabled: Boolean) {
        playCtlEnabled = enabled
        playCtlColor = if (enabled) Color.DarkGray else Color.LightGray
    }

    private fun playEnabled(enabled: Boolean) {
        playIcon = R.drawable.baseline_play_arrow_24
        playEnabled = enabled
        playColor = if (enabled) Color.DarkGray else Color.LightGray
    }

    private fun pauseEnabled(enabled: Boolean) {
        playIcon = R.drawable.baseline_pause_24
        playEnabled = enabled
        playColor = if (enabled) Color.DarkGray else Color.LightGray
    }

    private fun recEnabled() {
        recIcon = R.drawable.baseline_radio_button_checked_24
        recEnabled = true
        recColor = Moss
    }

    private fun doneEnabled(enabled: Boolean) {
        doneEnabled = enabled
        doneColor = if (enabled) Color.DarkGray else Color.LightGray
    }

    fun propagate(playerState: PlayerState) = when (playerState) {
        is PlayerState.start -> {
            when (playerState.mode) {
                StartMode.play -> {
                    recVisible = false
                    recEnabled = false
                    recColor = Color.Transparent
                    playEnabled(true)
                    playCtlEnabled(false)
                    doneIcon = R.drawable.baseline_exit_to_app_24
                    doneColor = Color.DarkGray
                }
                StartMode.standby -> {
                    if (recVisible) recEnabled()
                    playEnabled(true)
                    playCtlEnabled(false)
                    doneEnabled(true)
                }
                StartMode.record -> {
                    // initial values already set up for record start mode.
                    reset()
                }
            }
        }
        PlayerState.recording -> {
            recIcon = R.drawable.outline_stop_circle_24
            recColor = Firebrick
            playEnabled(false)
            playCtlEnabled(false)
            doneEnabled(false)
        }
        is PlayerState.paused -> {
            if (recVisible) recEnabled()
            playIcon = R.drawable.baseline_play_arrow_24
        }
        is PlayerState.playing -> {
            if (recVisible) {
                recEnabled = false
                recColor = Color.LightGray
            }
            pauseEnabled(true)
            playCtlEnabled(true)
        }
    }
}
Except for recVisible, all properties of PlayerUIState are declared MutableState, by delegating to mutableStateOf(), allowing Compose’s Snapshot State state management framework to automatically recompose all composables that read these properties when they change. Now that we have set up the states affecting player UI for Compose’s reactive framework, we can “declare” the UI (composables) for the audio player. Let’s start with AudioView. Add the following code to your AudioView.kt:
@Composable
fun AudioView(autoPlay: Boolean?) {
    val navController = LocalNavHostController.current
    val audioPlayer = LocalAudioPlayer.current
    var isLaunching by rememberSaveable { mutableStateOf(true) }

    LaunchedEffect(Unit) {
        if (isLaunching) {
            isLaunching = false
            if (autoPlay != null && autoPlay) {
                audioPlayer.playTapped()
            }
        }
    }
}
We first read navController and audioPlayer off the current values of the CompositionLocal variables LocalNavHostController and LocalAudioPlayer.
A composable must be referentially transparent (can be called several times with the same outcome) and therefore side-effect free. The LaunchedEffect() function allows us to call one or more functions with side-effect in a composable. Upon recomposition of its composable, LaunchedEffect() will be called again if its key argument has changed value (there could be more than one keys). Setting the key to the unchanging Unit (or true) means LaunchedEffect() will be called only once in the composable lifecycle: when the composable is invoked initially (for the first time), but not on re-compositions. A configuration change, however, resets the “initial call” state. To prevent the side-effect function being called again after configuration changes, we guard the call with an isLaunching variable whose value is remembered and saved across configuration changes.
If the argument passed to AudioView’s autoPlay parameter is true, we immediately invoke AudioPlayer.playTapped(). However, the call to playTapped() is done within a LaunchedEffect() to prevent this function with side-effect to be launched on recompositions. We further guard the call to playTapped() with the isLaunching variable, to prevent its being called again on orientation changes.
We now lay out the audio player screen. Add the following to your AudioView() composable right below the LaunchedEffect() block:
    Column(verticalArrangement = Arrangement.SpaceAround,
        horizontalAlignment = Alignment.CenterHorizontally,
        modifier=Modifier.fillMaxHeight(1f)) {
        Spacer(modifier = Modifier.fillMaxHeight(.05f))
        Row(horizontalArrangement = Arrangement.SpaceEvenly, modifier = Modifier.fillMaxWidth(1f)) {
            StopButton()
            RwndButton()
            PlayButton()
            FfwdButton()
            DoneButton()
        }
        RecButton()
    }
We now add the definition of the RecButton() composable, outside the AudioView composable but in the same file:
@Composable
fun RecButton() {
    val audioPlayer = LocalAudioPlayer.current
    val playerUIState = audioPlayer.playerUIState

    Button(onClick = { audioPlayer.recTapped() },
        enabled = playerUIState.recEnabled,
        colors = ButtonDefaults.buttonColors(containerColor = Color.Transparent,
            disabledContainerColor = Color.Transparent),
        elevation = ButtonDefaults.buttonElevation(0.dp)
    ) {
        Icon(imageVector = ImageVector.vectorResource(playerUIState.recIcon),
            modifier= Modifier.size(100.dp),
            contentDescription = stringResource(R.string.recButton),
            tint = playerUIState.recColor
        )
    }
}
First, we read audioPlayer from the CompositionLocal variable LocalAudioPlayer.current and set playerUIState as shorthand for audioPlayer.playerUIState. Whether the button is enabled depends on the value in playerUIState.recEnabled. If enabled, the look of the RecButton follows the value in playerUIState.recIcon and its color depends on playerUIState.recColor. Recall that all three of these PlayerUIState properties are MutableStates. RecButton() will be recomposed if any of them changes. When visible, if RecButton is tapped, it calls audioPlayer.recTapped().
Here’s the definition of the DoneButton() composable:
@Composable
fun DoneButton() {
    val navController = LocalNavHostController.current
    val audioPlayer = LocalAudioPlayer.current
    val playerUIState = audioPlayer.playerUIState

    Button(onClick = {
        audioPlayer.doneTapped()
        navController.popBackStack()
    },
        enabled = playerUIState.doneEnabled,
        colors = ButtonDefaults.buttonColors(containerColor = Color.Transparent,
            disabledContainerColor = Color.Transparent),
        elevation = ButtonDefaults.buttonElevation(0.dp)
    ) {
        Icon(imageVector = ImageVector.vectorResource(playerUIState.doneIcon),
            modifier= Modifier.scale(1.7f).padding(end = 8.dp),
            contentDescription = stringResource(R.string.doneButton),
            tint = playerUIState.doneColor
        )
    }
}
When the done button is tapped, in addition to calling audioPlayer.doneTapped(), we also call navController.popBackStack() to pop the navigation stack back to the composable that launched AudioView.
TODO 2/3: the other buttons, StopButton, RwndButton, and FfwdButton, PlayButton, are defined similarly to the DoneButton, except each should call its respective AudioPlayer method, each has its corresponding contentDescription, each has its own playUIStates (see below), and they do not pop the navigation stack and do not need to read navController as a CompositionLocal variable.
Go ahead and implement the other buttons.
For the stop icon, you can use R.drawable.baseline_stop_24. Similarly for the fast-forward icon, you can use R.drawable.baseline_forward_10_24, and for the rewind icon, you can use R.drawable.baseline_replay_10_24. Assuming these are the icons you have added to your drawable resource in the Overview section above. Since we are not changing the appearances of these icons, you can use them inline without storing them as observable variables (which incurs system overhead). The play icon, on the other hand, toggles between “play” and “pause”, so be sure to use playerUIState.playIcon when defining PlayButton. UI states of the other play back control buttons, whether they are enabled or greyed out, are determined by playCtlEnabled and playCtlColor.
There is one more thing we need to take care of. User could leave AudioView by tapping the Done button or by tapping the device’s Back Button (◀). We want to stop playback or recording before leaving the view. Go back to your AudioView() composable and add the following call to the BackHandler() composable inside AudioView(), below the Column() block:
    BackHandler(true) {
        audioPlayer.doneTapped()
        navController.popBackStack()
    }
With that, we’re done with the audio player and its Views!
PostView
There are two changes we need to make to PostView. First, as explained earlier, instead of passing applicationContext and navController to PostView as its arguments, we can retrieve the context from a “built-in” composition local variable LocalContext and the navController from the composition local variable LocalNavHostController we defined in MainActivity.kt. Replace your definition of PostView with:
fun PostView() {
    val context = LocalContext.current
    val navController = LocalNavHostController.current
In subsequent labs, for logistical convenience, we will continue to build off the
chatterlab, and passapplicationContextandnavControllerto bothPostViewandMainView. You can choose to optionally read them offCompositionLocalvariables instead.
To make an audio recording for posting with a chatt, we want to add a button to launch AudioView at the bottom of PostView. We read audioPlayer off the CompositionLocal variable, LocalAudioPlayer. We then set up audioPlayer to record as a side-effect to be run everytime PostView is launched, but not on configuration change, as controlled by the isLaunching variable. Add the following to your PostView() composable, after existing local variables of the PostView composable function:
    var isLaunching by rememberSaveable { mutableStateOf(true) }
    val audioPlayer = LocalAudioPlayer.current
    val focus = LocalFocusManager.current

    LaunchedEffect(Unit) {
        if (isLaunching) {
            isLaunching = false
            audioPlayer.setupRecorder()
        }
    }
The variable focus will be used to dismiss the virtual keyboard later. It again relies on a built-in composition local variable, LocalFocusManager.
We want to show the audio button at the bottom of the PostView screen. Add a bottomBar argument to your call to Scaffold(), right below the topBar argument:
        bottomBar = {
            Row (
                modifier = Modifier
                    .fillMaxWidth(1f)
                    .padding(WindowInsets.navigationBars.asPaddingValues())
                    .background(color = WhiteSmoke),
                horizontalArrangement = Arrangement.SpaceEvenly,
                verticalAlignment = Alignment.CenterVertically
            ) {
                AudioButton()
            }
        },
and add the following AudioButton composable inside your PostView composable, before the call to Scaffold():
    @Composable
    fun AudioButton() {
        IconButton(
            modifier = Modifier.fillMaxWidth().background(color = WhiteSmoke),
            onClick = {
                navController.navigate("AudioView")
            },
        ) {
            Icon(imageVector = ImageVector.vectorResource(audioPlayer.audio?.let { R.drawable.baseline_mic_24 } ?: R.drawable.baseline_mic_none_24),
                contentDescription = stringResource(R.string.audio),
                modifier = Modifier.scale(1.4f),
                tint = audioPlayer.audio?.let { Firebrick } ?: Moss,
            )
        }
    }
The mic button reads audioPlayer.audio to toggle its color depending on the existence of recorded audio clip.
We now add a modifier argument to your Scaffold, right after the bottomBar argument:
        modifier = Modifier.pointerInput(Unit) {
            detectTapGestures(onTap = {
                // dismiss virtual keyboard
                focus.clearFocus()
            })
        },
The modifier adds tap detection to dismiss the virtual keyboard, allowing user to reveal the bottomBar after editing the message field.
You should now be able to launch AudioView from your PostView and to test your audio recording and playback. We now integrate it with the rest of Chatter.
Chatt
Let’s start with our Model. In Chatt.kt, the Chatt class would need to hold an extra audio String:
class Chatt(var username: String? = null,
            var message: String? = null,
            var id: UUID? = null,
            var timestamp: String? = null,
            var altRow: Boolean = true,
            audio: String? = null) {
    var audio: String? by NullifiedEmpty(audio)
}
The audio property uses the NullifiedEmpty property delegate class. When there’s no valid audio string associated with audio, we want its value to be null. Unfortunately an empty value in a JSON object will be encoded as JSONObject.NULL by the Android JSON library, which when typecast to String is given the value "null", i.e., a non-null String with the characters n, u, l, l inside. NullifiedEmpty converts "null" and the empty string "" into null. Add the following class to your Chatt.kt file:
class NullifiedEmpty private constructor ():
        ReadWriteProperty<Any?, String?> {
    private var _value: String? = null
        set(newValue) {
            newValue ?: run {
                field = null
                return
            }
            field = if (newValue == "null" || newValue.isEmpty()) null else newValue
        }

    constructor(initialValue: String?): this() { _value = initialValue }

    override fun getValue(thisRef: Any?, property: KProperty<*>) = _value
    override fun setValue(thisRef: Any?, property: KProperty<*>, value: String?) {
        _value = value
    }
}
ChattStore
TODO 3/3: to retrieve the audio String, replace getchatts with getaudio in the url construction for getRequest. Then add the fourth chattEntry element to initialize the audio property in creating a new instance of Chatt that you append to the chatts array in getChatts().
Similarly, in postChatt(), replace postchatt with postaudio in the url construction for postRequest and modify the declaration of jsonObj to add chatt.audio with key "audio" to the map.
In the Chatter lab we used Java’s synchronized() to limit the number of backend retrieval to one per frontend. In this lab, we make all accesses to isRetrieving “atomic,” i.e., cannot be interrupted until done.
First in your libs.version.toml, change your kotlin version to 2.1.20 or higher. Then opt in to the “ExperimentalAtomicApi” in your build.gradle (Module:app) file:
kotlin {
    compilerOptions {
        optIn.addAll("androidx.compose.material3.ExperimentalMaterial3Api",
            "kotlin.concurrent.atomics.ExperimentalAtomicApi",)
    }
}
In ChattStore, replace the property isRetrieving with:
private val isRetrieving = AtomicBoolean(false)
Check your import at the top of the file. If it says,
import java.util.concurrent.atomic.AtomicBoolean
change it to:
import kotlin.concurrent.atomics.AtomicBoolean
In getChatts(), replace the code:
        synchronized(this) {
            if (isRetrieving) {
                return
            }
            isRetrieving = true
        }
with:
if (isRetrieving.exchange(true)) return
and replace the two occurrences of:
                synchronized(this) {
                    isRetrieving = false
                }
with:
isRetrieving.store(false)
We now turn to integrating audio to our View:
PostView
In SubmitButton(), we now add the audio element to the chatt to be posted, after encoding it into a base64 string:
            postChatt(Chatt(username, message,
                audio = audioPlayer.audio?.let { Base64.encodeToString(it, Base64.DEFAULT) })) {
                getChatts()
            }
ChattListRow
To be able to launch AudioView and work with the audio player, modify ChattListRow to add navController and audioPlayer variables that read off their values from the CompositionLocal variables, LocalNavHostController and LocalAudioPlayer respectively:
@Composable
fun ChattListRow(chatt: Chatt) {
    val navController = LocalNavHostController.current
    val audioPlayer = LocalAudioPlayer.current
If there is an audio clip associated with the chatt of this ChattListRow, we want to display a button to indicate that user can play back the audio clip. Find the text box displaying the chatt message, which should look like this:
chatt.message?.let { Text(it, fontSize = 17.sp, modifier = Modifier.padding(4.dp, 10.dp, 4.dp, 10.dp)) }
and wrap it in a Row() composable along with a button to launch AudioView, making sure that the Text box doesn’t exceed 80% of Row width so that there’s always space for the button. Replace the above two lines with:
        Row(horizontalArrangement = Arrangement.SpaceBetween,
            modifier=Modifier.fillMaxWidth(1f)) {
            chatt.message?.let {
                Text(it, fontSize = 17.sp,
                    modifier = Modifier
                        .padding(4.dp, 10.dp, 4.dp, 10.dp)
                        .fillMaxWidth(.8f))
            }
            chatt.audio?.let {
                IconButton(onClick = {
                    audioPlayer.setupPlayer(it)
                    navController.navigate("AudioView?autoPlay=true")
                },
                    modifier = Modifier.padding(0.dp, 0.dp, 8.dp, 0.dp).align(Alignment.CenterVertically)) {
                    Icon(imageVector = ImageVector.vectorResource(R.drawable.baseline_voicemail_24),
                        contentDescription = stringResource(R.string.audio),
                        modifier = Modifier.scale(1.4f),
                        tint = Color.DarkGray
                    )
                }
            }
        }
When the “audio” button is clicked, we set up the audioPlayer with the audio clip. We can pass along an argument when navigating to a destination composable. In this case, we tell AudioView to automatically play back the audio clip.
Congratulations, you’ve successfully integrated audio into your Chatter app!
To use the Android emulator with audio, follow the instructions in our Getting Started with Android Development.
Submission guidelines
We will only grade files committed to the master (a.k.a. main) branch. If you use multiple branches, please merge them all to the master/main branch for submission.
Ensure that you have completed the back-end part and have pushed your changes to your back-end code to your 441 GitHub repo.
Push your audio lab folder to your GitHub repo as set up at the start of this spec.
git push
- Open GitHub Desktop and click on
Current Repositoryon the top left of the interface - Click on your
441GitHub repo - Add Summary to your changes and click
Commit to master(orCommit to main) - If you have a team mate and they have pushed changes to GitHub, you’ll have to click
Pull Originand resolve any conflicts - Finally click
Push Originto push all changes to GitHub
![]() Go to the GitHub website to confirm that your front-end files have been uploaded to your GitHub repo under the folder
Go to the GitHub website to confirm that your front-end files have been uploaded to your GitHub repo under the folder audio. Confirm that your repo has a folder structure outline similar to the following. If your folder structure is not as outlined, our script will not pick up your submission, you will get ZERO point, and you will further have problems getting started on latter labs. There could be other files or folders in your local folder not listed below, don’t delete them. As long as you have installed the course .gitignore as per the instructions in Preparing GitHub for EECS 441 Labs, only files needed for grading will be pushed to GitHub.
  441
    |-- audio
        |-- composeChatter
            |-- app
            |-- gradle
    |-- chatter.zip
    |-- # files and folders from other labs . . .
Verify that your Git repo is set up correctly: on your laptop, grab a new clone of your repo and build and run your submission to make sure that it works. You will get ZERO point if your lab doesn’t open, build, or run.
IMPORTANT: If you work in a team, put your team mate’s name and uniqname in your repo’s README.md (click the pencil icon at the upper right corner of the README.md box on your git repo) so that we’d know. Otherwise, we could mistakenly think that you were cheating and accidentally report you to the Honor Council, which would be a hassle to undo. You don’t need a README.md if you work by yourself.
Review your information on the Lab Links sheet. If you’ve changed your teaming arrangement from previous lab’s, please update your entry. If you’re using a different GitHub repo from previous lab’s, invite eecs441staff@umich.edu to your new GitHub repo and update your entry.
References
Activity Results
- Activity Results API: A better way to pass data between Activities
- Deep Dive into Activity Results API – No More onActivityResult()
ViewModel
- ViewModel Overview
- The lifecycle of a ViewModel
- ViewModels: A Simple Example
- Recommended Ways to Create ViewModel or AndroidViewModel and errata
ViewModels in Compose
- ViewModels in Compose
- Jetpack Compose navigation architecture with ViewModels
- Handling lifecycle events on Jetpack Compose
Composition Local
Side-effects
Audio
- Base64
- Recording and playing audio
Finite State Machines
-
Building a state-driven app in SwiftUI using state machines. The
Stateenum in this article corresponds to ourPlayerState, while theEventenum corresponds to ourTransEvent. A differentViewis shown for each state in the article, hence there’s no equivalent to ourPlayerUIState. -
Finite State Machine as a ViewModel for Jetpack Compose Screens. The truth/state table mentioned in this article is distributed by row across our FSM in Figure 1, i.e., each row of the truth table is shown within a state in Figure 1. The
ListScreenStatein the article corresponds to ourPlayerState, with ourPlayerUIStateencoded as properties ofListScreenState. The article encodes the actions/events as nodes in a graph,ListScreenActions, which is used to validate action/event and, with the help of theonAction()function, drive the transition to the next state. TheonAction()function also takes two optional lambda expressions to be executed prior to and after each state transition. TheonAction()function introduces an additional layer of indirection that we don’t have in our implementation. Our action/event functions,doneTapped()et al., encode all the side effects associated with each state transition and perform the state transition by callingPlayerState.transition(), our closest equivalent to the article’sListScreenActions.
Misc
- How can I access all drawables in android?
- Reduce Recomposition for Images/Icons in Jetpack Compose
- Navigating in a pure jetpack compose project – part #2
- Pass Arguments to Destinations: Jetpack Compose Navigation
- How to Implement Bottom App Bar in Compose
- How to close the virtual keyboard from a Jetpack Compose TextField?
- Restore activity UI state using saved instance state
- A cool enum Parcelable technique
Appendix: imports
| Prepared for EECS 441 by Benjamin Brengman, Ollie Elmgren, Alexander Wu, Wendan Jiang, Nowrin Mohamed, Yibo Pi, and Sugih Jamin | Last updated: May 23rd, 2024 |