Audio SwiftUI
Cover Page
DUE Wed, 02/12, 2 pm
We have the following objectives in this lab:
- to add audio support to
Chatter, - to learn about property wrapper,
- to use enums,
- to learn about handling side-effect in SwiftUI,
- to introduce you to environment objects, and
- to introduce you to the use of finite state machine to control UI transitions.
This lab can be largely be completed on the iOS simulator.
Expected behavior
Post chatts with/without audio:
DISCLAIMER: the video demo shows you one aspect of the app’s behavior. It is not a substitute for the spec. If there are any discrepancies between the demo and the spec, please follow the spec. The spec is the single source of truth. If the spec is ambiguous, please consult the teaching staff for clarification.
Setting up the back end
If you haven’t modified your back end to handle audio, please go ahead and do so now:
Once you’ve updated your back end, return here to continue work on your front end.
Preparing your GitHub repo
- On your laptop, navigate to
YOUR_LABSFOLDER/ - Create a zip of your
chatterfolder - Rename your
chatterfolder audioIf there’s a
DerivedDatafolder in youraudio/swiftUIChatter/, delete it - Push your local
YOUR_LABSFOLDER/repo to GitHub and make sure there’re no git issues<summary>git push</summary>- Open GitHub Desktop and click on
Current Repositoryon the top left of the interface - Click on your
441GitHub repo - Add Summary to your changes and click
Commit to master(orCommit to main) - Since you have pushed your back end code, you’ll have to click
Pull Originto synch up the repo on your laptop - Finally click on
Push Originto push changes to GitHub
- Open GitHub Desktop and click on
![]() Go to the GitHub website to confirm that your folders follow this structure outline:
Go to the GitHub website to confirm that your folders follow this structure outline:
  441
    |-- audio
        |-- swiftUIChatter
            |-- swiftUIChatter.xcodeproj
            |-- swiftUIChatter
    |-- chatter.zip
    |-- # files and folders from other labs . . .
If the folders in your GitHub repo does not have the above structure, we will not be able to grade your labs and you will get a ZERO.
Open YOUR_LABSFOLDER/audio/swiftUIChatter in Xcode.
We now go through the details of how to record, playback, pause, fast forward, rewind, stop, and upload audio. We will use the AVFoundation iOS library: AVAudioRecorder to record from the device’s microphone and save to local file, and AVAudioPlayer to play back audio on the device’s speakers.
Requesting permission
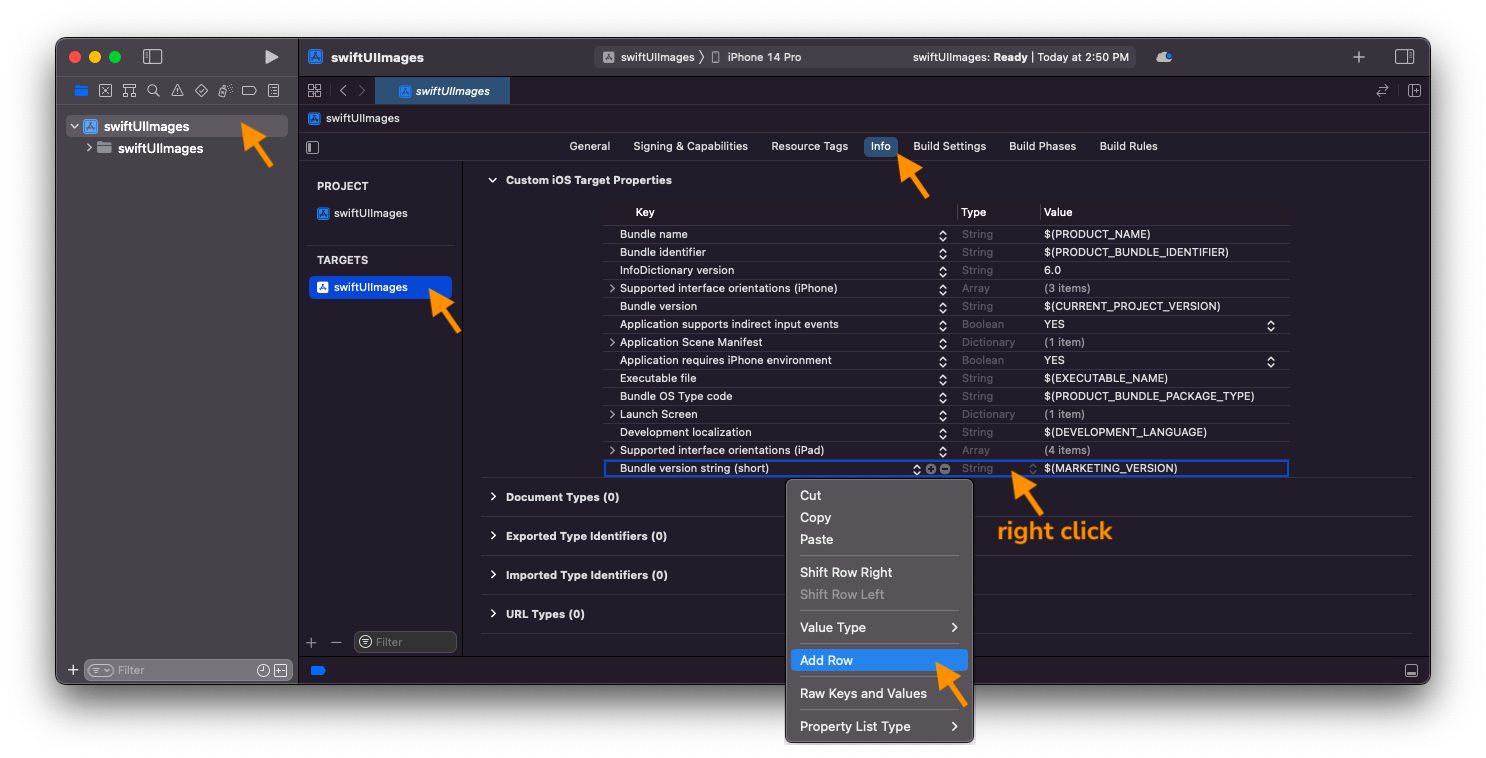
To record audio, we need user’s permission to access the device’s microphone. Add justification to use the microphone to your Info list. Click on your project name (first item in your left/navigator pane), then click on the project in the TARGETS section, and then click on the Info tab. In the Custom iOS Target Properties section, right click (or ctl-click) on any row in the table and choose Add Row (screenshot). Select App Category in the drop down menu. Then enter Privacy - Microphone Usage Description (overwriting App Category:) and in the Value field to the right enter the reason you want to access the mic, for example, “to record audio chatt”. What you enter into the value field will be displayed to the user when seeking their permission (screenshot).
When you try to access the mic, iOS will automatically check for access permission and, if it is your app’s first attempt to access the mic, iOS will automatically prompt the user for permission.
If you accidentally denied permission when your app requested it, go to
Settings > Privacy & Security > Microphone, locate your app and slide the corresponding toggle to allow access.
Overview
To add support for audio in our app, we need to accomplish three things in the front end.
- Work with iOS’s audio subsystem to record and play back audio.
- Manage the transition of our audio frontend between recording, playback, and the various modes of the playback state: play, pause, stop, etc. We will use a state machine to track these transitions.
- Update the UI elements to reflect the current state of the audio player, to control UX flow.
The first two tasks we will put in an AudioPlayer class, while the last task we will implement in AudioView, a SwiftUI View.
AudioPlayer
Chatter UI’s appearance and behavior will change in reaction to changes in the underlying Audio Player’s state, following a state machine.
We will create an AudioPlayer class to interface with iOS’s AVFoundation subsytem. As the user uses the player to record or play audio, rewind and fast forward, pause and stop playback, we need to keep track of the state the player currently is at, to enable or disable some player control buttons. For example, we don’t want the user to be able to press the play button in the middle of recording. The deterministic finite state machine (FSM) capturing all the states of the player and the events triggering transition between states is shown in Figure 1:

Figure 1: AudioPlayer deterministic finite state machine
We implement the FSM as two data structures: PlayerState and PlayerUIState. This separation allows us to reason about player state transitions with no regard to the UI state. Only once player state transitions are completed do we update the UI state to match the current player state.
Create a new Swift file and call it AudioPlayer. We first define PlayerState:
import AVFoundation
import Observation

enum StartMode {
    case standby, record, play
}
enum PlayerState: Equatable {
    case start(StartMode)
    case recording
    case playing(StartMode)
    case paused(StartMode)
}
As shown in Figure 1, the start state consists of three modes, which we have implemented using an enum. The PlayerState itself is implemented as another enum. (For further explanation, please see lecture on enums.)
To implement the transition between states as shown in Figure 1, we enumerate the possible transition events (we don’t include ffwdTapped and rwndTapped since they don’t transition the state machine):
enum TransEvent {
    case recTapped, playTapped, stopTapped, doneTapped, failed
}
and encode the state transitions in a transition(_:) function of PlayerState:
    mutating func transition(_ event: TransEvent) {
        if (event == .doneTapped) {
            self = .start(.standby)
            return
        }
        switch self {
        case .start(.record) where event == .recTapped:
            self = .recording
        case .start(.play) where event == .playTapped:
            self = .playing(.play)
        case .start(.standby):
            switch event {
            case .recTapped:
                self = .recording
            case .playTapped:
                self = .playing(.standby)
            default:
                break
            }
        case .recording:
            switch event {
            case .recTapped:
                fallthrough
            case .stopTapped:
                self = .start(.standby)
            case .failed:
                self = .start(.record)
            default:
                break
            }
        case .playing(let parent):
            switch event {
            case .playTapped:
                self = .paused(parent)
            case .stopTapped, .failed:
                self = .start(parent)
            default:
                break
            }
        case .paused(let grand):
            switch event {
            case .recTapped:
                self = .recording
            case .playTapped:
                self = .playing(grand)
            case .stopTapped:
                self = .start(.standby)
            default:
                break
            }
        default:
            break
        }
    }
The function transition(_:) must be declared mutating because it changes the value of self. You can trace the transitions encoded in this function by following along the edges of the state machine diagram in Figure 1.
As for the AudioPlayer class, we start with the following declaration:
@Observable
final class AudioPlayer: NSObject, AVAudioRecorderDelegate, AVAudioPlayerDelegate {
    var audio: Data! = nil
    private let audioFilePath = FileManager.default.urls(for: .documentDirectory, in: .userDomainMask)[0].appendingPathComponent("chatteraudio.m4a")

    @ObservationIgnored let playerUIState = PlayerUIState()
    @ObservationIgnored var playerState = PlayerState.start(.standby) {
        didSet { playerUIState.propagate(playerState) }
    }

    private let audioSession = AVAudioSession.sharedInstance()
    private var audioRecorder: AVAudioRecorder! = nil
    private var audioPlayer: AVAudioPlayer! = nil

    override init() {
        super.init()

        do {
            try audioSession.setCategory(.playAndRecord, mode: .default)
            try audioSession.setActive(true)
        } catch {
            print("AudioPlayer: failed to setup AVAudioSession")
        }
    }
}
AudioPlayer must be declared an NSObject type so that it can conform to the AVAudioRecorderDelegate and AVAudioPlayerDelegate protocols needed by the AVFoundation subsystem. The class property audio will hold either recorded audio or the audio to be played. The property audioFilePath must be initialized to point to a temporary audio file. The AVAudioRecorder requires the audio data to be stored in a file.
In addition, we tag AudioPlayer with @Observable so that changes to the property audio can be propagated when subscribed to by Views.
The property playerState holds the audio player’s state machine, as described above. We delegated playerState to a property observer that will propagate changes to playerState further to playerUIState. We tagged both playerUIState and playerState as non-tracked properties. Upon instantiation, AudioPlayer starts in the standby mode of its start state.
From the standby mode, the player can be put in record or play mode. Add the following AudioPlayer methods:
    func setupRecorder() {
        playerState = .start(.record)
        audio = nil

        guard let _ = audioRecorder else {
            let settings = [
                AVFormatIDKey: Int(kAudioFormatMPEG4AAC),
                AVSampleRateKey: 12000,
                AVNumberOfChannelsKey: 1,
                AVEncoderAudioQualityKey: AVAudioQuality.high.rawValue
            ]
            audioRecorder = try? AVAudioRecorder(url: audioFilePath, settings: settings)
            guard let _ = audioRecorder else {
                print("setupRecorder: failed")
                return
            }
            audioRecorder.delegate = self
            return
        }
    }

    func audioRecorderEncodeErrorDidOccur(_ recorder: AVAudioRecorder, error: Error?) {
        print("Error encoding audio: \(error!.localizedDescription)")
        audioRecorder.stop()
        playerState.transition(.failed)
    }

    func setupPlayer(_ audioStr: String) {
        playerState = .start(.play)
        audio = Data(base64Encoded: audioStr, options: .ignoreUnknownCharacters)
        preparePlayer()
    }

    func audioPlayerDecodeErrorDidOccur(_ player: AVAudioPlayer, error: Error?) {
        print("Error decoding audio \(error?.localizedDescription ?? "on playback")")
        // don't dismiss, in case user wants to record
        playerState.transition(.failed)
    }
Conforming to AVAudioRecorderDelegate, we provide a callback handler for encoding error. Conforming to AVAudioPlayerDelegate, we similarly provide a callback handler for decoding error. In the case of encoding error during recording, we stop recording. In both cases, we transition playerState to the .failed state.
When the player is set to record mode, we always re-initialize audio to nil so as not to accidentally carry over previously recorded or played audio. When the player is set to play mode, we expect to be passed along a Base64-encoded audio string to be played back. This would normally be an audio clip associated with a posted chatt. We store the decoded string in the audio property and prepare the AVAudioPlayer for playback.
AVAudioPlayer
Add the following preparePlayer() method to the AudioPlayer class:
    private func preparePlayer() {
        audioPlayer = try? AVAudioPlayer(data: audio)
        guard let audioPlayer else {
            print("preparePlayer: incompatible audio encoding, not m4a?")
            return
        }
        audioPlayer.volume = 10.0
        audioPlayer.delegate = self
        audioPlayer.prepareToPlay()
    }

    func audioPlayerDidFinishPlaying(_ player: AVAudioPlayer, successfully flag: Bool) {
        playerState.transition(.stopTapped)
    }
In preparePlayer(), we instantiate an AVAudioPlayer with the audio data for playback, set the playback volume, and call the prepareToPlay() method of AVAudioPlayer.
Conforming to the AVAudioPlayerDelegate, we also provide a callback handler audioPlayerDidFinishPlaying(). In the handler, we call the transition() function of PlayerState to transition it as if the stop button has been pressed (see Figure 1).
With the AVAudioPlayer set up, we now fill in the code to perform the action associated with playback buttons. Create a playTapped() method in AudioPlayer class as follows:
    func playTapped() {
        guard let audioPlayer else {
            print("playTapped: no audioPlayer!")
            return
        }
        playerState.transition(.playTapped)
        if audioPlayer.isPlaying {
            audioPlayer.pause()
        } else {
            audioPlayer.play()
        }
    }
As captured in Figure 1, if the play button is tapped when the player is playing, the user wants to pause play, call AVAudioPlayer’s pause() method. Otherwise, if the player is not playing when the play button is tapped, call AVAudioPlayer’s play() method which will either start or resume play, depending on current state. In all cases, we transition the playerState to the appropriate next state by calling the transition(_:) function of PlayerState.
The fast-forward and rewind playback controls simply move the play head forward or backward by 10 seconds respectively. These controls assign a new value to audioPlayer.currentTime, without changing state in the FSM. Add these two methods to your AudioPlayer class:
    func rwndTapped() {
        audioPlayer.currentTime = max(0, audioPlayer.currentTime - 10.0) // seconds
    }

    func ffwdTapped() {
        audioPlayer.currentTime = min(audioPlayer.duration, audioPlayer.currentTime + 10.0) // seconds
    }
Finally, if the stop button is tapped,
- we call
AVAudioPlayer’sstop()method similar to how we called itsplay()orpause()method above when the play button is pressed, - reset the play head to the beginning of the audio clip (by assigning a new value to
currentTimeas we did in the rewind and fast-forward functions), and - call the
transition(_:)function to transition theplayerStatefrom its current state given thestopTappedevent.
TODO 1/3: write the stopTapped() function and add it as a method to the AudioPlayer class.
AVAudioRecorder
Earlier we have defined the method setupRecorder(). Once the recorder is set up, recording is initiated by the user tapping a record button, which calls the recTapped() method of AudioPlayer:
    func recTapped() {
        if playerState == .recording {
            audioRecorder.stop()
            audio = try? Data(contentsOf: audioFilePath)
            preparePlayer()
        } else {
            audioRecorder.record()
        }
        playerState.transition(.recTapped)
    }
When the recording button is tapped, if we are not currently recording, we start recording by calling the record() method of AVAudioRecorder.
If recTapped() is called when recording is ongoing, we end recording by calling the stop() method of AVAudioRecorder. Next we load the recorded clip into the audio property (to be uploaded to the Chatter back end along with the posted chatt), and prepare the AVAudioPlayer in case the user wants to play back the recorded audio before posting. In both cases we call the transition(_:) function of PlayerState to perform the appropriate state transitions.
Once the user is satisfied with the recording, they tap the done button, which calls the doneTapped() function to stop any ongoing playback of the AVAudioPlayer and delete any recording at the AVAudioRecorder:
    func doneTapped() {
        defer {
            if let _ = audio {
                playerState.transition(.doneTapped)
            }
        }

        if let _ = audioPlayer {
            stopTapped()
        }

        guard let audioRecorder else {
            return
        }
        if playerState == .recording {
            recTapped()
        }
        audioRecorder.deleteRecording()  // clean up
    }
With that, we are done with the AudioPlayer!
Hoisting AudioPlayer
Prop drilling vs. State hoisting
Almost every View in the app must access the instance of AudioPlayer to control playback. All of the Views rendering the player UI will also need to access the instance of PlayerUIState in AudioPlayer to determine how to render each UI element. We could pass AudioPlayer to every Views, their child-Views, and so on down the hierarchy of the View tree. In React this is called “prop drilling” as the HTML properties needed to render the UI are passed down and down to the bottom of the UI hierarchy, even if some intermediate components do not need access to the properties.
As an alternative, we can “hoist” the needed state to the top of the UI sub-tree (which may be the root of the tree in the limit) and have each UI component needing the state data search up its UI sub-tree until it finds the state. The state is said to be “provided” to the sub-tree. The Provider usually maintains a look-up table of available states, identifiable by the type of the state. When the same data type is provided at different levels of the UI-tree, the one lowest in the hierarchy above the component searching for the state will match.
In SwiftUI, data hoisted and made available to a View sub-tree is said to be an environment object. An environment object is an observable state that can be subscribed to by Views within the sub-tree where the object is provided.
We will have one instance of AudioPlayer for the whole app. For this instance of AudioPlayer to be accessible to all Views in the app, we instantiate it in swiftUIChatterApp and make it available as an environment object at the very root of the whole app’s View hierarchy. Add the environment(_:) modifier to your NavigationStack() in swiftUIChatterApp:
            NavigationStack {
                MainView()
            }
            .environment(AudioPlayer())
The states or values of environment objects are scoped to the sub-tree where the data is provided. The advantage of using an environment object is that we don’t have to pass/drill it down a sub-tree yet Views in the sub-tree can subscribe and react to changes in the object.
Now we declare the UI to go along with the audio player.
AudioView
The UI for our audio player consists of buttons one would expect to find in an audio player: record, play, stop, rewind, and fast forward. In addition, we also have a “done” button for when the user is done and wish to exit the audio player. As shown in Figure 1, the state the player is in determines whether the record button is shown, whether it is shown in red or blue, whether the play button shows the “play” or “pause” icon, etc. In “playing” and “paused” states, whether the record button is shown further depends on the state the player was at prior to arriving in these states.
We will use PlayerUIState to hold the modifiers affecting the appearance of every UI element in AudioView. Whenever the audio player state changes, the playerState property observer will propagate the change to PlayerUIState by invoking its propagate() method. Each child View of AudioView subscribes to one or more properties of PlayerUIState. Whenever propagate() updates a property of PlayerUIState, child Views of AudioView observing the property will be re-computed and, if changed, re-rendered.
Following the Unidirectional Data Flow (UDF) principle, no child View of AudioView modifies another child View directly, all user interactions are routed to the appropriate audioPlayer actions, e.g., recTapped(), affecting changes to playerState, which in turn lead to playerUIState updates.
Design rationale and alternative
We could have each UI element (i.e., record button, play button, etc.) subscribe to the playerState maintained by AudioPlayer directly. Each UI element would then react to the observed playerState, e.g., when playerState is in start state, play mode, the record button would make itself invisible. This is the “object-oriented” way of programming the reactive UI.
Here we use the “functional” or “algebraic data type” way of data modeling: “separate behavior from data, by grouping behavior for all types together by operation.” This approach makes sense here because:
- it’s easier to reason with and maintain all variants of the same operation on all types centrally: for example, how each AudioPlayer state transitions when a button is tapped, and
- variations between operations on different types are more related to each other than to the types they’re operating on: how each button of the AudioView is affected by a transition in the AudioPlayer state.
We are still observing the reactive paradigm by hoisting the PlayerUIState above all the buttons. When a button is tapped, we update the PlayerUIState and not mutate the other buttons directly. Instead, we continue to rely on the Unidirectional Data Flow paradigm to update the UI.
Create a new Swift file, call it AudioView, and put the following PlayerUIState in it:
import SwiftUI
import Observation

@Observable
final class PlayerUIState {

    @ObservationIgnored var recHidden = false
    var recDisabled = false
    var recColor = Color(.systemBlue)
    var recIcon = Image(systemName: "largecircle.fill.circle") // initial value

    var playCtlDisabled = true

    var playDisabled = true
    var playIcon = Image(systemName: "play")

    var doneDisabled = false
    var doneIcon = Image(systemName: "square.and.arrow.up") // initial value

    private func reset() {
        recHidden = false
        recDisabled = false
        recColor = Color(.systemBlue)
        recIcon = Image(systemName: "largecircle.fill.circle") // initial value

        playCtlDisabled = true

        playDisabled = true
        playIcon = Image(systemName: "play")

        doneDisabled = false
        doneIcon = Image(systemName: "square.and.arrow.up") // initial value

    }

    private func playCtlEnabled(_ enabled: Bool) {
        playCtlDisabled = !enabled
    }

    private func playEnabled(_ enabled: Bool) {
        playIcon = Image(systemName: "play")
        playDisabled = !enabled
    }

    private func pauseEnabled(_ enabled: Bool) {
        playIcon = Image(systemName: "pause")
        playDisabled = !enabled
    }

    private func recEnabled() {
        recIcon = Image(systemName: "largecircle.fill.circle")
        recDisabled = false
        recColor = Color(.systemBlue)
    }

    func propagate(_ playerState: PlayerState) {
        switch (playerState) {
        case .start(.play):
            recHidden = true
            playEnabled(true)
            playCtlEnabled(false)
            doneIcon = Image(systemName: "xmark.square")
        case .start(.standby):
            if !recHidden { recEnabled() }
            playEnabled(true)
            playCtlEnabled(false)
            doneDisabled = false
        case .start(.record):
            // initial values already set up for record start mode.
            reset()
        case .recording:
            recIcon = Image(systemName: "stop.circle")
            recColor = Color(.systemRed)
            playEnabled(false)
            playCtlEnabled(false)
            doneDisabled = true
        case .paused:
            if !recHidden { recEnabled() }
            playIcon = Image(systemName: "play")
        case .playing:
            if !recHidden {
                recDisabled = true
                recColor = Color(.systemGray6)
            }
            pauseEnabled(true)
            playCtlEnabled(true)
        }
    }
}
We tag PlayerUIState with @Observable so that Views can subscribe to its properties. Except for recHidden, all properties of PlayerUIState are tracked, allowing the SwiftUI/Observation state management framework to automatically re-compute and, if necessary, re-render all Views that subscribe to these properties when they change. Now that we have set up the states affecting player UI for SwiftUI’s reactive framework, we can “declare” the UI (Views) for the audio player. Let’s start with AudioView. Add the following code to your AudioView.swift:
struct AudioView: View {
    @Binding var isPresented: Bool
    var autoPlay = false
    @Environment(AudioPlayer.self) private var audioPlayer

    var body: some View {
        VStack {
            // view to be defined
        }
        .onAppear {
            if autoPlay {
                audioPlayer.playTapped()
            }
        }
        .onDisappear {
            audioPlayer.doneTapped()
        }
    }
}
A SwiftUI View must be idempotent (can be called several times with the same outcome) and therefore side-effect free. The modifier .onAppear(perform:) allows us to call a function with side-effect once, when the View first appear, but not on re-rendering. While .onDisappear(perform:) allows us to call a function with side-effect when a View disappears. In this case, when AudioView appear initiallly, if autoPlay is true, AudioView automatically invokes AudioPlayer.playTapped(). When user exits AudioView(), including, for example, by swiping down to dismiss a modally presented AudioView, we stop playback or recording by calling AudioPlayer.doneTapped(). Incidentally, we look up audioPlayer off the environment using its type as the lookup key: .self appended to the data type accesses its type.
With autoPlay set up, we now lay out the audio player screen. Add the following to your AudioView following the comment // view to be defined:
            // view to be defined
            Spacer()
            HStack {
                Spacer()
                StopButton()
                Spacer()
                RwndButton()
                Spacer()
                PlayButton()
                Spacer()
                FfwdButton()
                Spacer()
                DoneButton(isPresented: $isPresented)
                Spacer()
            }
            Spacer()
            RecButton()
We now add the definition of the RecButton() View, outside the AudioView struct, but in the same file:
struct RecButton: View {
    @Environment(AudioPlayer.self) private var audioPlayer

    var body: some View {
        let playerUIState = audioPlayer.playerUIState

        Button {
            audioPlayer.recTapped()
        } label: {
            playerUIState.recIcon
                .scaleEffect(3.5)
                .padding(.bottom, 80)
                .foregroundColor(playerUIState.recColor)
        }
        .disabled(playerUIState.recDisabled)
        .opacity(playerUIState.recHidden ? 0 : 1)
    }
}
First, we subscribe to audioPlayer on the environment. The look of the RecButton follows the value in audioPlayer.playerUIState.recIcon. Whether the button is enabled depends on audioPlayer.playerUIState.recDisabled. If we simply not show a button when it is disabled, the space it would have occupied will be filled by another view instead of being left blank. To leave a space of the right dimension blank, we render the view with opacity 0.
When visible, the color of recButton depends on audioPlayer.playerUIState.recColor. Recall that all three of these PlayerUIState properties are observed. RecButton() will be re-rendered if any of the three properties changes. When visible, if RecButton is tapped, it calls audioPlayer.recTapped().
Here’s the definition of the DoneButton() View:
struct DoneButton: View {
    @Binding var isPresented: Bool
    @Environment(AudioPlayer.self) private var audioPlayer

    var body: some View {
        let playerUIState = audioPlayer.playerUIState

        Button {
            audioPlayer.doneTapped()
            isPresented.toggle()
        } label: {
            playerUIState.doneIcon.scaleEffect(2.0)
        }
        .disabled(playerUIState.doneDisabled)
    }
}
We again subscribe to audioPlayer on the environment. When the done button is tapped, in addition to calling audioPlayer.doneTapped(), we also toggle isPresented passed into DoneButton via AudioView. Toggling isPresented pops the navigation stack back to the View that launched AudioView.
TODO 2/3: the other buttons, StopButton, RwndButton, and FfwdButton, PlayButton, are defined similarly to the DoneButton except each should call its respective AudioPlayer method, each has its own playUIStates (see below), and they don’t pop the navigation stack.
Go ahead and implement the other buttons.
For the stop icon, you can use Image(systemName: "stop"). For the fast-forward icon, you can use "goforward.10", and for the rewind icon, you can use "gobackward.10". Since we are not changing the appearances of these icons, you can use them inline without storing them as published variables (which incurs system overhead). The play icon, on the other hand, toggles between “play” and “pause”, so be sure to use audioPlayer.playerUIState.playIcon when defining PlayButton. UI states of the other play back control buttons, whether they are enabled or greyed out, are determined by playCtlDisabled.
With that, we’re done with the audio player and its Views!
PostView
To make an audio recording for posting with a chatt, we want to add an AudioButton to launch AudioView at the bottom of PostView. First add the following subscription to audioPlayer on the SwiftUI environment, after the existing property declarations. Also add the property to control presentation of AudioView:
    @Environment(AudioPlayer.self) private var audioPlayer
    @State private var isPresenting = false
    @FocusState private var messageInFocus: Bool
The last property is to allow user to dismiss iOS’s virtual keyboard when they are done updating message.
We want to show the audio button at the bottom of the PostView screen. Add the following AudioButton outside your PostView, but in the same file:
struct AudioButton: View {
    @Binding var isPresenting: Bool
    @Environment(AudioPlayer.self) private var audioPlayer

    var body: some View {
        Button {
            isPresenting.toggle()
        } label: {
            if let _ = audioPlayer.audio {
                Image(systemName: "mic.fill").padding(EdgeInsets(top: 0, leading: 0, bottom: 20, trailing: 0)).scaleEffect(1.5).foregroundColor(Color(.systemRed))
            } else {
                Image(systemName: "mic").padding(EdgeInsets(top: 0, leading: 0, bottom: 20, trailing: 0)).scaleEffect(1.5).foregroundColor(Color(.systemGreen))
            }
        }
    }
}
The mic button subscribes to audioPlayer.audio to toggle its color depending on the existence of recorded audio clip.
When user clicks on the TextEditor() to edit the message, the virtual keyboard slides up to let them enter their input. To allow user to dismiss the virtual keyboard when they are done updating message, earlier we added the messageInFocus property to PostView. Now add the following modifier to the TextEditor:
.focused($messageInFocus)
such that when message is tapped, we can associate focus with it. Next, add the following Spacer() after TextEditor() and all its modifiers, but still within the VStack {} block:
Spacer().frame(maxHeight: .infinity)
this will fill the space between the TextEditor() and the bottom of the screen and make the whole screen be part of the VStack {} so that onTapGesture() modifier below can pass the tap gesture to the VStack {}.
Now add a bottomBar toolbar-item inside the .toolbar{} modifier of VStack in PostView, right below the existing ToolbarItem(placement:) { } block:
            ToolbarItem(placement: .bottomBar) {
                AudioButton(isPresenting: $isPresenting)
            }
and add the following modifiers to VStack in PostView, right after and outside the .toolbar {} block:
        .fullScreenCover(isPresented: $isPresenting) {
            AudioView(isPresented: $isPresenting, autoPlay: false)
        }
        .onAppear {
            audioPlayer.setupRecorder()
        }
        .contentShape(.rect)
        .onTapGesture {
            messageInFocus.toggle()
        }
The contentShape(.rect) wraps around the whole VStack, including the Spacer(), so that user tap on any empty space in VStack {} will register with VStack {} and triggers the .onTapGesture functionality. In this case, .onTapGesture makes message to no longer be “in focus,” thereby
dismissing the virtual keyboard, revealing the bottomBar again.
The .onAppear() modifier sets up audioPlayer to record, as a side-effect to be run everytime PostView appears. As part of this setup process, setupRecorder() clears the variable holding recorded audio. We use .fullScreenCover(isPresented:) instead of .navigationDestination(isPresented:) to present AudioView here because returning from a navigation destination also triggers a View’s .onAppear() to run, which in this case would cause lost of any recorded audio when navigating back from AudioView to PostView. By presenting a sheet/fullScreenCover instead of navigating to a different destination, we prevent don’t trigger PostView’s side effect when AudioView is dismissed.
You should now be able to launch AudioView from your PostView and to test your audio recording and playback. We now integrate it with the rest of Chatter.
Chatt
Let’s start with our Model. In Chatt.swift, the Chatt struct would need to an additional property to hold audio String:
struct Chatt: Identifiable {
    var username: String?
    var message: String?
    var id: UUID?
    var timestamp: String?
    var altRow: Bool = true
    @OptionalizedEmpty var audio: String?

    // so that we don't need to compare every property for equality
    static func ==(lhs: Chatt, rhs: Chatt) -> Bool {
        lhs.id == rhs.id
    }
}
The audio property uses the OptionalizedEmpty property wrapper. When there’s no audio string associated with audio, we want its value to be nil. Unfortunately an empty value in a JSON object can sometimes be encoded by some systems as "null", i.e., a non-nil String with the characters n, u, l, l inside. OptionalizedEmpty converts "null" and the empty string "" into nil. Add the following struct to your Chatt.swift file:
@propertyWrapper
struct OptionalizedEmpty {
    private var _value: String?
    var wrappedValue: String? {
        get { _value }
        set {
            guard let newValue else {
                _value = nil
                return
            }
            _value = (newValue == "null" || newValue.isEmpty) ? nil : newValue
        }
    }

    init(wrappedValue: String?) {
        self.wrappedValue = wrappedValue
    }
}
ChattStore
TODO 3/3: to retrieve the audio String, replace getchatts with getaudio in the url construction for apiUrl. Then add the fifth chattEntry element to initialize the audio property in creating a new instance of Chatt that you append to the chatts array in getChatts().
Similarly, in postChatt(_:) replace postchatt with postaudio in the url construction for apiUrl and modify the declaration of jsonObj to add chatt.audio with key "audio" to the dictionary.
In the Chatter lab we used a serial queue to synchronize accesses to the isRetrieving variable that limits on-going backend retrieval to one per frontend. In this lab, instead of trying to synchronize access to isRetrieving, we make all accesses to it “atomic,” i.e., cannot be interrupted until done. First select File > Add Package Dependencies...; in the search field at the upper right corner type, “swift-atomics”, select the resulting swift-atomics package and click Add Package. Once the package has been added, to the top of your ChattStore file add:
import Atomics
Next, remove the property synchronized and replace the property isRetrieving with:
private let isRetrieving = ManagedAtomic(false)
In getChatts(), replace the code:
        synchronized.sync {
            guard !self.isRetrieving else {
                //proceed = true
                return
            }
            self.isRetrieving = true
        }
with:
        if isRetrieving.exchange(true, ordering: .acquiring) {
            return
        }
and replace the following code in the defer block:
                self.synchronized.async {
                    self.isRetrieving = false
                }
with:
self.isRetrieving.store(false, ordering: .releasing)
staying inside the defer block.
We now turn to integrating audio to our View:
PostView
In SubmitButton(), we now add the audio element to the chatt to be posted, after encoding it into a base64 string:
            ChattStore.shared.postChatt(Chatt(username: username, message: message, audio: audioPlayer.audio?.base64EncodedString())) {
                ChattStore.shared.getChatts()
            }
ChattListRow
As with PostView, to be able to launch the AudioView and to work with audio, add two properties to ChattListRow:
    @Environment(AudioPlayer.self) private var audioPlayer
    @State private var isPresenting = false
The first is to subscribe to the audioPlayer on the environment and the second is to control the presentation of AudioView.
If there is an audio clip associated with the chatt of this ChattListRow, we want to display a button to indicate that user can play back the audio clip. Find the text box displaying the chatt message, which should look like this:
            if let message = chatt.message {
                Text(message).padding(EdgeInsets(top: 8, leading: 0, bottom: 6, trailing: 0))
            }
and wrap it in an HStack() along with a button to launch AudioView. Replace the lines above with:
            HStack {
                if let message = chatt.message {
                    Text(message).padding(EdgeInsets(top: 8, leading: 0, bottom: 6, trailing: 0))
                }
                Spacer()
                if let audio = chatt.audio {
                    Button {
                        audioPlayer.setupPlayer(audio)
                        isPresenting.toggle()
                    } label: {
                        Image(systemName: "recordingtape").scaleEffect(1.5)
                    }
                    .fullScreenCover(isPresented: $isPresenting) {
                        AudioView(isPresented: $isPresenting, autoPlay: true)
                    }
                }
            }
When the “audio” button is clicked, we set up the audioPlayer with the audio clip. When presenting AudioView, we tell it to automatically play back the audio clip. We use .fullScreenCover(isPresented:) instead of .navigationDestination(isPresented:) here to prevent the back button from showing on the navigation bar in AudioView.
Congratulations, you’ve successfully integrated audio into your Chatter app written in SwiftUI!
Submission guidelines
We will only grade files committed to the master (a.k.a. main) branch. If you use multiple branches, please merge them all to the master/main branch for submission.
Ensure that you have completed the back-end part and have also pushed your changes to your back-end code to your 441 GitHub repo.
Push your audio lab folder to your GitHub repo as set up at the start of this spec.
git push
- Open GitHub Desktop and click on
Current Repositoryon the top left of the interface - Click on your
441GitHub repo - Add Summary to your changes and click
Commit to master(orCommit to main) - If you have a team mate and they have pushed changes to GitHub, you’ll have to click
Pull Originand resolve any conflicts - Finally click
Push Originto push changes to GitHub
![]() Go to the GitHub website on your browser to confirm that your front-end files have been uploaded to your GitHub repo under the folder
Go to the GitHub website on your browser to confirm that your front-end files have been uploaded to your GitHub repo under the folder audio. Confirm that your repo has a folder structure outline similar to the following. If your folder structure is not as outlined, our script will not pick up your submission, you will get ZERO point, and you will further have problems getting started on latter labs. There could be other files or folders in your local folder not listed below, don’t delete them. As long as you have installed the course .gitignore as per the instructions in Preparing GitHub for EECS 441 Labs, only files needed for grading will be pushed to GitHub.
  441
    |-- audio
        |-- swiftUIChatter
            |-- swiftUIChatter.xcodeproj
            |-- swiftUIChatter
    |-- chatter.zip
    |-- # files and folders from other labs . . .
Verify that your Git repo is set up correctly: on your laptop, grab a new clone of your repo and build and run your submission to make sure that it works. You will get ZERO point if your lab doesn’t open, build, or run.
IMPORTANT: If you work in a team, put your team mate’s name and uniqname in your repo’s README.md (click the pencil icon at the upper right corner of the README.md box on your git repo) so that we’d know. Otherwise, we could mistakenly think that you were cheating and accidentally report you to the Honor Council, which would be a hassle to undo. You don’t need a README.md if you work by yourself.
Review your information on the Lab Links sheet. If you’ve changed your teaming arrangement from previous lab’s, please update your entry. If you’re using a different GitHub repo from previous lab’s, invite eecs441staff@umich.edu to your new GitHub repo and update your entry.
References
State Management and Side-effects
- Discover Observation in SwiftUI
- Observation
- ObservationIgnored
- EnvironmentValues
- View.environment(::)
- SwiftUI View Lifecycle
- View modifiers
- Great SwiftUI see the section “Prefer No Effect Modifiers over Conditional Views”
Audio
- Record audio in iOS Swift 4.2
- Fast Forward and Rewind
- Identifying the TableView cell button tap
- Base64
Finite State Machines
-
Building a state-driven app in SwiftUI using state machines. The
Stateenum in this article corresponds to ourPlayerState, while theEventenum corresponds to ourTransEvent. A differentViewis shown for each state in the article, hence there’s no equivalent to ourPlayerUIState. -
Finite State Machine as a ViewModel for Jetpack Compose Screens. The truth/state table mentioned in this article is distributed by row across our FSM in Figure 1, i.e., each row of the truth table is shown within a state in Figure 1. The
ListScreenStatein the article corresponds to ourPlayerState, with ourPlayerUIStateencoded as properties ofListScreenState. The article encodes the actions/events as nodes in a graph,ListScreenActions, which is used to validate action/event and, with the help of theonAction()function, drive the transition to the next state. TheonAction()function also takes two optional lambda expressions to be executed prior to and after each state transition. TheonAction()function introduces an additional layer of indirection that we don’t have in our implementation. Our action/event functions,doneTapped()et al., encode all the side effects associated with each state transition and perform the state transition by callingPlayerState.transition(), our closest equivalent to the article’sListScreenActions.
Toolbar and keyboard
- How to create a toolbar and add buttons to it
- How to dismiss the keyboard for a TextField
-
How to control the tappable area of a view using contentShape()
-
Disabling user interactivity with allowsHitTesting() discusses
contentShape()near the end of article.
-
Disabling user interactivity with allowsHitTesting() discusses
Atomics
- [Hardware Memory Models
- Programming Language Memory Models
- C/C++ memory models Swift’s memory model is compatible with C/C++’s for interoperability [SE-0282].
| Prepared for EECS 441 by Ollie Elmgren, Benjamin Brengman, Wendan Jiang, Alexander Wu, Nowrin Mohamed, Yibo Pi, and Sugih Jamin | Last updated: May 3rd, 2025 |