Chatter Back End
Cover Page
DUE Wed, 01/29, 2 pm
At the end of the lab, you’ll be prompted to keep a clean copy of your working solution and it will form the starting point for all subsequent labs in the course.
Server hosting
You need an Internet-accessible server running Ubuntu 24.04 or later. You can use a real physical host or a virtual machine on Amazon Web Services (AWS), Google Cloud Platform (GCP), Microsoft Azure, AlibabaCloud, etc. as long as you can ssh to an Ubuntu shell with root privileges. However, if you need help with your backend setup and code, we can only help if your backend is running on AWS or GCP (we couldn’t help when students were assigned compromised Digital Ocean IP addresses that were blocked by the network, for example). Furthermore, for grading purposes, your backend server must have a public IP address and is online at all times (i.e., it cannot be running on your laptop). The setup presented here has been verified to work on Ubuntu 24.04 hosted on AWS, GCP, and a local Linux KVM and physical host. We provide instructions on how to set up the labs’ back-end server on both AWS and GCP. Please click the one you want to use to reveal the instructions.
Which hosting service to use?
If you had used AWS in a different course and wanted to avoid going beyond your free tier, you can use GCP in this course. Similarly, if you planned to host your team’s project on your AWS free tier, you can set up your labs’ back end on GCP. If you plan to build your back end server in Rust, we recommend using GCP instead of AWS. GCP gives you 2GB more disk space than AWS, which Rust needs to build dependencies.
AWS
AWS
The instructions to set up an AWS instance here is adapted from EECS 485’s tutorial.
Create an account
Create an AWS account at the AWS Registration. You should be eligible for their free tier, which means that you will be able to run an instance for free for the duration of the course.
Despite that, you will need to enter a credit card number on the account, even if you only use free tier resources. This is how Amazon charges, in case you request more resources than provided in the free tier. Do not launch any additional instances other than the one we specify in order to avoid additional charges.
Optionally, you may redeem extra benefits as a student, including $100 in AWS credits.
Start instance
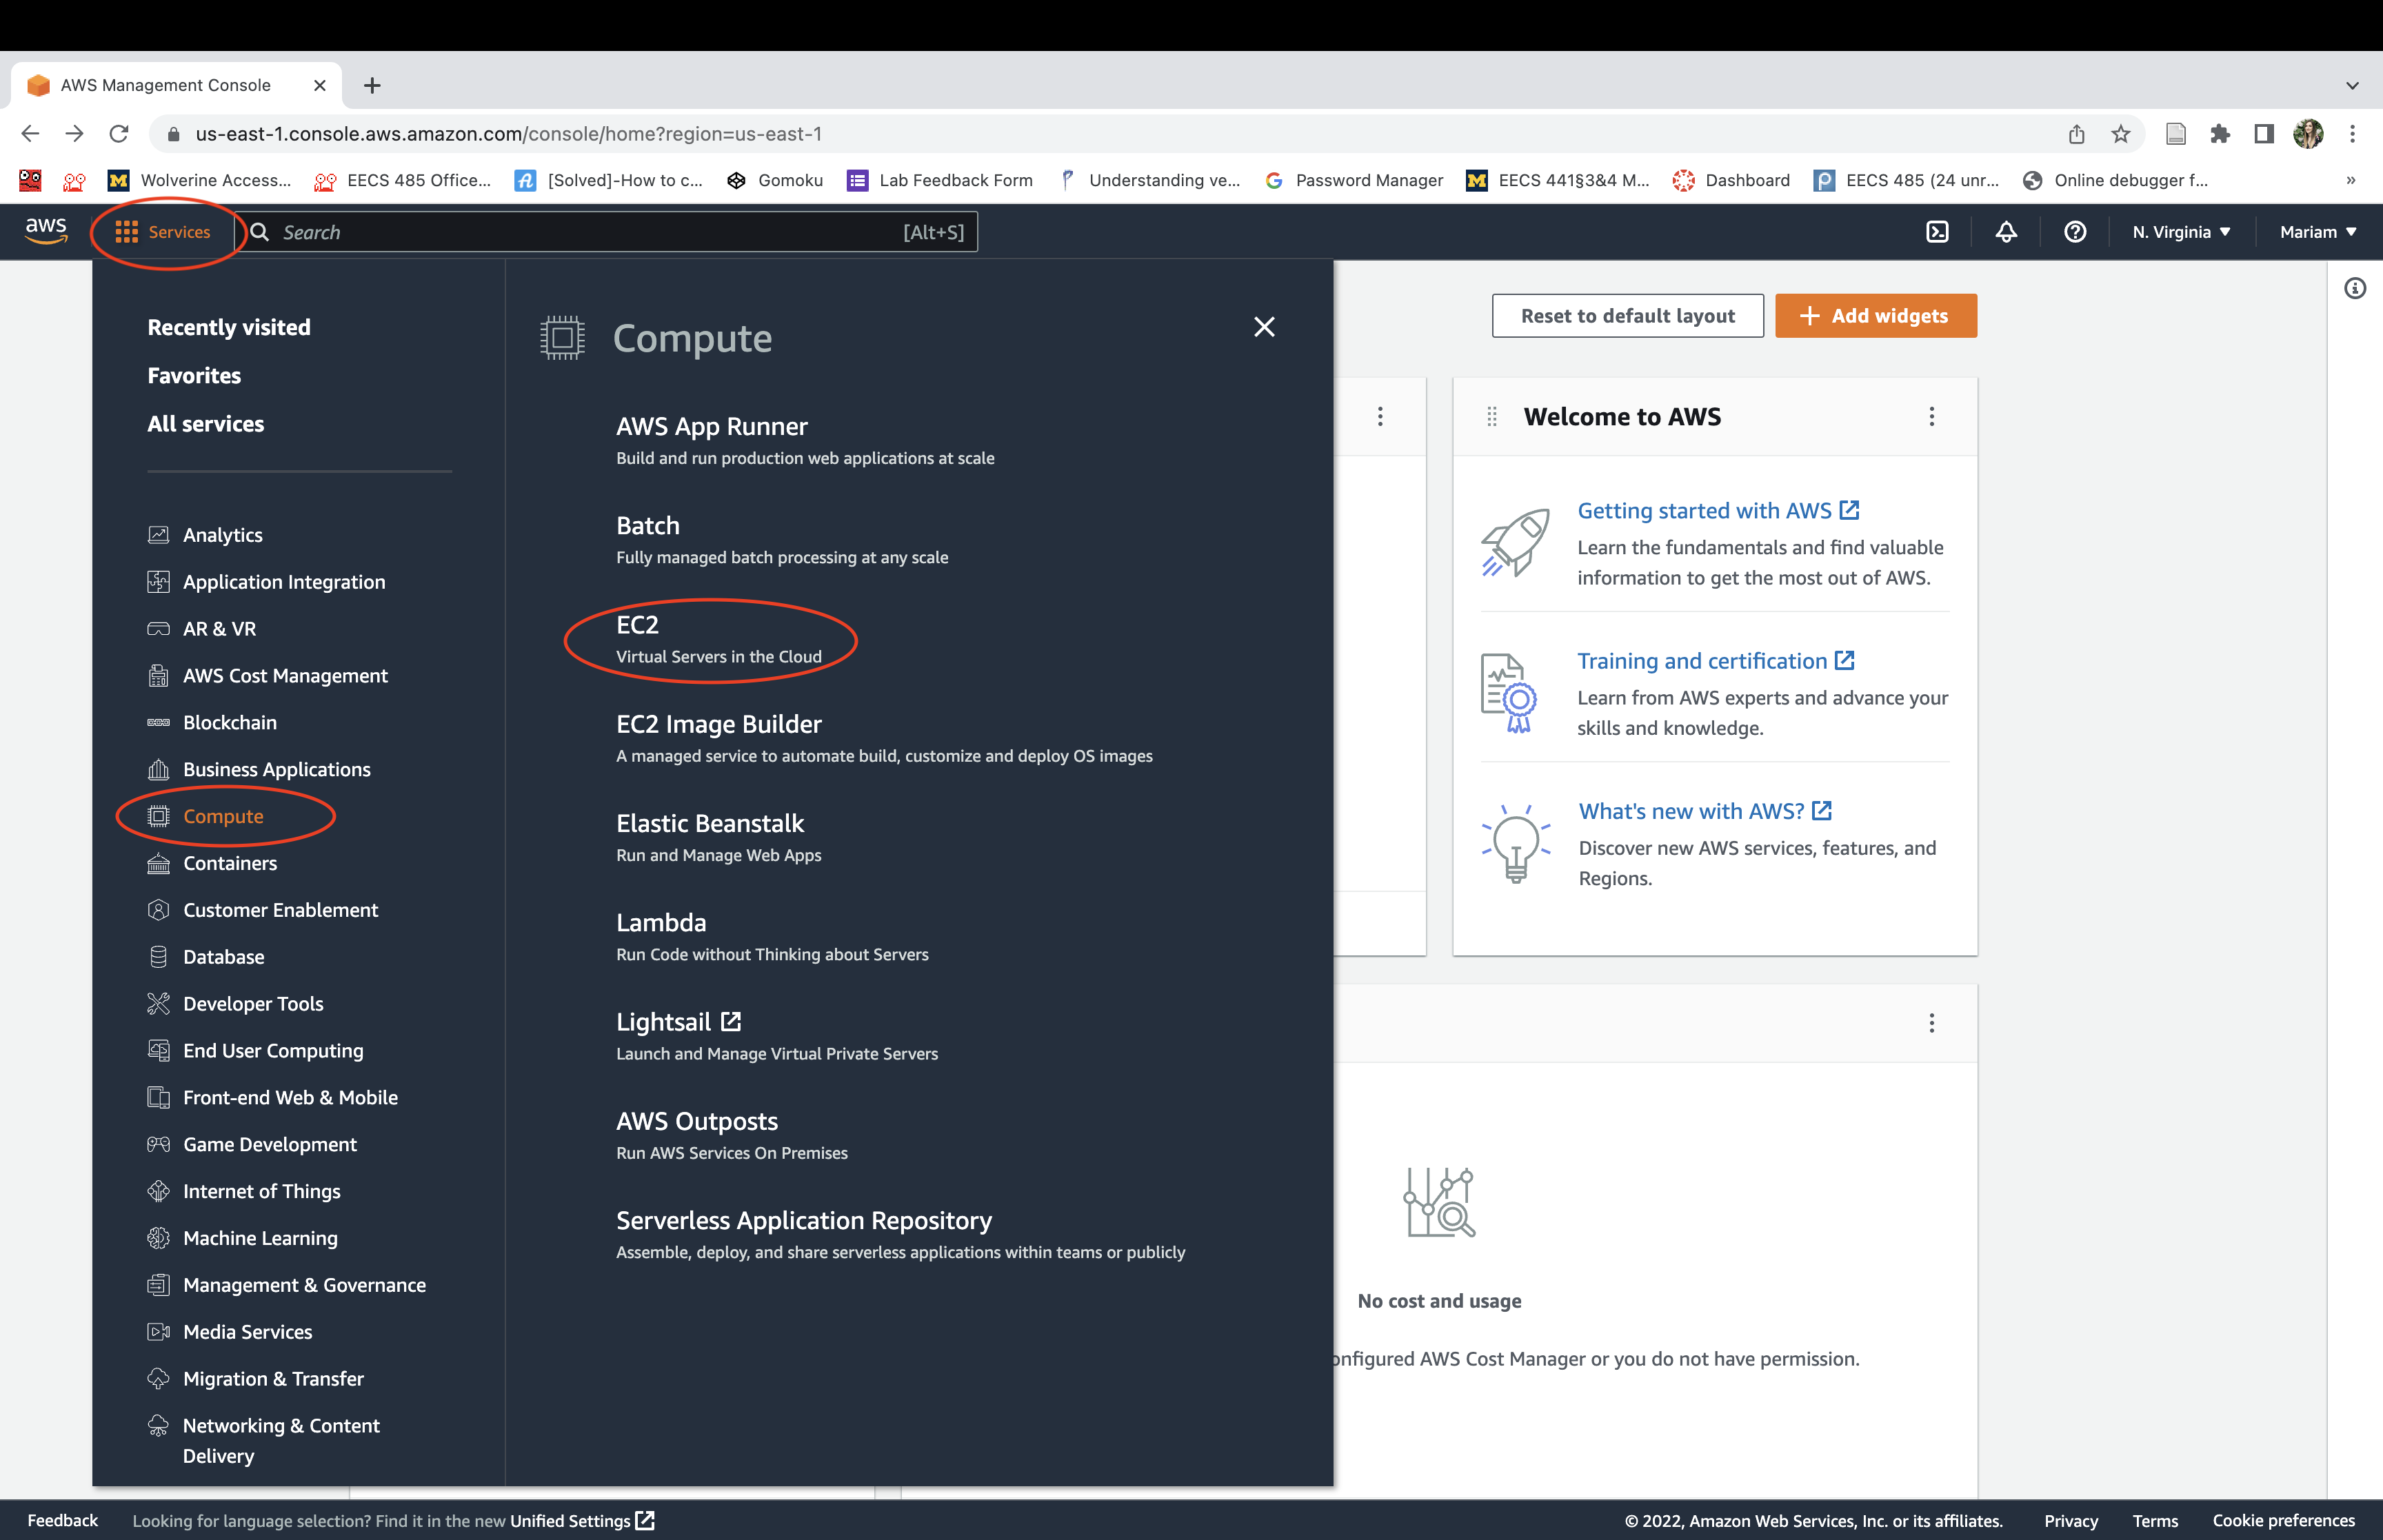
Navigate to the AWS Management Console. Select the “Services” dropdown menu, then “EC2”. An EC2 “instance” is a virtual machine running on Amazon AWS hardware.
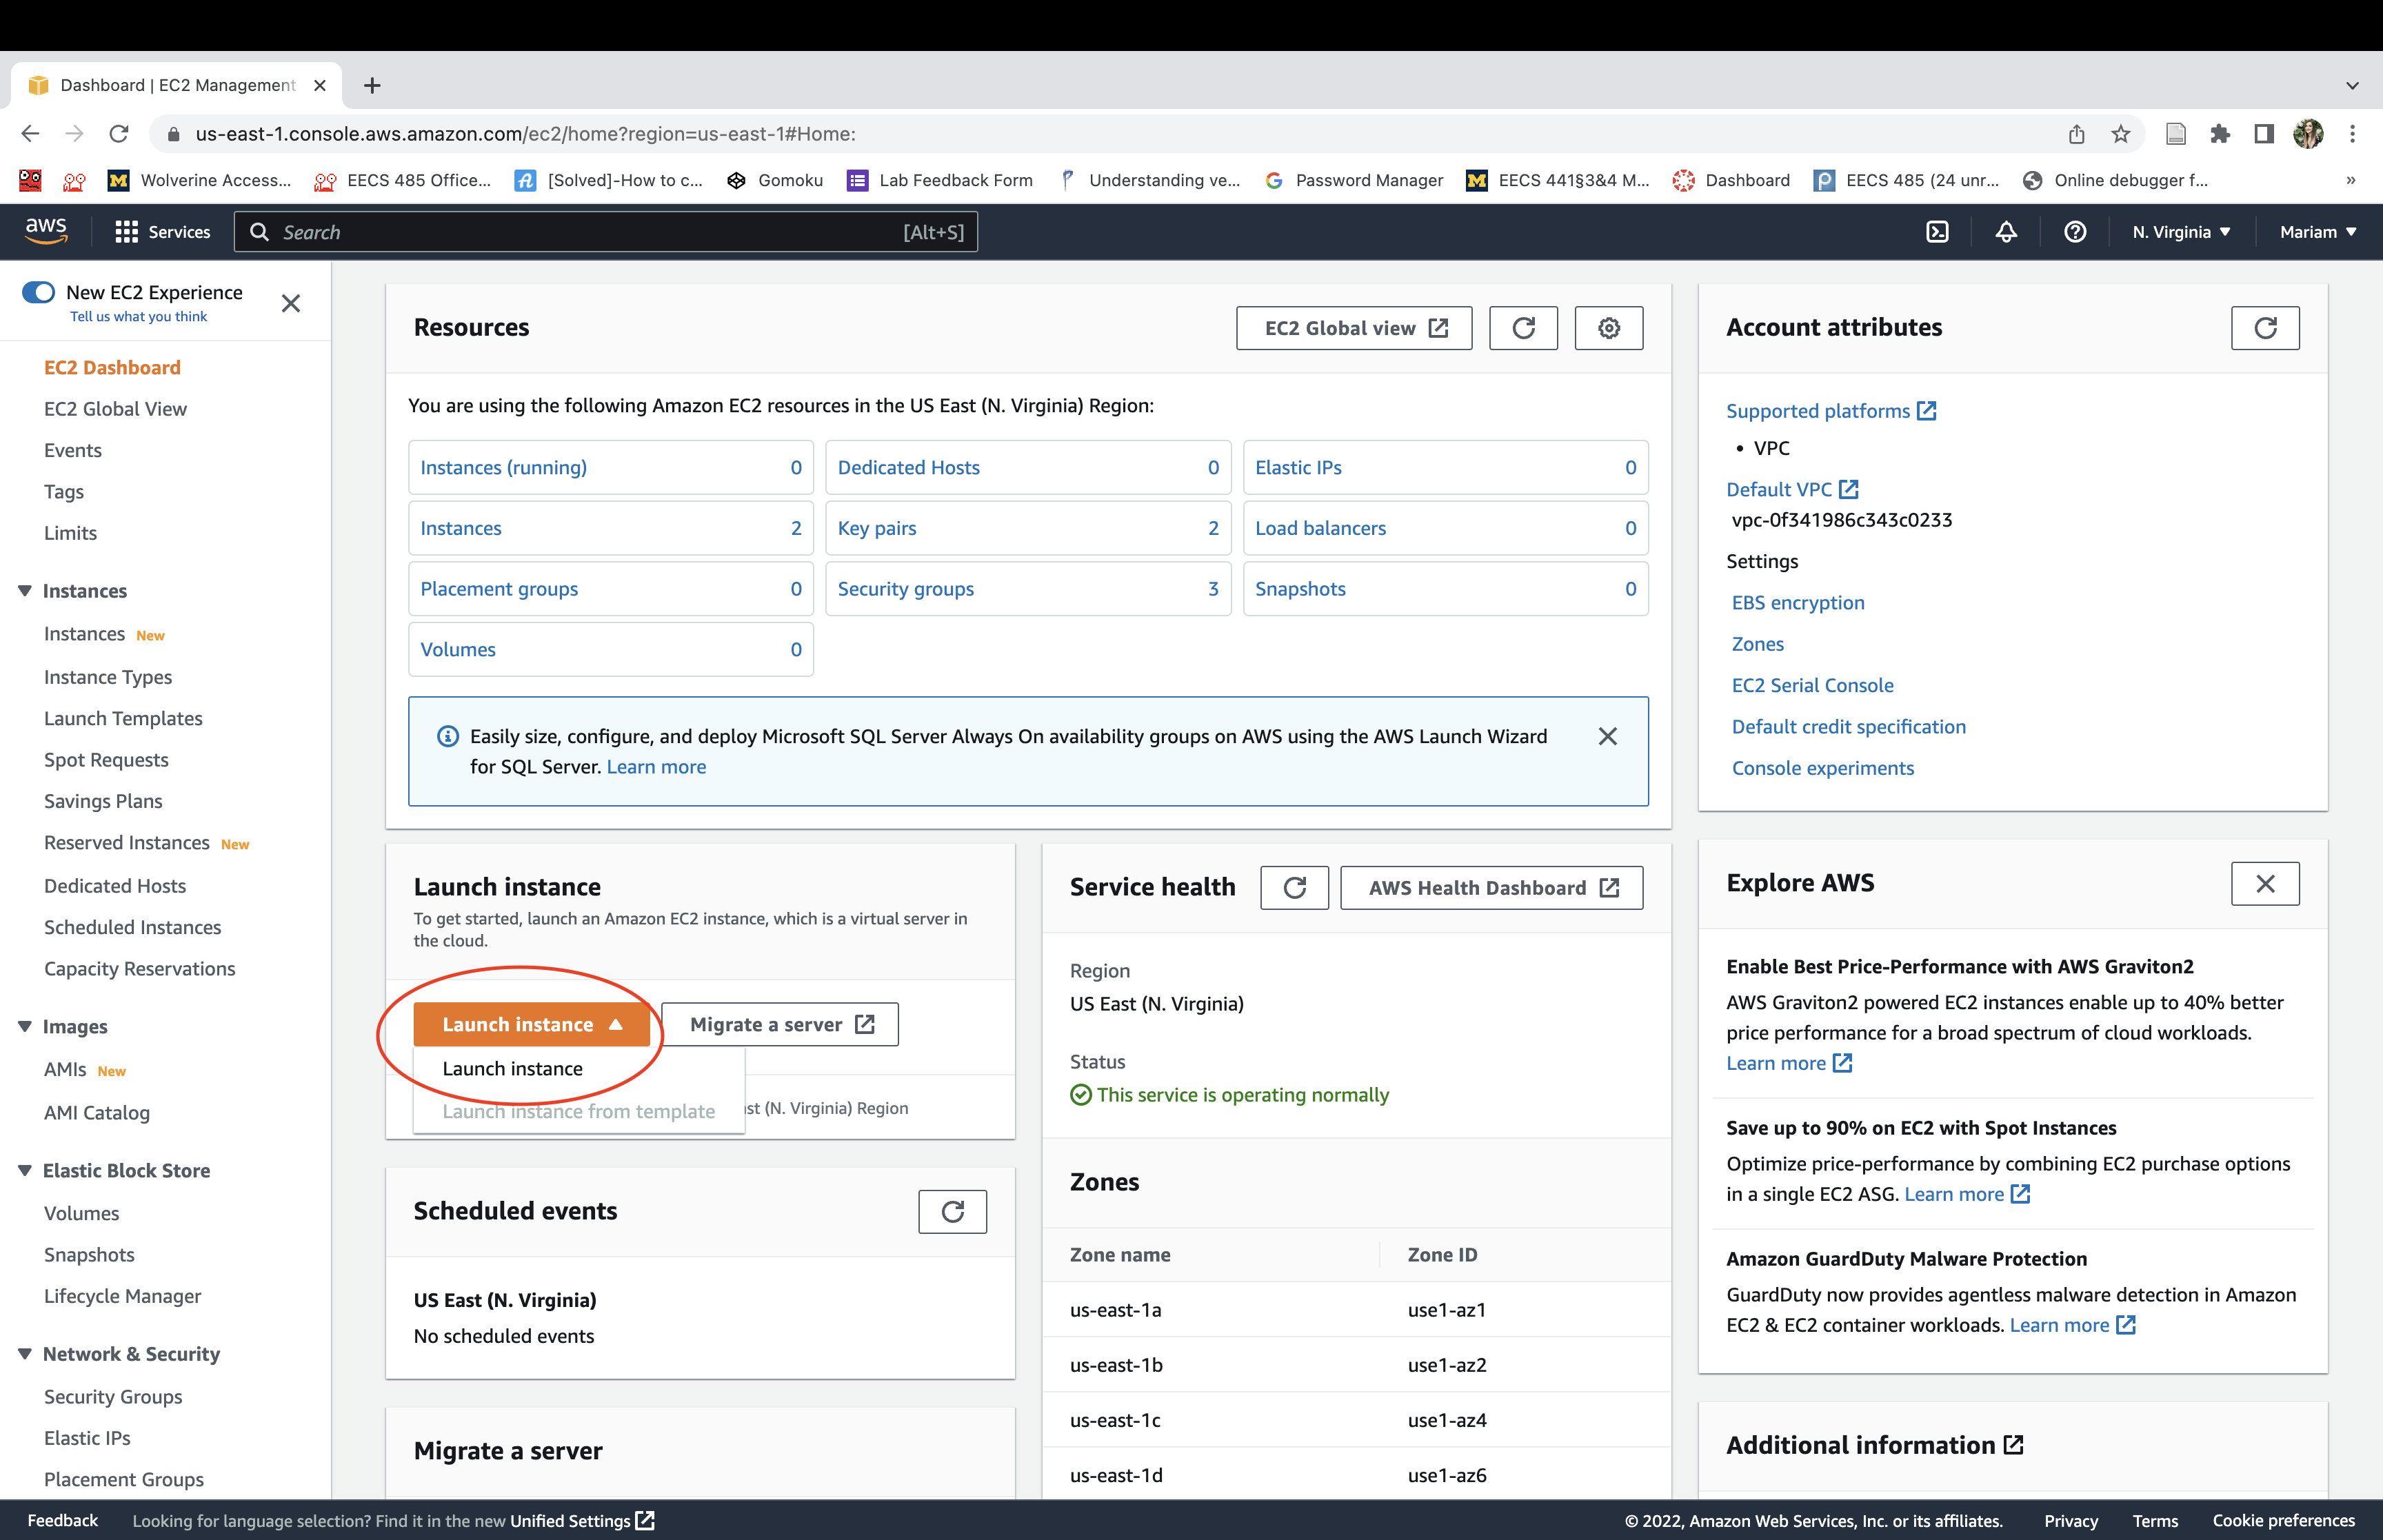
Click launch an instance. It may take a few minutes to initialize before it’s running.
Select the “Ubuntu Server 24.04.01 LTS” Amazon Machine Image (AMI).

Select the “t2.micro” instance type. You should see “free tier eligible”. When you create an instance, AWS automatically creates user “ubuntu” for you on the instance.

Create a key pair for user “ubuntu”. The private key will be automatically downloaded for you once the key pair is created. You’ll use this private key later to ssh to the instance. Click on Create new key pair:
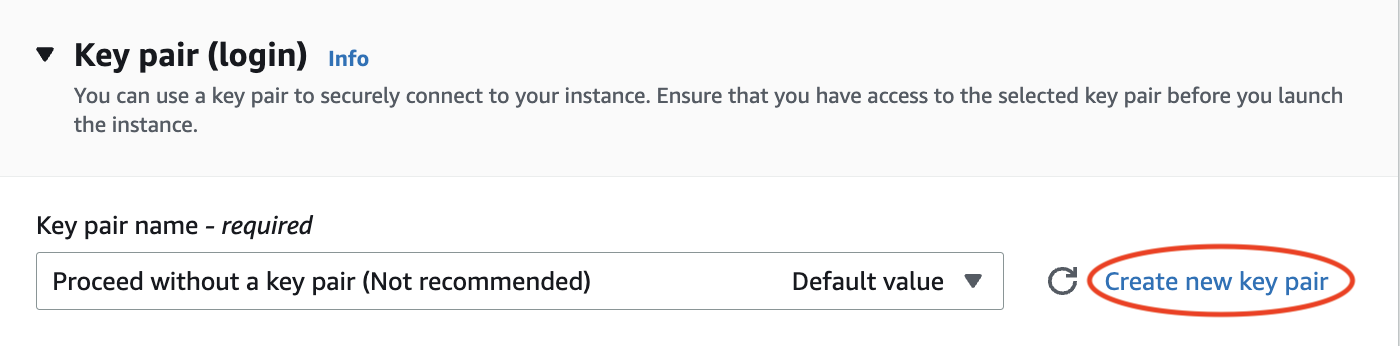
Then enter “eecs441” as the key pair name and click Create key pair:

Allow SSH, HTTP, and HTTPS and click Edit on the top right:

Verify if three security group rules have been added. After this, Click on Add security group rule.

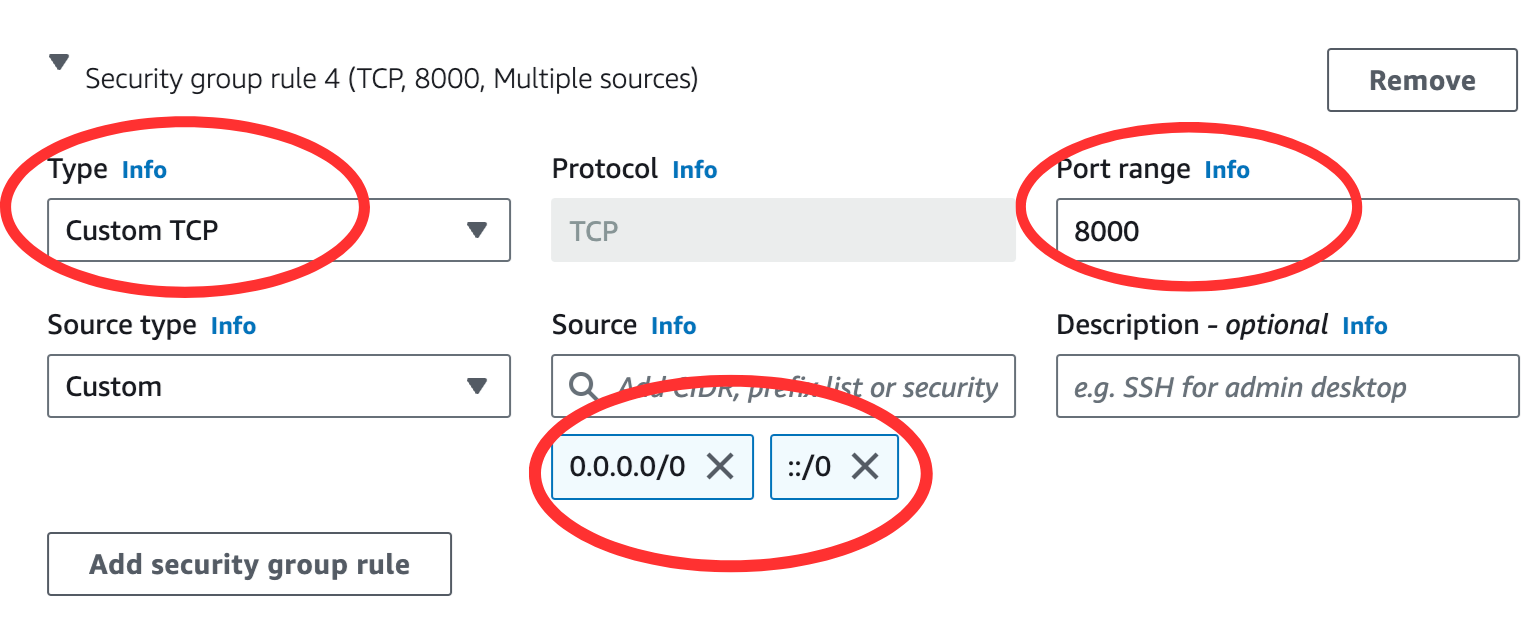
Edit the “Security group rule 4 (TCP, 0)” section, and add “Custom TCP” for port 8000 to allow server traffic in and out of your instance. [Thanks to Z. Liang and R. Nagavardhan ‘23.]
Click “Launch Instance”.
Instance status
Navigate to the AWS Management Console. Select the “Services” dropdown menu, then “EC2”.
Select one of the instances and view its status and Public DNS.
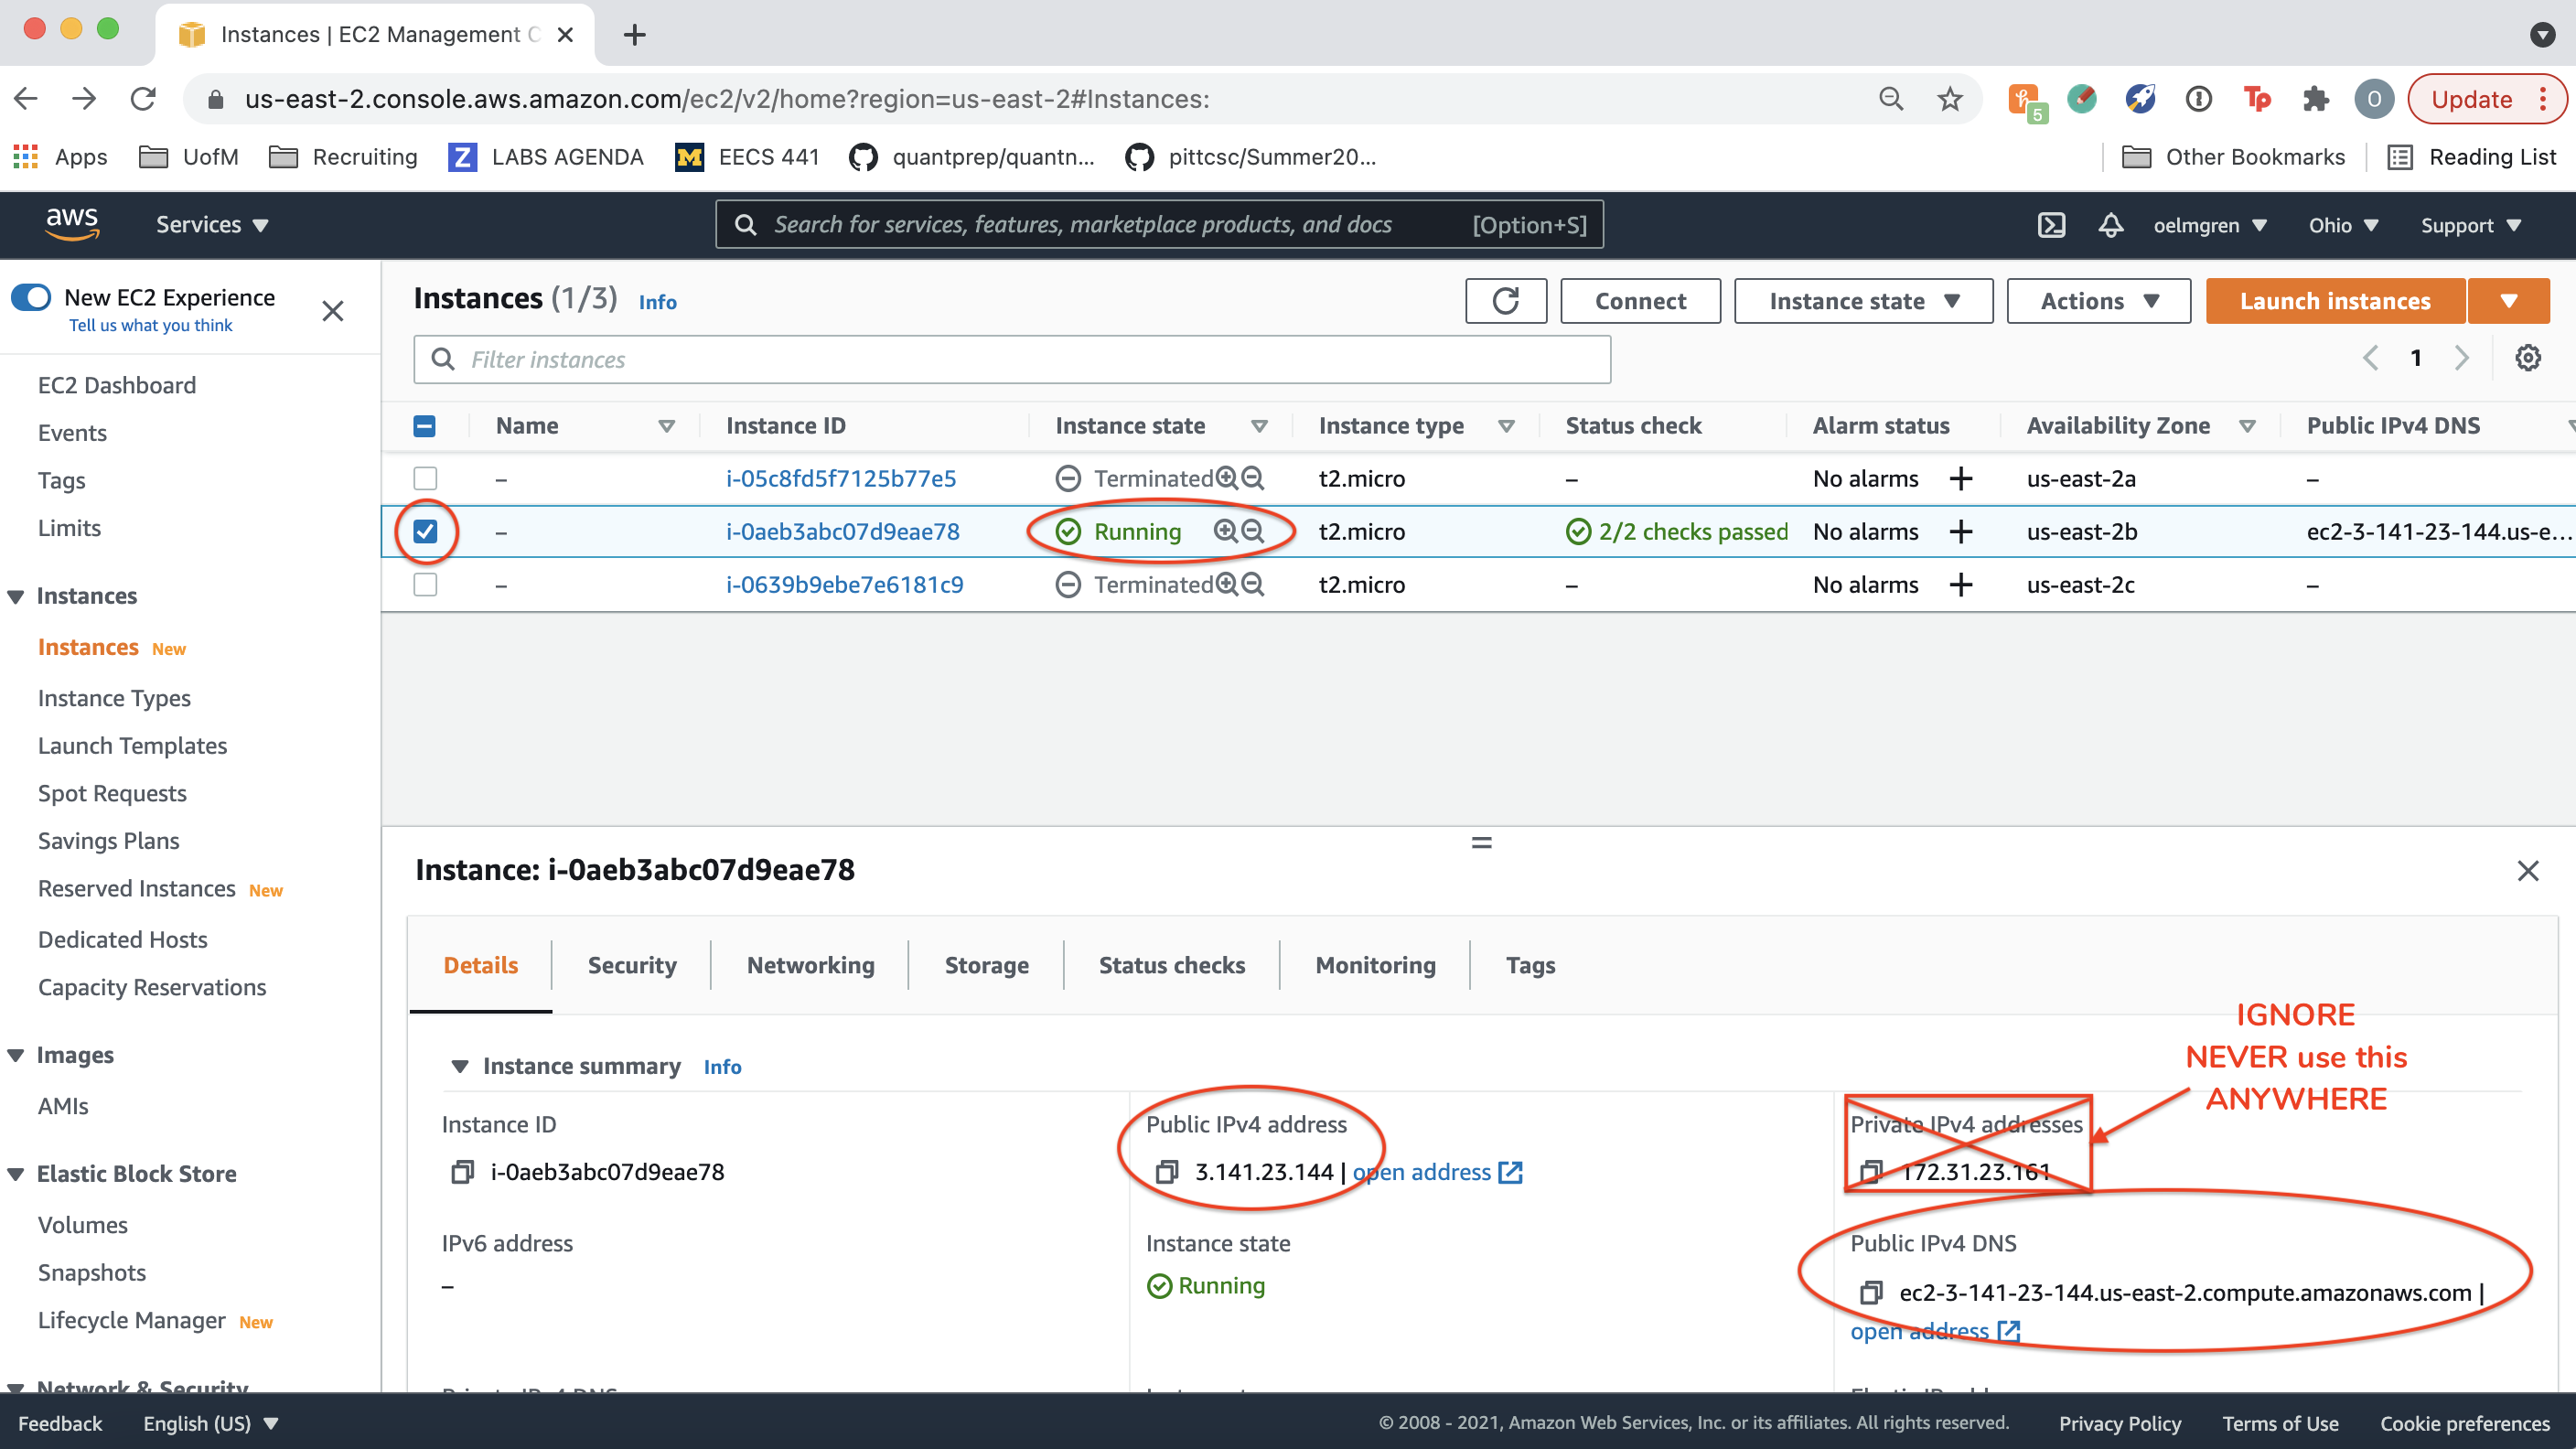
In the remainder of this spec, and this term, we will refer to your “IPv4 Public IP” as YOUR_SERVER_IP (in the image it’s 52.90.192.32).
ssh to instance
On your development host (laptop):
If AWS gave you a
eec441.cerinstead ofeecs441.pem, just useeecs441.cereverywhere you seeeecs441.pemin this spec.
MacOS on Terminal:
#         👇👇👇👇👇👇👇👇👇👇
laptop$ cd YOUR*LABS*FOLDER
laptop$ mv ~/Downloads/eecs441.pem eecs441.pem
laptop$ chmod 400 eecs441.pem
laptop$ ssh -i eecs441.pem ubuntu@YOUR_SERVER_IP
#                                 👆👆👆👆👆👆👆👆👆
Windows on PowerShell [thanks to Jad Beydoun (F21) for use of icacls]:
#            👇👇👇👇👇👇👇👇👇👇
PS laptop> cd YOUR*LABS*FOLDER
PS laptop> mv ~\Downloads\eecs441.pem eecs441.pem
PS laptop> icacls eecs441.pem /grant "$($env:username):(r)" /inheritance:r
PS laptop> ssh -i eecs441.pem ubuntu@YOUR_SERVER_IP
#                                    👆👆👆👆👆👆👆👆👆
Windows on WSL
If you prefer to run Ubuntu shell instead of Windows’ PowerShell, on Ubuntu’s terminal create /etc/wsl.conf:
laptop$ sudo vi /etc/wsl.conf
and put the following content in it:
  [automount]
  options = "metadata"
Exit all Ubuntu shells such that Ubuntu is not running and its icon is not showing in your dock (or sign out and sign back in to your Windows account), restart your Ubuntu terminal, and continue with the steps below:
  #          👇👇👇👇👇👇👇👇👇
  laptop$ cd YOUR*LABS*FOLDER
  #                       👇👇👇👇👇👇👇👇👇👇👇👇👇
  laptop$ mv /mnt/c/Users/YOUR_WINDOWS_USERNAME/Downloads/eecs441.pem eecs441.pem
  laptop$ chmod 400 eecs441.pem
  laptop$ ssh -i eecs441.pem ubuntu@YOUR_SERVER_IP
  #                                 👆👆👆👆👆👆👆👆👆
In both cases, what the above does:
- change working directory to
YOUR*LABS*FOLDER, - move the private
sshkey you created and downloaded earlier intoYOUR*LABS*FOLDER, - set its permissions to read-only, and
-
sshto your AWS instance as user “ubuntu” using the downloaded private key. (Make sure your instance is running. See Instance status.)
![]() WARNING Students have reported issues trying to run the
WARNING Students have reported issues trying to run the Chatter backend service on VSCode Server or JetBrains Remote Development Gateway. These are meant for maintaining your source files remotely; they may not be set up for long-running services. Always ssh directly to your server as described in this section to run your server.
Stop instance
DO NOT STOP YOUR INSTANCE. Please leave your EC2 instance running for grading purposes. Stopping your instance will change its alloted IP address and undo some of the customizations you’ve done following this spec. When we’re done with all the labs, after the last lab has been graded, in about 2.5 months, and if you don’t need your instance for your course project, then you can stop your instance, to avoid using your AWS credits. ![]()
The AWS free credit refreshes every month. So don’t fret if you get an email from AWS near the end of a month saying you’ve used up 85% of your free credit. It should reset when the new month rolls around.
Check your Instance status.
Right click on your instance Instance State > Stop.
You should see that your instance is stopped.
Appendix
Command line tools
To administer AWS EC2 instance from the Ubuntu command line, install the following:
server$ sudo apt install cloud-utils awscli
Useful commands:
server$ ec2metadata
server$ aws configure
server$ aws ec2 help
The command ec2metadata shows the instance’s public-ip and public-hostname.
The command aws configure asks for AWS Access Key ID, which can be obtained from:
server$ aws iam list-access-keys
It also asks for AWS Secret Access Key, which is shown only at creation time at the IAM console.

The Default region name is listed in the public-hostname following the public-ip.
The command aws ec2 is the main interface to configure ec2. The help sub-command lists all the sub-commands such as describe-security-groups, from which one can obtain the group name/id needed to run sub-command authorize-security-group-ingress, for example.
To add IPv6 CIDR block use --ip-permissions, e.g.,
server$ aws ec2 authorize-security-group-ingress --group-id YOUR_GROUP_ID --ip-permissions IpProtocol=tcp,FromPort=8000,ToPort=8000,Ipv6Ranges=[{CidrIpv6=::/0}]
GCP
GCP
Google Cloud Platform has a free-tier, with free credits that are easy to qualify for.
Login to Google account
You’ll need a personal Google account to use the Google Cloud Platform. Do not use your umich email address. The following steps are adapted from Google Cloud’s Quickstart using a Linux VM, though they have been adapted to the course. For example, we choose an E2 instance that is eligible for the free-tier.
Create project
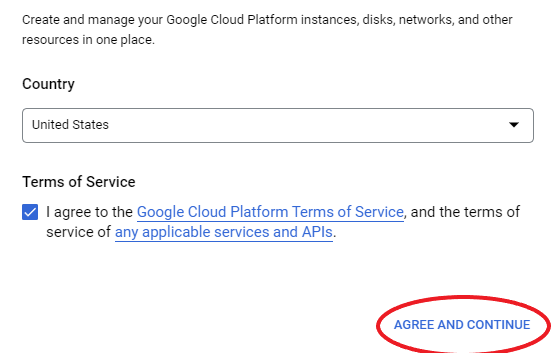
Go to the Google Cloud Platform Project Selector page
and create a project. Click AGREE AND CONTINUE if you agreed to Google’s Terms of Service.
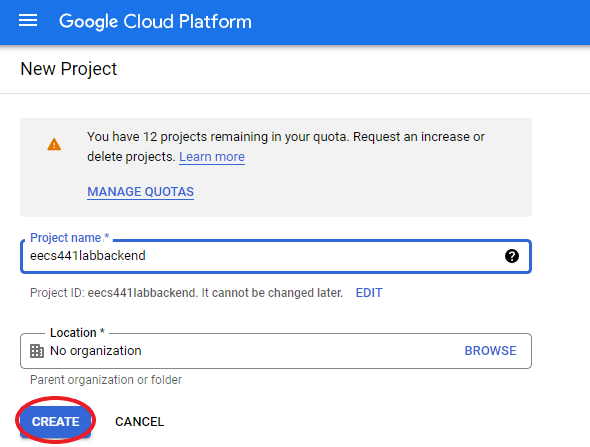
Create a project by clicking on the Create Project button.

Give your project a name unique to you and click Create.
Add billing
Add a billing method to your project.
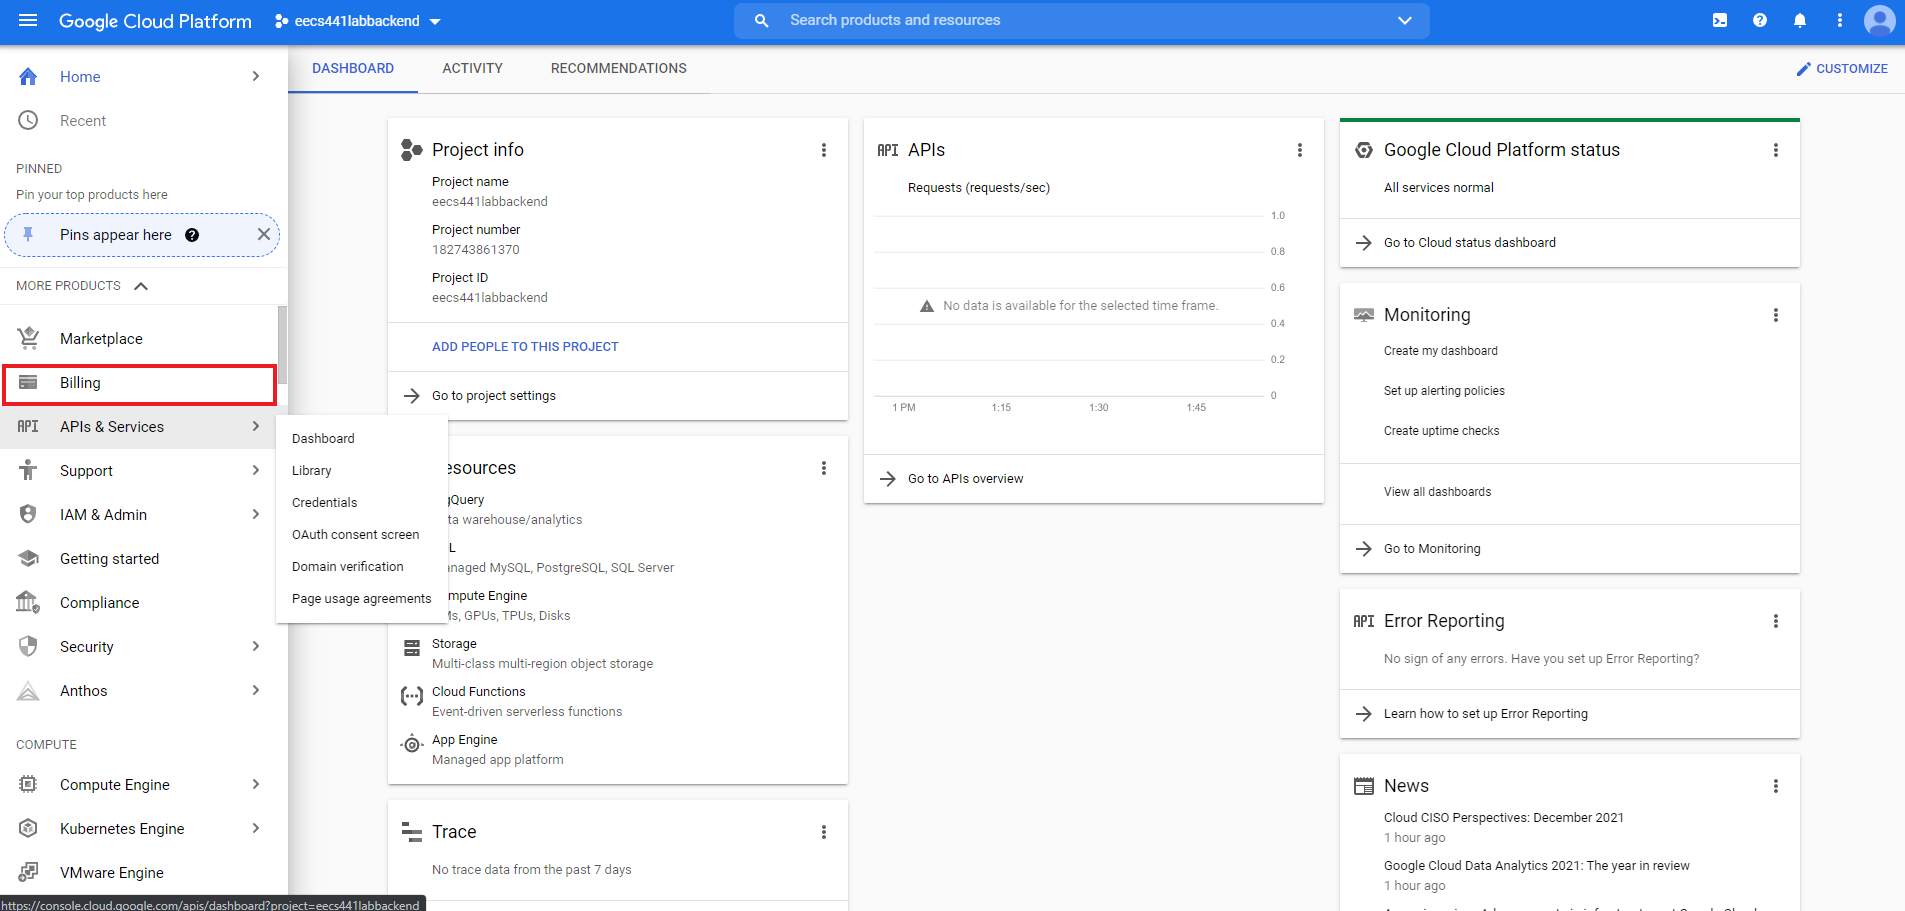
The side menu may have additional items pre-pinned, however the two items we need Billing and Compute Engine are easily identifiable. Please consult the teaching staff if you couldn’t find any
menu items referenced in this spec.

When you fill out your billing information, select “individual” as account type. Make sure you see something like this:

Add a credit or debit card. If your back end qualifies for free-tier (it should), this card will not be charged. Select START MY FREE TRIAL. Return to the project console.
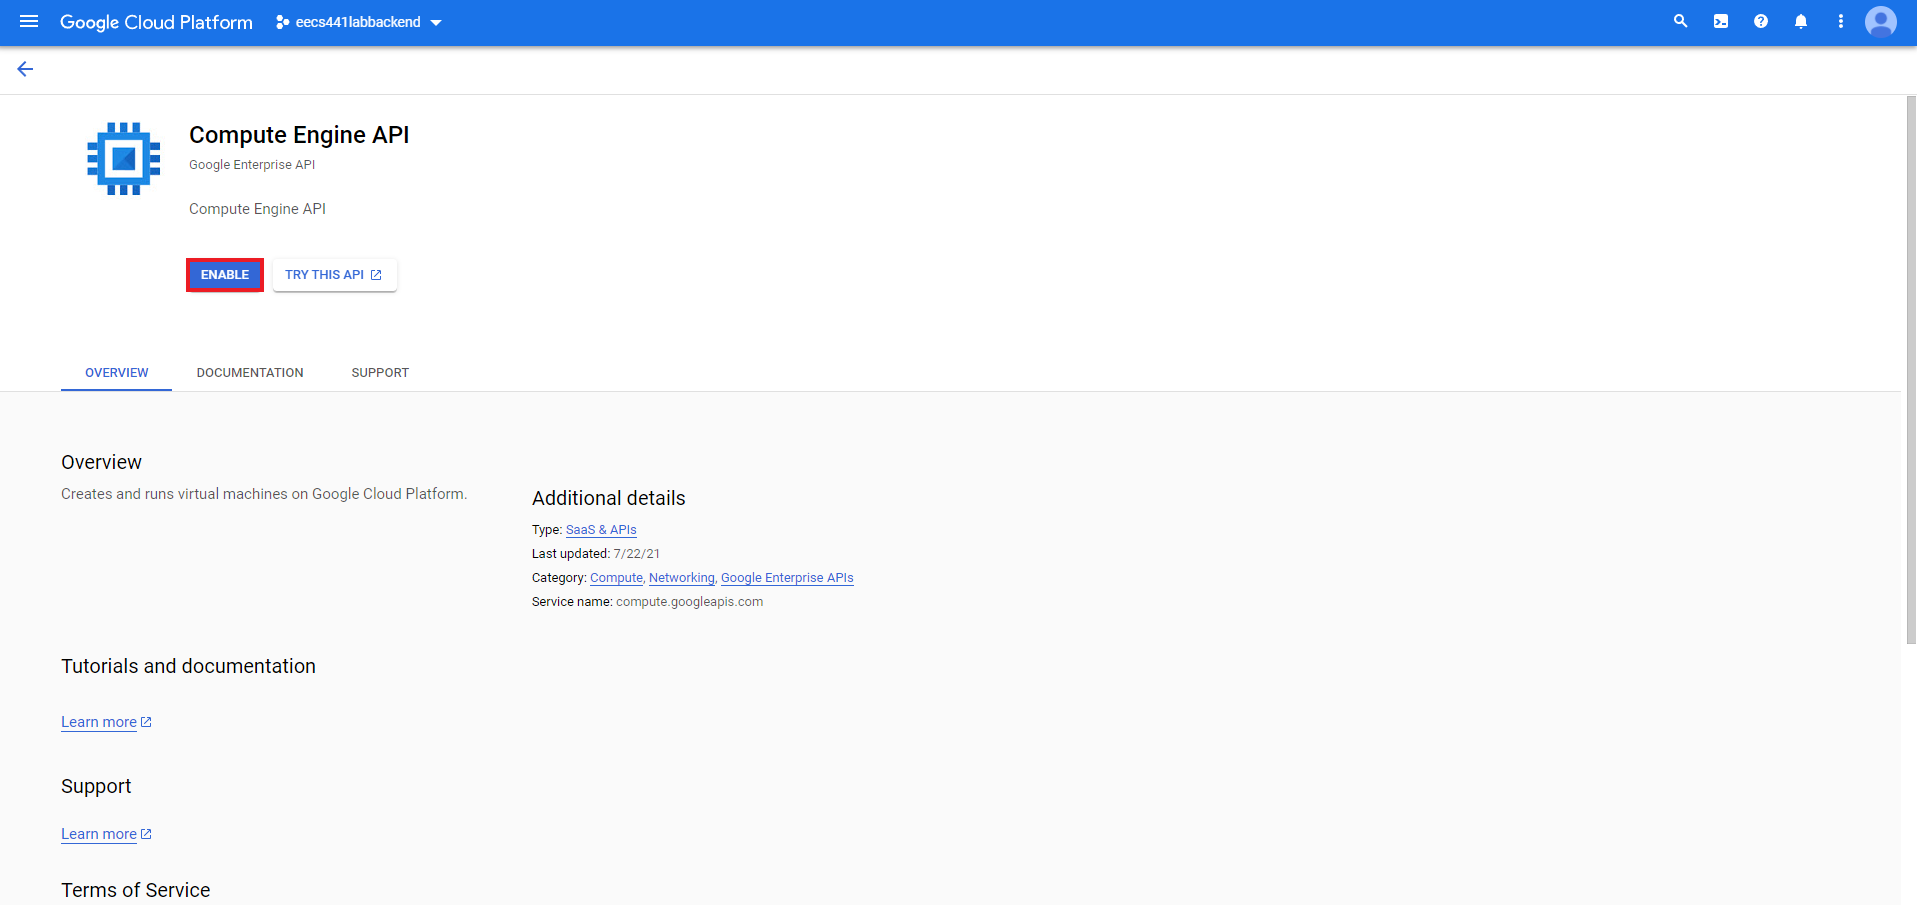
Enable Compute Engine API
Visit GCP’s Compute Engine API site and select ENABLE.
Create VM instance
Return to the console. Hover over Compute Engine on the left navigation bar and select VM Instances.

Select CREATE INSTANCE.

Review the free tier options at the Google Cloud Free Program page by scrolling to the section titled “Free Tier usage limits”. Look under the “Compute Engine” section and check regions eligible for free tier. Free tier usage is governed by time used. Currently, an E2 in Oregon, Iowa, or South Carolina is eligible for free tier if used for the number of hours in a month.

Give the instance a name and carefully select the regions that are available as free tier with an e2-micro configuration.
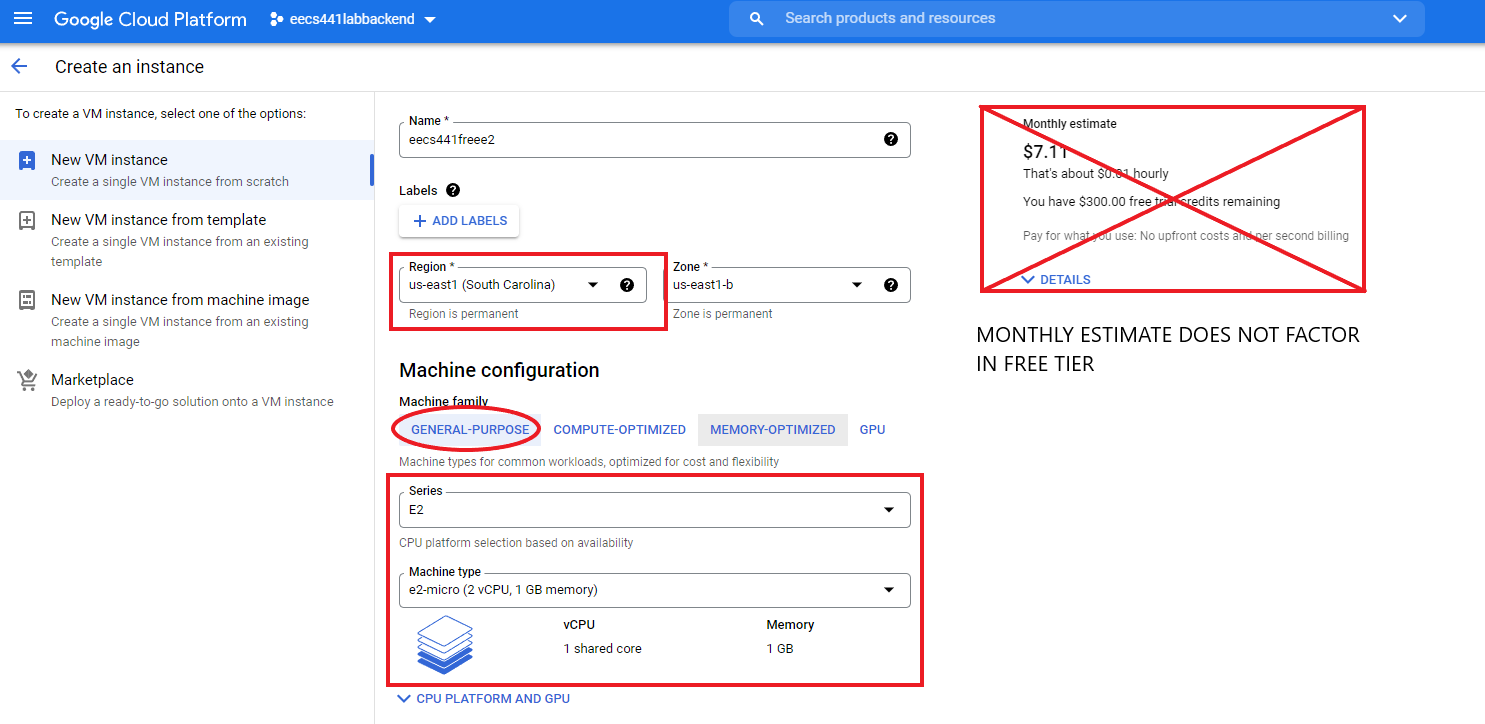
The monthly estimate does not factor in free tier. If the steps are followed, your account should not be billed.
Scroll down until you see the **Boot disk**** section. Click “CHANGE” under Boot disk and configure it
to Ubuntu 24.04.01 LTS. Be sure to select STANDARD PERSISTENT DISK. Any other Boot Disk type option will cost you.

After you’ve chosen “Ubuntu 24.04.01 LTS” and “Standard persistent disk”, click the blue SELECT button.
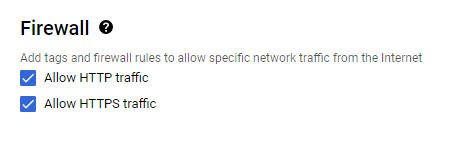
Back in the “Machine configuration” page, scroll down further, pass the “Boot disk” section, to get to the “Firewall” section. In the “Firewall” section, allow both HTTP and HTTPS traffic. You should see two boxes like this:
Press “CREATE” to create the instance. Wait for the instance to initialize.
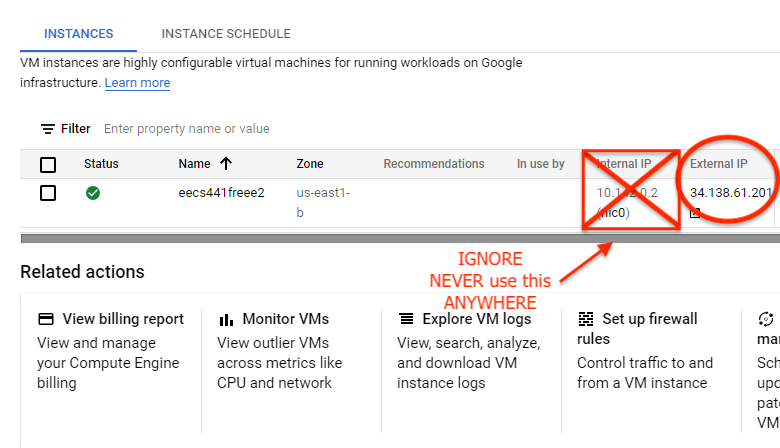
When the loading animations are done, write down the external IP address shown on the screen. In the remainder of this spec, and this term, we will refer to your “external IP” as YOUR_SERVER_IP (in the image it’s 34.73.108.54).
You’ll never need the internal IP (and GCP doesn’t
provide any public DNS for your instance).
Next select the triple dots on your E2. Select “Network Details”.

Select “Firewall”. We have to change one more firewall setting to allow us to test the web server we’ll be setting up later.
Create a firewall rule.
Give your rule a name. Scroll down to “Targets”. Enter “http-server” into the “Target tags” box. Enter 0.0.0.0/0 into the source IPv4 ranges box. Enter port 8000 into the tcp box. Press “CREATE”.
ssh to instance
The back-end specs in this course will assume that you have a user with username “ubuntu” created on your instance.
The specs further assume that you’re doing all your back-end work, building your server, under user “ubuntu”.
You’re free to build under a different username, e.g., your Google account name, however you will then have to map
between the instructions in the specs and your setup. More importantly, we will NOT be able to help
you should you need help debugging your back-end server. To build your back end as user ubuntu, please do the following:
Windows on WSL
If you prefer to run Ubuntu shell instead of Windows’ PowerShell, on Ubuntu’s terminal create /etc/wsl.conf:
laptop$ sudo vi /etc/wsl.conf
and put the following content in it:
  [automount]
  options = "metadata"
Exit all Ubuntu shells such that Ubuntu is not running and its icon is not showing in your dock (or sign out and sign back in to your Windows account), restart your Ubuntu terminal, and continue with the steps below.
To access your Windows folder from your WSL shell:
  #                       👇👇👇👇👇👇👇👇👇👇👇👇👇
  laptop$ ls /mnt/c/Users/YOUR_WINDOWS_USERNAME/
First generate a public/private key pair for user “ubuntu” in a safe place you can easily remember, for example YOUR*LABS*FOLDER.:
#         👇👇👇👇👇👇👇👇👇👇
laptop$ cd YOUR*LABS*FOLDER
laptop$ ssh-keygen -C ubuntu
when ssh-keygen prompts you for the file in which to save the key, enter “eecs441.pem”. It will then
prompt you for a passphrase. Leave it empty. Hit return or enter, twice. Your identification (private key) would
have been saved in eecs441.pem and your public key in eecs441.pem.pub. You can view the content of
your public key for posting to Google below by:
laptop$ cat eecs441.pem.pub
Go to GCP Metadata page, open the SSH KEYS tab and click on EDIT.

On the edit page, click + ADD ITEM, copy and paste the content of your “eecs441.pem.pub” to the empty box that
+ ADD ITEM brought up, and hit the blue SAVE button.
Your SSH KEYS tab should now list “ubuntu” under Username with its corresponding public key:

To ssh to your GCP instance as user “ubuntu” using your private key, eecs441.pem, you must first set its permissions to read-only. In the following, YOUR_SERVER_IP always refers to the external IP address you’ve noted down earlier.
laptop$ chmod 400 eecs441.pem
laptop$ ssh -i eecs441.pem ubuntu@YOUR_SERVER_IP
#                                 👆👆👆👆👆👆👆👆👆
Windows on PowerShell
[Thanks to Jad B. ‘F21 for use of icacls]
PS laptop> icacls eecs441.pem /grant "$($env:username):(r)" /inheritance:r
PS laptop> ssh -i eecs441.pem ubuntu@YOUR_SERVER_IP
#                                    👆👆👆👆👆👆👆👆👆
![]() WARNING Students have reported issues trying to run the
WARNING Students have reported issues trying to run the Chatter backend service on VSCode Server or JetBrains Remote Development Gateway. These are meant for maintaining your source files remotely; they may not be set up for long-running services. Always ssh directly to your server as described in this section to run your server.
Stop instance
DO NOT STOP YOUR INSTANCE. Please leave your E2 instance running for grading purposes. Stopping your instance will change its alloted IP address and undo some of the customizations you’ve done following this spec. When we’re done with all the labs, after the last lab has been graded, in about 2.5 months, and if you don’t need your instance for your course project, then you can stop your instance, to avoid using your GCP credits.![]()
GCP should have given you the minimum of 90 days and $300 of credit upon signing up. That is, if your E2 runs more than 3 months and is not eligible for free tier after that (this should not happen anyways) you will get billed a small amount.
Head to your E2 dashboard. Select “Compute Engine”.

When you are completely done with your E2, delete it to ensure you are not charged. A day or two later, ensure that there are no charges for your E2 at all.
Updating packages
Run the following:
server$ sudo apt update
server$ sudo apt upgrade
Subsequently, for the rest of the term, every time you ssh to your server, if you see something like:
N updates can be installed immediately.
with N > 0, repeat the apt commands above.
Failure to update your packages could lead to your lab not performing at all and also makes you vulnerable to security hacks.
Further, any time you see *** System restart required *** when you ssh to your server, immediately run:
server$ sync
server$ sudo reboot
Your ssh session will be ended at the server. Wait a few minutes for the system to reboot before you ssh to your server again.
Clone your 441 repo
Clone your 441 GitHub repo to enable pushing your
back-end files for submission:
- First, on your browser, navigate to your
441GitHub repo - Click on the green
Codebutton and copy the URL to your clipboard by clicking the clipboard icon next to the URL - Then on your back-end server:
  server$ cd ~
  server$ git clone <paste the URL you copied above> 441
If you haven’t, you would need to create a personal access token to use HTTPS Git.
If all goes well, your 441 repo should be cloned to ~/441. Check that:
server$ ls ~/441
shows the content of your 441 git repo, including your chatter lab front end.
Preparing certificates for HTTPS
Starting in 2017, Apple required apps to use HTTPS, the secure version of HTTP. Android has followed suite in Aug. 2018 and defaulted to blocking all cleartext (HTTP) traffic.
To support HTTPS, we first need a public key signed by a Certification Authority (CA). Obtaining a certificate from a legitimate CA requires that your server have a fully qualified domain name (FQDN), such as www.eecs.umich.edu, which would require extra set-up steps. Or we could generate our own certificate, which can only be used during development; good enough for the course.
Start by installing curl and wget so we can grab the configuration file, selfsigned.cnf, which we will use to generate a certificate and its corresponding private key:
  server$ sudo apt install curl wget
  server$ hash -r
  server$ wget https://eecs441.eecs.umich.edu/asns/selfsigned.cnf
Open selfsigned.cnf:
server$ vi selfsigned.cnf
When asked to open and/or edit a file on your back-end server, use your favorite editor. In this and all subsequent labs, we will assume
vi(orvimornvim) because it has the shortest name 😊. You can replaceviwith your favorite editor; for example,nanohas on-screen help and may be easier to pick up. See cheatsheet for a list ofvi’s commands.
search for the string “YOUR_SERVER_IP” and replace it with yours:
  extendedKeyUsage = serverAuth
  #                  👇👇👇👇👇👇👇👇👇
  subjectAltName = IP:YOUR_SERVER_IP   # replace YOUR_SERVER_IP with yours
DNS instead of IP
If your server has a fully qualified domain name (FQDN, e.g., eecs441.eecs.umich.edu and
not the public DNS AWS assigned you),
you can use it instead, tagging it with DNS instead of IP. If you specify your
IP address as the subjectAltName, you can only access your server using its IP address,
not by its FQDN, and vice versa.
Now create a self-signed key and certificate pair with the following command; here also, replace YOUR_SERVER_IP in the command line with yours:
  server$ openssl req -x509 -newkey rsa:4096 -sha256 -keyout /home/ubuntu/441/chatterd.key -out /home/ubuntu/441/chatterd.crt -days 100 -subj "/C=US/ST=MI/L=AA/O=UM/OU=CSE/CN=YOUR_SERVER_IP" -config selfsigned.cnf -nodes
  # replace YOUR_SERVER_IP with yours
We will use the generated key and certicate files later.
iOS requirements
Starting with iOS 13 (and macOS 10.15 Catalina), Apple added some security requirements that all server certificates must comply with. To support both iOS and Android clients, a back-end server must thus comply with these security requirements also.
Verify that your server certificate satisfies the requirement, do:
server$ sudo openssl x509 -text -in /home/ubuntu/441/chatterd.crt -noout
You must see the following lines:
    X509v3 extensions:

        X509v3 Extended Key Usage:
            TLS Web Server Authentication
        X509v3 Subject Alternative Name:
            IP Address:YOUR_SERVER_IP         # or DNS:YOUR_SERVER_FQDN
The configuration file for generating openssl certificate, /etc/ssl/openssl.cnf distributed with Ubuntu are missing some fields that make certificate generated by openssl not satisy the iOS requirements, which is why we have you download and use the selfsigned.cnf configuration file above.
Instead of generating a self-signed certificate, you could create a local Certification Authority (CA) and generate certificates signed by that local CA. The tool mkcert creates a local CA for you and generates certificates signed by that local CA.
With self-signed certificates, you must tell your device OS to trust each and every one of your self-signed certificates one at a time. If you have a local CA, you only need to tell your device OS to trust your local CA’s root certificate, then all certificates generated by this local CA will be trusted by your device OS. The process to get your device OS to trust your self-signed certificate or the local CA’s root certificate is the same for both iOS and Android. If you need to trust multiple server cerficates, then installing a local CA’s root certificate is more convenient. However, trusting a root CA’s certificate means you trust all certificates generated by that root, which seems to be a bit more vulnerable than just trusting one self-signed certificate. Since we are running only one server in this course, we’ve opted to use a single self-signed certificate.
PostgreSQL
We will be using the PostgreSQL relational database management system (RDBMS) to store chatts posted by the front end. First we need to install PostgreSQL:
server$ sudo apt update
server$ sudo apt install libpq-dev postgresql postgresql-contrib
Once PostgreSQL is installed:
-
Log into an interactive Postgres (
psql) session as userpostgres:server$ sudo -u postgres psqlYou may receive the message: “could not change directory to “/root”: Permission denied”. You can safely ignore this message.
Your command-line prompt should change to
postgres=#. - Check the version of your PostgreSQL:
SELECT version();It should say version 13 or higher. Consult the teaching staff if it doesn’t.
-
Create a database user for your project. Make sure to select a secure password.
CREATE USER chatter WITH PASSWORD 'chattchatt'; TIP: Forgetting to do this is a common cause of getting HTTP error code
 500 Internal Server Error.All SQL commands must end with a
;. -
Create a database for your project and change its owner to
chatter:CREATE DATABASE chatterdb; ALTER DATABASE chatterdb OWNER TO chatter; -
Connect to the database you just created:
\connect chatterdb\connectmay be shortened to\c.Your command-line prompt should now change to
chatterdb=#. -
We next use SQL command to create a
chattstable in thechatterdbdatabase. The table consists of four columns:username,message,id, andtime:CREATE TABLE chatts (username varchar(255) not null, message varchar(255) not null, id UUID not null, time timestamp with time zone DEFAULT CURRENT_TIMESTAMP(0));We will generate a random UUID as the
idof each entry;timewill be automatically filled in by the database as an entry is inserted. -
Give user
chatteraccess to administer the new database, including querying and inserting new data:GRANT ALL PRIVILEGES ON ALL TABLES IN SCHEMA public TO chatter; - Insert and view a sample entry:
INSERT INTO chatts  VALUES ('testuser1', 'Hello world', gen_random_uuid());
SELECT * from chatts;
You should see something like:
username | message | id | time | -----------+-------------+--------------------------------------+----------------------------| testuser1 | Hello world | 20f713af-015d-48c8-8b09-3036cf104134 | 2025-01-03 10:54:58.362108 | (1 row)TIP: Trying to send messagelonger than 255 characters is another common cause of getting HTTP error code500 Internal Server Error.To delete all entries from a table:
TRUNCATE TABLE chatts; -
You can issue the
\dtcommand to list all tables:\dt List of relations Schema | Name | Type | Owner --------+--------+-------+---------- public | chatts | table | postgres (1 rows) -
When you are finished, exit PostgreSQL:
\qor hit
Ctl-d(^d).
Chatter’s API
Chatter is a simple CRUD app. We’ll use the chatts table just created to hold submitted chatts. We associate a username with each message in a chatt.
To start with, chatter has only two APIs:
-
getchatts: use HTTP GET to query the database and return all foundchatts -
postchatt: use HTTP POST to post achattas JSON object
Chatter does not provide “replace” (HTTP PUT) and “delete” (HTTP DELETE) functions.
The protocol handshakes:
url
<- request
-> response

/getchatts/
<— HTTP GET {}
—> { array of chatts } 200 OK

/postchatt/
<- HTTP POST { username, message }
—> {} 200 OK
Data formats
The getchatts API will send back all accumulated chatts as a JSON array of string arrays. Each string array consists of four elements “username”, “message”, “id”, and “timestamp”. For example:
[
    ["username0", "message0", "id0", "timestamp0"],
    ["username1", "message1", "id1", "timestamp1"],
    ...
]
Each element of the string array may have a value of JSON null or the empty string ("").
To post a chatt with the postchatt API, the front-end client sends a JSON object
consisting of "username" and "message". For example:
{
   "username": "ubuntu",
   "message": "Hello world!"
}
Web server framework
We provide instructions to set up the Chatter back-end service using different back-end stacks. Please click the one you want to use to reveal the instructions.
Which back-end stack to use?
🔸 Go is a popular back-end language due to its learnability. We considered several Go-based web frameworks and ended up using the Echo web framework, which is built on the net/http web server from Go’s standard library. Personally, I find Go awkward to use; see, for example, I wish Go were a Better Programming Language.
🔸 JavaScript is familiar to web front-end developers. TypeScript introduces static type checking to JavaScript. Node.js was the first runtime environment that enables use of JavaScript outside a web browser, to build backend applications. Subsequently, Deno (written in Rust) and Bun (written in Zig) have come on the scene, with better runtime performance and smoother developer experience, unfortunately they do not yet fully support HTTP/2 at the time of writing. We have chosen the popular Express web framework running on Node.js, with TypeScript code compiled with tsc. JavaScript documentation and community often assume code running in a web browser, resulting in explanations that can be disorienting to native mobile developers. JavaScript stack relies heavily on third-party libraries. Each library developer may use JavaScript in ways that are just so slightly different from others. Incorporating these libraries into one stack can feel like trying to communicate in American English, Australian English, British English, Irish English, Scottish English, etc. all at the same time. Type inference that a JavaScript IDE, such as WebStorm, relies on sometimes gives false negative, flagging a type-inference error, when the code actually runs fine with dynamic typing.
🔸 Python: If you plan to use any ML-related libraries in your project’s back end, a Python-based stack could mean easier integration. We considered several web frameworks that support asynchronous Python operations and ended up choosing Starlette. Starlette commonly runs on the uvicorn web server, created by the same author. To support HTTP/2 however, we run Starlette on granian. This is made possible by Python’s Asynchronous Standard Gateway Interface (ASGI), which was expressedly designed to allow plug-and-play between various modules in the Python stack. Interestingly, Granian uses hyper, written in Rust, as the underlying web server. If you decide to use the Python stack, be aware that it has the worst performance compared to the other options, by a large distance. Python’s reliance on indentation to delimit code blocks makes it bug prone. A Python IDE, such as PyCharm or VSCode, that uses a Language Server to watch over the use of the correct amount of indentations is highly recommended.
🔸 Rust does static type checking and memory-ownership data-flow analysis, resulting in a language that allows you to write safe and performant code, two goals that are hitherto considered antithetical. Alone amongst the language choices here, Rust does not rely on a runtime running garbage collection for memory management. We use the axum web framework, built on the hyper web server and the tokio asynchronous stack. Rust-based axum-hyper stack consistently outperforms all the other options here, by order of magnitude. Should you contemplate using the Rust stack, however, be forewarned that Rust does have a reputation for being hard to learn and frustrating to use, mainly due to its reliance on its type system to enforce memory ownership, scoped lifetime, and safe concurrency. The advantage is that the compiler can check and enforce these ownership, lifetime, and safe access requirements statically at compile time. Plus, you get the “documentation” for these requirements “for free” in the types used. The frustration comes when your use of existing APIs does not meet one or more of these requirements and you don’t know how to satisfy them—often, you didn’t even know there’s a need for these requirements in the first place. A Rust IDE, such as RustRover or VSCode, that uses a Language Server for type inference can be immensely helpful, or rather, indispensable, in resolving type mismatches.
Evaluating web frameworks
A web framework in this course serves mostly simple CRUD operations. Our needs are thus modest, yet the need to support mobile apps, on both the Android and iOS platforms, brings its own requirements: the front-ends are not web browsers and do not understand JavaScript. The framework must support HTTPS, required by both iOS and Android. The apps in our labs are multi-modal and the web framework must support both download and upload of text, audio, images, and video. Some frameworks can support video transfer when communicating with one mobile platform but not the other. Others can transfer video on HTTP/1.1, but not on HTTP/2, even when they otherwise support HTTP/2. We require HTTP/2 in course projects that transmit Server-Side Events (SSEs). We further require the following from web frameworks:
- integration with PostgreSQL with connection pool,
- handling of missing or duplicated trailing slash in URL endpoints,
- serving dynamically added static files from a designated directory,
- generating url for dynamically added static files,
- specifying upload size limit.
We limit our backend-stack choices to those supporting asynchronous operations–hence not Flask nor Django for Python, for example. Finally, given our modest needs, we consider only frameworks with minimal API surface–so-called microframeworks, eschewing more comprehensive, “batteries included,” ones that integrate object-relational mapper (ORM) for database access, OAuth and JSON web token (JWT) for authentication/authorization, auto-generated interactive documentation (OpenAPI), automatic collection of instrumentation and logging (telemetry) data (OpenTelemetry), etc. While such frameworks are useful for building and maintaining enterprise-level production site, they are usually also more opinionated and have a larger API surface. This table comparing microframework Starlette (our choice for Python) against the more comprehensive and opinionated Starlite illustrates the differences. (For further discussions on micro- vs. batteries-included frameworks see also, Which Is the Best Python Web Framework: Django, Flask, or FastAPI? and Flask as April Fools’ joke (slides).)
We found the TechEmpower Web Framework Benchmarks (TFB) to be a decent place to get to know what frameworks are available. Not all frameworks participate in the benchmark: three of the ones we’ve evaluated here are not, and it’s likely there are more we’re not aware of. As with most benchmarks, TFB entries do not always reflect common, casual usage of web frameworks, and its results should be taken with a grain of salt. Discounting those entries intended only to show how the benchmark can be gamed, we nevertheless found it useful to compare the relative performance of the frameworks we do consider. The linked table below lists the web frameworks, with their web server pairing, that we have either considered (C), evaluated (E), implemented (I), or finally deployed (D). For those we do not deploy, the notes column records the first road-block we encountered, stopping us from considering the entry further. A couple of those not deployed we’re watching (W) for further development.
![]() If you plan to build your back end server in Rust, know that GCP gives you 2GB more disk space than AWS, which you’ll need to build Rust dependencies.
If you plan to build your back end server in Rust, know that GCP gives you 2GB more disk space than AWS, which you’ll need to build Rust dependencies.
![]() Should you decide to switch from one back-end stack to another during the term, be sure to disable the previous one completely before enabling the new one or you won’t be able to start the new one due to the HTTP and HTTPS ports being already in use:
Should you decide to switch from one back-end stack to another during the term, be sure to disable the previous one completely before enabling the new one or you won’t be able to start the new one due to the HTTP and HTTPS ports being already in use:
server$ sudo systemctl stop chatterd
server$ sudo systemctl daemon-reload
server$ sudo systemctl start chatterd
![]() Note: in this and subsequent labs, we will assume your folders/directories are named using the “canonical” names listed here. For example, we will always refer to the project directory as
Note: in this and subsequent labs, we will assume your folders/directories are named using the “canonical” names listed here. For example, we will always refer to the project directory as ~/441/chatterd, without further explanations, from this lab to the last lab. If you prefer to use your own naming scheme, you’re welcome to do so, but be aware that you’d have to map your naming scheme to the canonical one in all the labs—plus we may not be able to grade your labs correctly, requiring back and forth to sort things out.
Go with Echo
Go with Echo
Install Go
-
sshto your server and download the latest version of Go: Check Go’s Downloads page for the current latest version. As of the time of writing, the latest version is 1.23.4.server$ cd /tmp server$ wget https://go.dev/dl/go1.23.4.linux-amd64.tar.gz The version of Go distributed with the Ubuntu package manager
 aptmay not be the latest version and may be incompatible with our solution, which requires Go version 1.18 or later. -
Go to Go’s download and install page.
-
Skip the first section on
Go download, you’ve already downloaded Go. -
Click on the
Linuxtab in the second (Go install) section of the instructions. - Follow the instructions, with the following modifications to step 1 (you need to be root to modify
/usr/local):server$ sudo rm -rf /usr/local/go && sudo tar -C /usr/local -xzf go1.23.4.linux-amd64.tar.gz server$ sudo chmod -R go+rX /usr/local/go
To update to a later version of Go, follow the instructions in Managing Go installations—which would have you manually delete the existing Go folder (usually /usr/local/go/), so don’t put any custom files in there.
chatterd module
First create and change into a directory where you want to keep your chatterd module:
server$ mkdir ~/441/chatterd
server$ cd ~/441/chatterd
Create a Go module called chatterd to house the Chatter back end:
server$ go mod init chatterd
# output:
go: creating new go.mod: module chatterd
Create a file called main.go:
server$ vi main.go
We will put the server and URL routing code in main.go, starting with the following import lines:
package main

import (
	"context"
	"log"
	"github.com/jackc/pgx/v4/pgxpool"
	"github.com/labstack/echo/v4"
	"github.com/labstack/echo/v4/middleware"
)
We next create a Route struct to hold the URL routing information needed by Echo and declare a global variable routes to hold an array of Routes. We define the routes to serve Chatter’s two APIs. We route HTTP GET requests with URL endpoint getchatts/ to the getchatts() function and we route HTTP POST requests with endpoint postchatt/ to the postchatt() function. With each route, we also specify which HTTP method is allowed for that URL endpoint:
type Route struct {
    HTTPMethod string
    URLPath    string
    URLHandler echo.HandlerFunc
}

var routes = []Route {
    {"GET", "/getchatts/", getchatts},
    {"POST", "/postchatt/", postchatt},
}
The functions getchatts() and postchatt() will be implemented in handlers.go later.
For now, staying in main.go, in our main() function, we first set up a pool of open connections to our PostgreSQL chatterdb database. Maintaining a pool of open connections avoids the cost of opening and closing a connection on every database operation. The password used in creating pgxpool must match the one you used when setting up Postgres earlier. The connection pool needs to be accessible to all the URL handlers, so we store it in a global variable chatterDB:
var background = context.Background()
var chatterDB *pgxpool.Pool

func main() {
	var err error
	chatterDB, err = pgxpool.Connect(background, "host=localhost user=chatter password=chattchatt dbname=chatterdb")
	if err != nil { panic(err) }
Continuing inside the main() function, we set up the Echo server:
- disable the
Echobanner printing on the console, - load up the
routesarray above, - set it to automatically reroute any URL specified without a trailing ‘/’ to one with trailing ‘/’, for example
https://YOUR_SERVER_IP/getchattswill be routed tohttps://YOUR_SERVER_IP/getchatts/, - bind it to the default HTTPS port (443),
- assign it the
chatterdcertificate and key we created earlier, and . . .
launch the server:
	server := echo.New()
	server.HideBanner = true
	for _, route := range routes {
		server.Match([]string{route.HTTPMethod}, route.URLPath, route.URLHandler)
	}
	server.Pre(middleware.AddTrailingSlash())

	log.Fatal(server.StartTLS(":443",
		"/home/ubuntu/441/chatterd.crt",
		"/home/ubuntu/441/chatterd.key"))
}
handlers.go
We implement the URL path API handlers in handlers.go:
server$ vi handlers.go
Start the file with the following imports:
package main

import (
    "log"
    "net/http"
    "time"

    "github.com/labstack/echo/v4"
)
We define a Chatt struct to help postchatt() deserialize JSON received from clients:
type Chatt struct {
    Username  string    `json:"username"`
    Message   string    `json:"message"`
    Id        string    `json:"id"`
    Timestamp time.Time `json:"timestamp"`
}
The property names must be capitalized to be visible to the JSON deserializer.
We add a number of logging functions to print to console results of handling each HTTP request and, in case of error, prepare a corresponding JSON response to be returned to the client:
func logOk(c echo.Context) {
	log.Println("[Echo] |", http.StatusOK, `|`, c.RealIP(), `|`, c.Request().Method, c.Request().RequestURI)
}

func logServerErr(c echo.Context, err error) error {
	log.Println("[Echo] |", http.StatusInternalServerError, `|`, c.RealIP(), `|`, c.Request().Method, c.Request().RequestURI, err.Error())
	return c.JSON(http.StatusInternalServerError, err.Error())
}

func logClientErr(c echo.Context, sc int, err error) error {
	log.Println("[Echo] |", sc, `|`, c.RealIP(), `|`, c.Request().Method, c.Request().RequestURI, err.Error())
	return c.JSON(sc, err.Error())
}
The handler getchatts() uses an open connection from the connection pool to query the database for stored chatts.
func getchatts(c echo.Context) error {

    var chattArr [][]any
    var chatt Chatt

    rows, err := chatterDB.Query(background, `SELECT username, message, id, time FROM chatts ORDER BY time DESC`)
    if err != nil {
      if rows != nil { rows.Close() }
		  return logServerErr(c, err)
    }

    for rows.Next() {
        err = rows.Scan(&chatt.Username, &chatt.Message, &chatt.Id, &chatt.Timestamp)
        if err != nil {
          rows.Close()
          return logServerErr(c, err)
        }
        chattArr = append(chattArr, []any{chatt.Username, chatt.Message, chatt.Id, chatt.Timestamp})
    }

    logOk(c)
    return c.JSON(http.StatusOK, chattArr)
}
Similarly, postchatt() receives a posted chatt in the expected JSON format, has it deserialized into the Chatt struct, and inserts it into the database, using a connection from the pool. The UUID and time stamp of each chatt are automatically generated at insertion time.
func postchatt(c echo.Context) error {
    var chatt Chatt

    if err := c.Bind(&chatt); err != nil {
      return logClientErr(c, http.StatusUnprocessableEntity, err)
    }

    _, err := chatterDB.Exec(background, `INSERT INTO chatts (username, message, id) VALUES ($1, $2, gen_random_uuid())`, chatt.Username, chatt.Message)
    if err != nil {
        return logClientErr(c, http.StatusBadRequest, err)
    }

    logOk(c)
	  return c.JSON(http.StatusOK, struct{}{}) // empty struct instance serialized to empty JSON: {}
}
Build and test run
To build your server:
server$ go get   # -u  # to upgrade all packages to the latest version
server$ go build
![]()
Go is a compiled language, like C/C++ and unlike Python, which is an interpreted language. This means you must run go build each and every time you made changes to your code, for the changes to show up in your executable.
To run your server:
server$ sudo ./chatterd
# Hit ^C to end the test
If you had
Preforkenabled and wanted to prefork 3 servers, do instead:server$ sudo GOMAXPROCS=3 ./chatterd
You can test your implementation following the instructions in the Testing Chatter APIs section.
References
-
Working with Go
- Golang tutorial series gentle and clear, though a bit out of date in parts now.
- Running multiple HTTP servers in Go
- Making a RESTful JSON API in Go
- Golang Json Marshal Example
- HTTP Status Code
- Go: Format a time or date
- pgxpool
- Effective Error Handling in Golang
- URL
JavaScript with Express
JavaScript with Express
Install Node.js
We will first use the apt package manager to install Node.js version 18.19.1 or later (up to version 23.11.0 tested) and its tools:
server$ sudo apt update
server$ sudo apt install npm    # will automatically install node.js also
Confirm that you’ve installed Node.js version 18.19.1 or later:
server$ node --version
# output:
v18.19.1
# or later
Installing other versions of Node.js
To install Node.js v23:
server$ curl -sL https://deb.nodesource.com/setup_23.x | sudo bash -
server$ sudo apt update
server$ sudo apt install nodejs # automatically install npm also
For other versions of Node.js, replace 23 with the version number you want.
To remove Node.js installed from nodesource:
server$ sudo apt purge nodejs
server$ sudo rm /etc/apt/sources.list.d/nodesource.list
See documentations on How to Install Node.js on Ubuntu and How to remove nodejs from nodesource.com
package.json and tsconfig.json
First create and change into a directory where you want to keep your chatterd package files:
server$ mkdir ~/441/chatterd
server$ cd ~/441/chatterd
Create the file package.json with the following content:
{
  "type": "module"
}
This allows use of import statements instead of require() of CommonJS.
Install the following packages, including the PostgreSQL adaptor and pm2 process manager:
server$ npm install express@4.21.2 http-status-codes http2-express morgan postgres
server$ sudo npm install -D @types/express @types/morgan @types/node @types/typescript
server$ sudo npm install -g pm2
[Express v. 5.1.0 doesn’t seem to work with HTTP/2])https://docs.google.com/spreadsheets/d/1V0t6XLtn8qIWvGq1G_-u2OMpkmj7b-B6xNsuhioHy5M/edit?usp=sharing), hence we’re staying with v. 4.21.2, which requires
http2-expressto bridge withnode:http2.
Your ~/441/chatterd directory should now contain the following:
node_modules/ package-lock.json package.json
The package.json file should contain:
{
  "type": "module",
  "dependencies": {
    "express": "^4.21.2",
    "http2-express": "^1.0.1",
    "morgan": "^1.10.0",
    "postgres": "^3.4.5"
  },
  "devDependencies": {
    "@types/express": "^5.0.2",
    "@types/morgan": "^1.9.9",
    "@types/node": "^22.15.29",
    "@types/typescript": "^0.4.29"
  }
}
The devDependencies are used in development, not deployed in production. In our case, all the devDependencies are for static type checking. The dependencies with @types prefix define the types
used in their corresponding native JavaScript modules that have no static typing information. The file package-lock.json locks the dependencies to specific versions, to prevent automatically incorporating later, breaking versions. The node_modules directory contains the module files of both direct dependencies in package.json and indirect dependencies used by the direct dependencies.
Package update
Updating packages downloaded from the registry:
server$ npm outdated
server$ sudo npm update # -g # to update globally
See documentations on How to Install Node.js on Ubuntu and How to remove nodejs from nodesource.com
Create a tsconfig.json configuration file for use by TypeScript:
server$ vi tsconfig.json
and put the following lines in it:
{
  "compilerOptions": {
    // https://aka.ms/tsconfig for definitions

    /* Language and Environment */
    "target": "ES2022",                   // version of emitted JavaScript and compatible library
    "module": "ES2022",                   // version of generated module code
    "moduleResolution": "bundler",        // how TypeScript looks up a file from module

    /* Interop Constraints */
    "verbatimModuleSyntax": true,         // transform and elide only imports/exports marked
                                          // "type"; the rest are emitted per the "module" setting
    "allowSyntheticDefaultImports": true, // can 'import x from y' even if y has no default export
    "esModuleInterop": true,              // can import CommonJS modules;
                                          // enables 'allowSyntheticDefaultImports'

    /* Type Checking */
    "alwaysStrict": true,                 // always enable all strict type-checking options

    /* Completeness */
    "skipLibCheck": true                  // skip type checking all .d.ts files
  }
}
Save and exit tsconfig.json.
You now have all of the packages needed by the Chatter backend.
chatterd app
Create a file called main.ts:
server$ vi main.ts
We will put the server and URL routing code in main.ts. Open and edit the file to add the following import lines:
import type { AddressInfo } from 'node:net'       // import type
import { createSecureServer } from 'node:http2'   // import function
import express from 'express'                     // import default, can't be used with import type
import http2Express from 'http2-express'
import morgan from 'morgan'
import postgres from 'postgres'
import { readFileSync } from 'node:fs'
import type { Sql } from 'postgres'
import * as handlers from './handlers.js'         // import namespace

process.on('SIGTERM', () => {
  process.exit(0)
})

process.on('uncaughtException', (err) => {
  console.error(`Uncaught exception: ${err}\n` + `Stack trace: ${err.stack}`);
  process.exit(2);
});
We also took the opportunity to register two callback functions with the process: (1) to shutdown gracefully when the process is terminated by user, and (2) to print out a stack trace and exit with an error code in the case of any uncaught exception.
With process termination events taken care of, we set up a pool of open connections to our PostgreSQL chatterdb database. Maintaining a pool of open connections avoids the cost of opening and closing a connection on every database operation. The password used in the call to postgress() must match the one you used when setting up Postgres earlier. The connection pool needs to be accessible to all the URL handlers, so we store it in a global variable chatterDB:
export let chatterDB: Sql

try {
  chatterDB = postgres('postgres://chatter:chattchatt@localhost/chatterdb')

  // the rest of main.ts will go here

} catch (error) {
  console.log(error)
  process.exit(1)
}
Inside the try block, right under the call to postgres(), we next create an express
instance and define routes to serve Chatter’s first two APIs: HTTP GET requests with URL endpoint getchatts/ are routed to the getchatts() function and HTTP POST requests with endpoint postchatt/ are routed to the postchatt() function. With each route, we implicit specify which HTTP method is allowed for that URL endpoint by providing only route definition with get() or post() method that will be invoked only when there is an HTTP GET or POST request for the specified endpoint:
  const app = http2Express(express)
      .use(morgan('common')) // logging
      .use(express.json())
      .get('/getchatts/', handlers.getchatts)
      .post('/postchatt/', handlers.postchatt)
We have also configured our express app with two middlewares: morgan to log each response and
express.json() to automatically parse incoming requests containing JSON payload and making it available as the Request’s body to the URL handler. We also wrapped express inside the http2Express() bridge to allow interoperability with HTTP/2. This is a workaround until HTTP/2 is eventually supported natively in express. The functions getchatts() and postchatt() themselves will be implemented in handlers.ts later.
Staying inside the try block, after setting up the express app, we set up the node.js server:
- create an instace of the secure server with the
chatterdcertificate and key we created earlier, - load up the
appinstance ofexpressto the secure server, - bind it to the wildcard IP address (
0.0.0.0, equivalent ofany) and the default HTTPS port (443), and launch it:const tls = { key: readFileSync("/home/ubuntu/441/chatterd.key"), cert: readFileSync("/home/ubuntu/441/chatterd.crt"), allowHTTP1: true } const server = createSecureServer(tls, app).listen({host: '0.0.0.0', port: 443}, () => { const address = server.address() as AddressInfo console.log(`chatterd on https://${address.address}:${address.port}`) })handlers.ts
We implement the URL path API handlers module in the handlers.rs:
server$ vi handlers.ts
Start the file with the following imports:
import { chatterDB } from './main.js'
import { createHash, randomUUID } from 'crypto'
import type { PostgresError } from 'postgres'
import type { Request, Response } from 'express'
We define a Chatt struct to help postchatt() deserialize JSON received from clients:
interface Chatt {
    username: string
    message: string
}
The handler getchatts() uses an open connection from the connection pool to query the database for stored chatts. By default, postgres.js retrieves each database row as a JSON object, whereas we want each row represented as an array of values only, without column name as tags. We achieve this by calling .values() on each retrieved row. We insert the resulting array of chatts into the response JSON object, if no exception has been raised.
export async function getchatts(req: Request, res: Response) {
    try {
        const chatts = await chatterDB`SELECT username, message, id, time FROM chatts ORDER BY time DESC`.values()
        res.json(chatts)
    } catch (error) {
        res.status(500).json(`${error as PostgresError}`)
    }
}
Similarly, postchatt() receives a posted chatt in the expected JSON format, has it deserialized into the Chatt interface, and inserts it into the database, using a connection from the pool. The UUID and time stamp of each chatt are automatically generated at insertion time.
export async function postchatt(req: Request, res: Response) {
    let chatt: Chatt
    try {
        chatt = req.body
    } catch (error) {
        res.status(422).json(error)
        return
    }
    try {
        await chatterDB`INSERT INTO chatts (username, message, id) VALUES (${chatt.username}, ${chatt.message}, ${randomUUID()})`
        res.json({})
    } catch (error) {
        res.status(400).json(`${error as PostgresError}`)
    }
}
Build and Test run
![]()
TypeScript is a compiled language, like C/C++ and unlike JavaScript and Python, which are an interpreted languages. This means you must run npx tsc each and every time you made changes to your code, for the changes to show up when you run node.
To build your server, transpile TypeScript into JavaScript:
server$ npx tsc
You should now see a .js file for each .ts file in the directory.
To run your server:
server$ sudo node main.js
# Hit ^C to end the test
tsxcan run TypeScript directly, but it doesn’t perform type checking.BunandDenocan also run TypeScript directly, but they don’t support HTTP/2 yet at the time of writing.
You can test your implementation following the instructions in the Testing Chatter APIs section.
References
Python with Starlette
Python with Starlette
Install uv
First confirm that you have Python version 3.12 or later installed on your system:
server$ python3 --version
# output:
Python 3.12 # or later
Installing other versions of Python
![]() Do NOT remove the Python that comes with Ubuntu. Ubuntu relies on it.
Do NOT remove the Python that comes with Ubuntu. Ubuntu relies on it.
To install other versions of Python:
server$ sudo add-apt-repository ppa:deadsnakes/ppa
server$ sudo apt update
server$ sudo apt install python3.13 # for example
To choose the version of Python as default:
server$ sudo update-alternatives --install /usr/bin/python python /usr/bin/python3<TAB> 0 # TAB for autocompletion
server$ sudo update-alternatives --config python
# then type a selection number corresponding to the Python of choice.
See documentation on deadsnakes personal package archive (PPA)
We’ll be using uv to manage Python package and project. It is written in Rust and is reputably faster than other Python package management tools you may have used, such as pip, pip-tools, pipx, poetry, pyenv, twine, virtualenv, and others.
server$ curl -LsSf https://astral.sh/uv/install.sh | sh
Confirm that uv is installed:
server$ uv --version
Create project and install dependencies
Create and change into a directory where you want to keep your chatterd project and initialize the project:
server$ mkdir ~/441/chatterd
server$ cd ~/441/chatterd
server$ uv init --bare
Install the following packages, including the PostgreSQL adaptor:
server$ uv add granian starlette fastapi 'psycopg[binary,pool]'
uv syncupdates all packages to the latest version.
chatterd app
Create and open a file called main.py to put the server and URL routing code.
server$ vi main.py
Edit the file to add the following import lines:
from contextlib import asynccontextmanager
import handlers
from psycopg_pool import AsyncConnectionPool
from starlette.applications import Starlette
from starlette.routing import Route
In the lifespan() function, we set up a pool of open connections to our PostgreSQL chatterdb database. Maintaining a pool of open connections avoids the cost of opening and closing a connection on every database operation. The password used in creating AsyncConnectionPool must match the one you used when setting up Postgres earlier.
@asynccontextmanager
async def lifespan(server):
    server.pool = AsyncConnectionPool("dbname=chatterdb user=chatter password=chattchatt host=localhost", open=False)
    await server.pool.open()
    yield
    await server.pool.close()
We declare the routes global array to hold the URL routing information needed by Starlette server and define routes to serve Chatter’s first two APIs: HTTP GET requests with URL endpoint getchatts/ are routed to the getchatts() function and HTTP POST requests with endpoint postchatt/ are routed to the postchatt() function. With each route, we also specify which HTTP method is allowed for that URL endpoint:
# must include the trailing '/'
routes = [
    Route('/getchatts/', handlers.getchatts, methods=['GET']),
    Route('/postchatt/', handlers.postchatt, methods=['POST']),
]
Finally, construct the web server, server, providing it with the routes array and lifespan function defined above:
# must come after route definitions
server = Starlette(routes=routes, lifespan=lifespan)
handlers.py
We implement the URL path API handlers in handlers.py:
server$ vi handlers.py
Start the file with the following imports:
from dataclasses import dataclass
from datetime import datetime
from fastapi.encoders import jsonable_encoder
import main
from psycopg.errors import StringDataRightTruncation
from starlette.responses import JSONResponse
from typing import Optional
from uuid import UUID
We define a Chatt class to help postchatt() deserialize JSON received from clients:
@dataclass
class Chatt:
    username: str
    message: str
The @dataclass annotations, among other things, automatically provides it with a replace() constructor, allowing us to deserialize incoming JSON object into the Chatt dataclass directly.
The handler getchatts() uses an open connection from the connection pool to query the database for stored chatts. We obtain and use the connection with its context manager that automatically commits all transactions if no exception has been raised. In the case of the cursor, its context manager releases any resources used. Once all the rows from the database are retrieved, we insert the resulting array of chatts into the response JSON object. We use jsonable_encoder() from the fastapi package to convert UUIDs present in the chatts into strings for JSONResponse(). Python’s built-in json.dumps() method cannot serialize UUIDs.
async def getchatts(request):
    try:
        async with main.server.pool.connection() as connection:
            async with connection.cursor() as cursor:
                await cursor.execute('SELECT username, message, id, time FROM chatts ORDER BY time DESC;')
                return JSONResponse(jsonable_encoder(await cursor.fetchall()))
    except Exception as err:
        print(f'{err=}')
        return JSONResponse(f'{type(err).__name__}: {str(err)}', status_code = 500)
Similarly, postchatt() receives a posted chatt in the expected JSON format, has it deserialized into the Chatt class, and inserts it into the database, using a connection from the pool. The UUID and time stamp of each chatt are automatically generated at insertion time.
async def postchatt(request):
    try:
        # loading json (not multipart/form-data)
        chatt = Chatt(**(await request.json()))
    except Exception as err:
        print(f'{err=}')
        return JSONResponse(f'Unprocessable entity: {str(err)}', status_code=422)

    try:
        async with main.server.pool.connection() as connection:
            async with connection.cursor() as cursor:
                await cursor.execute('INSERT INTO chatts (username, message, id) VALUES '
                    '(%s, %s, gen_random_uuid());', (chatt.username, chatt.message))
        return JSONResponse({})
    except StringDataRightTruncation as err:
        print(f'Message too long: {str(err)}')
        return JSONResponse(f'Message too long: {str(err)}', status_code = 400)
    except Exception as err:
        print(f'{err=}')
        return JSONResponse(f'{type(err).__name__}: {str(err)}', status_code = 500)
For more Python-PostgreSQL interaction, see Passing parameters to SQL queries.
Test run
To test run your server, launch your server from the command line:
server$ sudo su
# You are now root, note the command-line prompt changed from '$' or '%' to '#'.
# You can do a lot of harm with all of root's privileges, so be very careful what you do.
server# source .venv/bin/activate
(chattterd) ubuntu@server:/home/ubuntu/441/chatterd# granian --host 0.0.0.0 --port 443 --interface asgi --ssl-certificate /home/ubuntu/441/chatterd.crt --ssl-keyfile /home/ubuntu/441/chatterd.key --access-log --workers-kill-timeout 1 main:server
# Hit ^C to end the test
(chattterd) ubuntu@server:/home/ubuntu/441/chatterd# exit
# So that you're no longer root.
server$
You can test your implementation following the instructions in the Testing Chatter APIs section.
References
Rust with axum
Rust with axum
Install Rust
Note that GCP gives you 2 GB more disk space than AWS, which allows Rust to build dependencies without complaining of running out of space.
ssh to your server and install Rust:
server$ sudo apt install gcc          # cargo depends on gcc's linker
server$ curl --proto '=https' --tlsv1.2 -sSf https://sh.rustup.rs | sh
server$ rustup update
If you see:
rustup: Command not found.
try to logout from your server and ssh back to it again. If the problem persisted and you need help updating your PATH shell environment variable, please see a teaching staff.
The command rustup update is also how you can subsequently update your installation of Rust to a new version.
Cargo.toml
First create and change into a directory where you want to keep your chatterd package:
server$ cd ~/441
server$ cargo new chatterd
# output:
     Created binary (application) `chatterd` package
This will create the ~/441/chatterd/ directory for you. Change to this directory and edit the file Cargo.toml to list all the 3rd-party libraries (crates in Rust-speak) we will be using.
server$ cd chatterd
server$ vi Cargo.toml
In Cargo.toml, add the following below the [dependencies] tag:
axum = "0.8.3"
axum-extra = { version = "0.10.1" }
axum-server = { version = "0.7.2", features = ["tls-rustls"] }
bb8 = "0.9.0"
bb8-postgres = "0.9.0"
chrono = { version = "0.4.40", features = ["serde"] }
postgres = { version = "0.19.10", features = ["with-chrono-0_4", "with-uuid-1"] }
serde = { version = "1.0.219", features = ["derive"] }
serde_json = "1.0.140"
tokio = { version = "1.44.2", features = ["full"] }
tokio-postgres = "0.7.13"
tower-http = { version = "0.6.2", features = ["trace"] }
tracing = "0.1.41"
tracing-subscriber = { version = "0.3.19", features = ["env-filter"] }
uuid = { version = "1.16.0", features = ["v4", "macro-diagnostics", "serde"] }
chatterd package
In ~/441/chatterd/src/ the file main.rs has also been created for you. Edit the file:
server$ vi src/main.rs
and replace the existing lines in main.rs with the server and URL routing code, starting with the following use lines::
#![allow(non_snake_case)]
use axum::{
    handler::HandlerWithoutStateExt,
    routing::{ get, post },
    Router,
};
use axum_server::tls_rustls::RustlsConfig;
use bb8::Pool;
use bb8_postgres::PostgresConnectionManager;
use std::{ net::SocketAddr, process };
use tokio_postgres::NoTls;
use tower_http::trace::{ DefaultMakeSpan, DefaultOnFailure, TraceLayer };
use tracing::Level;

pub mod handlers;
After listing all our imports, we export our module handlers, which we will define later.
In main(), we enable logging (tracing) and set up a pool of open connections to our PostgreSQL chatterdb database. Maintaining a pool of open connections avoids the cost of opening and closing a connection on every database operation. The password used in creating pgmanager must match the one you used when setting up Postgres earlier:
#[tokio::main]
async fn main() {
    tracing_subscriber::fmt()
        .with_level(false)
        .with_target(false)
        .compact()
        .init();

    // setup connection pool for PostgreSQL
    let pgmanager = PostgresConnectionManager::new_from_stringlike(
        "host=localhost user=chatter password=chattchatt dbname=chatterdb",
        NoTls,
    )
    .map_err(|err| { eprintln!("{:?}", err); process::exit(1) })
    .unwrap();

    let pgpool = Pool::builder()
        .build(pgmanager)
        .await
        .map_err(|err| { eprintln!("{:?}", err); process::exit(1) })
        .unwrap();
Continuing inside the main() function, we next create a Router struct to hold the URL routing information needed by axum_server. We define routes to serve Chatter’s first two APIs: HTTP GET requests with URL endpoint getchatts/ are routed to the getchatts() function and HTTP POST requests with endpoint postchatt/ are routed to the postchatt() function. With each route, we implicit specify which HTTP method is allowed for that URL endpoint by providing handler only with the get(), post(), or other MethodRouter. The database connection pool, pgpool, is passed to all the URL handlers as Router’s State:
    let router = Router::new()
        .route("/getchatts/", get(handlers::getchatts))
        .route("/postchatt/", post(handlers::postchatt))
        .layer(
            // must be after all handlers to be traced
            TraceLayer::new_for_http()
                .make_span_with(DefaultMakeSpan::new().level(Level::INFO))
                .on_failure(DefaultOnFailure::new().level(Level::INFO)),
        )
        .with_state(pgpool); // must always be last line in Router set up
The functions getchatts() and postchatt() will be implemented in handlers.rs later.
For now, staying in main.rs, in our main() function, we set up the axum_server:
- assign it the
chatterdcertificate and key we created earlier, - bind it to the wildcard IP address (
0.0.0.0, equivalent ofany) and the default HTTPS port (443), and - launch it (
serve()) with therouterstruct instance above:
    // certificate and private key used with HTTPS
    let certkey = RustlsConfig::from_pem_file(
        "/home/ubuntu/441/chatterd.crt",
        "/home/ubuntu/441/chatterd.key",
    )
    .await
    .map_err(|err| { eprintln!("{:?}", err); process::exit(1) })
    .unwrap();

    // bind HTTPS server to wildcard IP address and default port number:
    let addr = SocketAddr::from(([0, 0, 0, 0], 443));
    tracing::info!("chatterd on https://{}", addr);
    // run the HTTPS server
    axum_server::bind_rustls(addr, certkey)
        .serve(router.into_make_service_with_connect_info::<SocketAddr>())
        .await
        .map_err(|err| { eprintln!("{:?}", err); process::exit(1) })
        .unwrap();
}
handlers module
We implement the URL path API handlers module in the handlers.rs:
server$ vi src/handlers.rs
Start the file with the following use imports:
#![allow(non_snake_case)]
use axum::{
    extract::{ ConnectInfo, Json, State },
    http::StatusCode,
};
use axum_extra::extract::Host;
use bb8::Pool;
use bb8_postgres::PostgresConnectionManager;
use chrono::{ DateTime, Local };
use serde::{ Deserialize, Serialize };
use serde_json::{ json, Value };
use std::{ net::SocketAddr };
use tokio_postgres::NoTls;
use uuid::Uuid;

type PGPool = Pool<PostgresConnectionManager<NoTls>>;
The type alias PGPool will be used as a short hand in the following.
We define a Chatt struct to help postchatt() deserialize JSON received from clients:
#[derive(Debug, Serialize, Deserialize)]
pub struct Chatt {
    username: String,
    message: String,
    id: Option<String>,
    timestamp: Option<DateTime<Local>>,
}
We add a number of logging functions to print to console results of handling each HTTP request and, in case of error, return a tuple of HTTP status code and error message:
fn logOk(clientIP: SocketAddr) {
    tracing::info!("{:?} | {:?} |", StatusCode::OK, clientIP);
}

fn logServerErr(clientIP: SocketAddr, errmsg: String) -> (StatusCode, String) {
    tracing::info!("{:?} | {:?} |", StatusCode::INTERNAL_SERVER_ERROR, clientIP);
    (StatusCode::INTERNAL_SERVER_ERROR, errmsg)
}

fn logClientErr(clientIP: SocketAddr, errcode: StatusCode, errmsg: String) -> (StatusCode, String) {
    tracing::info!("{:?} | {:?} |", errcode, clientIP);
    (errcode, errmsg)
}
The handler getchatts() uses an open connection from the connection pool to query the database for stored chatts.
pub async fn getchatts(
    State(pgpool): State<PGPool>,
    ConnectInfo(clientIP): ConnectInfo<SocketAddr>,
) -> Result<Json<Value>, (StatusCode, String)> {

    let chatterDB = pgpool
        .get()
        .await
        .map_err(|err| logServerErr(clientIP, err.to_string()))?;

    let mut chattArr: Vec<Vec<Option<String>>> = Vec::new();

    for row in chatterDB
        .query(
            "SELECT username, message, id, time FROM chatts ORDER BY time DESC",
            &[],
        )
        .await
        .map_err(|err| logServerErr(clientIP, err.to_string()))?
    {
        chattArr.push(vec![
            row.get(0),
            row.get(1),
            Some(row.get::<usize, Uuid>(2).to_string()),
            Some(row.get::<usize, DateTime<Local>>(3).to_string()),
        ]);
    }

    logOk(clientIP);
    Ok(Json(json!(chattArr)))
}
Similarly, postchatt() receives a posted chatt in the expected JSON format, has it deserialized into the Chatt struct, and inserts it into the database, using a connection from the pool. The UUID and time stamp of each chatt are automatically generated at insertion time.
pub async fn postchatt(
    State(pgpool): State<PGPool>,
    ConnectInfo(clientIP): ConnectInfo<SocketAddr>,
    Json(chatt): Json<Chatt>,
) -> Result<Json<Value>, (StatusCode, String)> {
    let chatterDB = pgpool
        .get()
        .await
        .map_err(|err| logServerErr(clientIP, err.to_string()))?;

    chatterDB
        .execute(
            "INSERT INTO chatts (username, message, id) VALUES ($1, $2, gen_random_uuid())",
            &[&chatt.username, &chatt.message],
        )
        .await
        .map_err(|err| logClientErr(clientIP, StatusCode::NOT_ACCEPTABLE, err.to_string()))?;

    logOk(clientIP);
    Ok(Json(json!({})))
}
Build and test run
To build your server:
server$ cargo build --release
server$ ln -s target/release/chatterd chatterd
Build release version?
We would normally build for development without the --release flag, but due to the limited disk space on AWS virtual hosts, cargo build for debug version often runs out of space. The release version at least doesn’t keep debug symbols around.
Linking error with cargo build?
When running cargo build --release, if you see:
  error: linking with cc failed: exit status: 1
  note: collect2: fatal error: ld terminated with signal 9 [Killed]
below a long list of object files, try running cargo build --release again. It usually works the second time around, when it will have less remaining linking to do. If the error persisted, please talk to the teaching staff.
The first time around, it will take some time to download and build all the 3rd-party crates. Be patient.
![]()
Rust is a compiled language, like C/C++ and unlike Python, which is an interpreted language. This means you must run cargo build each and every time you made changes to your code, for the changes to show up in your executable.
To run your server:
server$ sudo ./chatterd
# Hit ^C to end the test
You can test your implementation following the instructions in the Testing Chatter APIs section.
References
- The Rust Programming Language the standard and best intro to Rust.
- axum
- axum_server
- axum_server::tls_rustls
- axum examples
-
http::StatusCode
see the list of
Associated Constantson the left menu. - axum::extract
- axum::Extension
- Serde JSON
- bb8 Pool
- Postgres with Rust
- postgres::types::FromSql
- chrono::DateTime
- http::Uri
-
Loggin in Rust - How to Get Started
-
[Adding logging and tracing to an Axum App Rust](https://carlosmv.hashnode.dev/adding-logging-and-tracing-to-an-axum-app-rust) - Tracing .. a deep dive
-
- Error Handling in Rust
Testing Chatter APIs
There are several ways to test HTTP POST. You can use a REST API cient with a graphical interface or you can use a command-line tool.
with a REST API client
To test HTTP POST graphically, you could use a REST API client such as Postman, Insomnia, or, if you use VSCode, the Thunder Client extension.
Postman
The instructions for Postman in this and subsequent labs are intended for the desktop version. If you’re proficient with the web version, you can use the web version.
First for Settings > General > Request > HTTP version choose Auto on the drop down menu. Then three items down, disable Settings > General > SSL certificate verification. We use self-signed certificate that cannot be verified with a trusted authroity.
-
Then in the main Postman screen, next to the
Overviewtab, click the+tab. You get a newUntitled Requestscreen. You should seeGETlisted underUntitled Request. -
Click on
GETto show the drop down menu and selectPOST. -
Enter
https://YOUR_SERVER_IP/postchatt/in the field next toPOST. -
Below that there’s a menu with
Bodybeing the fourth element. Click onBody. -
You should see a submenu under
Body. Click onraw. -
At the end of the submenu, click on
TEXTand select it withJSONin the drop down menu. -
You can now enter the following in the box under the submenu:
{
    "username": "Postman",
    "message": "Ring! Ring!"
}
and click the big blue
Sendbutton.If everything works as expected, the bottom pane of Postman should say to the right of its menu line,
Status: 200 OKand the pane should simply display{}. -
You can create a new request in Postman to do
GETwithhttps://YOUR_SERVER_IP/getchattsand click the big blueSendbutton. It should return something like:[ [ "Postman", "Ring! Ring!", "9249b958-6e46-44b2-8004-9bccf0e8f1c1", "2022-07-22T17:33:25.947" ] ]
Insomnia
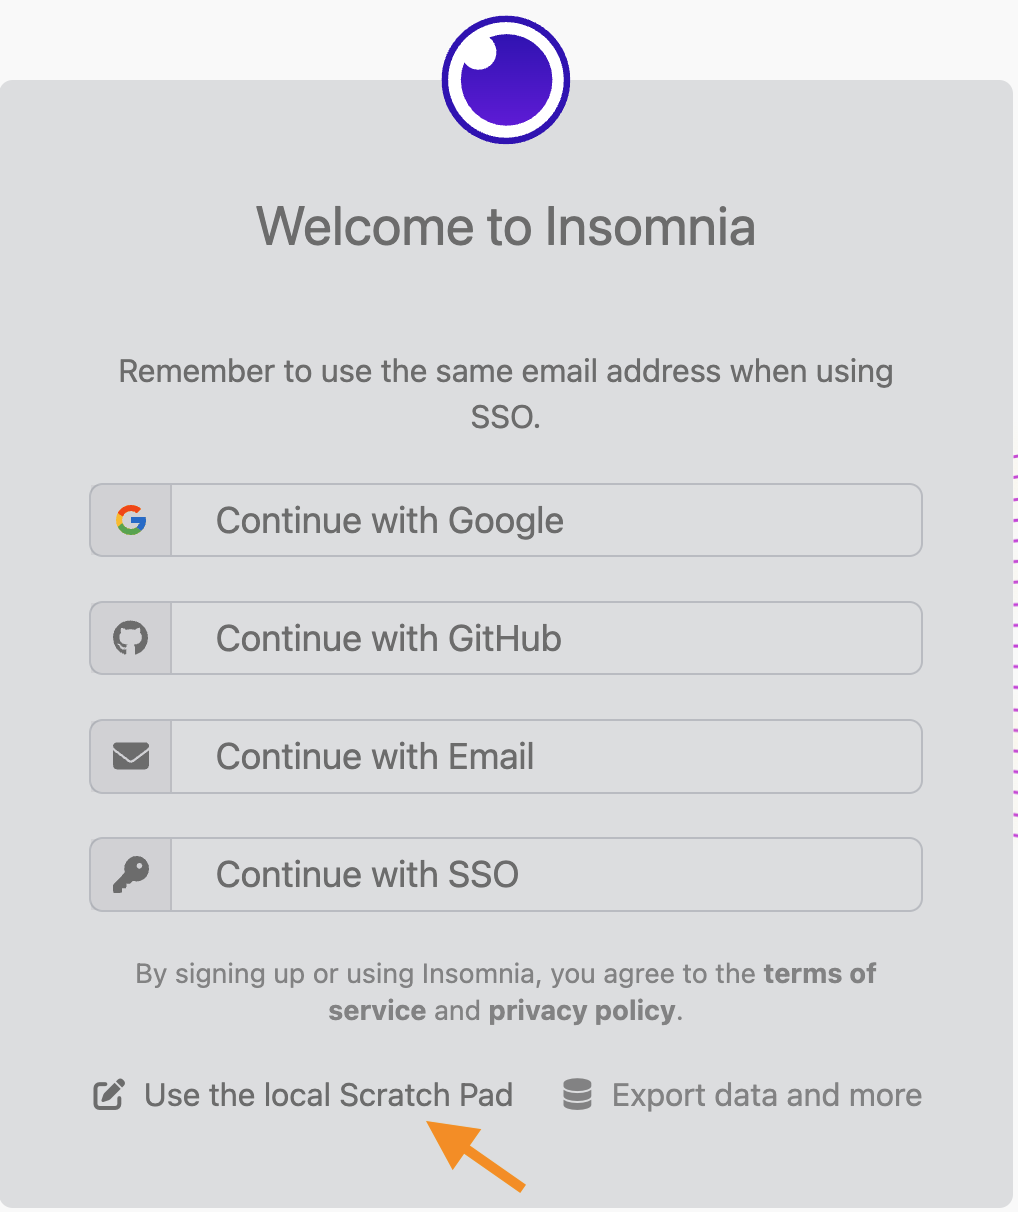
When you first launch Insomnia, it will ask you to login and setup E2EE to keep your data safe. If you don’t need to keep your data in the backend, just click Use the local Scratch Pad at the bottom of the screen (screenshot).
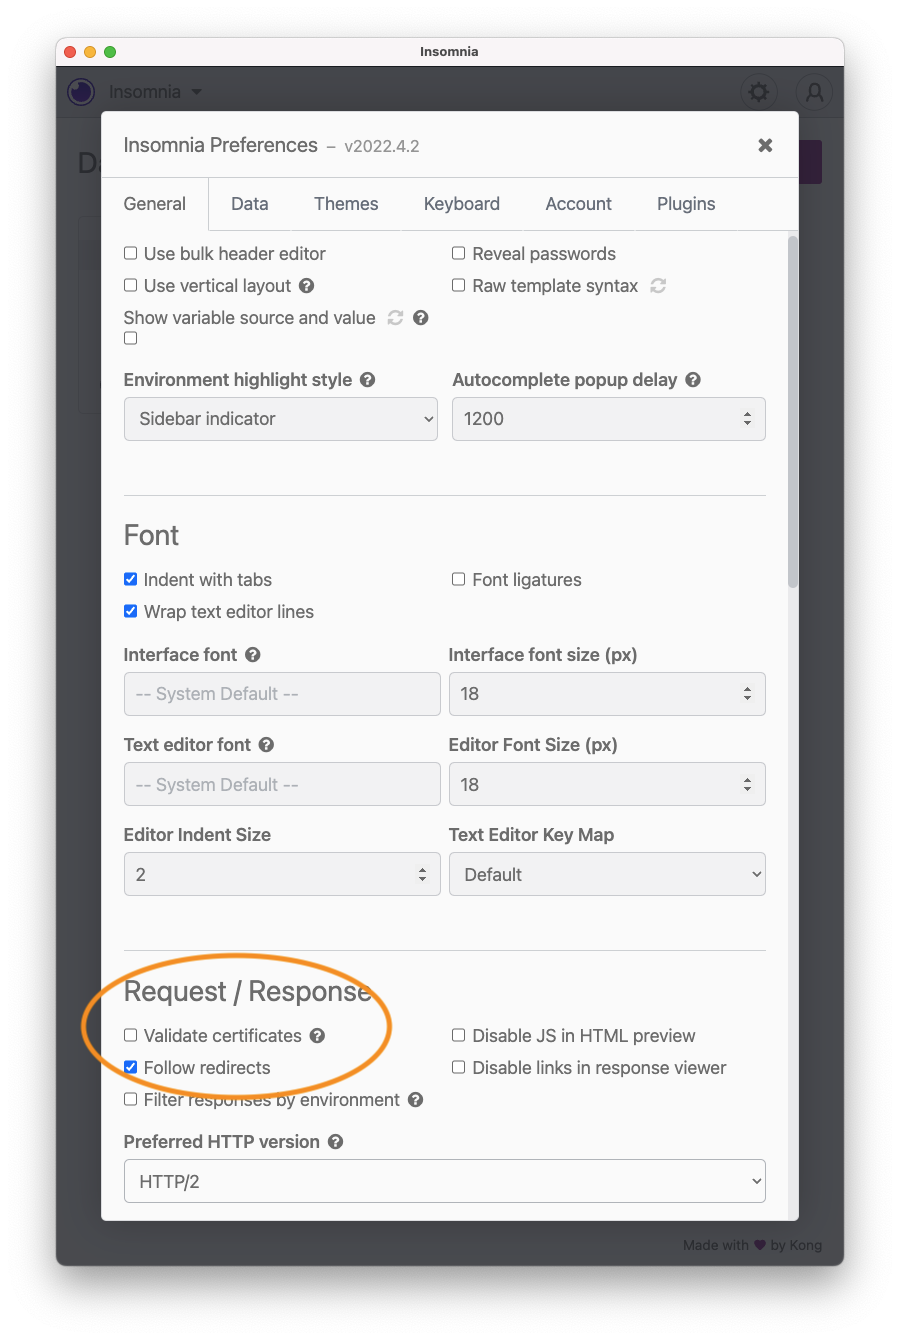
To test with Insomnia, first click the Preferences gear on the extreme lower left corner, scroll down to the Request/Response section and uncheck Validate Certificates (screenshot). Your certificate wasn’t signed by a trusted certification authority, it was self signed.
-
You should see three panes in
Insomnia, with the middle pane showing a dropdown withGETselected. -
Click on
GETto show the drop down menu and selectPOST. -
Enter
https://YOUR_SERVER_IP/postchatt/in the field next toPOST.Remember to replace
YOUR_SERVER_IPwith your server’s external IP. If you’re running a Python server from the command line, and not as root, replacehttpsin the url withhttp. -
Below that there’s a button with the title
Body. Click onBodyand of the options in the submenu that come up, selectJSON. -
You can now enter the following in the box under the submenu:
{
    "username": "Insomnia",
    "message": "Are you sleeping?"
}
and click the big purple
Sendbutton.If everything works as expected, the right pane of
Insomniashould have a header with a green button saying200 OK, and the pane itself should simply display{}underPreview. -
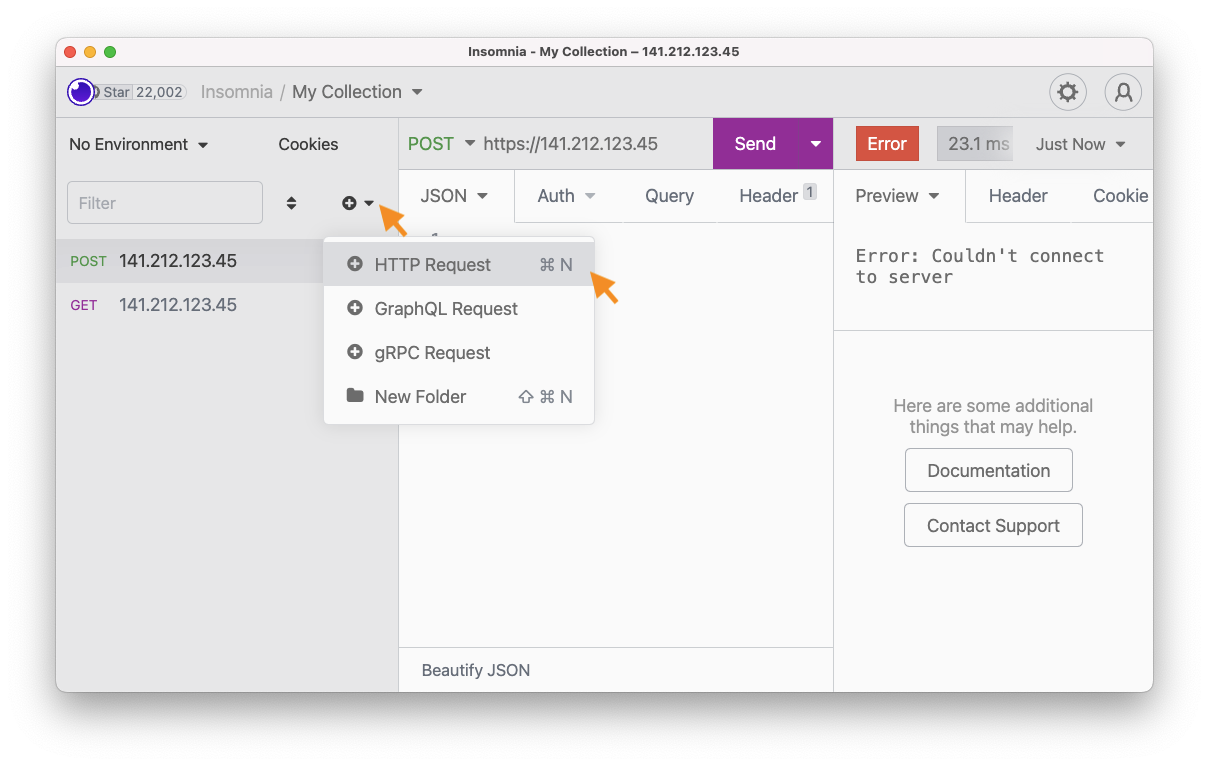
On the left pane of
Insomnia, you can create a new request by clicking on the small plus-sign icon, selectHTTP Requestin the drop down menu (screenshot). In the newly created request (middle pane), you can doGETwithhttps://YOUR_SERVER_IP/getchattsand click the big purpleSendbutton. It should return something like:[ [ "Insomnia", "Are you sleeping?", "9249b958-6e46-44b2-8004-9bccf0e8f1c1", "2024-07-22T17:33:25.947" ] ]
with a command-line tool
For all of the below, if you’re running a Python server on the command line not as root, replace https with http throughout.
curl
To test HTTP POST (or HTTP PUT or other) requests with curl:
laptop$ curl -X POST -d '{ "username": "Curly", "message": "Hello World" }' --insecure https://YOUR_SERVER_IP/postchatt/
The --insecure option tells curl not to verify your self-signed certificate.
To retrieve the posted chatt:
laptop$ curl --insecure https://YOUR_SERVER_IP/getchatts/
HTTPie
You can also use HTTPie instead of curl to test on the command line:
laptop$ echo '{ "username": "weepie", "message": "Yummy!" }' | http --verify=no POST https://YOUR_SERVER_IP/postchatt/
# output:
HTTP/1.1 200 OK
Connection: keep-alive
Content-Length: 2
Content-Type: application/json
Date: Wed, 22 Jul 2022 17:45:53 GMT
Server: nginx/1.14.0 (Ubuntu)
X-Content-Type-Options: nosniff
X-Frame-Options: DENY

{}
The --verify=no option tells HTTPie not to verify your self-signed certificate.
You can also use HTTPie to test getchatts:
laptop$ http --verify=no https://YOUR_SERVER_IP/getchatts/
# output:
HTTP/1.1 200 OK
Connection: keep-alive
Content-Length: 116
Content-Type: application/json
Date: Wed, 22 Jul 2022 17:46:32 GMT
Server: nginx/1.14.0 (Ubuntu)
X-Content-Type-Options: nosniff
X-Frame-Options: DENY

[
  [
    "weepie",
    "Yummy!",
    "d6e5f8a6-e3cc-4501-9359-517af9f64cda",
    "20242-07-22T17:45:53.177"
  ]
]
Automatic chatterd restart
The following steps apply to all variants of the web server. The only difference is in the ExecStart entry of the chatterd.service file. Go and Rust have the same entry. Python has a different entry. I will have both listed and commented out in the file. You need to comment out the line corresponding to your server.
Once you have your server tested, to run it automatically on system reboot or on failure, first create the service configuration file:
server$ sudo vi /etc/systemd/system/chatterd.service
and put the following in the file:
[Unit]
Description=EECS441 chatterd
Requires=postgresql.service
After=network.target
StartLimitIntervalSec=0

[Service]
Type=simple
Restart=on-failure
RestartSec=1
User=root
Group=www-data
WorkingDirectory=/home/ubuntu/441/chatterd

# >>>>>>>>>>>>>>>>> Go or Rust: uncomment the following line: <<<<<<<<<<<<<<<<<
#ExecStart=/home/ubuntu/441/chatterd/chatterd

# >>>>>>>>>>>>>>>>> JavaScript: uncomment the following two lines: <<<<<<<<<<<<<<<<<
#Environment=NODE_ENV=production
#ExecStart=/usr/local/bin/pm2-runtime start  -i 3 main.js
# >>> Sometimes pm2-runtime is installed in /usr/bin. Double check your path with:
# >>> server$ which pm2-runtime
# >>> and use the output in the ExecStart above.

# >>>>>>>>>>>>>>>>>>> Python: uncomment the following line: <<<<<<<<<<<<<<<<<<<
#ExecStart=/home/ubuntu/441/chatterd/.venv/bin/granian --host 0.0.0.0 --port 443 --interface asgi --ssl-certificate /home/ubuntu/441/chatterd.crt --ssl-keyfile /home/ubuntu/441/chatterd.key --access-log --respawn-failed-workers --respawn-interval 1.0 --workers 3 --workers-kill-timeout 1 main:server

[Install]
WantedBy=multi-user.target
To test the service configuration file, run:
server$ sudo systemctl daemon-reload
server$ sudo systemctl start chatterd
server$ systemctl status chatterd
# first 3 lines of output:
● chatterd.service - EECS441 chatterd
     Loaded: loaded (/etc/systemd/system/chatterd.service; disabled; vendor preset: enabled)
     Active: active (running) since Thu 2024-10-15 01:28:56 EDT; 2min 30s ago
     . . .   👆👆👆👆👆👆👆👆👆👆
The last line should say, Active: active (running).
To have the system restart automatically upon reboot, run:
server$ sudo systemctl enable chatterd
server$ systemctl status chatterd
# first 2 lines of output:
● chatterd.service - EECS441 chatterd
     Loaded: loaded (/etc/systemd/system/chatterd.service; enabled; vendor preset: enabled)
     . . .                                                 👆👆👆👆👆
The second field inside the parentheses in the second line should now say “enabled”.
![]() For each lab, leave your
For each lab, leave your chatterd running until you have received your lab grade!
To view chatterd’s console output, run:
server$ sudo systemctl status chatterd
To view continuous status updates from chatterd, run:
server$ sudo journalctl -fu chatterd
![]() TIP:
TIP: sudo systemctl status chatterd is your BEST FRIEND in debugging your server. If you get an HTTP error code 500 Internal Server Error or if you just don’t know whether your HTTP request has made it to the server, first thing you do is run sudo systemctl status chatterd on your server and study its output.
If you’re running a Python server, it also shows error messages from your Python code, including any debug printouts from your code. The command systemctl status chatterd is by far the most useful go-to tool to diagnose your back-end server problem.
Everytime you rebuild your Go or Rust server or make changes to either of your JavaScript or Python files, you need to restart chatterd:
server$ sudo systemctl restart chatterd
If you change the /etc/systemd/system/chatterd.service configuration file, run:
server$ sudo systemctl daemon-reload
before restarting your chatterd.
To turn off auto restart:
server$ sudo systemctl disable chatterd
That’s all we need to do to prepare the back end. Before you return to work on your front end, wrap up your work here by submitting your files to GitHub.
Submitting your back end
We will only grade files committed to the main branch. If you use multiple branches, please merge them all to the main branch for submission.
Navigate to your 441 folder:
server$ cd ~/441/
Run:
server$ cp /etc/systemd/system/chatterd.service chatterd/
Then run:
server$ git add chatterd
You can check git status by running:
server$ git status
You should see the newly added files.
Commit changes to the local repo:
server$ git commit -am "chatter back end"
and push your chatterd folder to the remote GitHub repo:
server$ git push
If git push failed due to changes made to the remote repo by your lab partner, you must run git pull first. Then you may have to resolve any conflicts before you can git push again.
![]() Go to the GitHub website to confirm that your back-end files have been uploaded to your GitHub repo.
Go to the GitHub website to confirm that your back-end files have been uploaded to your GitHub repo.
![]() Leave your
Leave your chatterd running until you have received your lab grade.
You can now return to complete the front end: Android | iOS.
References
Setup
- Ubuntu setup
- GCP Instructions to set up ssh access with public key pair.
chmodin WSL- Creating a Linux service with systemd
Intro
Security
- What is HTTPS
- Everything about HTTPS and SSL
- New self-signed SSL Certificate for iOS 13
- Self-Signed SSL Certificate for Nginx
- Connecting mobile apps (iOS and Android) to backends for development with SSL
- How to do the CHMOD 400 Equivalent Command on Windows
| Prepared for EECS 441 by Tiberiu Vilcu, Wendan Jiang, Alexander Wu, Benjamin Brengman, Ollie Elmgren, Luke Wassink, Mark Wassink, Nowrin Mohamed, Chenglin Li, Yibo Pi, and Sugih Jamin | Last updated June 13th, 2025 |