Signin SwiftUI
Cover Page
DUE Wed, 02/26, 2 pm
We have three goals in this lab: first, to introduce you to concurrent programming using asynchronous functions (async/await); second, to add Google Sign-in; and third, to access Keychain with biometric authentication.
Expected behavior
Post chatts with Google Sign-in:
DISCLAIMER: the video demo shows you one aspect of the app’s behavior. It is not a substitute for the spec. If there are any discrepancies between the demo and the spec, please follow the spec. The spec is the single source of truth. If the spec is ambiguous, please consult the teaching staff for clarification.
Preparing your GitHub repo
On your laptop, navigate to YOUR_LABSFOLDER/
- Unzip your
chatter.zipthat you created as part of the audio lab - Rename the above unzipped
chatterfolder signinIf there’s a
DerivedDatafolder in yoursignin/swiftUIChatter/, delete it - Push your local
YOUR_LABSFOLDER/repo to GitHub and make sure there’re no git issues<summary>git push</summary>- Open GitHub Desktop and click on
Current Repositoryon the top left of the interface - Click on your
441GitHub repo - Add Summary to your changes and click
Commit to master(orCommit to main) - Since you have pushed your back end code, you’ll have to click
Pull Originto synch up the repo on your laptop - Finally click on
Push Originto push changes to GitHub
- Open GitHub Desktop and click on
![]() Go to the GitHub website to confirm that your folders follow this structure outline:
Go to the GitHub website to confirm that your folders follow this structure outline:
  441
    |-- # files and folders from other labs . . .
    |-- signin
        |-- swiftUIChatter
            |-- swiftUIChatter.xcodeproj
            |-- swiftUIChatter
If the folders in your GitHub repo does not have the above structure, we will not be able to grade your labs and you will get a ZERO.
Part I: Converting ChattStore to use Asynchronous Functions
With the introduction of asynchronous functions in Swift 5.5, Apple retrofitted the URLSession with an asynchronous API, URLSession.shared.data(for:). Since asynchronous functions can only be called from another asynchronous function or a top-level Task, we must convert our getChatts() and postChatt(_:) methods of ChattStore to be asynchronous.
In the Chatter lab we used a serial queue to synchronize accesses to the isRetrieving variable that limits on-going backend retrieval to one per frontend. In this lab, we replace the use of the serial queue with the asynchronous Mutex facility of Swift’s Synchronization package. First select File > Add Package Dependencies...; in the search field at the upper right corner type, “swift-async-algorithms”, select the resulting swift-async-algorithms package and click Add Package. Once the package has been added, to the top of your ChattStore file add:
import Synchronization
On iOS,
Mutexactually usesOSAllocatedUnfairLockinternally.
Since Synchronization is a Swift Concurrency package, we need to update ChattStore to adopt the @unchecked Sendable protocol to keep the compiler quiet about our use of synchronized-access mutable properties in ChattStore:
final class ChattStore: @unchecked Sendable {
If you cut and paste, be sure the spaces between
:and@uncheckedandSendableare normal spaces in Xcode.
Then in your ChattStore class definition, replace the property synchronized with:
private let mutex = Mutex(false)
Instead of a serial dispatch queue, we use the Mutex facility of the Synchronization package to ensure mutually exclusive accesses to isRetrieving below.
Next we make getChatts() an asynchronous function, replace the use of synchronized with
mutex, and call the asynchronous URLSession.shared.data(for:) instead of the synchronous URLSession.shared.dataTask(with:completionHandler:):
    func getChatts() async {
        guard let apiUrl = URL(string: "\(serverUrl)getchatts/") else {
            print("getChatts: Bad URL")
            return
        }

        // only one outstanding retrieval
        mutex.withLock { _ in
            guard !self.isRetrieving else {
                return
            }
            self.isRetrieving = true
        }
        defer { // allow subsequent retrieval
            mutex.withLock { _ in
                self.isRetrieving = false
            }
        }

        var request = URLRequest(url: apiUrl)
        request.setValue("application/json; charset=utf-8", forHTTPHeaderField: "Accept") // expect response in JSON
        request.httpMethod = "GET"

        do {
            let (data, response) = try await URLSession.shared.data(for: request)

            if let httpStatus = response as? HTTPURLResponse, httpStatus.statusCode != 200 {
                print("getChatts: HTTP STATUS: \(httpStatus.statusCode)")
                return
            }

            guard let chattsReceived = try? JSONSerialization.jsonObject(with: data) as? [[String?]] else {
                print("getChatts: failed JSON deserialization")
                return
            }

            var idx = 0
            var _chatts = [Chatt]()
            for chattEntry in chattsReceived {
                if chattEntry.count == self.nFields {
                    _chatts.append(Chatt(username: chattEntry[0],
                                             message: chattEntry[1],
                                             id: UUID(uuidString: chattEntry[2] ?? ""),
                                             timestamp: chattEntry[3],
                                             altRow: idx % 2 == 0))
                    idx += 1
                } else {
                    print("getChatts: Received unexpected number of fields: \(chattEntry.count) instead of \(self.nFields).")
                }
            }
            self.chatts = _chatts
        } catch {
            print("getChatts: NETWORKING ERROR")
        }
    }
For postChatt(_:), we append async to its signature and replace the call to URLSession.shared.dataTask(with: request) { /* ... */ }.resume() with the asynchronous URLSession.shared.data(for:). Upon completion, postChatt(_:) returns the optional Data? from URLSession.shared.data(for:) to its caller. Replace your postChatt(_:) with:
    func postChatt(_ chatt: Chatt) async -> Data? {
        let jsonObj = ["username": chatt.username,
                       "message": chatt.message]
        guard let jsonData = try? JSONSerialization.data(withJSONObject: jsonObj) else {
            print("postChatt: jsonData serialization error")
            return nil
        }

        guard let apiUrl = URL(string: "\(serverUrl)postchatt/") else {
            print("postChatt: Bad URL")
            return nil
        }

        var request = URLRequest(url: apiUrl)
        request.setValue("application/json; charset=utf-8", forHTTPHeaderField: "Content-Type")
        request.httpMethod = "POST"
        request.httpBody = jsonData

        do {
            let (data, response) = try await URLSession.shared.data(for: request)
            if let http = response as? HTTPURLResponse, http.statusCode != 200 {
                print("postChatt: \(HTTPURLResponse.localizedString(forStatusCode: http.statusCode))")
            } else {
                return data
            }
        } catch {
            print("postChatt: NETWORKING ERROR")
        }
        return nil
    }
Calling getChatts() and postChatt(_:)
In MainView, search for store.getChatts() inside .refreshable { } and add the await keyword:
await store.getChatts()
The action given to the .refreshable() block is run as a separate Task by default.
TODO 1/3: Calling asynchronous getChatts() and postChatt()
In previous labs, we call getChatts() in swiftUIChatterApp struct with:
    init() {
        ChattStore.shared.getChatts()
    }
so that we can grab chatts from the back end before MainView launches. Now that getChatts() is an asynchronous function, you need to call it from inside another asynchronous function or a Task {} block. Modify the above call to getChatts() to an await call and put it in a Task {} block.
Next we convert the call to postChatt(_:) in SubmitButton() in PostView. In the action closure of your Button(), replace:
                ChattStore.shared.postChatt(Chatt(username: username, message: message)) {
                    ChattStore.shared.getChatts()
                }
with asynchronous calls to both postChatt(_:) and getChatts(). As in the previous case, put the asynchronous calls in a Task {} block. Recall that postChatt(_:) returns an optional Data? type. In your modified code, call getChatts() only if the return value from postChatt(_:) is not nil. We are not doing anything with the returned value, ignore it as long as it is not nil. Be sure to retain the subsequent isPresented.toggle() line.
We’re done with the conversion of Chatter to using asynchronous functions!
Part II: Chatter with Google Sign-in and Biometric Authentication
We now add authentication to the Chatter app. We will be using OAuth 2.0 for authentication, in the guise of OpenID Connect, as implemented by Google Identity Platform. In other words, we’ll add Google Sign-in to Chatter.
Google Sign-in is not the only OAuth2.0-based identity authentication provider.
Apple, Facebook, Twitter, WeChat, among others, all use OAuth 2.0. We’ve chosen Google Sign-in for illustrative purposes as it seems to be the most popular and accessible. Following popular sites such as stackoverflow and reddit, we’ve designed Chatter to require authentication only for posting chatts, not for viewing them.
In addition to the two APIs getchatts and postchatt, we will be adding a new API, adduser, for user sign in. We will also modify the postchatt API, which must now carry an authenticated credential to post a chatt. Due to this change, we will rename the postchatt API to postauth. Unlike in previous labs, we will start with modifications to the front end before we make changes to the back end because we need the Google ID Token the front end will retrieve from Google Sign-In to test the back end. We will also start with learning about Google Sign-in before exploring changes to the API.
You’ll need access to a physical device with biometric sensor (fingerprint or facial recognition) to complete this lab.
DISCLAIMER: this lab is not an exercise in designing a secure authentication protocol. It is only meant to familiarize you with some of the authentication tools available in the mobile development environment. The protocol implemented here has not been vetted by a security expert.
Integrating Google Sign-in
The following instructions are largely based on Get started with Google Sign-In for iOS and macOS and Integrating Google Sign-In into your iOS and macOS app, simplified and elaborated upon. See also Google Sign-in for iOS.
Install the SDK
We will be using Apple’s Swift Package Manager (SPM) to install the Google SignIn SDK for iOS:
- In Xcode, select
File > Add Packages Dependencies.... - In the search box at the upper left of the
Apple Swift Packageswindow, enter the URL:https://github.com/google/GoogleSignIn-iOS.gitand - click the
Add Packagebutton (screenshot). - On the
Choose Package Products for GoogleSignIn-iOSpanel, check to add both theGoogleSignInand theGoogleSignInSwiftlibraries.
You’ve added the Google SignIn SDK to your project!
Creating an OAuth client ID
Follow this link: create an OAuth client ID. (You will need a gmail address, not a umich email address, to set up an OAuth client ID.)
At the linked page,
- Click the big blue
Create an OAuth client IDbutton. - Enter your project name, in this case we will use
swiftUIChatter. - Click
Nextand enter your project name yet again. - The next step is “Where are you calling from?”. Choose
iOS. - This will prompt for a
Bundle ID. For this we need to navigate to the Xcode project and get theBundle Identifierunder the Project Information (first top icon on the Xcode left pane). Click onTARGETS > swiftUIChatter, on the tab menu, click onSigning & Capabilities. Copy and paste the bundle identifier (screenshot). The Bundle ID of your Xcode project must match EXACTLY the Bundle ID used for the OAuth client. - Click
Create. - Click
Download Client Configuration. This will download acredentials.plistfile to your Mac (most likely into yourDownloadsfolder).
Next we add your CLIENT_ID and a URL Scheme to Xcode, as required by Google Sign-in:
- Click on the downloaded
credentials.plistfile. - Copy the value of
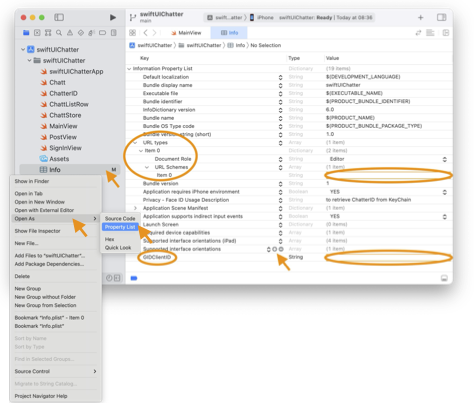
CLIENT_IDto your clipboard. - In Xcode select the top
swiftUIChattertop open up the project properties, make sureswiftUIChatteris selected underTARGETS, then navigate toInfoin the navigation bar (screenshot). - Click the
+button on as you hover over the last entry of theInfoor right click and selectAdd Row. - In the new row, under
KeyenterGIDClientIDand paste yourCLIENT_IDfrom the clipboard to the correspondingValuefield. - Go back to your
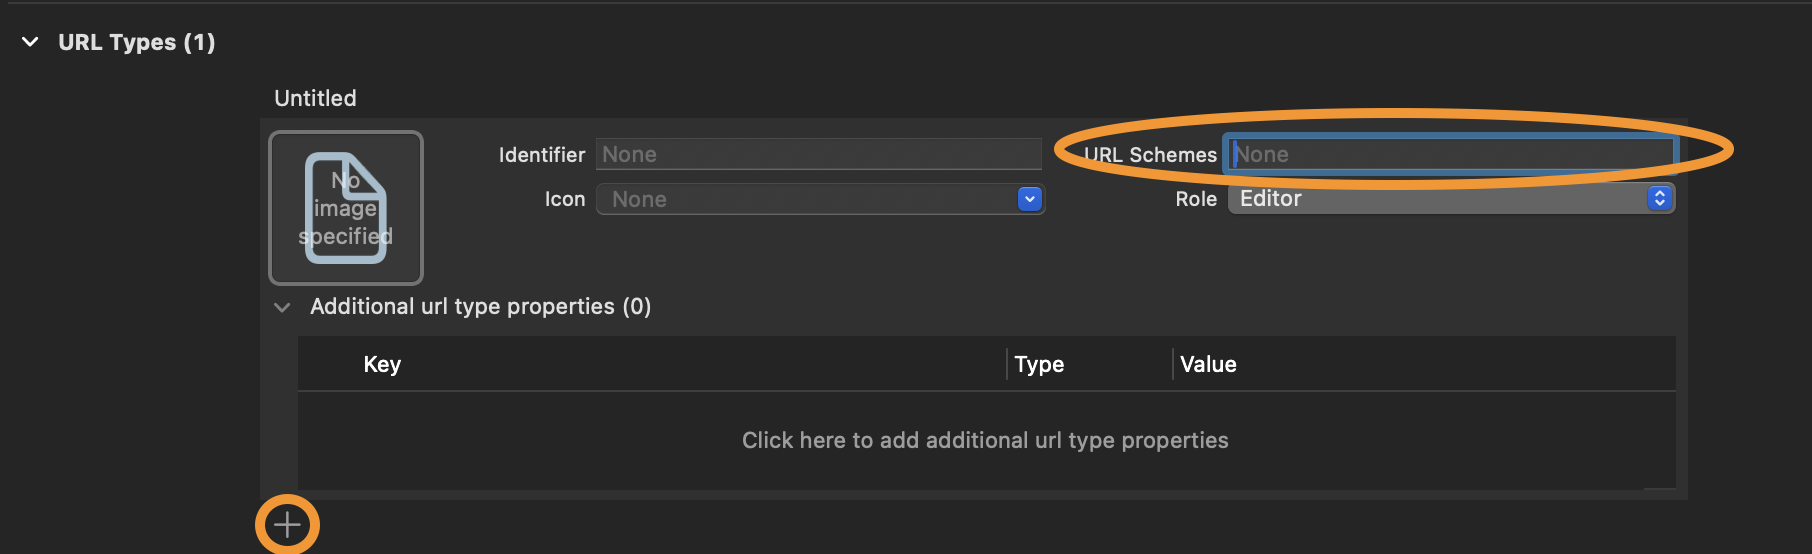
credentials.plistfile and copy the value ofREVERSED_CLIENT_IDto your clipboard. - Scroll down and expand
URL Types, then click the+button in theURL Typessection and paste the content of your clipboard into theURL Schemesfield, leaving all of the other fields empty/unchanged (screenshot). - On Xcode navigator/left pane, right-click the
Infoentry (usually located in the lower half of the list of file names) and selectOpen As > Property Listand verify that you’ve correctly set your info properties:GIDClientIDshould hold yourCLIENT_IDandURL Types > Item 0 > URL Schemes > Item 0should have yourREVERSED_CLIENT_ID(screenshot).
And that’s all you need to obtain a Google OAuth client ID.
Add Google Sign-in to Chatter
Recall that we design Chatter to allow users to view chatts without requiring authentication. We will authenticate users only when they post a chatt.
Here’s the authentication flow:
- In
MainView, when the user launchesPostViewfor the first time after launching the app, we prompt the user for biometric check to load previous session’schatterIDfrom iOSKeychain. - In
PostView, we check whether the user has a validchatterID. If so, they can go ahead and post achatt. - Otherwise, we launch
SigninView. - In
SigninView, we first check if the user is signed in. If so, we check the validity of their ID Token, which also automatically refreshes it if it’s no longer valid. - If the user is not signed in, we launch Google Sign-In and let the user obtain a new ID Token.
- Once the user has a valid ID Token, we contact the
Chatterback end with the ID Token and Client ID to obtain achatterID. - Upon receiving a new
chatterIDfrom the back end, we perform another biometric check to update thechatterIDin iOSKeychain. - We use
chatterIDduring its lifetime to postchatts without further checking the user’s sign-in status.
Signing out is not logging out
WARNING: With Google Sign-In, signing out only signs the user out of the app, it does not log the user out of Google on the device. Subsequently, all the user has to do to sign back in on the app is to select their account. Google will not challenge them for password again. Apparently, this is OAuth 2.0 standard-compliant behavior, including, for example for Twitter sign-in. The user is thus left vulnerable on public computers (see github and stackoverflow postings on this topic). Further, if the app is killed or force closed from outside the app, the user will not be signed out. The only way to sign a user out from the device is through the user’s Manage your Google Account button on a browser. Navigate to Security > Your devices. Click on the three vertical dots on the upper right of your device’s card on the web page and choose Sign out.
As you can see from steps 1 and 7 above, we use biometric check only to control access to the stored chatterID across invocations of the app. Our us of biometric check does not make the sign-in process itself any more secure. If you don’t have chatterID stored from a previous run of the app, you can still sign in with Google and post chatt normally. If your previous Google Sign-in has not expired, you can also still post chatt without being prompted to sign in again, as per standard Google Sign-in behavior.
Coming up: we will initially implement chatterID without storing it in iOS’s Keychain. After we have a working chatterID, we will return to steps 1 and 7 and implement Keychain storage and biometric checks.
ChatterID
Create a new Swift source file called ChatterID. We store the chatterID obtained from the Chatter back end in a singleton called ChatterID:
import Foundation

final class ChatterID: @unchecked Sendable {
    static let shared = ChatterID() // create one instance of the class to be shared
    private init(){}                // and make the constructor private so no other
                                    // instances can be created

    var expiration = Date(timeIntervalSince1970: 0.0)
    private var _id: String?
    var id: String? {
        get { Date() >= expiration ? nil : _id }
        set(newValue) { _id = newValue }
    }
}
ChatterID.shared.id is nil when either the user hasn’t obtained a chatterID from the back end or the ID has expired.
Please review the lecture slides for the definition of a singleton if you’re not sure what it means.
PostView
![]() To help with testing, you may want to work on next section,
To help with testing, you may want to work on next section, SigninView, first or at least have a mockup SigninView to test with PostView.
TODO 2/3: launch SigninView from PostView
When PostView appears, check whether there is already a valid ChatterID. If not, navigate to SigninView to obtain one. Recall that a SwiftUI View must be referentially transparent (can be called several times with the same outcome) and side-effect free. If the app doesn’t have a valid ChatterID when the View first appears, it should navigate to SigninView automatically (a side effect), but it should not navigate to SigninView again on re-rendering.
Take a look at how AudioView in the previous lab automatically plays an audio clip and how PostView presents AudioView. Together these two should give you an idea of how to automatically launch SiginView from PostView
Optional: if you’d like to allow user to cancel signing in by dismissing the SigninView, you can use .sheet(isPresented:), instead of .fullScreenCover(isPresented:), to present it modally when navigating to SigninView.
For the sake of defensive coding, if the user tries to post a chatt without a valid ChatterID, we want to show an alert and not post the chatt. If the posting fails, we also want to show an alert. Add the following property to your PostView struct:
@State private var showAlert = false
and the following enum for the AlertType:
    enum AlertType {
        case sendError, signinError
    }
Inside your SubmitButton(), add the following local variable:
@State var alertType = AlertType.sendError
TODO 3/3: posting chatt
When SubmitButton is tapped, check that there is a valid ChatterID before launching the asynchronous task to post the chatt. In the action closure of Button(), if there is no valid ChatterID, set the alertType to .signinError and set showAlert to true. If there is a valid ChatterID, call postChatt(_:) asynchronously as before, but this time, if postChatt(_:) returns nil, show an alert but don’t toggle isPresented. Only if postChatt(_:) returns non-nil, call getChatts() asynchronously and then toggle isPresented. So unlike in the original code, isPresented is toggled only if postChatt(_:) returns non-nil.
Finally, add the following modifier to Button(), inside SubmitButton():
        .alert(isPresented: $showAlert) {
            return Alert(title: Text(alertType == .sendError ? "Send failed" : "Signin failed"), message: Text(alertType == .sendError ? "Chatt not posted" : "Please try again"), dismissButton: .cancel{
                isPresented.toggle()})
        }
That’s all the changes we need to make to PostView().
SigninView
We encapsulate the Google Sign-in functionalities within its own View. Create a new Swift file, call it SigninView and declare the following View in it.
import SwiftUI
import GoogleSignIn
import GoogleSignInSwift

struct SigninView: View {
    @Binding var isPresented: Bool
    private let signinClient = GIDSignIn.sharedInstance
}
We now call GoogleSignInButton() to create a sign-in button and initiate the sign-in process. To sign in the user, Google Sign-In will present a view for user to enter their account name, another for their password, and perhaps a “Checking Info” view. To enable the presentation of these views, Google Sign-In still relies on the legacy UIKit and requires a ViewController to present these views. This being an iPhone SwiftUI app, we have only one ViewController: the rootViewController of the application’s only scene.
In the following code, we first obtain our only ViewController and pass it to Google’s sign-in flow. Put the following code in your SigninView struct:
    var body: some View {
        if let rootVC = (UIApplication.shared.connectedScenes.first as? UIWindowScene)?.keyWindow?.rootViewController {
            GoogleSignInButton {
                signinClient.signIn(withPresenting: rootVC){ result, error in
                    if error != nil {
                        print("signIn: \(error!.localizedDescription)")
                    } else {
                        backendSignin(result?.user.idToken?.tokenString)
                    }
                }
            }
            .frame(width:100, height:50, alignment: Alignment.center)
If the user is not signed in, GoogleSignInButton presents them the Google Sign-In button. When the user taps the button, we start the sign-in process. The Google Sign-in library is already asynchronous. The frame() modifier sizes the sign-in button and centers it.
To reduce the frequency we ask the user to sign in, we perform two checks prior to showing the sign-in button:
- if the user is already signed in (
signinClient.currentUseris notnil), we “silently” check the freshness of the user’s ID Token, and obtain a new one if necessary, without asking the user to sign in again, - if the user is not currently signed in, but their previous sign-in has not expired at Google, we simply restore the previous sign-in.
We perform the above two checks when the sign-in button is displayed by putting them in the .onAppear modifier of GoogleSignInButton so that these side-effect functions are not called upon every re-rendering. Add the following code right after the .frame line above:
            .onAppear {
                if let user = signinClient.currentUser {
                    backendSignin(user.idToken?.tokenString)
                } else {
                    signinClient.restorePreviousSignIn { user, error in
                        guard let _ = error else {
                            backendSignin(user?.idToken?.tokenString)
                            return
                        } // else do nothing, let body show GoogleSignInButton
                    }
                }
            }
        }
    }
In all three cases: whether we’re refreshing the token of an already signed in user, or we’re restoring the user’s previous sign in, or the user is newly signed in, we always call backendSignin(_:) to complete the process. Add backendSignin(_:) as a function of the SigninView struct, outside its body property:
    func backendSignin(_ token: String?) {
        Task {
            if let _ = await ChattStore.shared.addUser(token) {
                // will save() chatterID later
            }
            isPresented.toggle()
        }
    }
The function backendSignin() calls ChattStore.addUser(_:) to asynchronously add the user to the back end and obtain a chatterID. Later when we save the chatterID to Keychain, we will add a call to the save() method here. Upon completion of addUser(_:) we dismiss SigninView by toggling isPresented.
That’s all the code we need for the SigninView() View. Now we work on addUser(_:).
Add user to Chatter back-end service
adduser API
We add a new API to the Chatter backend. When the user signs in and submits their ID Token from Google, adduser will receive the token, make sure it hasn’t expired, generate a new chatterID, and return it, along with its lifetime, to the user.
API:
/adduser/
<- clientID, idToken
-> chatterID, lifetime 200 OK
The data format adduser expects is:
{
    "clientID": "YOUR_APP'S_CLIENT_ID",
    "idToken": "YOUR_GOOGLE_ID_TOKEN"
}
addUser(_:)
The method addUser(_:) creates a JSON object containing (1) the app’s OAuth 2.0 Client ID you’ve previously created and (2) the passed in idToken. It then asynchronously sends the JSON object to Chatter’s backend with a POST request.
The back end server will verify the presented idToken with Google. If verification is successful, the back end returns a chatterID (a String). Subsequently, the back end will identify the user by this chatterID, for the lifetime of the chatterID. If the token cannot be validated for whatever reason, addUser() returns nil.
Add the following addUser(_:) function to your ChattStore class. Replace YOUR_APP'S_CLIENT_ID below with your app’s OAuth 2.0 Client ID, retain the quotation marks.
You can retrieve your
clientIDfrom thecredentials.plistfile you downloaded from Google earlier.
    func addUser(_ idToken: String?) async -> String? {
        guard let idToken else {
            return nil
        }

        let jsonObj = ["clientID": "YOUR_APP'S_CLIENT_ID",
                    "idToken" : idToken]

        guard let jsonData = try? JSONSerialization.data(withJSONObject: jsonObj) else {
            print("addUser: jsonData serialization error")
            return nil
        }

        guard let apiUrl = URL(string: "\(serverUrl)adduser/") else {
            print("addUser: Bad URL")
            return nil
        }

        var request = URLRequest(url: apiUrl)
        request.setValue("application/json; charset=utf-8", forHTTPHeaderField: "Content-Type")
        request.setValue("application/json; charset=utf-8", forHTTPHeaderField: "Accept") // expect response in JSON
        request.httpMethod = "POST"
        request.httpBody = jsonData

        do {
            let (data, response) = try await URLSession.shared.data(for: request)

            if let httpStatus = response as? HTTPURLResponse, httpStatus.statusCode != 200 {
                print("addUser: HTTP STATUS: \(httpStatus.statusCode)")
                return nil
            }

            guard let jsonObj = try? JSONSerialization.jsonObject(with: data) as? [String:Any] else {
                print("addUser: failed JSON deserialization")
                return nil
            }

            ChatterID.shared.id = jsonObj["chatterID"] as? String
            ChatterID.shared.expiration = Date()+(jsonObj["lifetime"] as! TimeInterval)

            return ChatterID.shared.id
        } catch {
            print("addUser: NETWORKING ERROR")
            return nil
        }
    }
Upon receiving a chatterID from the Chatter back-end server, addUser(_:) stores it in the ChatterID singleton along with a computed expiration time. If we did not retrieve a valid chatterID from the back end, we simply print out an error message and return nil, otherwise we return the chatterID.
Note that addUser(_:) is an asynchronous function. When an asynchronous function returns, all its work is done.
postauth API
The postauth API, replacing the postchatt API, requires that chatterID be sent along with each chatt. It first verifies that the chatterID exists in the database and has not expired. That being the case, the new chatt, along with the user’s username (retrieved from the database) will be added to the chatts database. Otherwise, HTTP error 401 will be returned to the front end.
API for postauth:
/postauth/
<- chatterID, message
-> {} 200 OK
The data format postauth expects is:
{
    "chatterID": "YOUR_CHATTER_ID",
    "message": "Chitt chatts"
}
Modified postChatt(_:)
We need to make two changes to postChatt(_:) in ChattStore:
- change
postchattin theapiUrldeclaration topostauth, and - replace:
"username": chatt.username,with:
"chatterID": ChatterID.shared.id,
If the Chatter back end does not recognize the chatterID as valid, it will return an error.
Completing the back end
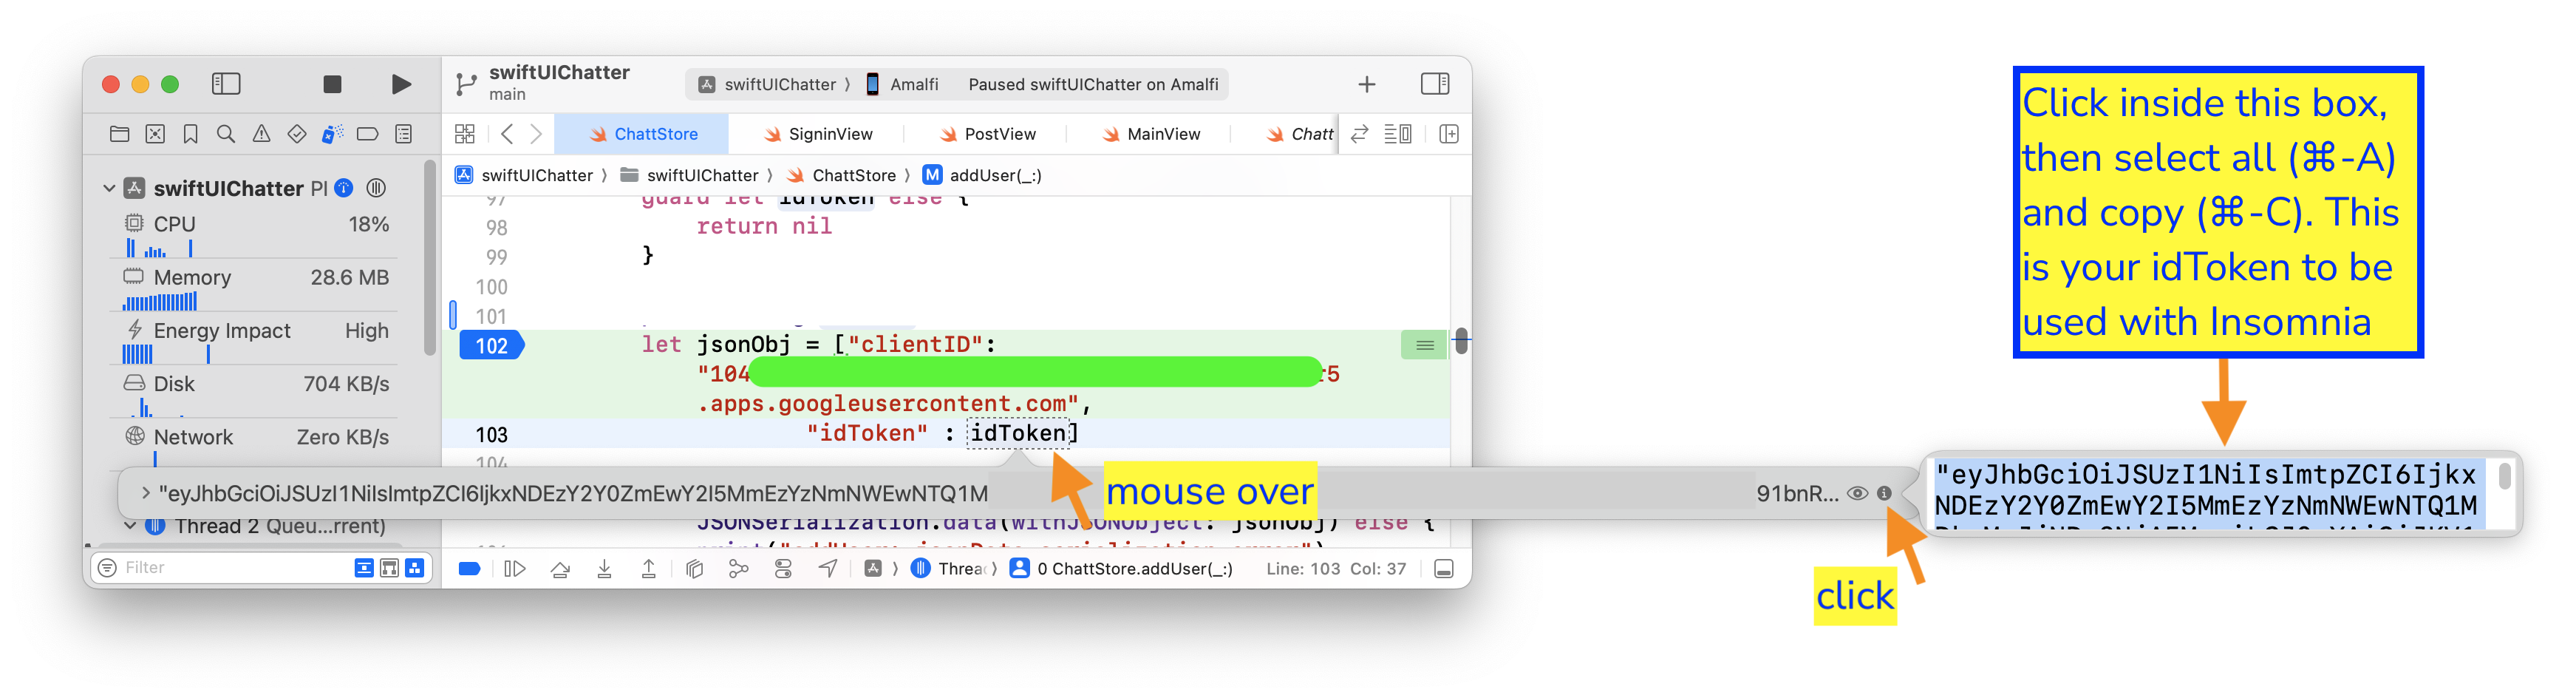
At this point, if you haven’t completed your back end, we suggest you switch gear and work on your back end. You’ll need the ID Token obtained from Google Sign-In to test your back end, which is why we had you work on the front end up to this point first.
The ID Token is the first argument passed to addUser(_:) above. Put a break point in addUser(_:) and run your front end to this break point. In Xcode, mouse over the idToken variable inside the addUser(_:) function, then click on the i icon on the extreme right of the box that pops up. The idToken will be displayed as plain text on yet another pop up box. Click in the box, then select all and copy (⌘-A, ⌘-C). This is your idToken to be used when testing your backend.
Now that you can obtain an ID Token from Google, you can switch to work on the back end before completing the rest of your front end.
With your back end completed, you should now be able to post chatts to your Google Sign-In integrated Chatter back end. Congratulations!
Keychain with biometric access control
Returning to the front end: we store the chatterID obtained from the back end in iOS Keychain, with biometric checks. Recall that the only purpose of the biometric check is to control access to the stored chatterID across invocations of the app. It doesn’t make the sign-in process itself any more secure.
Let’s first figure out how to securely store ChatterID in Keychain. Then we will look at how to use biometric control for Keychain access. The following instructions are heavily based on Using the iOS Keychain with Biometrics.
Keychain and secure enclave
Strictly speaking, the iOS Keychain is intended to store encryption keys. But it has been appropriated to securely store any key-value pair.
Storing encryption key in Keychain itself presents a small attack surface when the key must be kept in plain-text in system memory. A more secure way to store encryption keys is to use “Secure Enclave”. “Secure Enclave” or “trusted execution environment” (TEE) is a piece of hardware dedicated to performing cryptographic functions and storing secret keys. It has a limited set of APIs. To use it, you ask it to create a key for you. It returns a handle/alias for the key, but not the key itself. You can give the hardware plain text to be encrypted using the key it is holding for you. Or you give it encrypted text to be decrypted using the key under your name. The key itself never leaves the hardware’s possession and you can only ask the hardware to do encryption or decryption.
Since ChatterID is not an encryption key, storing it encrypted in the Keychain is good enough for our purposes.
Keychain storage
In MainView, when the user attempts to launch PostView, we try to load the previous session’s chatterID from the Keychain.
In MainView, search for:
isPresenting.toggle()
and replace it with a launch of the asynchronous open() method. We navigate to “PostView” only after the awaited open() returns:
                        Task {
                            await ChatterID.shared.open()
                            isPresenting.toggle()
                        }
open()
We define open() as an asynchronous method of the ChatterID class.
If ChatterID’s expiration is not zero interval since the Unix epoch (1/1/70), it indicates that open() is called after the initial launch of the app and we have already opened the Keychain and tried to load previous session’s chatterID, so we can just return.
The Keychain API on iOS is really old. Programming the Keychain thus has a C/C++ flavor to it.
    func open() async {
        if expiration != Date(timeIntervalSince1970: 0.0) {
            // not first launch
            return
        }

        let searchFor: [CFString: Any] = [
            kSecClass: kSecClassGenericPassword,
            kSecAttrDescription: "ChatterID",
            kSecReturnData: true,
            kSecReturnAttributes: true,
        ]

        var itemRef: AnyObject?
        let searchStatus = SecItemCopyMatching(searchFor as CFDictionary, &itemRef)
The code search for an item of “generic password” security class in the Keychain. The item has attribute description of "ChatterID". If the item is found, we want both the value associated with the attribute and all of its other attributes to be returned.
Now add the following code below the above:
        let df = DateFormatter()
        df.dateFormat="yyyy-MM-dd HH:mm:ss '+'SSSS"

        switch (searchStatus) {
        case errSecSuccess: // found keychain
            if let item = itemRef as? NSDictionary,
               let data = item[kSecValueData] as? Data,
               let dateStr = item[kSecAttrLabel] as? String,
               let date = df.date(from: dateStr) {
                id = String(data: data, encoding: .utf8)
                expiration = date
            } else {
                print("Keychain has null entry!")
            }
If the search is successful, searchStatus == errSecSuccess, store the found item value in the id property of ChatterID class, and store the Label attribute of the found item in the expiration property of ChatterID.
Next add the following code to handle the case when the search returns “item not found”:
        case errSecItemNotFound:
            let item: [CFString: Any] = [
                kSecClass: kSecClassGenericPassword,
                kSecAttrDescription: "ChatterID",
                kSecAttrLabel: df.string(from: expiration), // trailing comma ok
            ]

            let addStatus = SecItemAdd(item as CFDictionary, nil)
            if (addStatus != 0) {
                print("ChatterID.open add: \(String(describing: SecCopyErrorMessageString(addStatus, nil)!))")
            }
If the item is not found, we add a template for "ChatterID" item with unitialized (“blank”) value, but with expiration time set to the default of “1/1/70”, into the Keychain. We insert the “blank” template here so that when we receive a chatterID from the back end later, all we’ll need to do is to update the item.
We close off open() with the following code:
        default:
            print("ChatterID.open search: \(String(describing: SecCopyErrorMessageString(searchStatus, nil)!))")
        }
    }
Keychain update
Every time we obtain a new chatterID from the back end, we save it to the Keychain: in the backendSignin(_:) function of your SigninView, replace the comment, “// will save() chatterID later”, after successful return from addUser(_:), with the line:
await ChatterID.shared.save()
save()
Back in ChatterID file, define save() as a method of the ChatterID class:
    func save() async {
        let df = DateFormatter()
        df.dateFormat="yyyy-MM-dd HH:mm:ss '+'SSSS"

        let item: [CFString: Any] = [
            kSecClass: kSecClassGenericPassword,
            kSecAttrDescription: "ChatterID",
        ]

        let updates: [CFString: Any] = [
            kSecValueData: id?.data(using: .utf8) as Any,
            kSecAttrLabel: df.string(from: expiration)
        ]

        let updateStatus = SecItemUpdate(item as CFDictionary, updates as CFDictionary)
        if (updateStatus != 0) {
            print("ChatterID.save: \(String(describing: SecCopyErrorMessageString(updateStatus, nil)!))")
        }
    }
The code defines two dictionary variables: the item variable describing the item we want to update (in this case an item of “generic password” security class with attribute description "ChatterID") and the updates variable containing the fields of the item we want to update (in this case, the value associated with the item and the Label attribute).
That’s all the changes we need to make to store chatterID in the Keychain! You can now test your implementation of Keychain storage by closing your Chatter app after making a post, re-launching it within your chatterID lifetime (which you set in the back end), and it should allow you to post without requiring you to sign in again.
To help you test your code, you may want to add the following method to the ChatterID class:
    func delete() async {
        let item: [CFString: Any] = [
            kSecClass: kSecClassGenericPassword,
            kSecAttrDescription: "ChatterID",
        ]

        let delStatus = SecItemDelete(item as CFDictionary)
        if (delStatus != 0) {
            print("ChatterID.delete: \(String(describing: SecCopyErrorMessageString(delStatus, nil)!))")
        }
    }
and call it whenever you want to delete your Keychain entry; for example, right before you call open() in MainView(). You may also want to play with shorter or longer chatterID lifetime in the back end and see whether you’re asked to sign in again when expected.
Biometric check
To add biometric check to control access to your key chain, we only need to make three small changes.
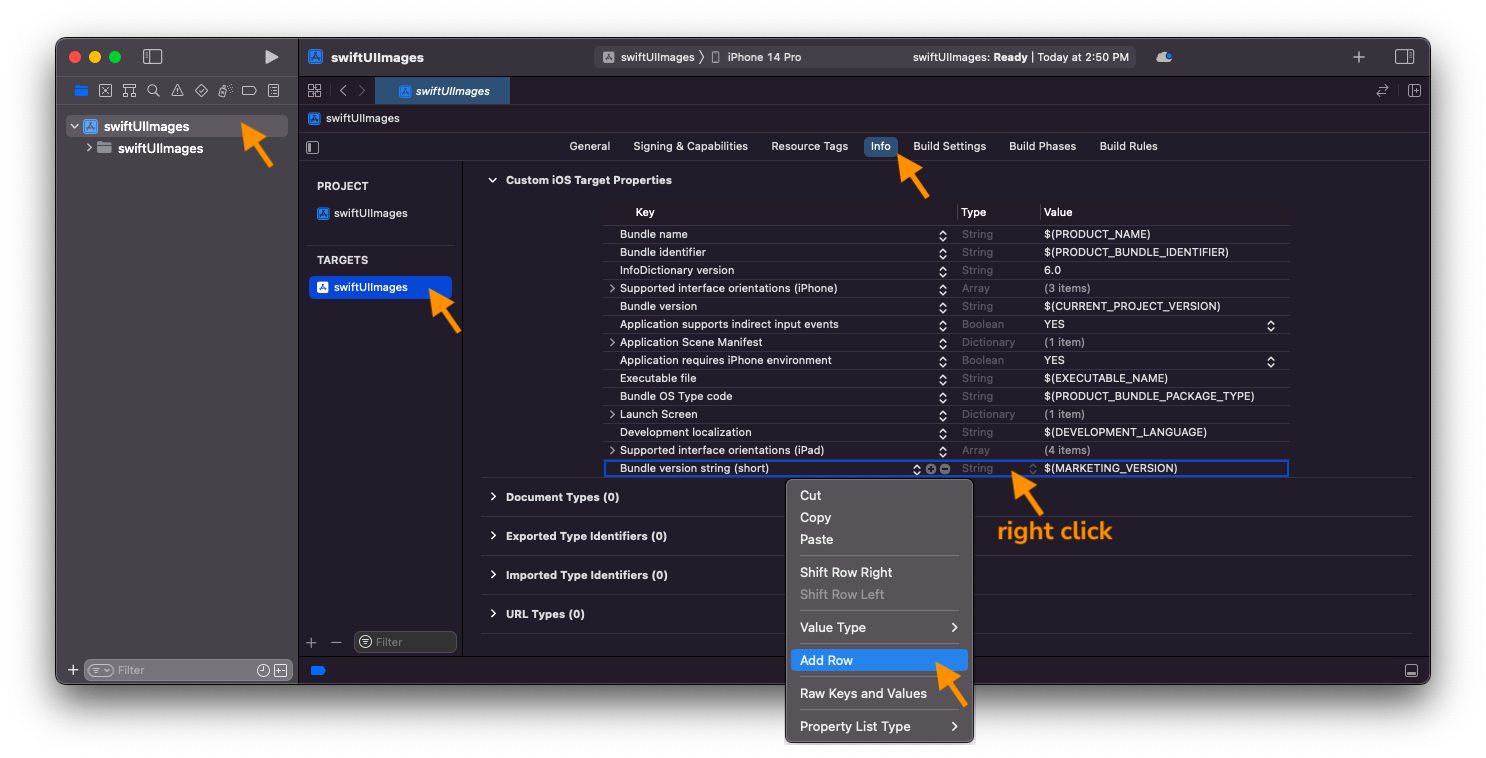
- Add the
Privacy - Face ID Usage Descriptionkey to yourInfolist with a descriptive value such as, “to access ChatterID in Keychain”:- Click on your project name (first item in your left/navigator pane), then click on the
Infotab. - In the
Custom iOS Target Propertiessection, right click (or ctl-click) any row in the table, - choose
Add Row(screenshot), and - add
Privacy - Face ID Usage Description.the same usage description will be used for Touch ID
- Click on your project name (first item in your left/navigator pane), then click on the
- In the
open()method of theChatterIDclass, forcase errSecItemNotFound:, add (before you add the item):// biometric check let accessControl = SecAccessControlCreateWithFlags(nil, kSecAttrAccessibleWhenPasscodeSetThisDeviceOnly, .userPresence, nil)! - Still within
case errSecItemNotFound:, add access control (last entry below) to the item dictionary:let item = [ kSecClass: kSecClassGenericPassword, kSecAttrDescription: "ChatterID", kSecAttrLabel: df.string(from: expiration), kSecAttrAccessControl: accessControl // biometric check ] as CFDictionarythe
kSecAttrAccessControl: accessControlfield enables access control and the.userPresenceflag used to create theaccessControlvariable specifies that we require the user to be present, which automatically translates to a FaceID check if available, or a TouchID check if FaceID is not available, or prompting for system passcode as a fall-back mechanism.
Biometric prompt on simulator
We explain the use of simulated biometric prompt in Getting Started with iOS Development. To use it, first add import LocalAuthentication to the top of your ChatterID file, then add the following property to your ChatterID class:
    #if targetEnvironment(simulator)
    private let auth = LAContext()
    #endif
Finally add the following code to ChatterID’s open() and save() methods. In open(), add the code after the expiration check. In save(), add it first thing.
        #if targetEnvironment(simulator)
        guard let _ = try? await auth.evaluatePolicy(.deviceOwnerAuthentication, localizedReason: "to allow simulator to access ChatterID in KeyChain") else { return }
        #endif
And with that, we’re done with this lab! Don’t forget to test the last version of your app with biometric authentication as you did earlier versions.
Testing
You may need to sign out from your Google account on your device to test Google Sign-In. On your development host (not on your device), open up your browser and go to a Google property, e.g., Gmail. At the upper right corner of your browser, click on your avatar icon and tap on Manage your Google Account button on the drop-down menu. Once in your Google Account, click on the Security menu on the left. In Security, scroll down until you see Your devices card. At the bottom of the card, click on Manage your devices. Find your device and click on the 3-vertical dot menu and select Sign out.
Submission guidelines
![]() Unlike in previous labs, there is one CRUCIAL extra step to do before you push your lab to GitHub: ensure that the
Unlike in previous labs, there is one CRUCIAL extra step to do before you push your lab to GitHub: ensure that the Bundle identifier under the Signing & Capabilities tab of your Project pane is the one you used to create your OAuth client ID.
We will only grade files committed to the master or main branch. If you use multiple branches, please merge them all to the master/main branch for submission.
Ensure that you have completed the back-end part and have pushed your changes to your back-end code to your 441 GitHub repo.
Push your signin lab folder to your GitHub repo as set up at the start of this spec.
git push
- Open GitHub Desktop and click on
Current Repositoryon the top left of the interface - Click on your
441GitHub repo - Add Summary to your changes and click
Commit to master(orCommit to main) - If you have a team mate and they have pushed changes to GitHub, you’ll have to click
Pull Originand resolve any conflicts - Finally click
Push Originto push changes to GitHub
![]() Go to the GitHub website to confirm that your front-end files have been uploaded to your GitHub repo under the folder
Go to the GitHub website to confirm that your front-end files have been uploaded to your GitHub repo under the folder signin. Confirm that your repo has a folder structure outline similar to the following. If your folder structure is not as outlined, our script will not pick up your submission, you will get ZERO point, and you will further have problems getting started on latter labs. There could be other files or folders in your local folder not listed below, don’t delete them. As long as you have installed the course .gitignore as per the instructions in Preparing GitHub for EECS 441 Labs, only files needed for grading will be pushed to GitHub.
  441
    |-- # files and folders from other labs . . .
    |-- signin
        |-- swiftUIChatter
            |-- swiftUIChatter.xcodeproj
            |-- swiftUIChatter
Verify that your Git repo is set up correctly: on your laptop, grab a new clone of your repo and build and run your submission to make sure that it works. You will get ZERO point if your lab doesn’t open, build, or run.
IMPORTANT: If you work in a team, put your team mate’s name and uniqname in your repo’s README.md (click the pencil icon at the upper right corner of the README.md box on your git repo) so that we’d know. Otherwise, we could mistakenly think that you were cheating and accidentally report you to the Honor Council, which would be a hassle to undo. You don’t need a README.md if you work by yourself.
Review your information on the Lab Links sheet. If you’ve changed your teaming arrangement from previous lab’s, please update your entry. If you’re using a different GitHub repo from previous lab’s, invite eecs441staff@umich.edu to your new GitHub repo and update your entry.
References
- SwiftUI Alert: Best Practices and Examples
- Start integrating Google Sign-In into your iOS app
- Google Sign-in for iOS and macOS
- GIDAuthenticaton-getTokensWithHandler
- Bringing up the Google Signin Screen in SwiftUI
- JWT (JSON Web Token) (in)security
- Singleton
- Date
- OSAllocatedUnfairLock
Async/await
Keychain
- Using the iOS Keychain in Swift
- Using the Keychain to Manage User Secrets
- SecItemAdd(::)
- SecItemCopyMatching(::)
- SecItemUpdate(::)
- Item Class Keys and Values
- Item Attribute Keys and Values
- Security Framework Result Codes
- Restricting Keychain Item Accessibility
Biometric
- Using the iOS Keychain with Biometrics
- Accessing Keychain Items with Face ID or Touch ID
- Get the biometric authentication prompt for protected keychain items in the iOS simulator
SwiftUI and UIKit interoperability
| Prepared for EECS 441 by Oli Raimond, Ollie Elmgren, Alexander Wu, Benjamin Brengman, Wendan Jiang, Nowrin Mohamed, Yibo Pi, and Sugih Jamin | Last updated: April 20th, 2025 |