Chatter Back End
Cover Page
DUE Sun, 06/08, 11:59pm (Beijing Time)
At the end of the lab, you’ll be prompted to keep a clean copy of your working solution and it will form the starting point for all subsequent labs.
A hosted server
You need an Internet-accessible server running
- Ubuntu 20.04 or later or equivalent
- Django 3.1.3 or later
- Python 3.8 or later
- Nginx, Gunicorn, and PostgreSQL (latest default version)
You can use a real physical host or a virtual machine on Aliyun, TencentCloud, Amazon Web Services (AWS), Google Cloud Platform (GCP), Microsoft Azure, etc. as long as they support the above systems. Note that AWS, GCP, Microsoft Azure may ask you to fill billing information that requires a visa card. The steps presented here have been verified to work on Ubuntu 20.04 hosted on a local Linux KVM, Aliyun, AWS, and GCP. These platforms give free trial or credit to students and new users. We provide instructions on how to set up the labs’ back-end server on Aliyun, AWS, and GCP. Please click on the service you want to use below to reveal the instructions.
Aliyun (Recommended)
Aliyun provides a free ECS machine for students and new users, where an ECS machine is a virtual machine running on Alibaba Cloud hardware.
Create an account
Following the steps at the Aliyun Developer to create an acount for students or new users. If registering as a student, you may be asked to verify your student identity.
Start instance
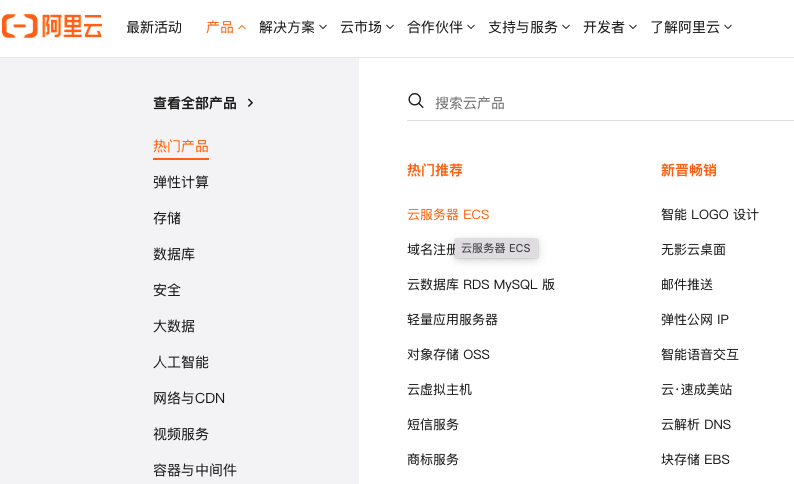
Navigate to the Aliyun home page with your account logged in. Select the “产品” dropdown menu, then “云服务ECS”.
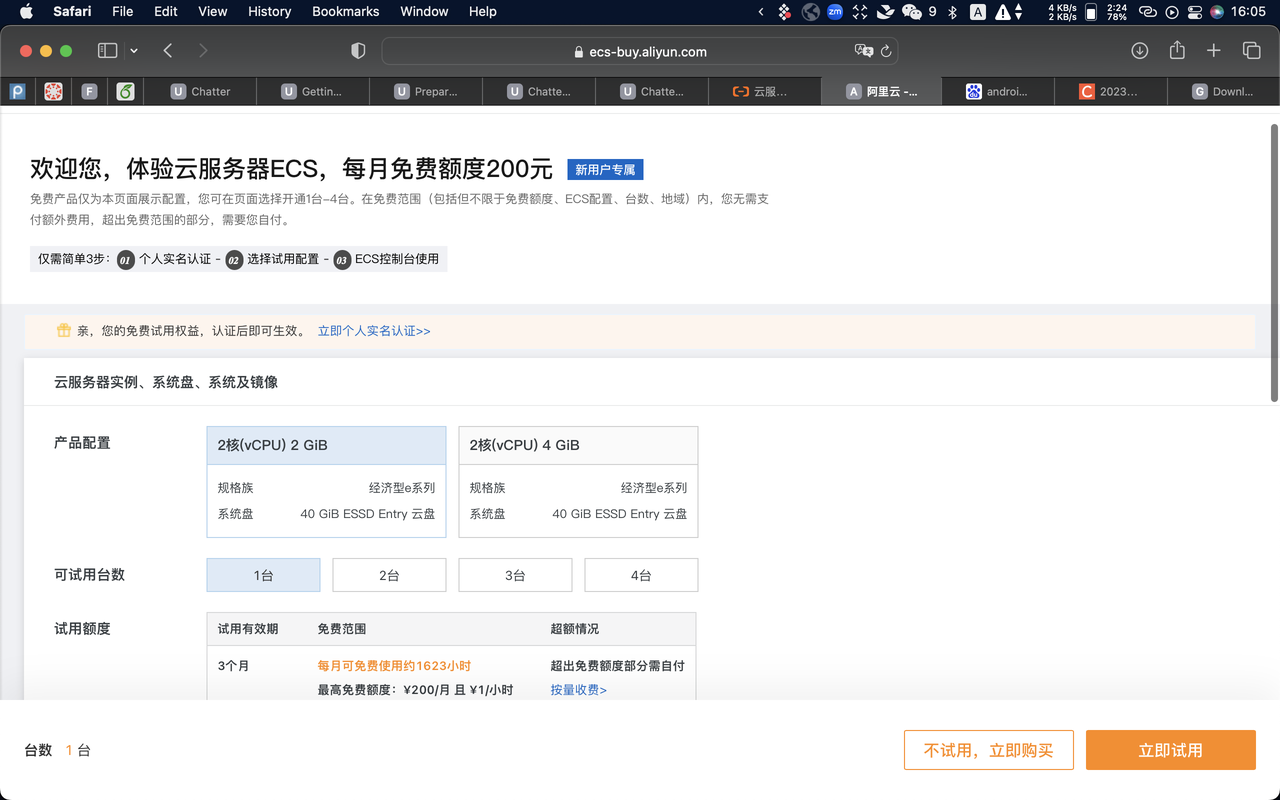
Click “立即购买” to create an instance or “管理控制台” to know more about Aliyun management console. Following is the page for VM configuration after clicking “立即购买” as a common new user (you might see a different page as a student). Remember to select Ubuntu 20.04 as your OS. At the bottom of the page, you should see keywords “试用周期” and “免费试用”. You can create an instance by clicking “免费试用”.
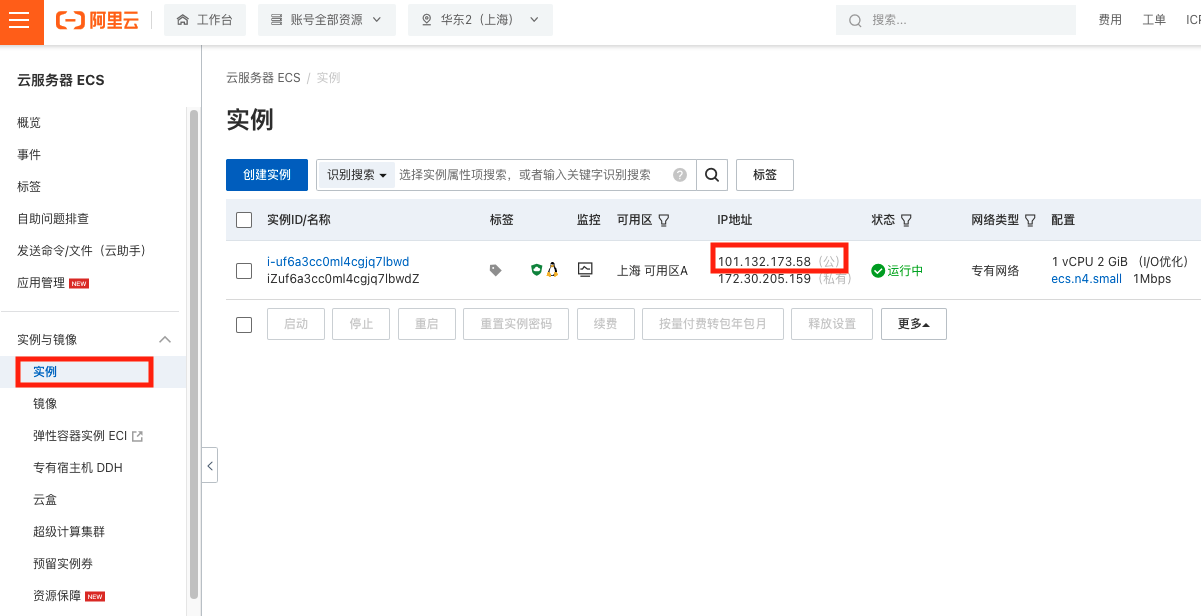
Instance status and configuration
After your instance is created, you can see it at the Aliyun management console under the “实例” tab. You can find YOUR_SERVER_IP in the instance list.
Click “更多” > “密码/密钥” > “重置实例密钥” to reset the password for remotely logging in the VM.
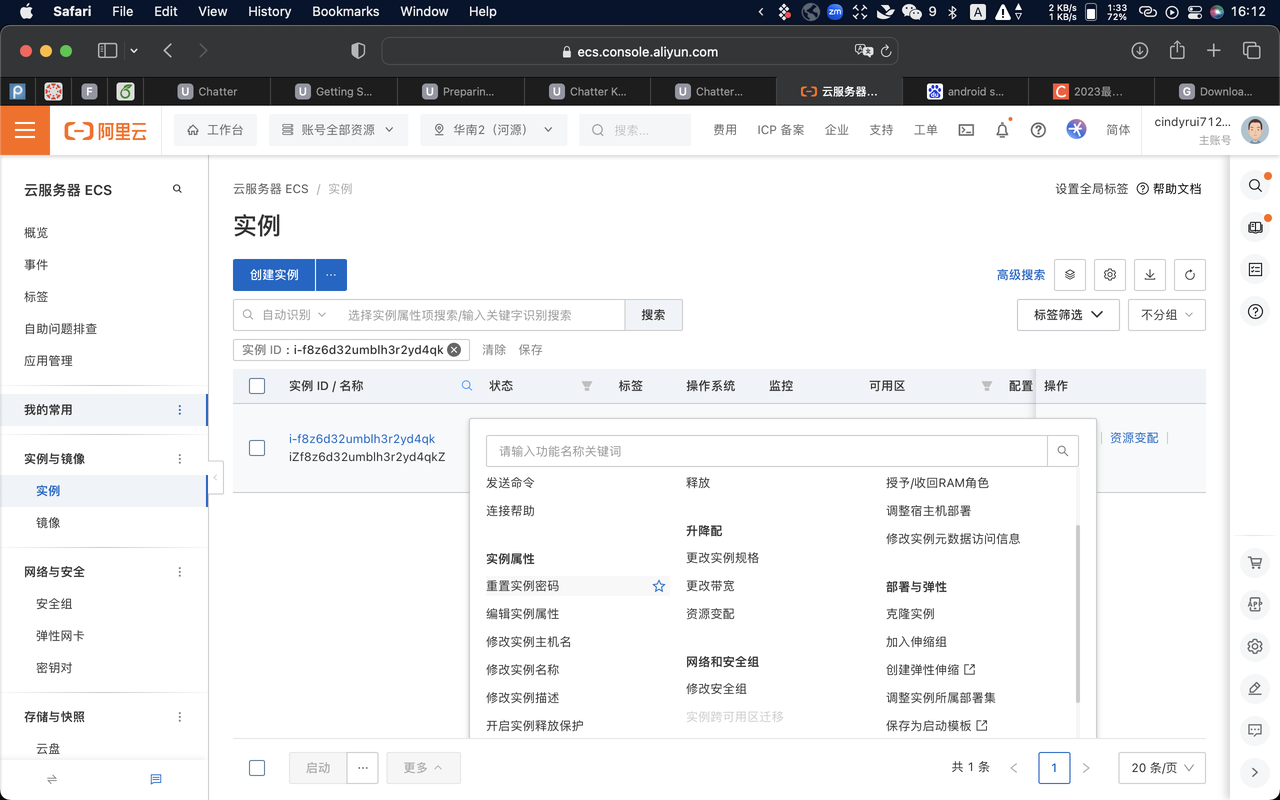
Click “更多” > “网络和安全组” > “安全组设置” to see the list of “安全组”.
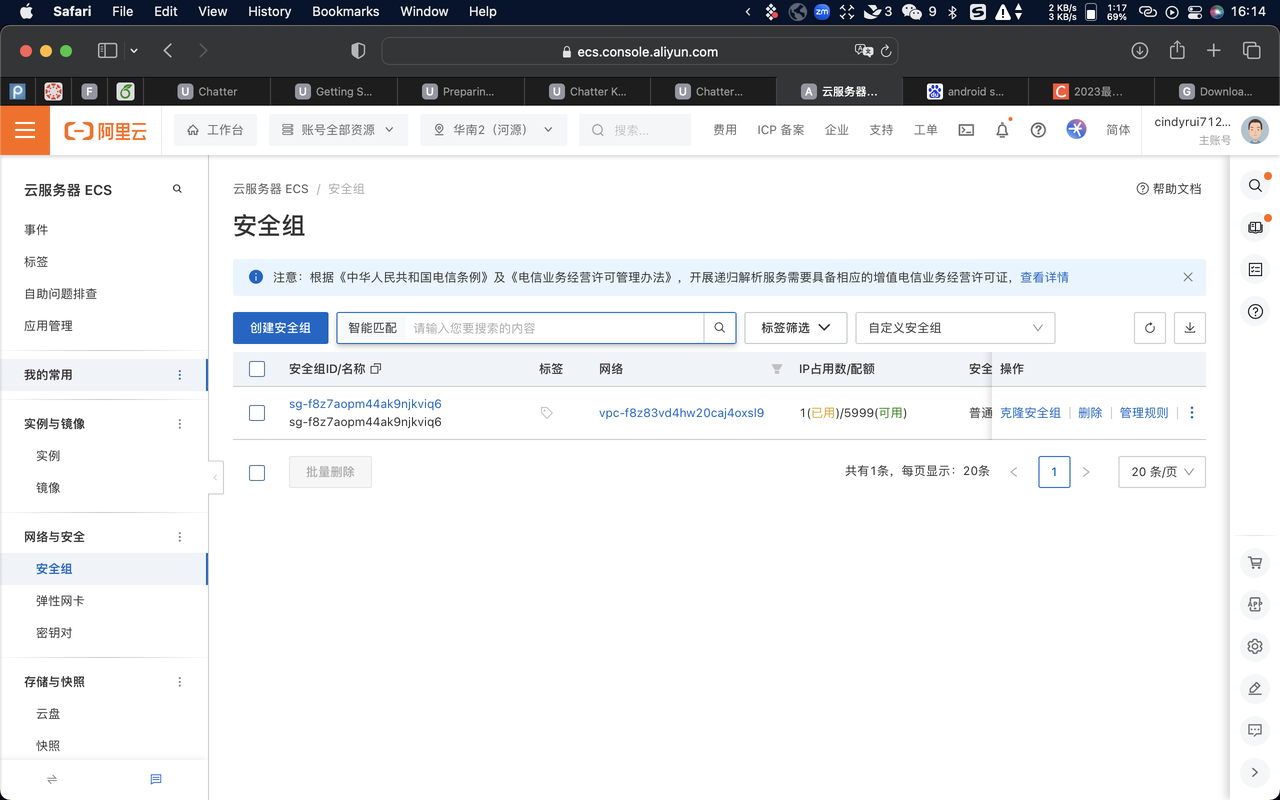
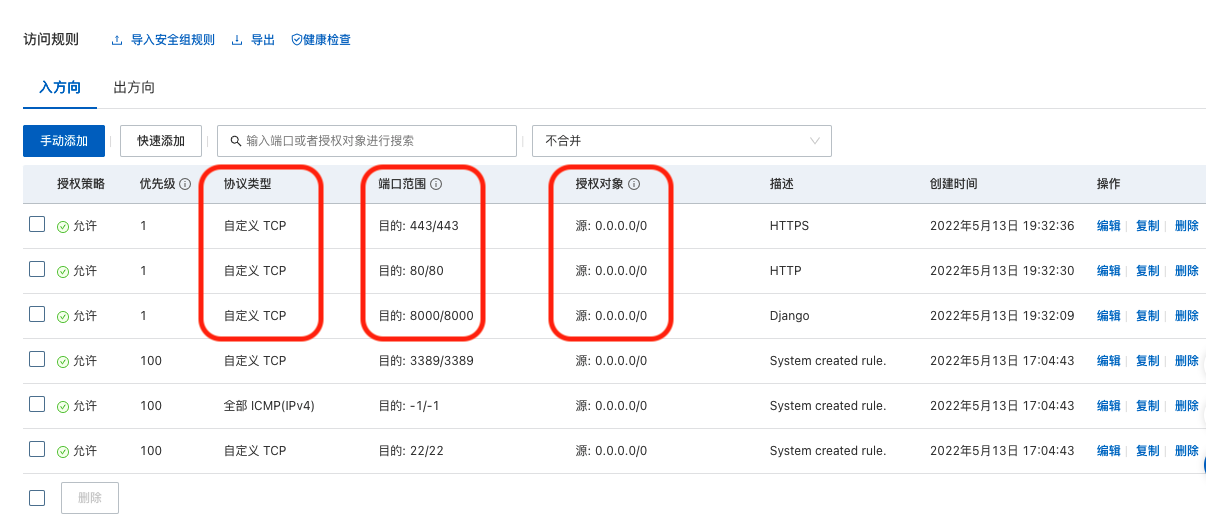
Click “配置规则” to see a list of firewall rules.
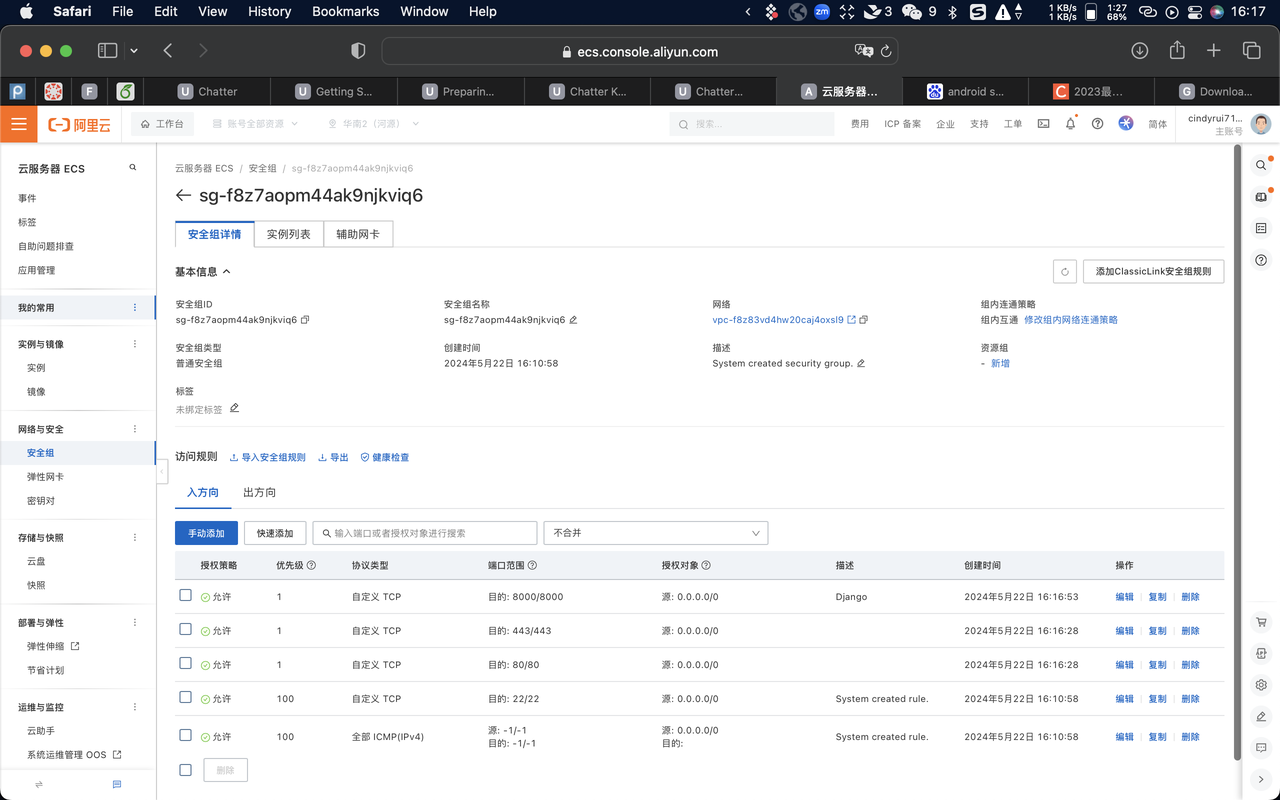
Add firewall rules to allow SSH, HTTP, HTTPS, and “Custom TCP Rule” for port 8000 (Django) traffic in and out of your instance.
ssh to instance
On your development host (laptop), type
ssh root@YOUR_SERVER_IP
and enter the password you set before. If this is your first time logging in the VM, you will be asked if you want to continue connecting. Choose Yes.
You can also use ssh keys to log in the VM without typing the password every time. Detailed instruction can be found here.
Stop instance
Stopping your instance may change its alloted IP address and undo some of the customizations you’ve done following this spec. Keep your instance up while your lab is being graded. Please remember to check if your instance IP is changed and update the server IP when you stop the instance and start it again.
AWS
The instructions to set up an AWS instance here is adapted from EECS 485’s tutorial.
Create an account
Create an AWS account at the AWS Registration. You should be eligible for their free tier, which means that you will be able to run an instance for free for the duration of the course.
Despite that, you will need to enter a credit card number on the account, even if you only use free tier resources. This is how Amazon charges, in case you request more resources than provided in the free tier. Do not launch any additional instances other than the one we specify in order to avoid additional charges.
Optionally, you may redeem extra benefits as a student, including $100 in AWS credits.
Start instance
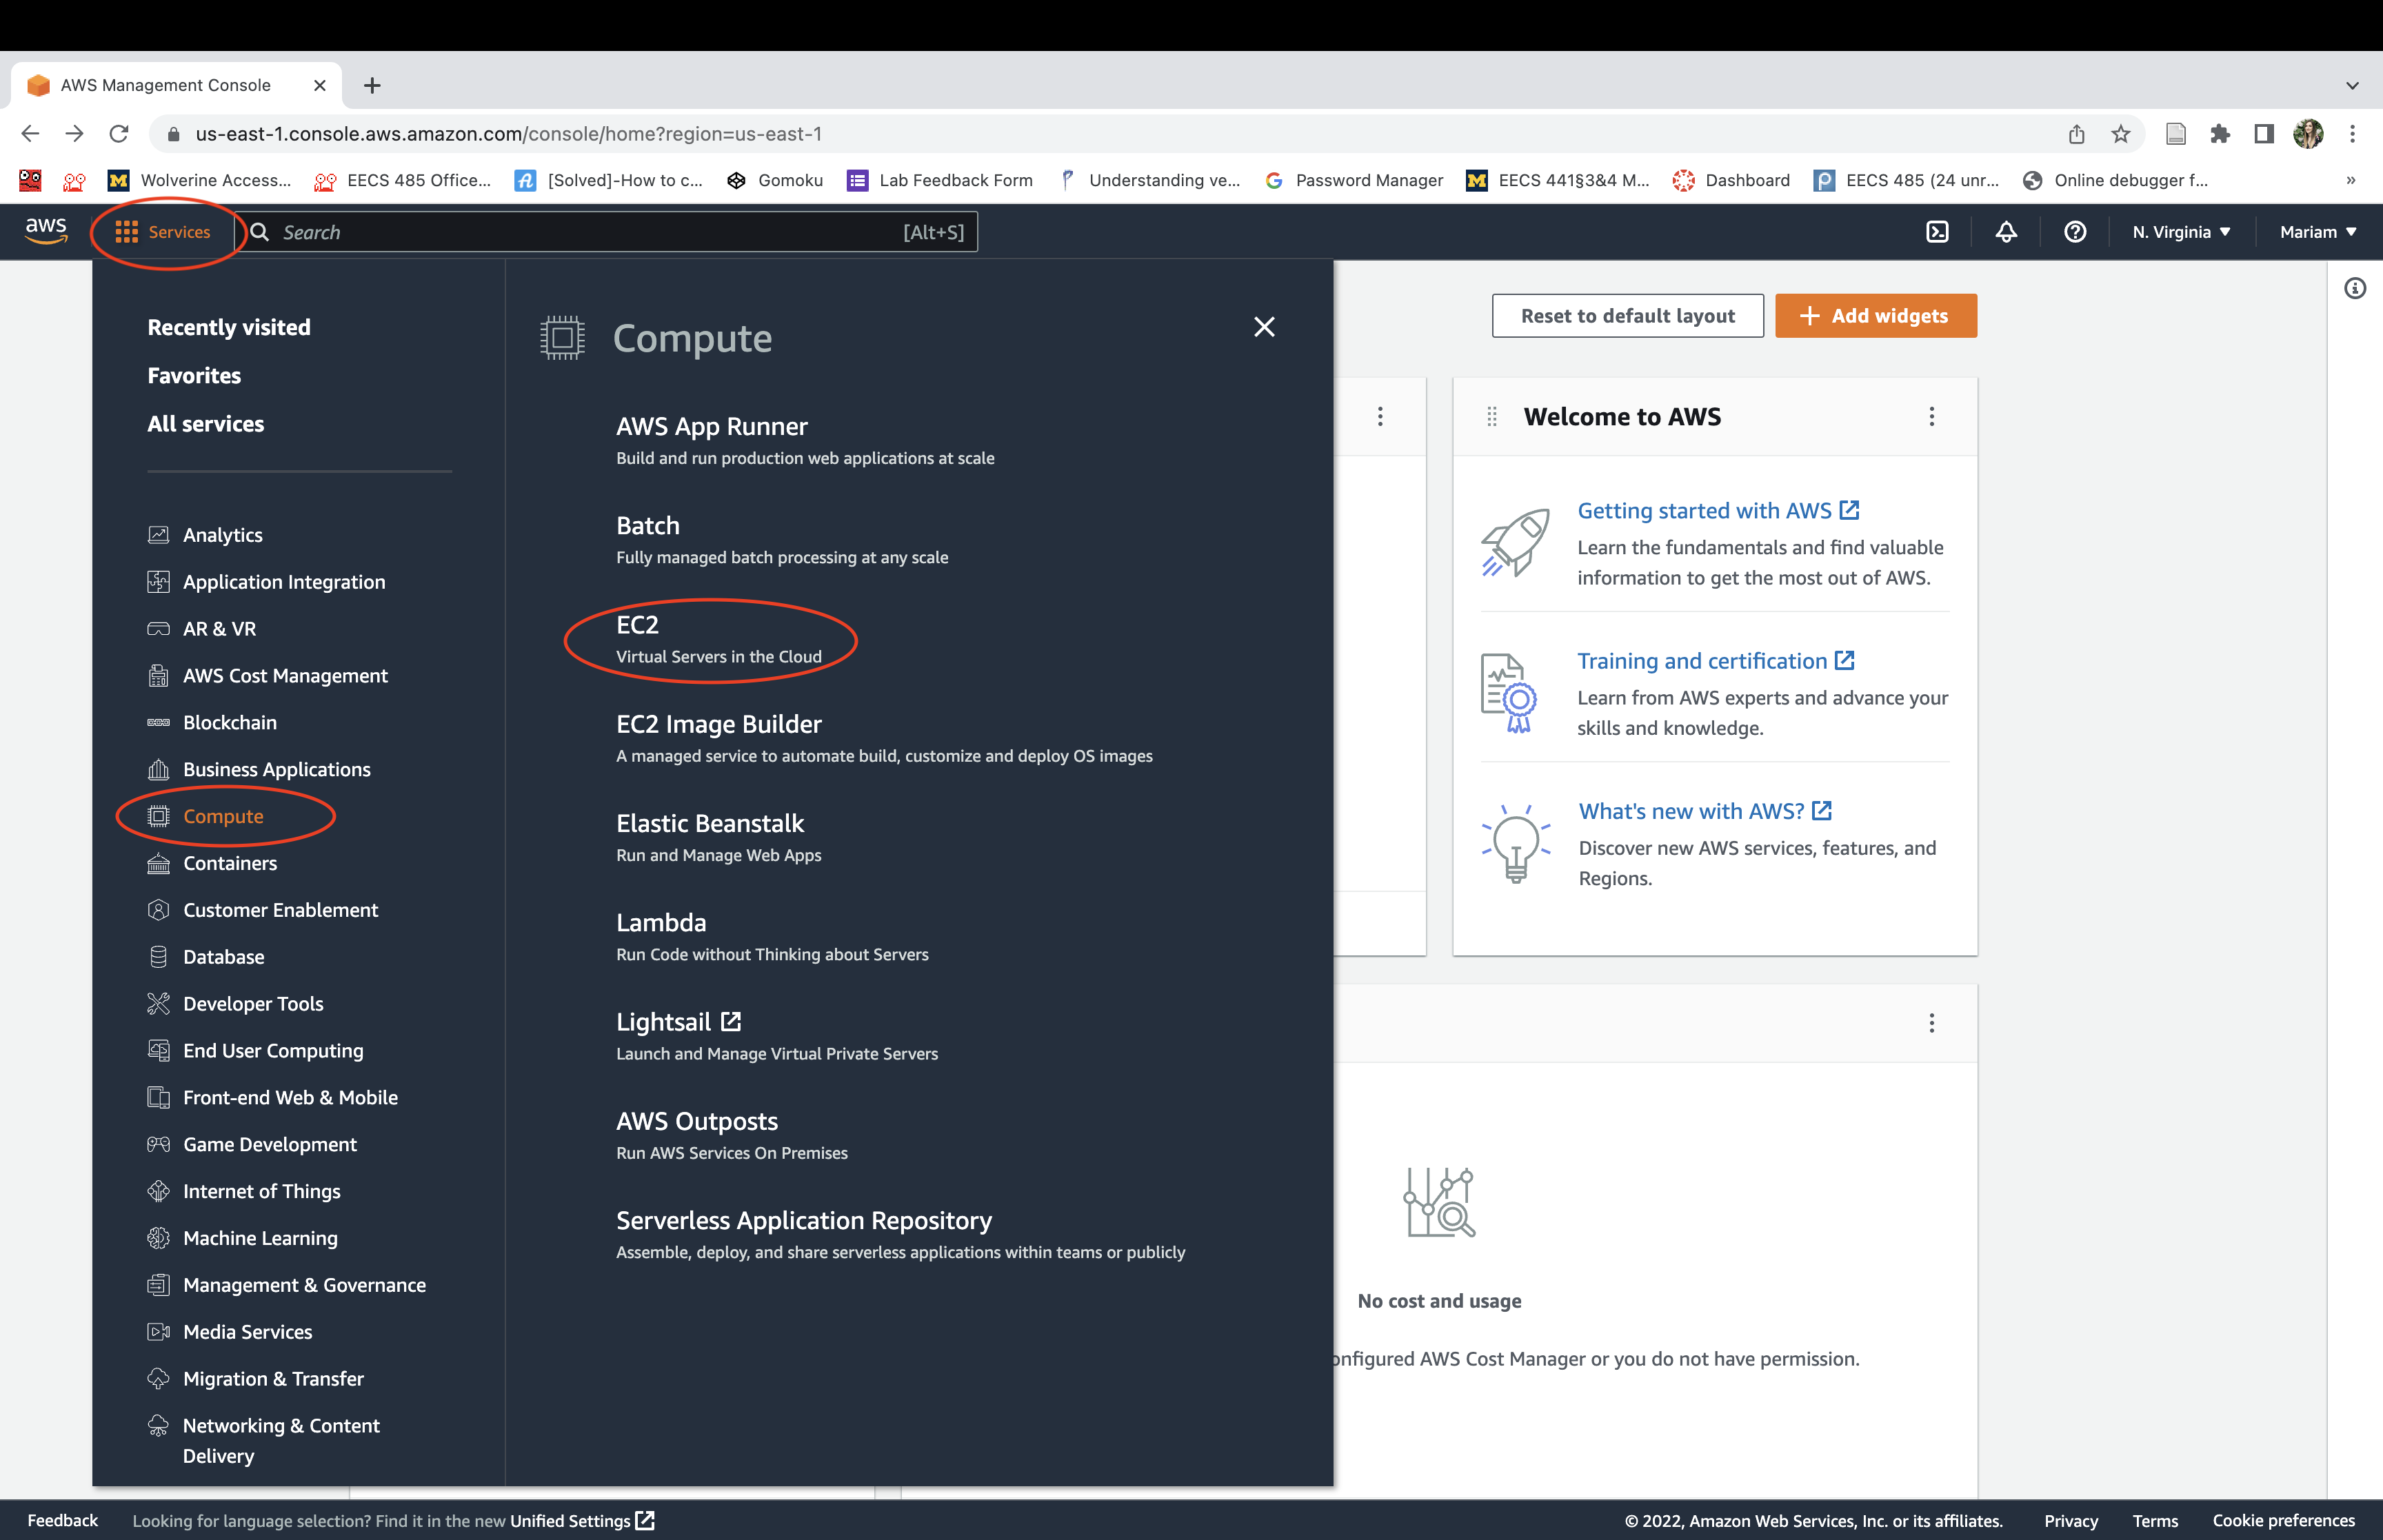
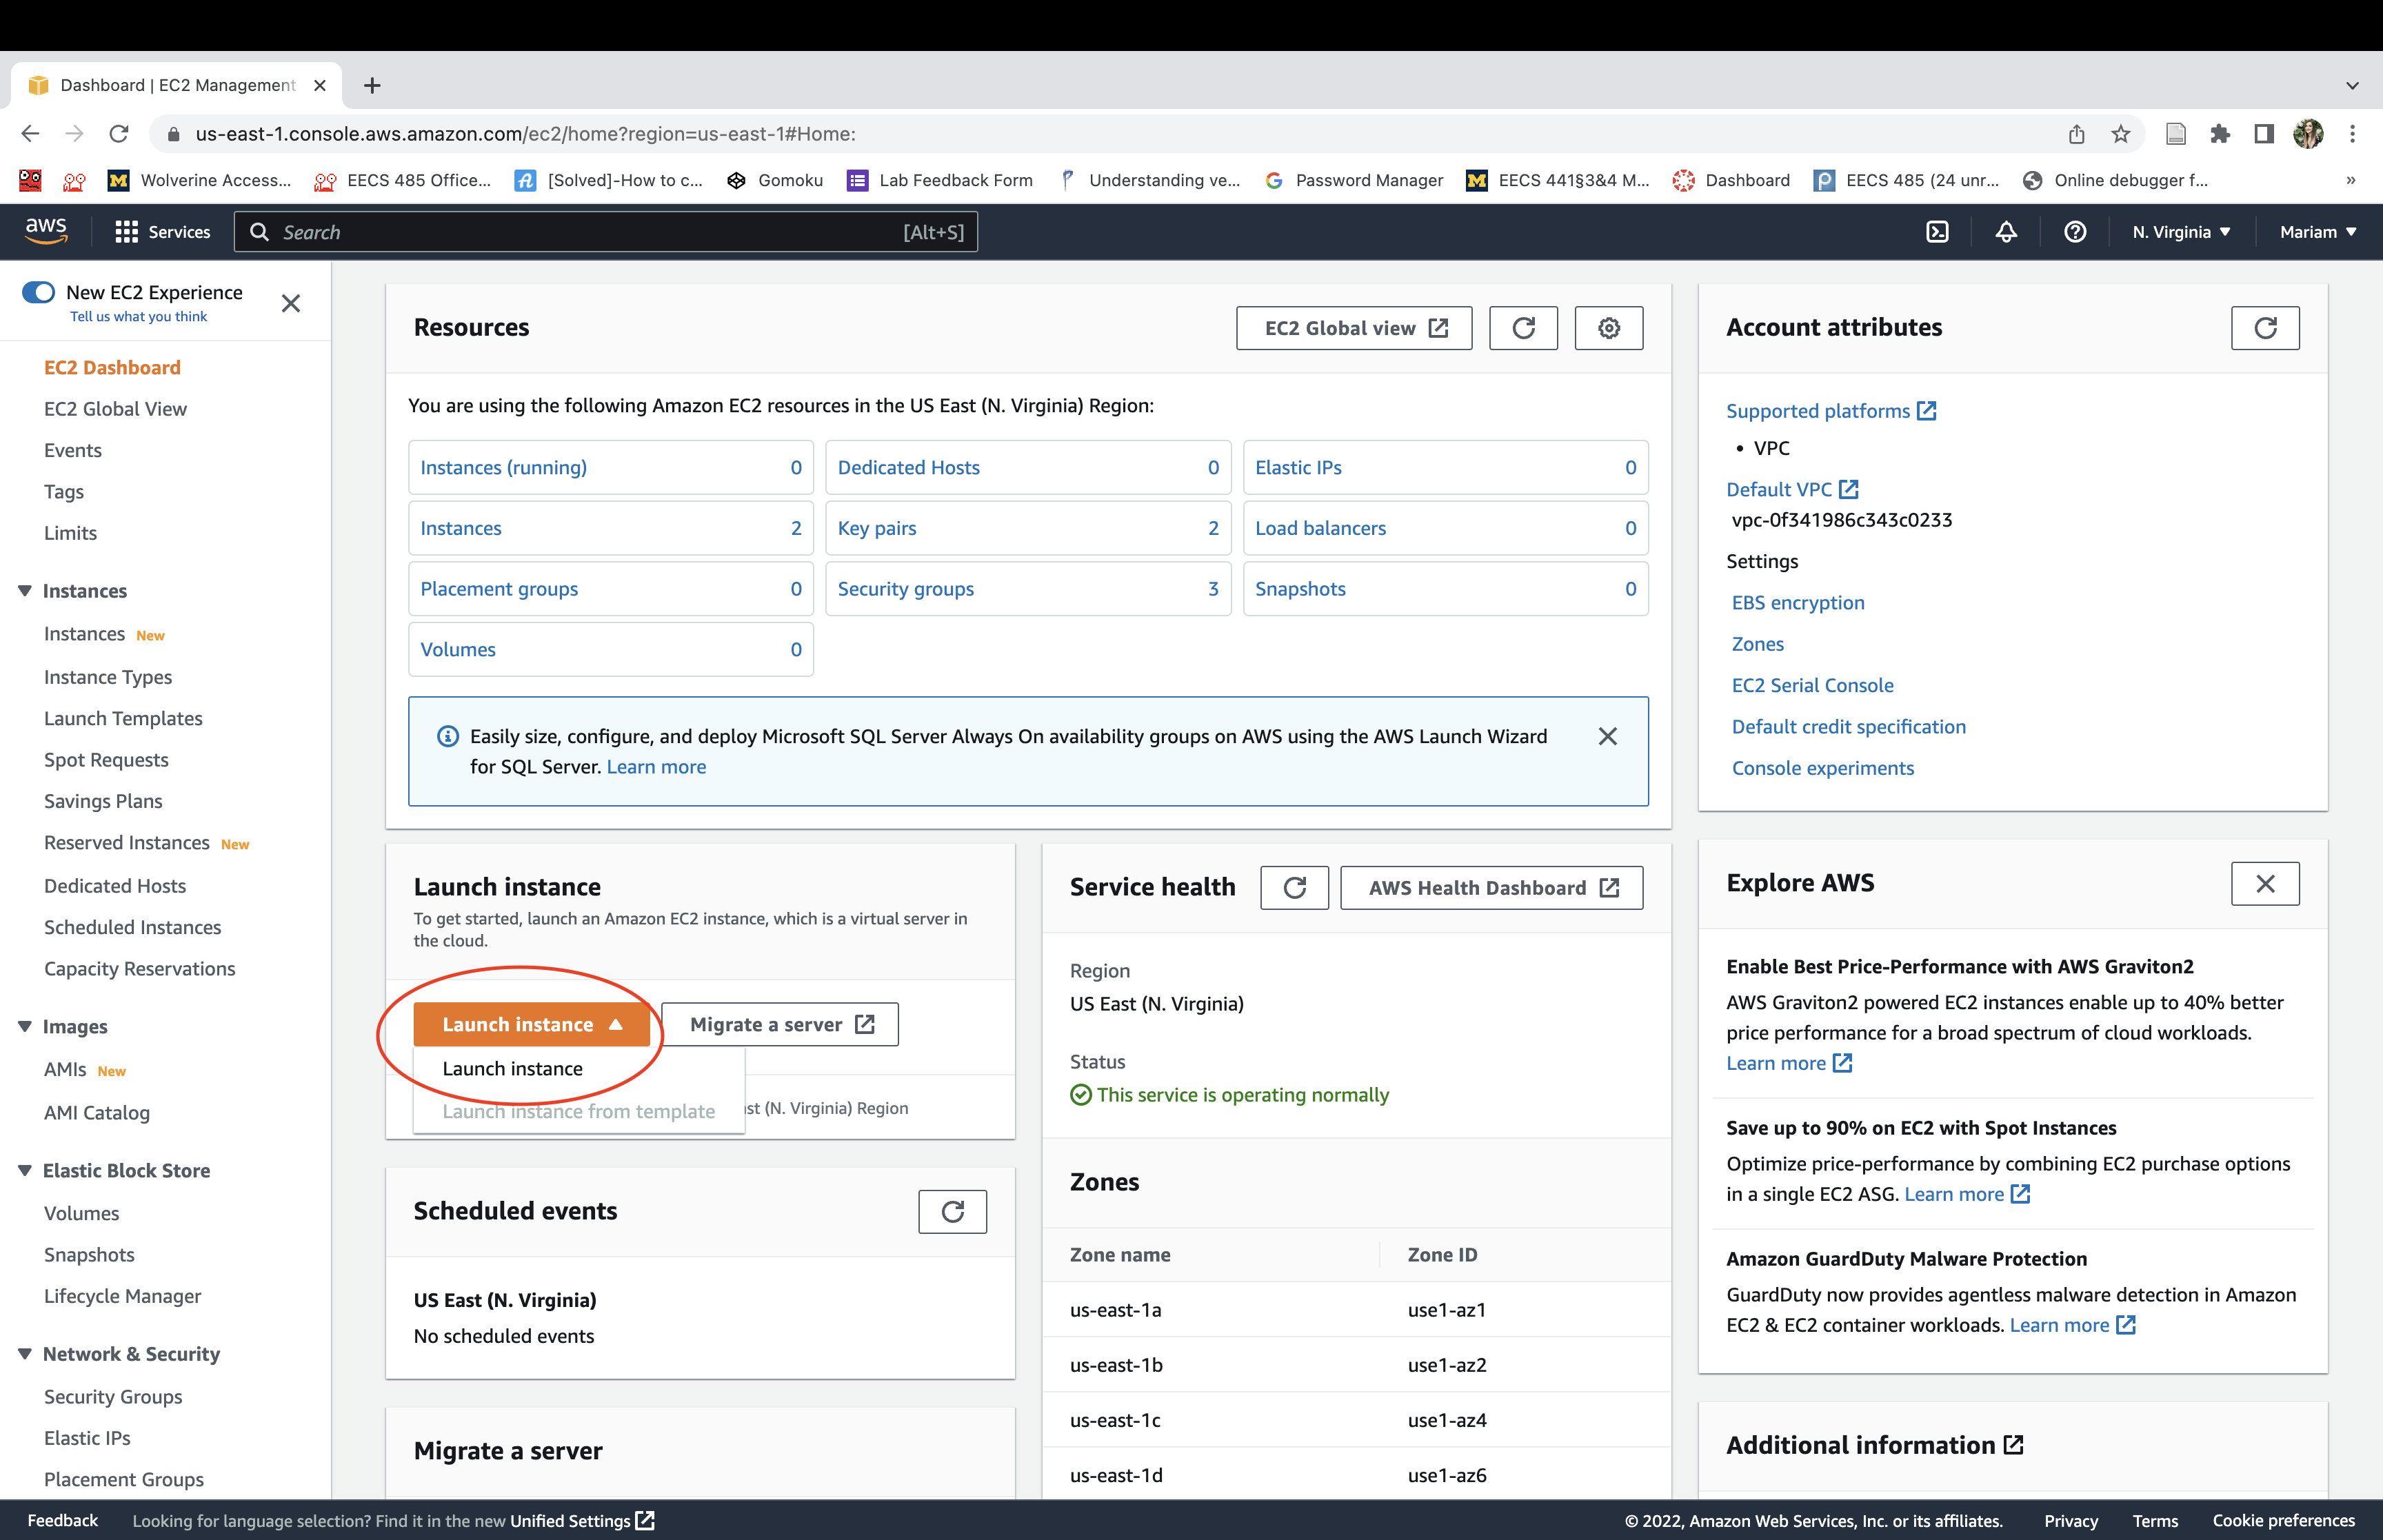
Navigate to the AWS Management Console. Select the “Services” dropdown menu, then “EC2”. An EC2 “instance” is a virtual machine running on Amazon AWS hardware.
Click launch an instance. It may take a few minutes to initialize before it’s running.
Select the “Ubuntu Server 20.04 LTS” Amazon Machine Image (AMI).
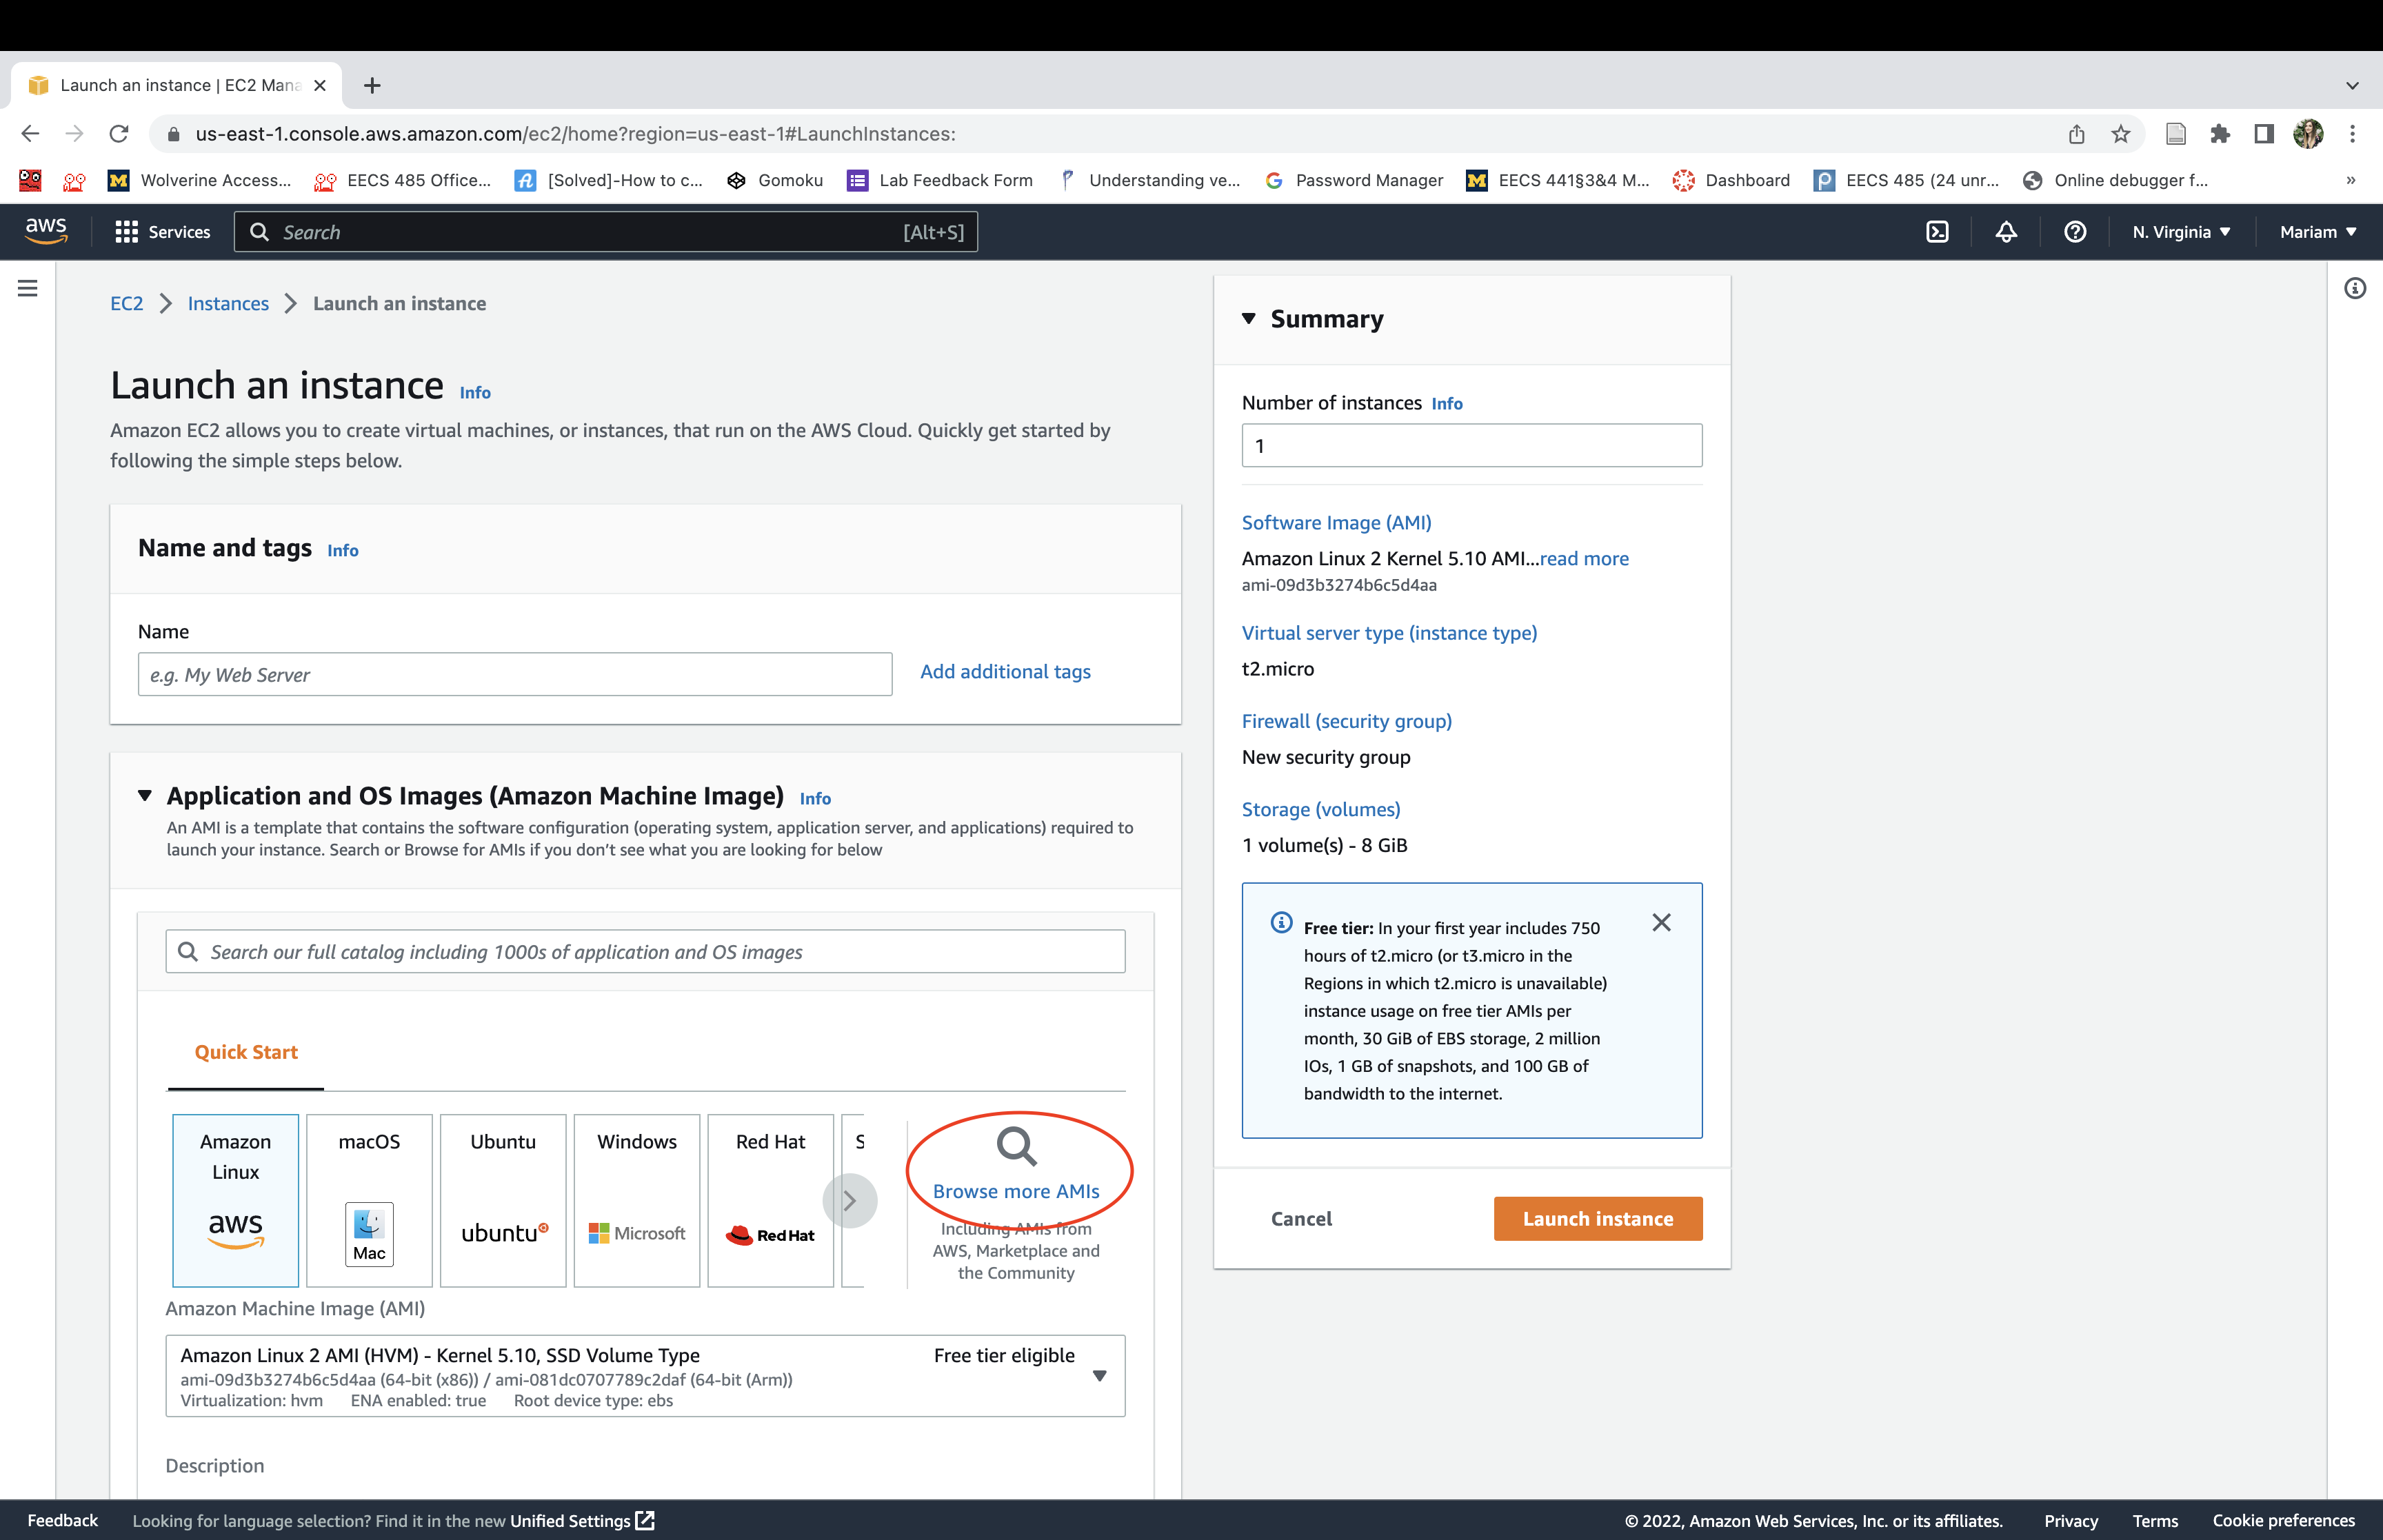
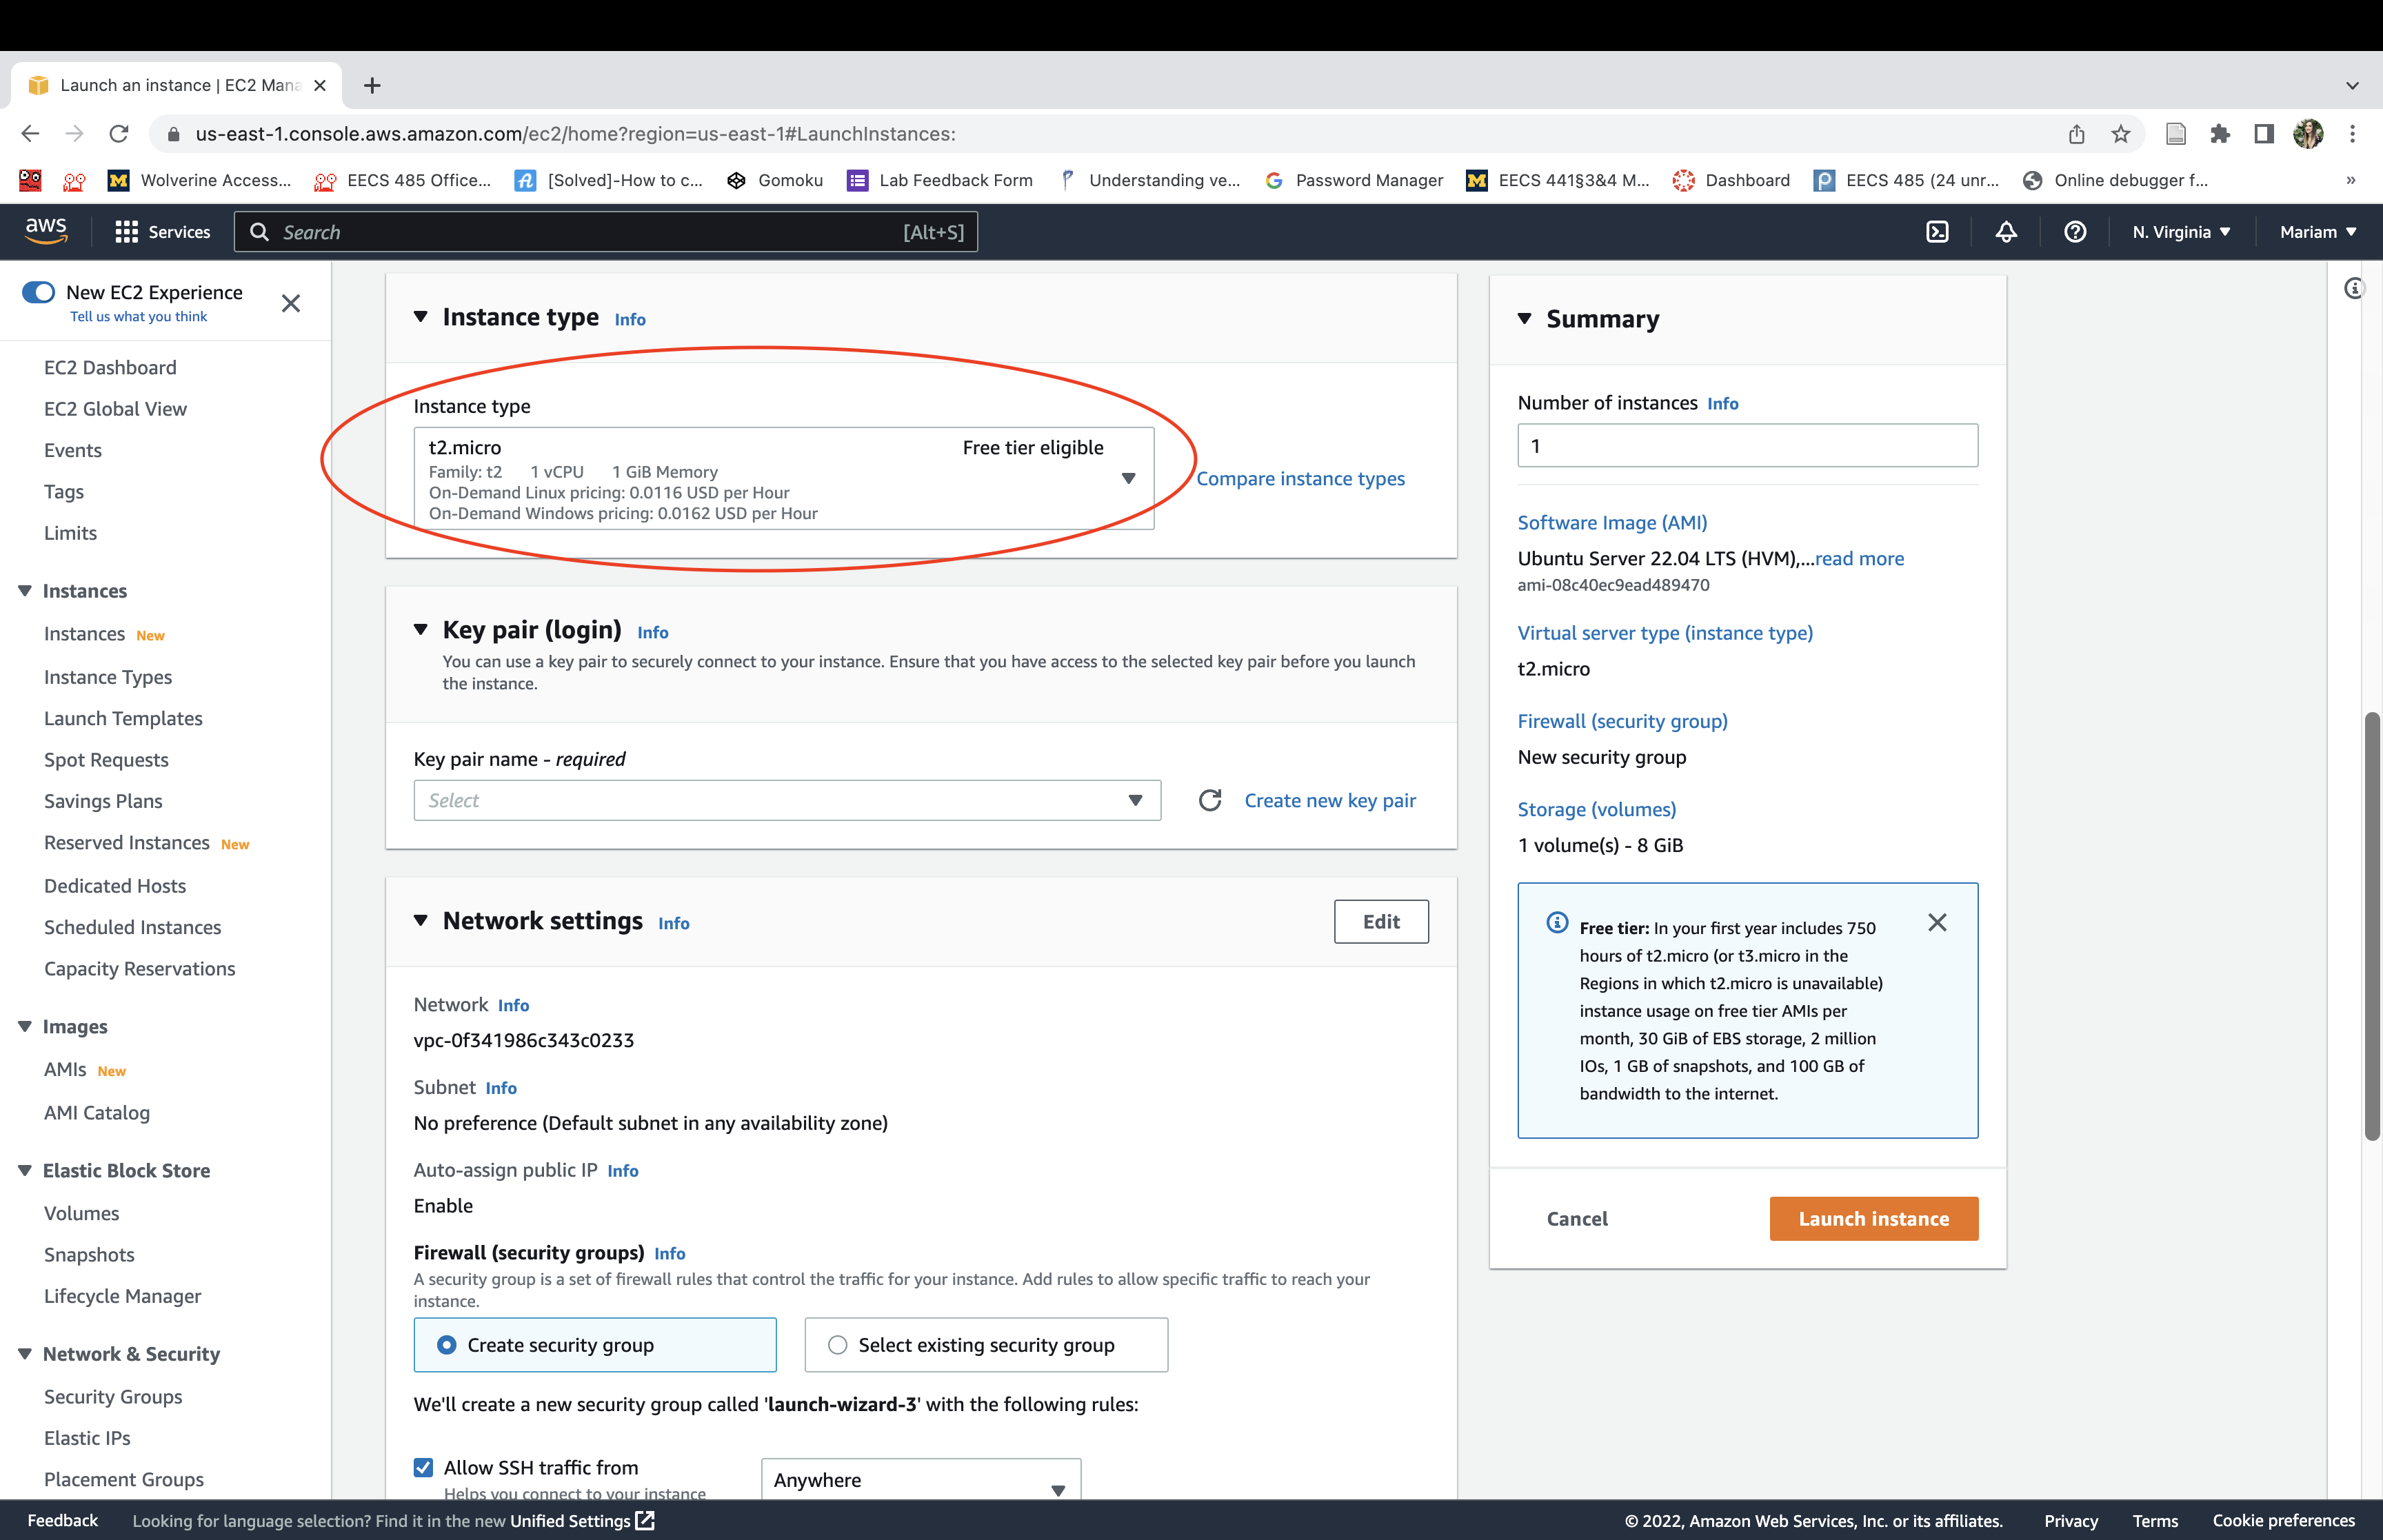
Select the “t2.micro” instance type. You should see “free tier eligible”. Click “Next”.
Click “Next”

Click “Next”

Click “Next”

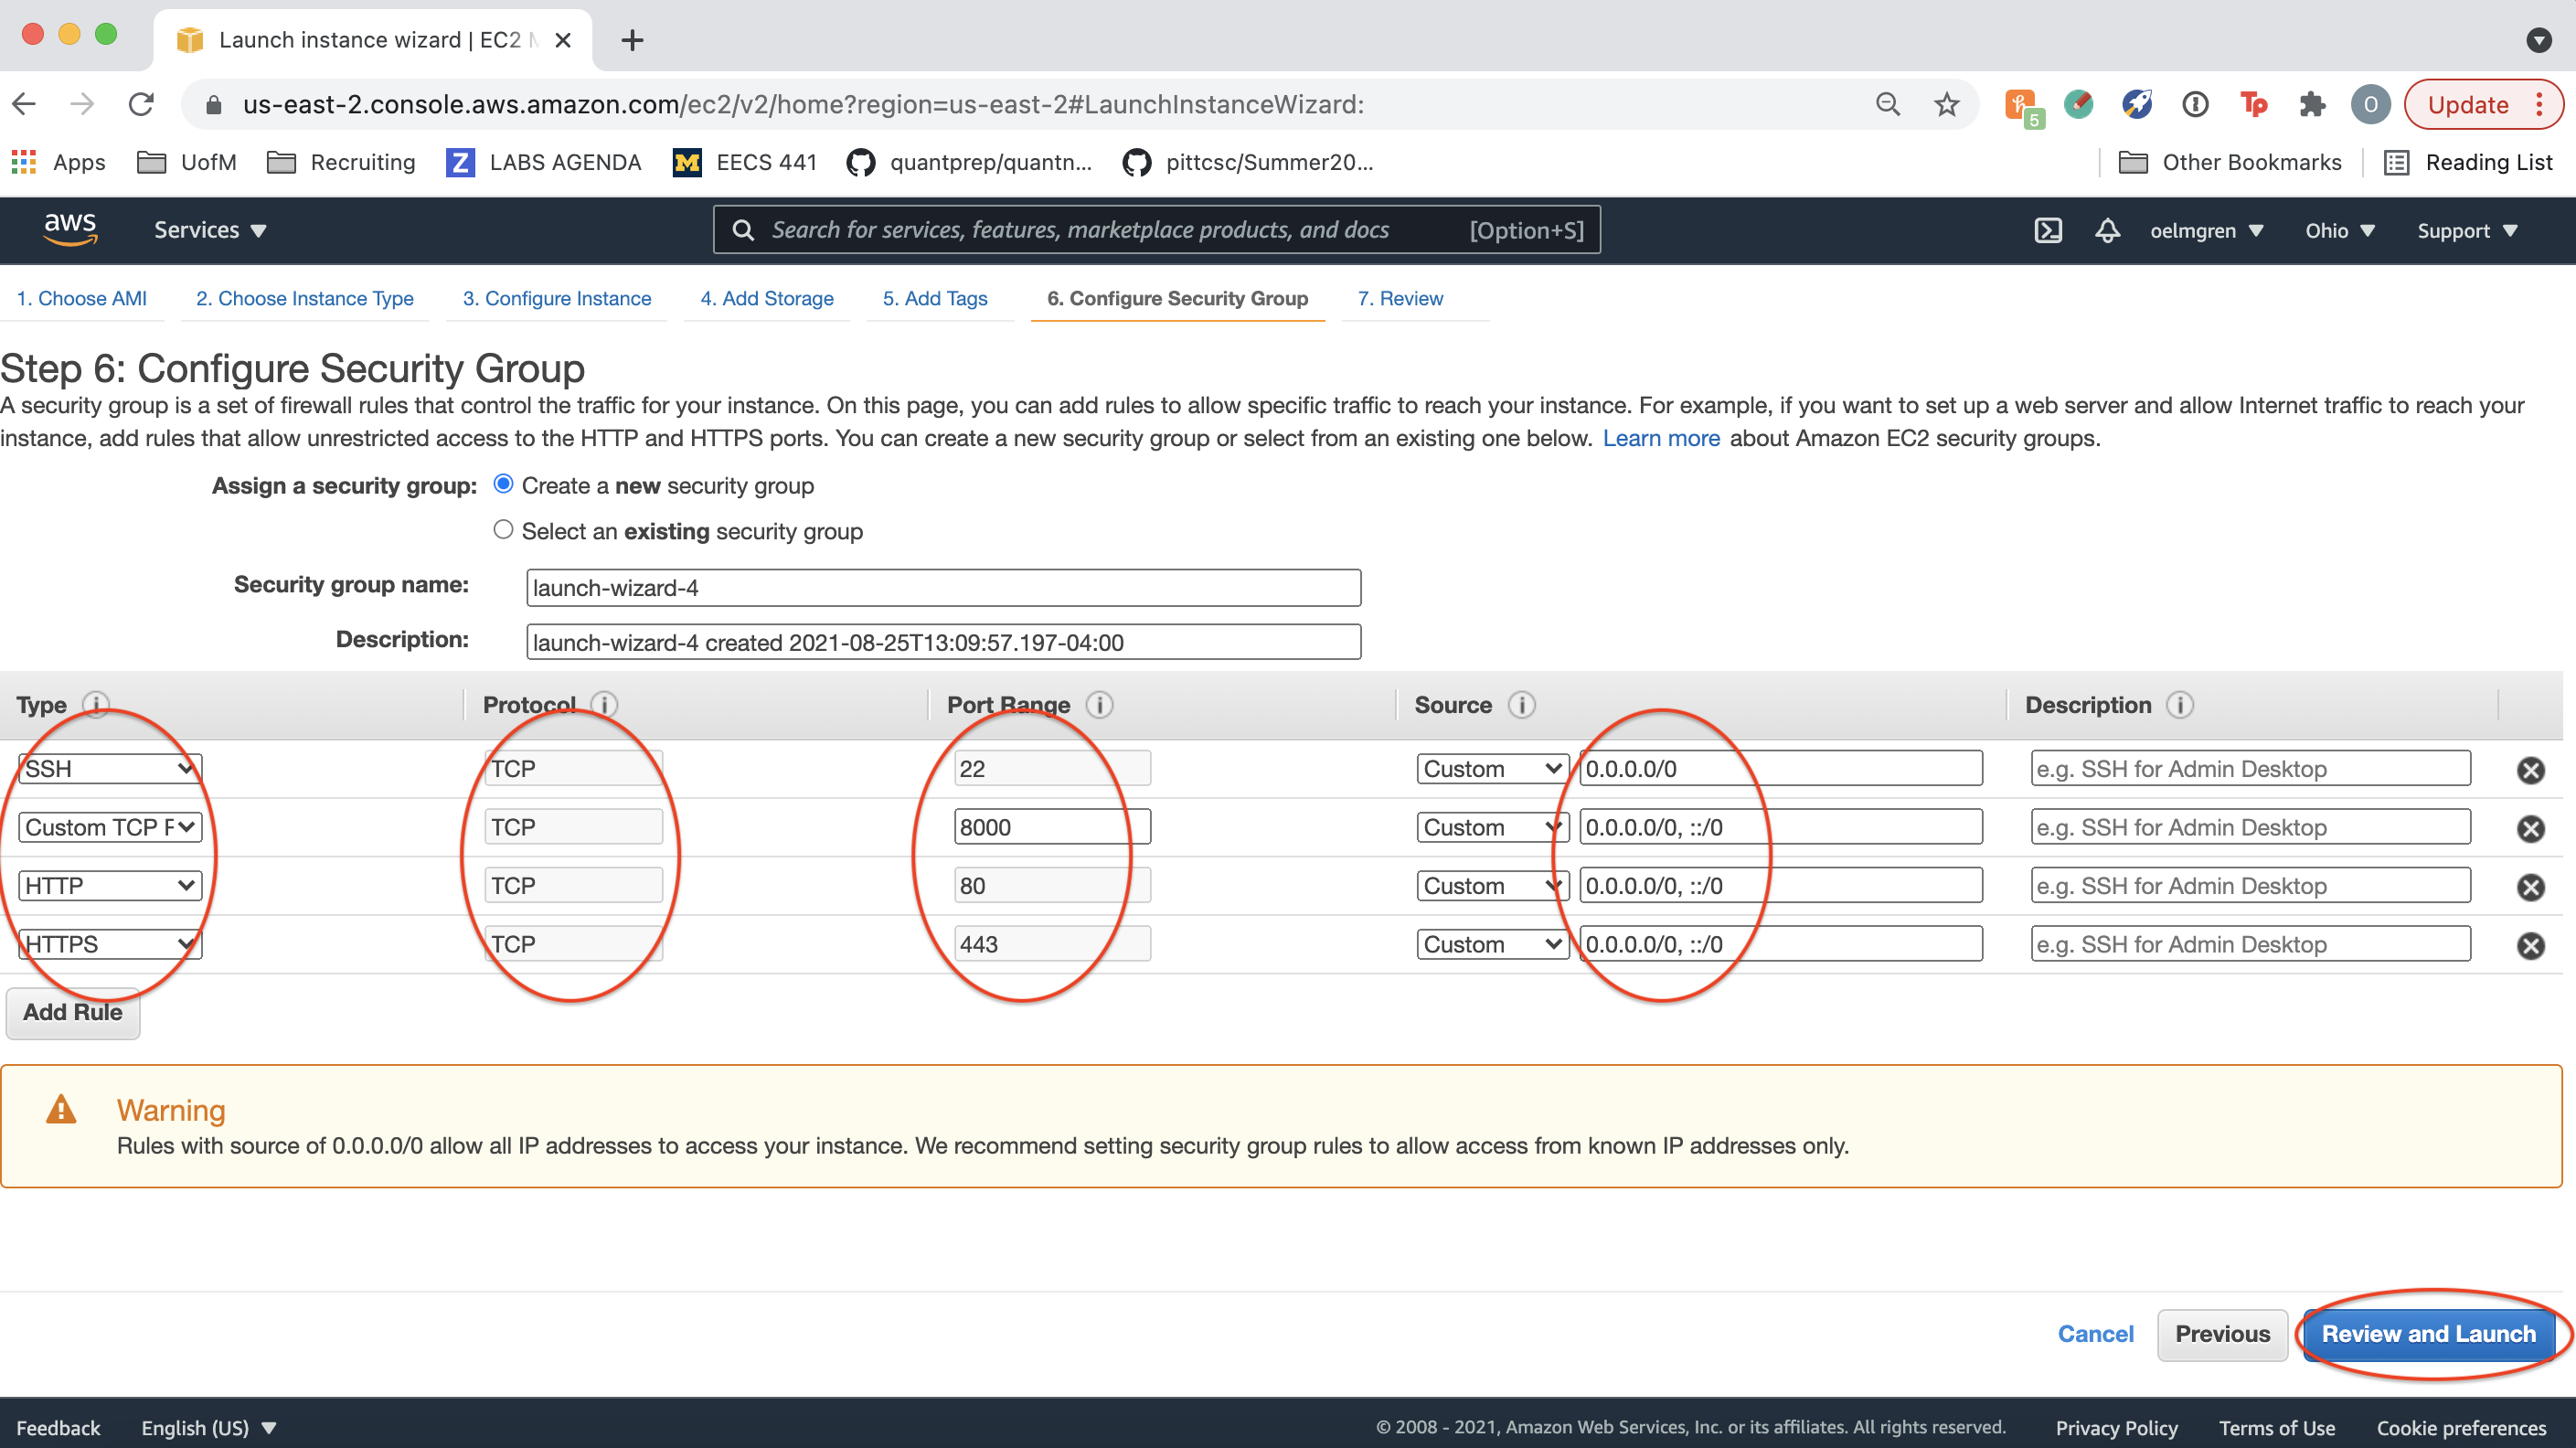
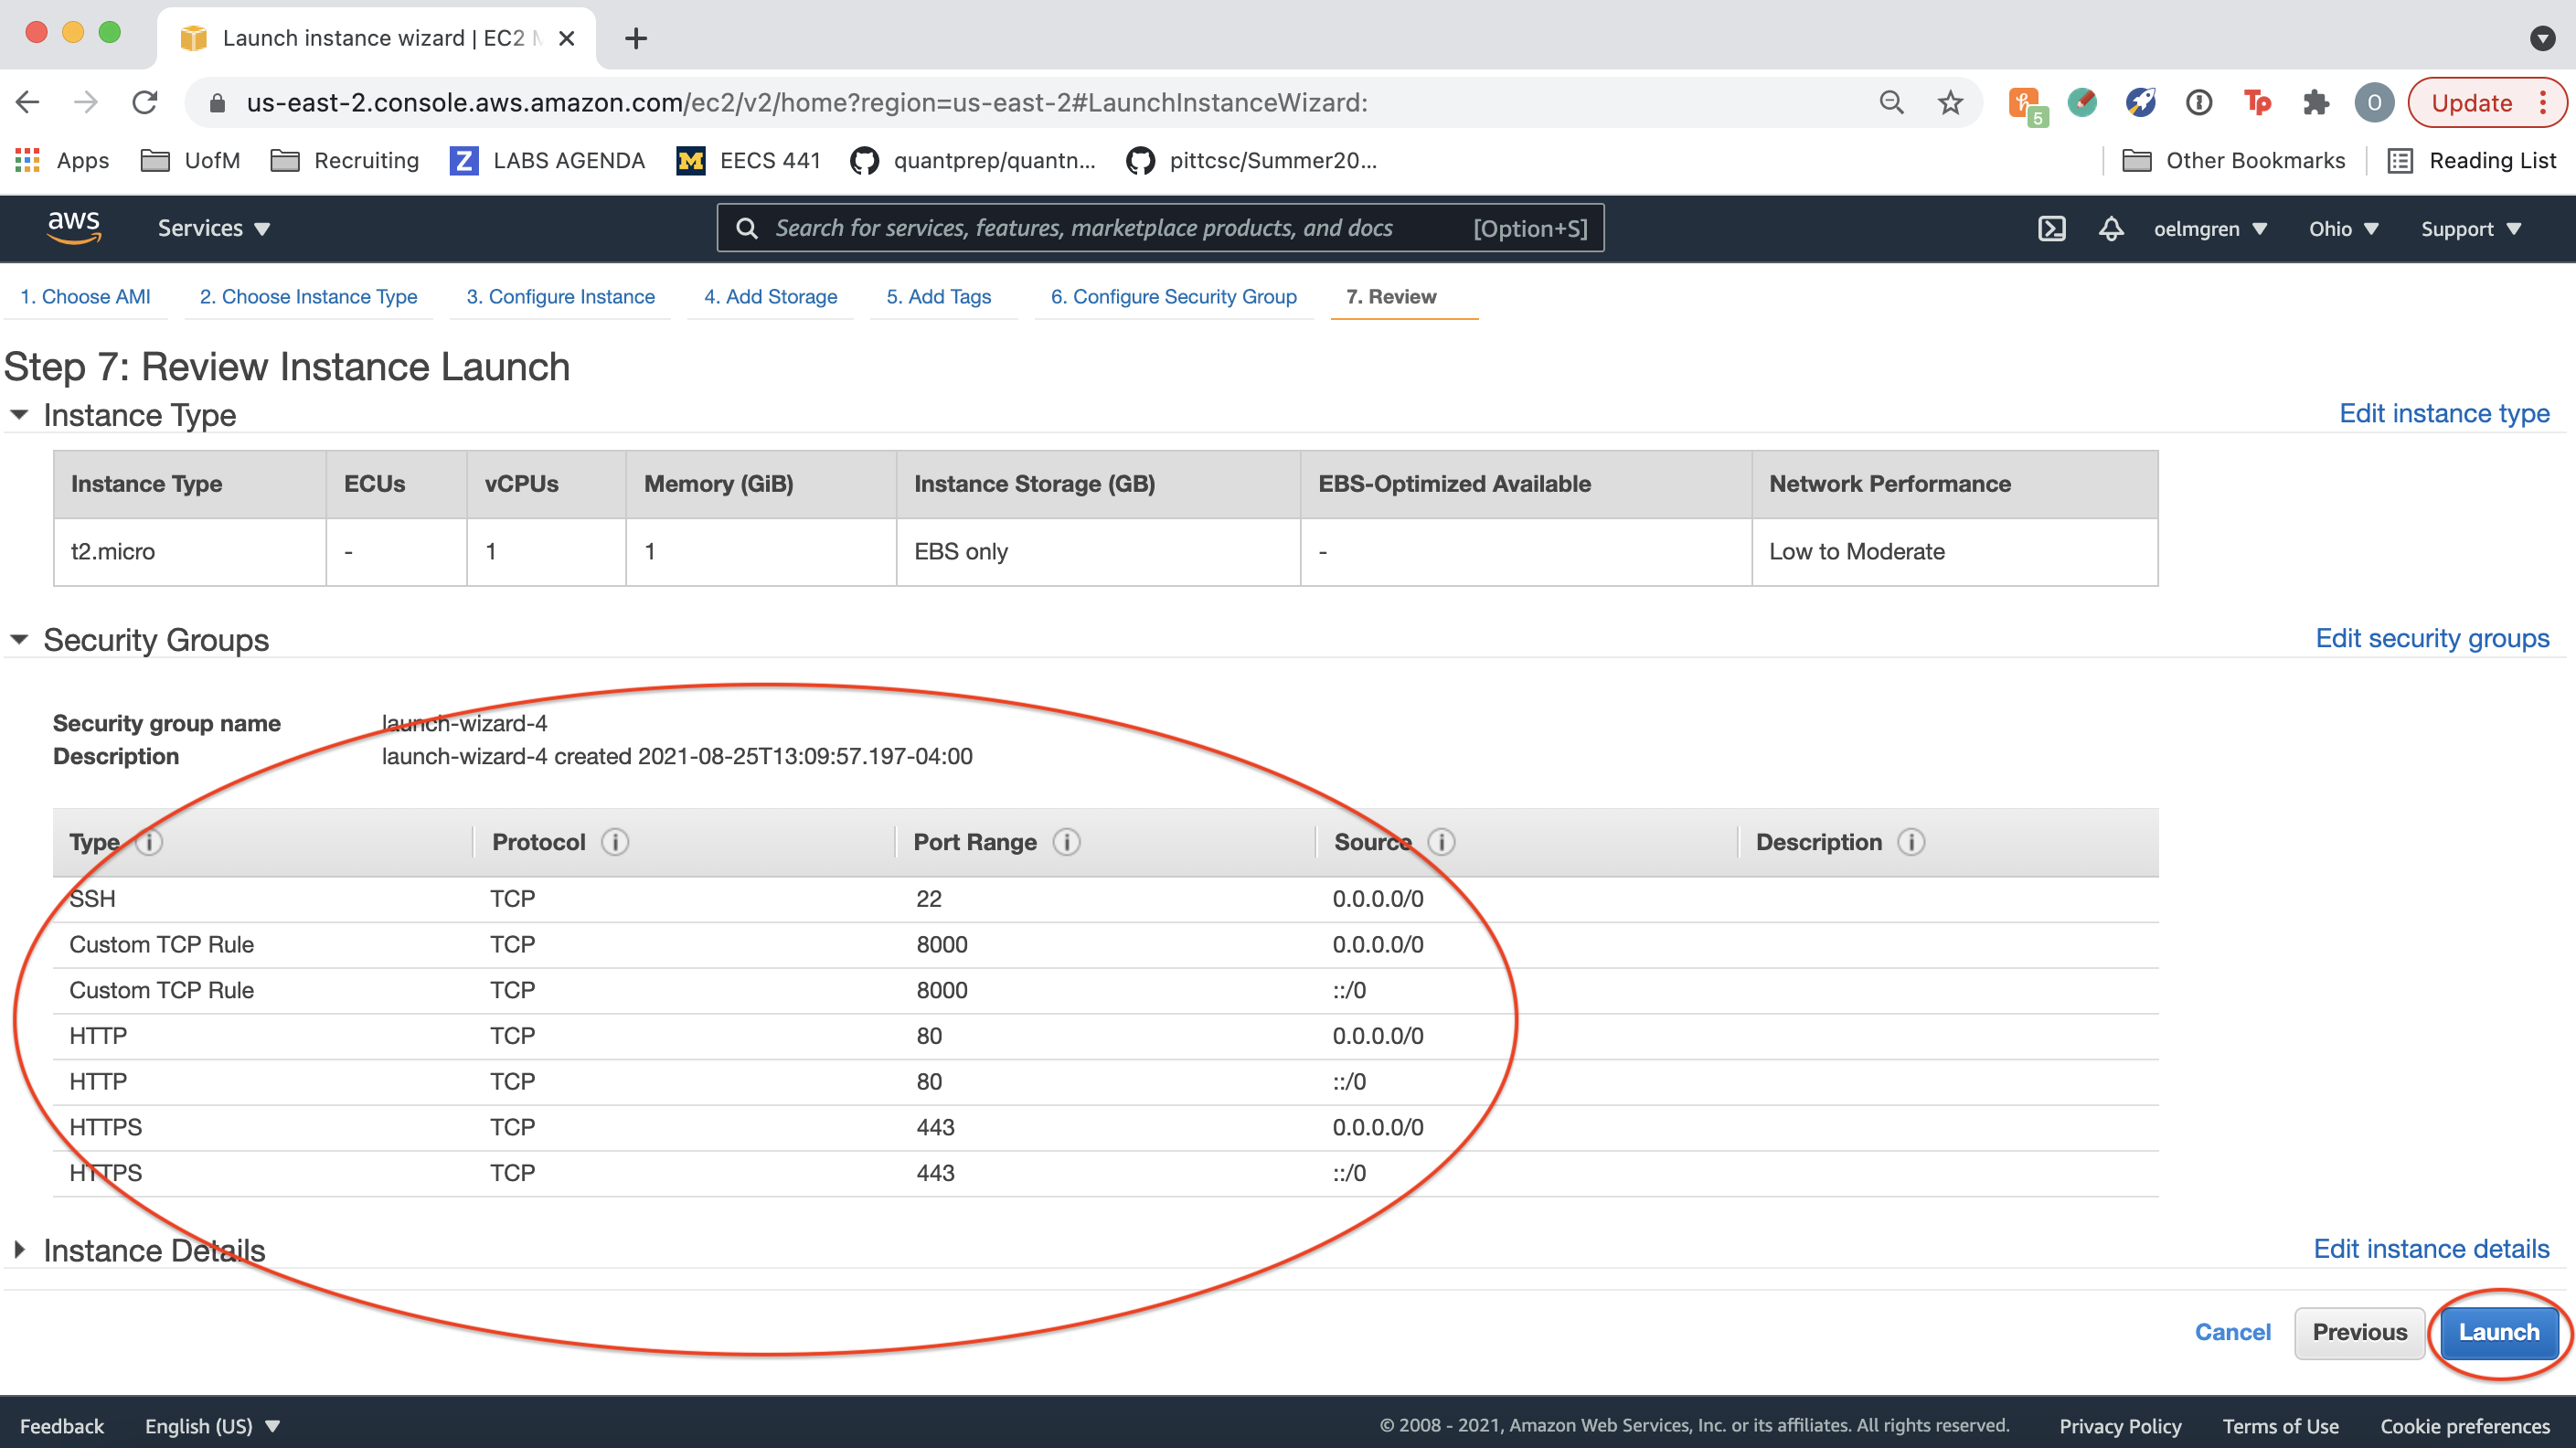
Add a rule to allow SSH, HTTP, HTTPS, and “Custom TCP Rule” for port 8000 (Django) traffic in and out of your instance. Then, click “Review and Launch”.
Click “Launch”. Ignore a warning about “Improve your instances’ security”.
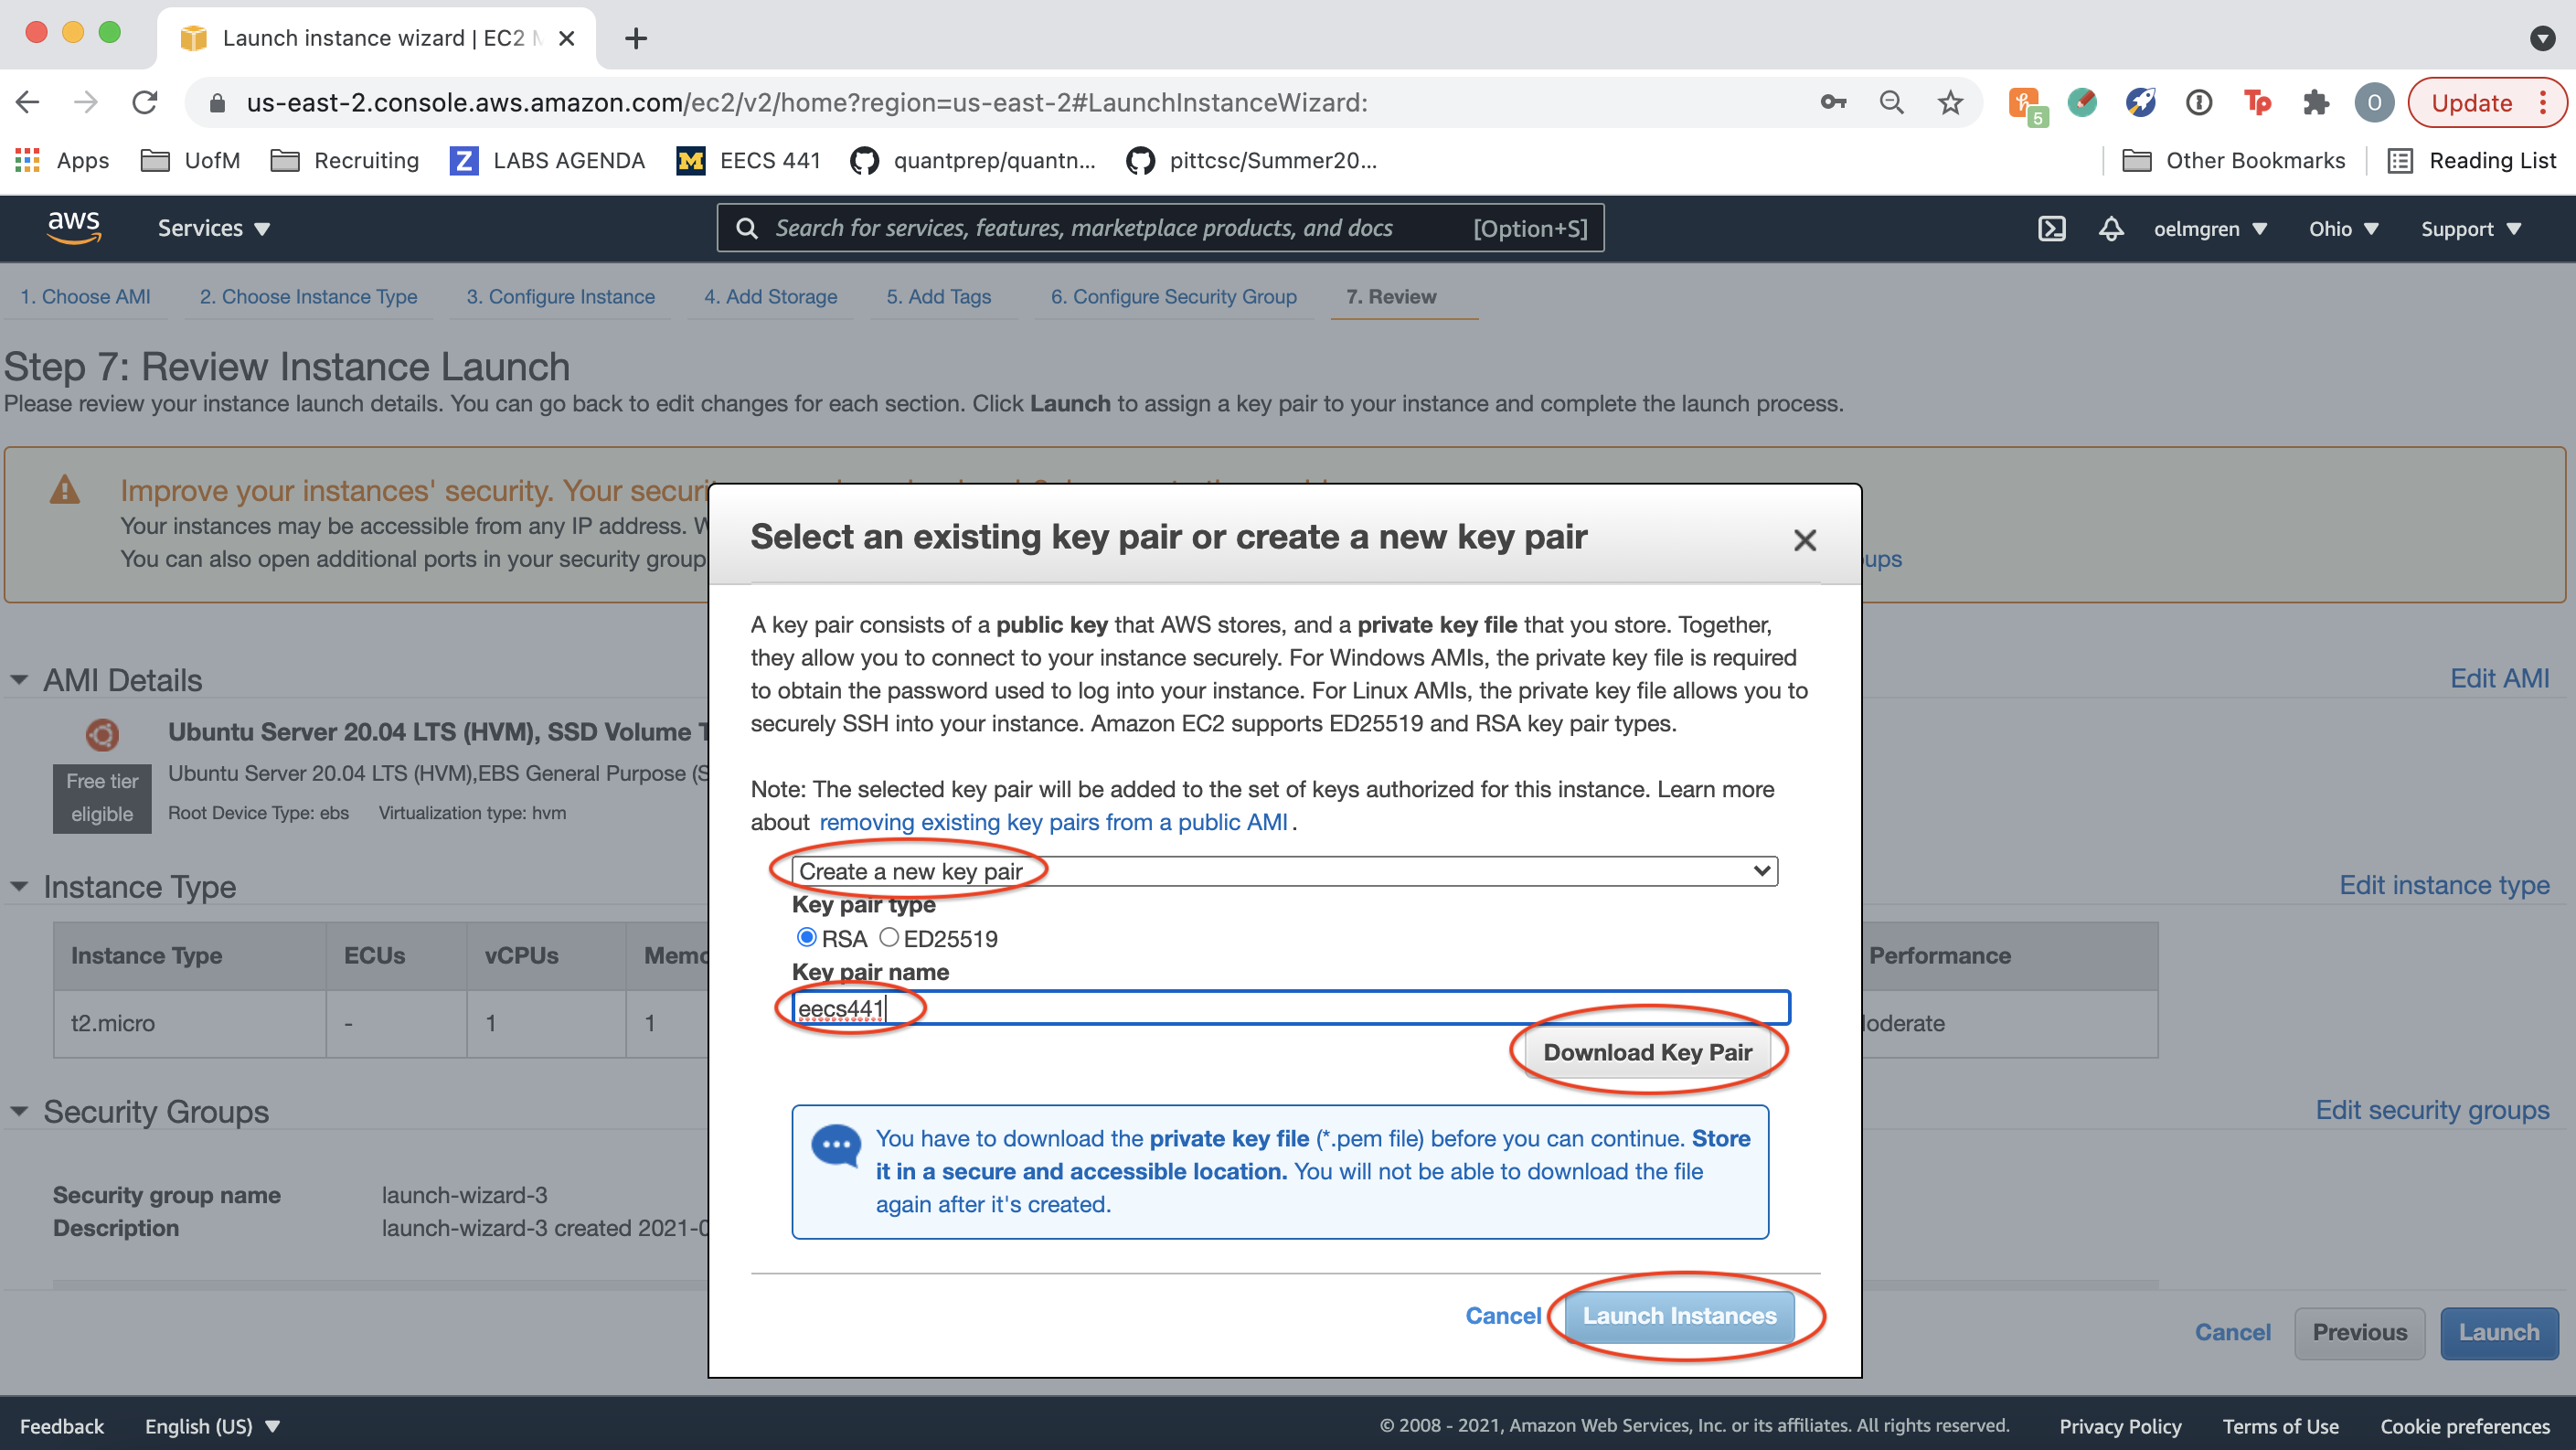
When you create an instance, AWS automatically creates user “ubuntu” for you on the instance. Create a key pair for user “ubuntu” and download it. You’ll use this later to ssh to the instance. Finally, click “Launch Instances”.
Click “View Instances”.
Instance status
Navigate to the AWS Management Console. Select the “Services” dropdown menu, then “EC2”.
Click “Instances”.
Select one of the instances and view its status and Public DNS.
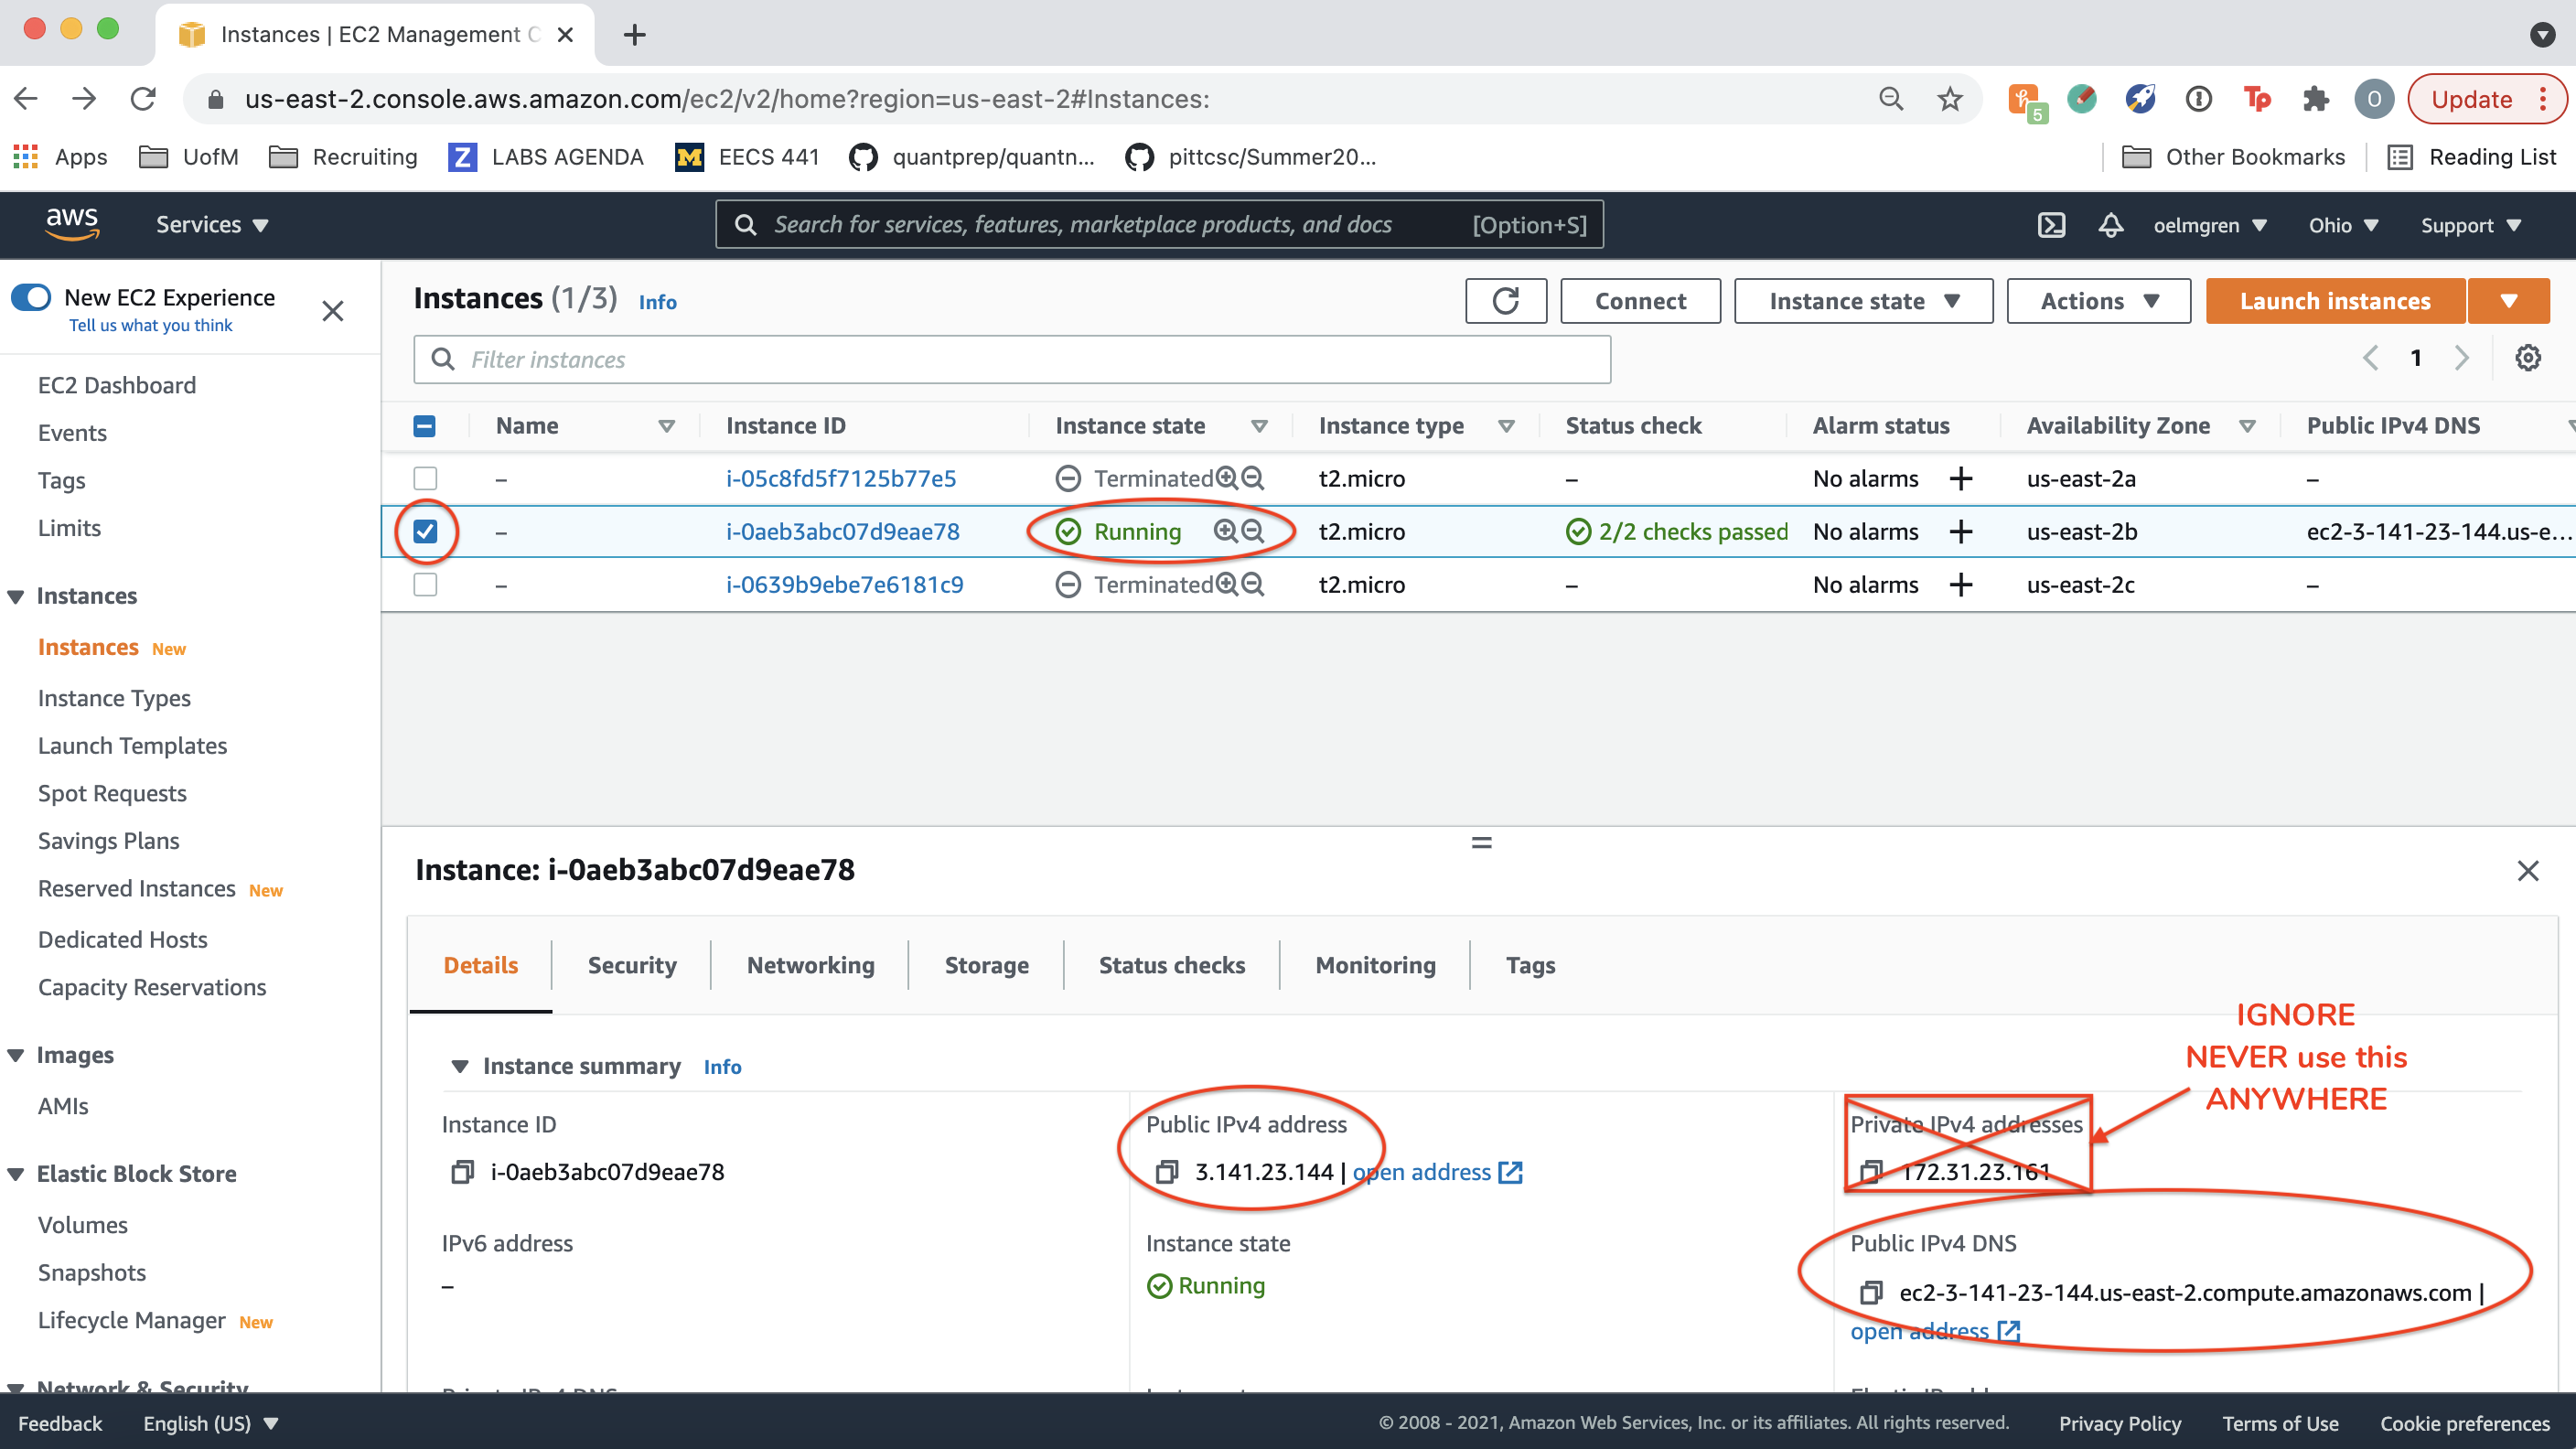
In the remainder of this spec, we will refer to your “IPv4 Public IP” as YOUR_SERVER_IP (in the image it’s 3.141.23.144) and “Public DNS (IPv4)” as YOUR_SERVER_DNS (in the image it’s ec2-3-141-23-144.us-east-2.compute.amazonaws.com). Note that YOUR_SERVER_IP always follows ec2 in YOUR_SERVER_DNS, with your “region” listed next (in this case us-east-2).
ssh to instance
On your development host (laptop):
If AWS gave you a
eec441.cerinstead ofeecs441.pem, just useeecs441.cereverywhere you seeeecs441.pemin this spec.
MacOS on Terminal:
laptop$ cd YOUR_LABSFOLDER
laptop$ mv ~/Downloads/eecs441.pem eecs441.pem
laptop$ chmod 400 eecs441.pem
laptop$ ssh -i eecs441.pem ubuntu@YOUR_SERVER_IP
Windows on PowerShell [thanks to Jad Beydoun (F21) for use of icacls]:
PS laptop> cd YOUR_LABSFOLDER
PS laptop> mv ~\Downloads\eecs441.pem eecs441.pem
PS laptop> icacls eecs441.pem /grant "$($env:username):(r)" /inheritance:r
PS laptop> ssh -i eecs441.pem ubuntu@YOUR_SERVER_IP
In both cases, what the above does:
- change working directory to
YOUR_LABSFOLDER, - move the private
sshkey you created and downloaded earlier toYOUR_LABSFOLDER, - set its permissions to read-only, and
sshto your AWS instance as user “ubuntu” using the downloaded private key.
You must use YOUR_SERVER_IP, not YOUR_SERVER_DNS, to ssh to your AWS instance. The DNS hostname assigned by AWS is too long for ssh.
And make sure your instance is running. See Instance status.
Stop instance
DO NOT STOP YOUR INSTANCE. Please leave your EC2 instance running for grading purposes. Stopping your instance will change its alloted IP address and undo some of the customizations you’ve done following this spec. When we’re done with all the labs, after lab3 has been graded, in about 2.5 months, and if you don’t need your instance for your course project, then you can stop your instance, to avoid using your AWS credits.
The AWS free credit refreshes every month. So don’t fret if you get an email from AWS near the end of a month saying you’ve used up 85% of your free credit. It should reset when the new month rolls around.
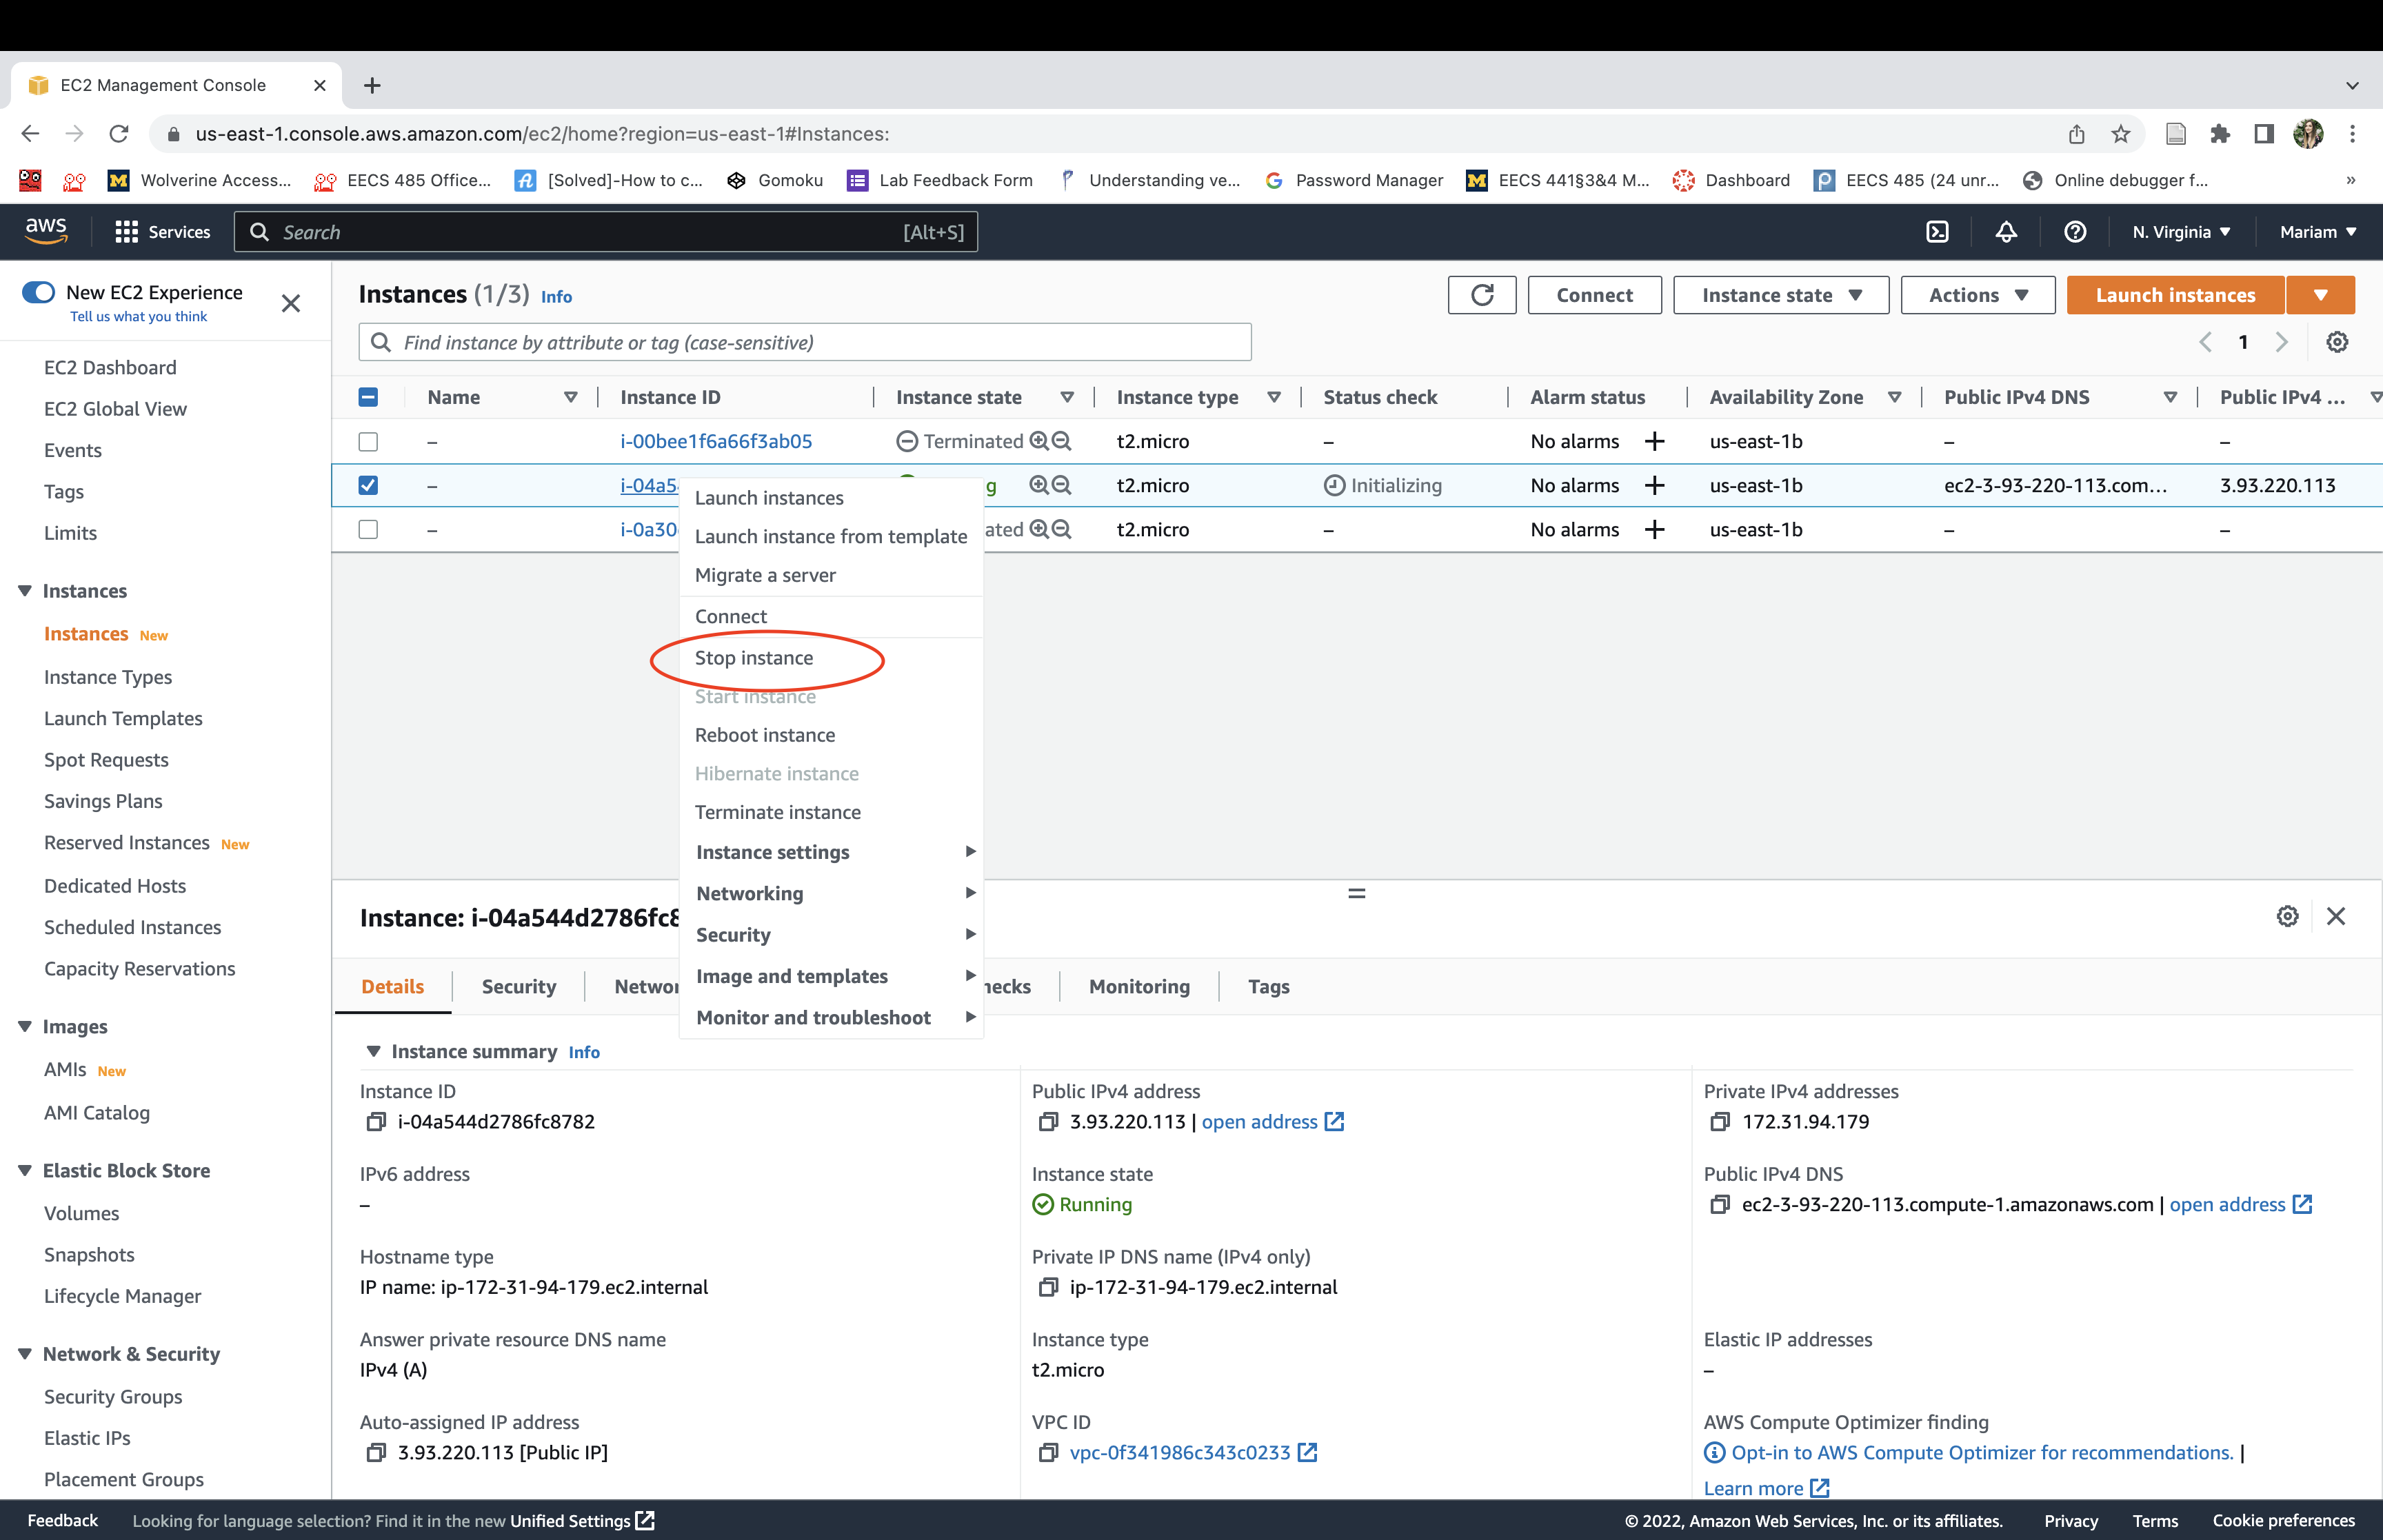
Check your Instance status.
Right click on your instance > Instance State >Stop.

You should now see that your instance is stopped.

Appendix
Command line tools
To administer AWS EC2 instance from the Ubuntu command line, install the following:
server$ sudo apt install cloud-utils awscli
Useful commands:
server$ ec2metadata
server$ aws configure
server$ aws ec2 help
The command ec2metadata shows the instance’s public-ip and public-hostname.
The command aws configure asks for AWS Access Key ID, which can be obtained from:
server$ aws iam list-access-keys
It also asks for AWS Secret Access Key, which is shown only at creation time at the IAM console.

The Default region name is listed in the public-hostname following the public-ip.
The command aws ec2 is the main interface to configure ec2. The help sub-command lists all the sub-commands such as describe-security-groups, from which one can obtain the group name/id needed to run sub-command authorize-security-group-ingress, for example.
To add IPv6 CIDR block use --ip-permissions, e.g.,
server$ aws ec2 authorize-security-group-ingress --group-id YOUR_GROUP_ID --ip-permissions IpProtocol=tcp,FromPort=8000,ToPort=8000,Ipv6Ranges=[{CidrIpv6=::/0}]
GCP
Google Cloud Platform has a free-tier, with free credits that are easy to qualify for.
Log in to Google Account
You’ll need a personal Google account to use the Google Cloud Platform. Do not use your umich email address. The following steps are adapted from Google Cloud’s Quickstart using a Linux VM, though they have been adapted to the course. For example, we choose an E2 instance that is eligible for the free-tier.
Create Project
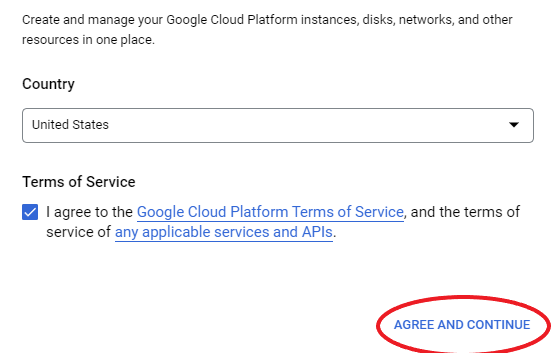
Go to the Google Cloud Platform Project Selector page
and create a project. Click AGREE AND CONTINUE if you agreed to Google’s Terms of Service.
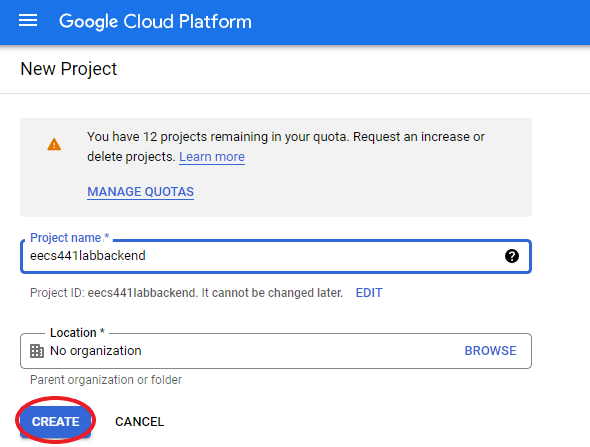
Create a project by clicking on the Create Project button.

Give your project a name unique to you and click Create.
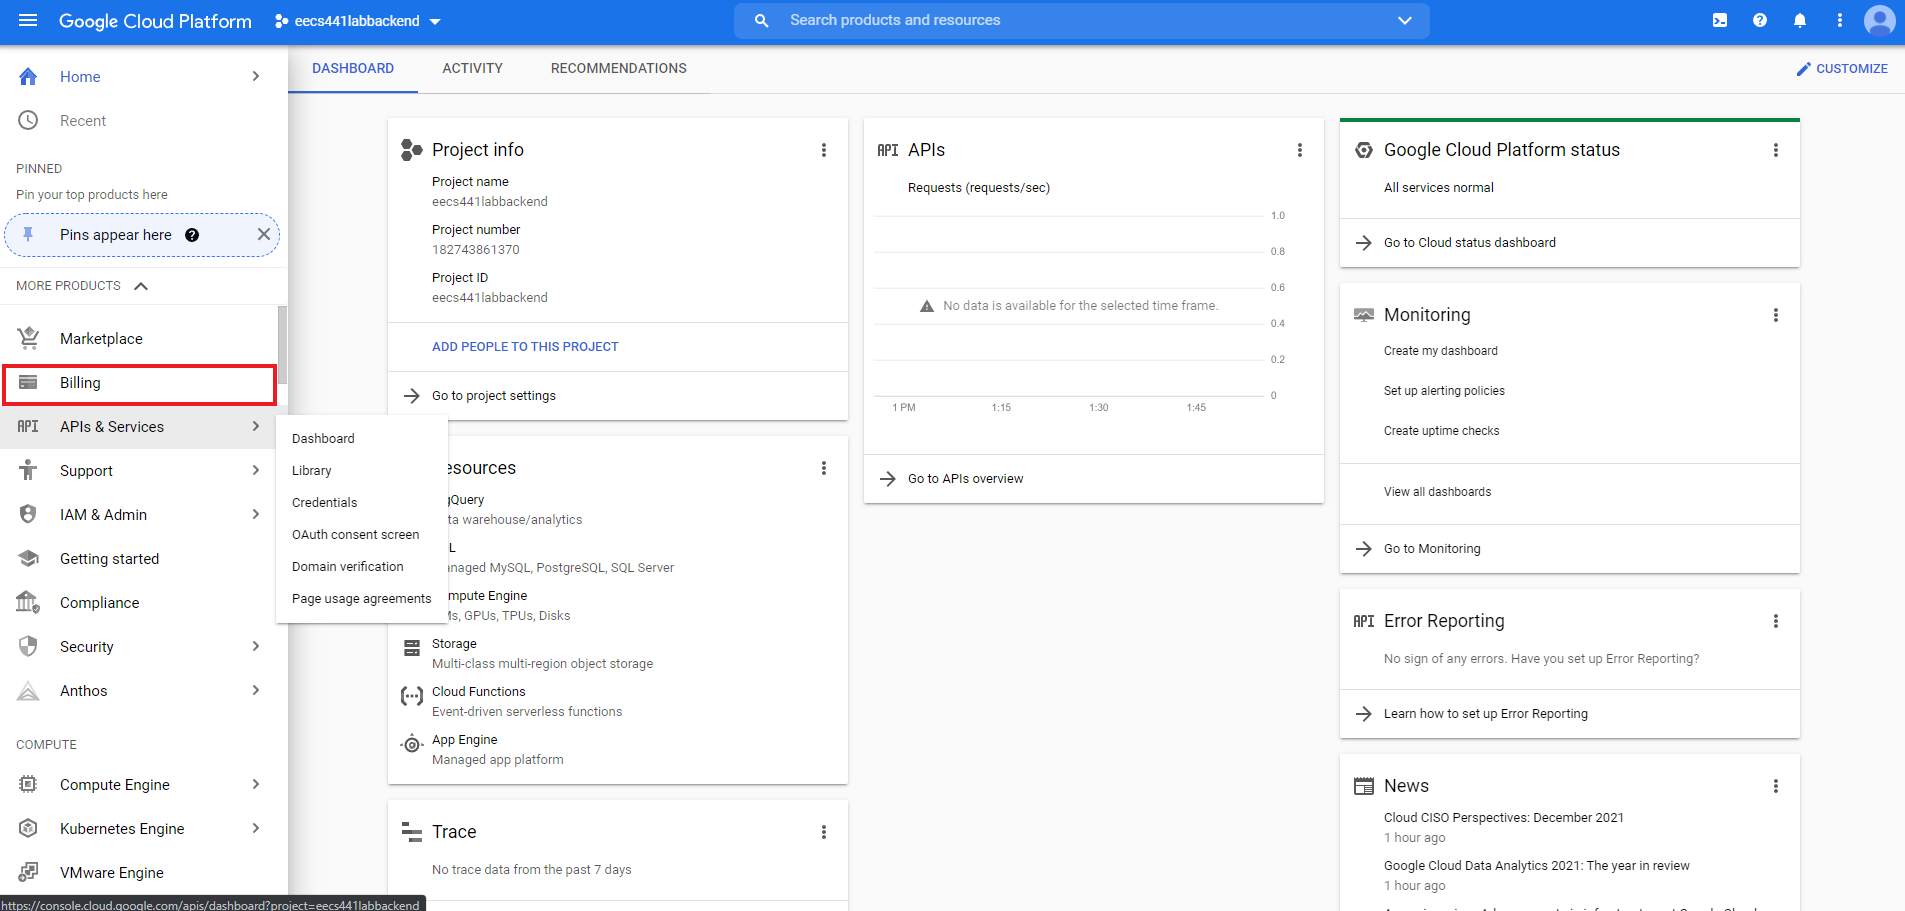
Add billing
Add a billing method to your project.
When you fill out your billing information, select “individual” as account type. Make sure you see something like this:

Add a credit or debit card. If your backend qualifies for free-tier (it should), this card will not be charged. Select START MY FREE TRIAL. Return to the project console.
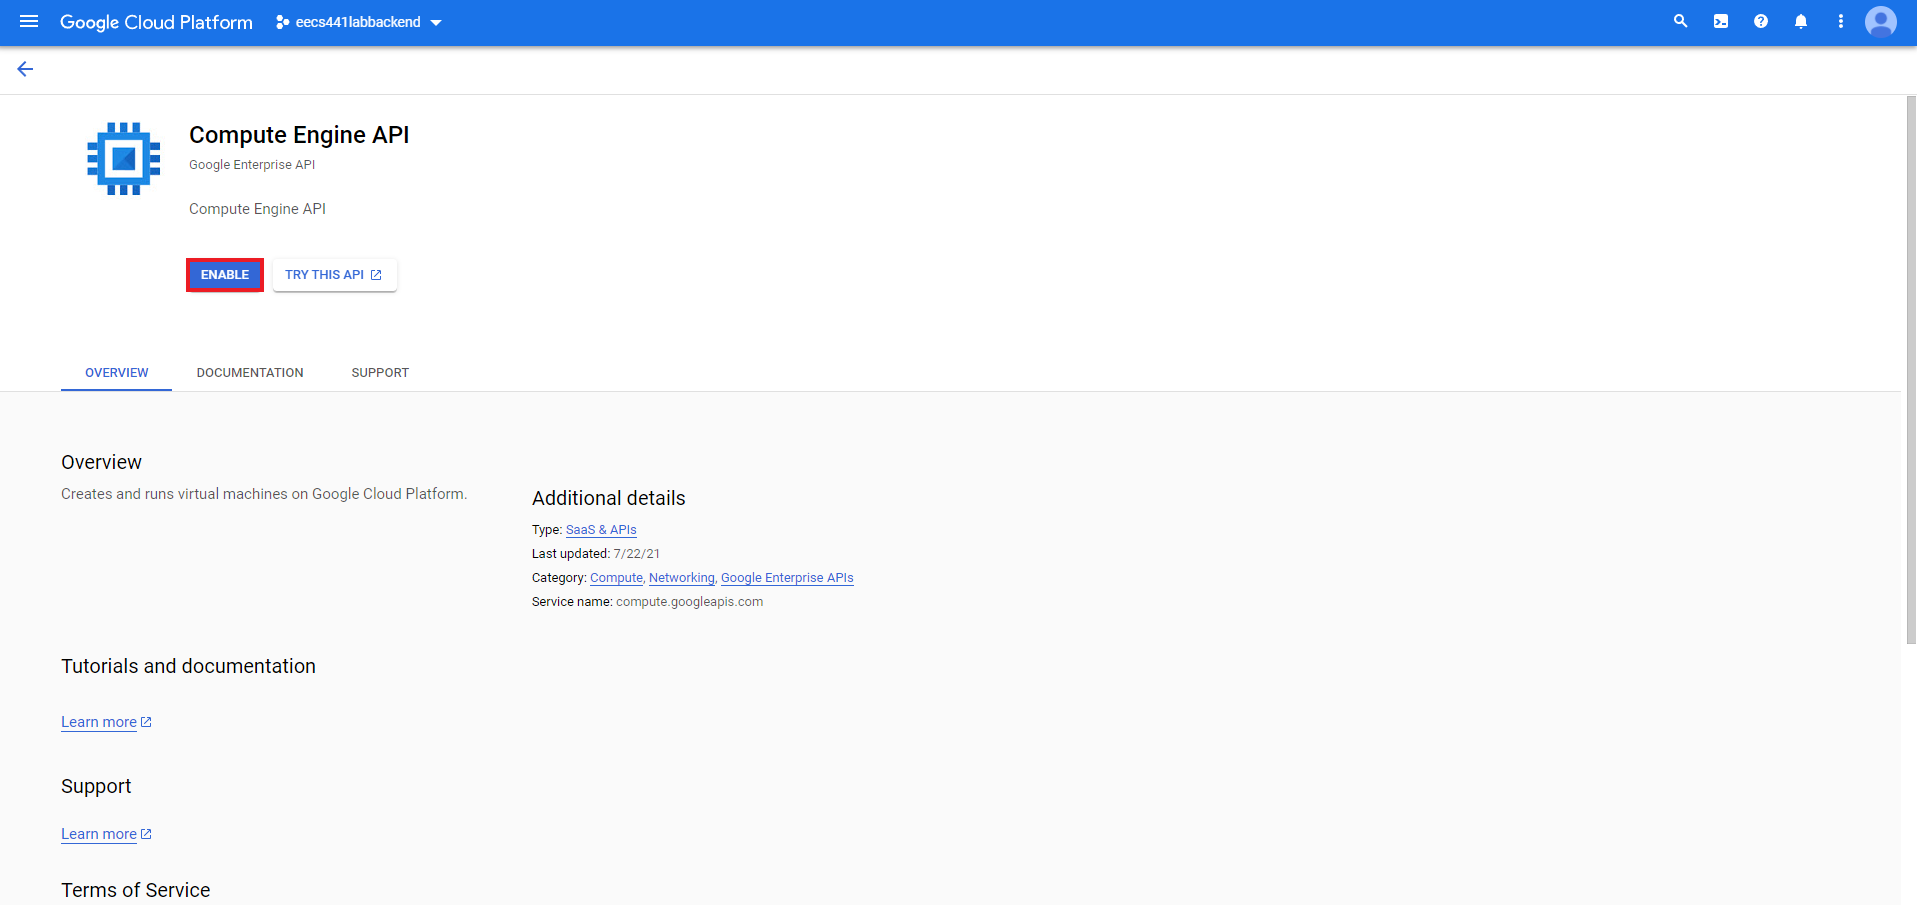
Enable Compute Engine API
Visit GCP’s Compute Engine API site and select ENABLE.
Create VM instance
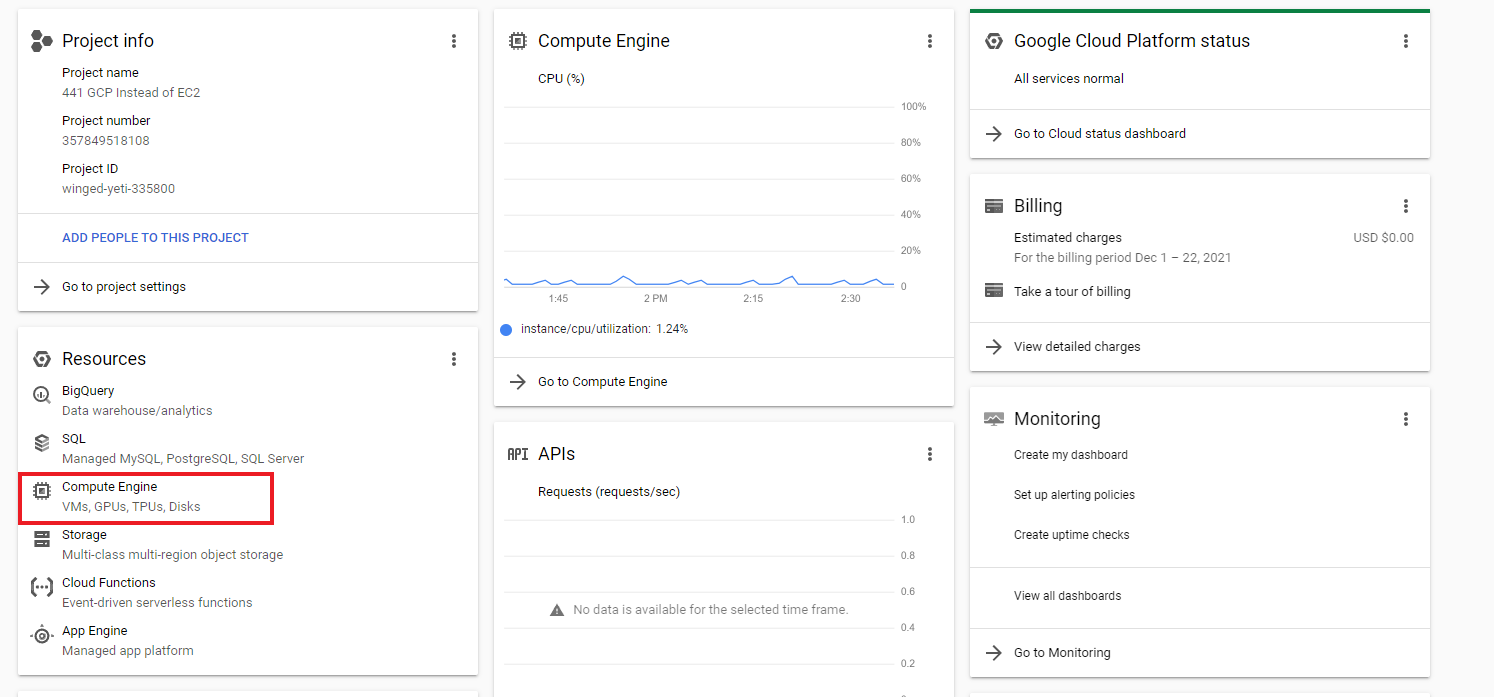
Return to the console. Hover over Compute Engine on the left navigation bar and select VM Instances.

Select CREATE INSTANCE.

Review the free tier options at the Google Cloud Free Program page by scrolling to the section titled “Free Tier usage limits”. Look under the “Compute Engine” section and check regions eligible for free tier. Free tier usage is governed by time used. Currently, an E2 in Oregon, Iowa, or South Carolina is eligible for free tier if used for the number of hours in a month.

Give the instance a name and carefully select the regions that are available as free tier with an e2-micro configuration.
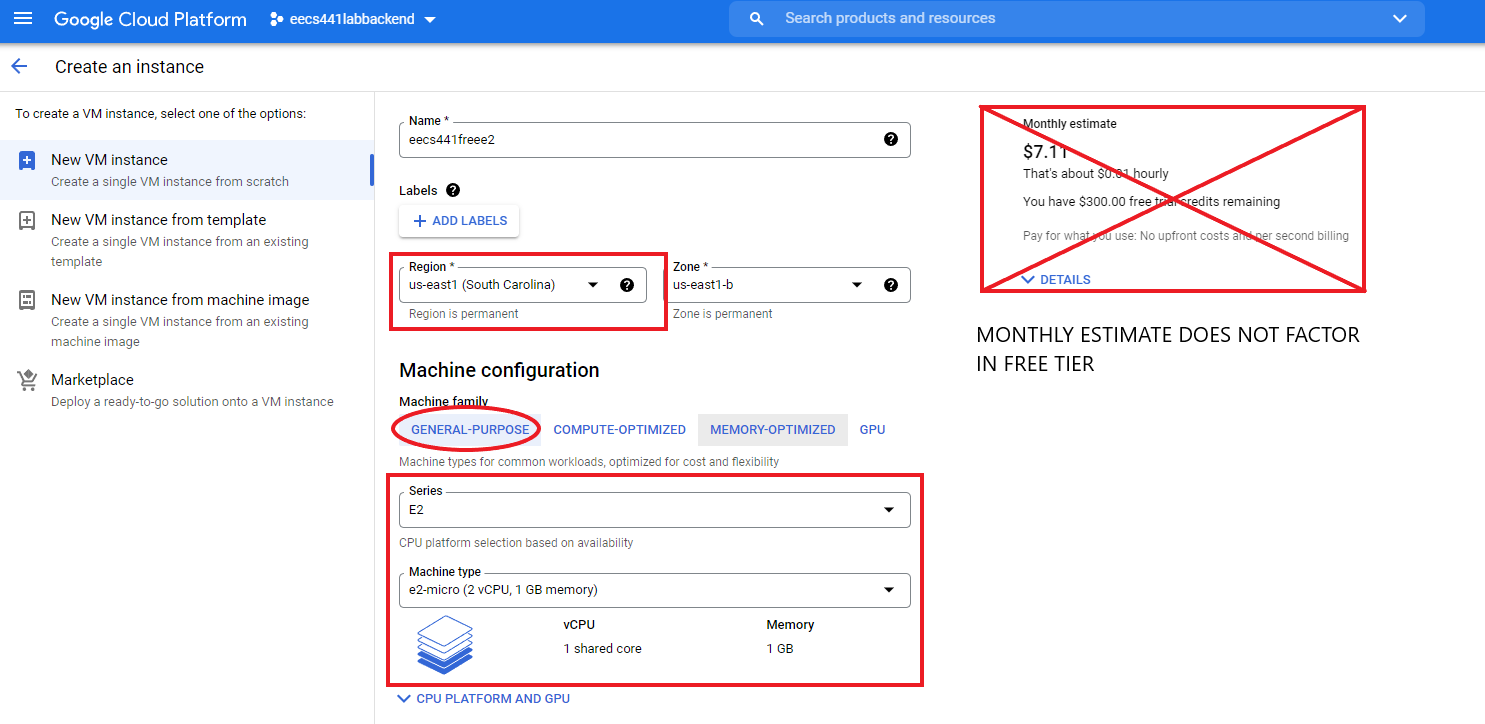
The monthly estimate does not factor in free tier. If the steps are followed, your account should not be billed.
Scroll down until you see the **Boot disk**** section. Click “CHANGE” under Boot disk and configure it
to Ubuntu 20.04 LTS. Be sure to select STANDARD PERSISTENT DISK. Any other Boot Disk type option will cost you.

After you’ve chosen “Ubuntu 20.04 LTS” and “Standard persistent disk”, click the blue SELECT button.
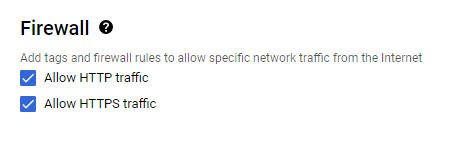
Back in the “Machine configuration” page, scroll down further, pass the “Boot disk” section, to get to the “Firewall” section. In the “Firewall” section, allow both HTTP and HTTPS traffic. You should see two boxes like this:
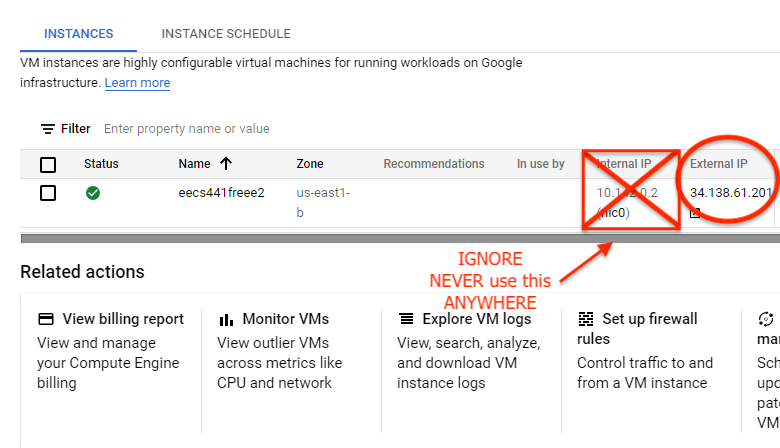
Press “CREATE” to create the instance. Wait for the instance to initialize. When the loading animations are done, write down the external IP address shown on the screen. You will need it for the rest of the term. You’ll never need the internal IP (and GCP doesn’t provide any public DNS for your instance).
Next select the triple dots on your E2. Select “Network Details”.

Select “Firewall”. We have to change one more firewall setting to allow us to test the web server we’ll be setting up later.
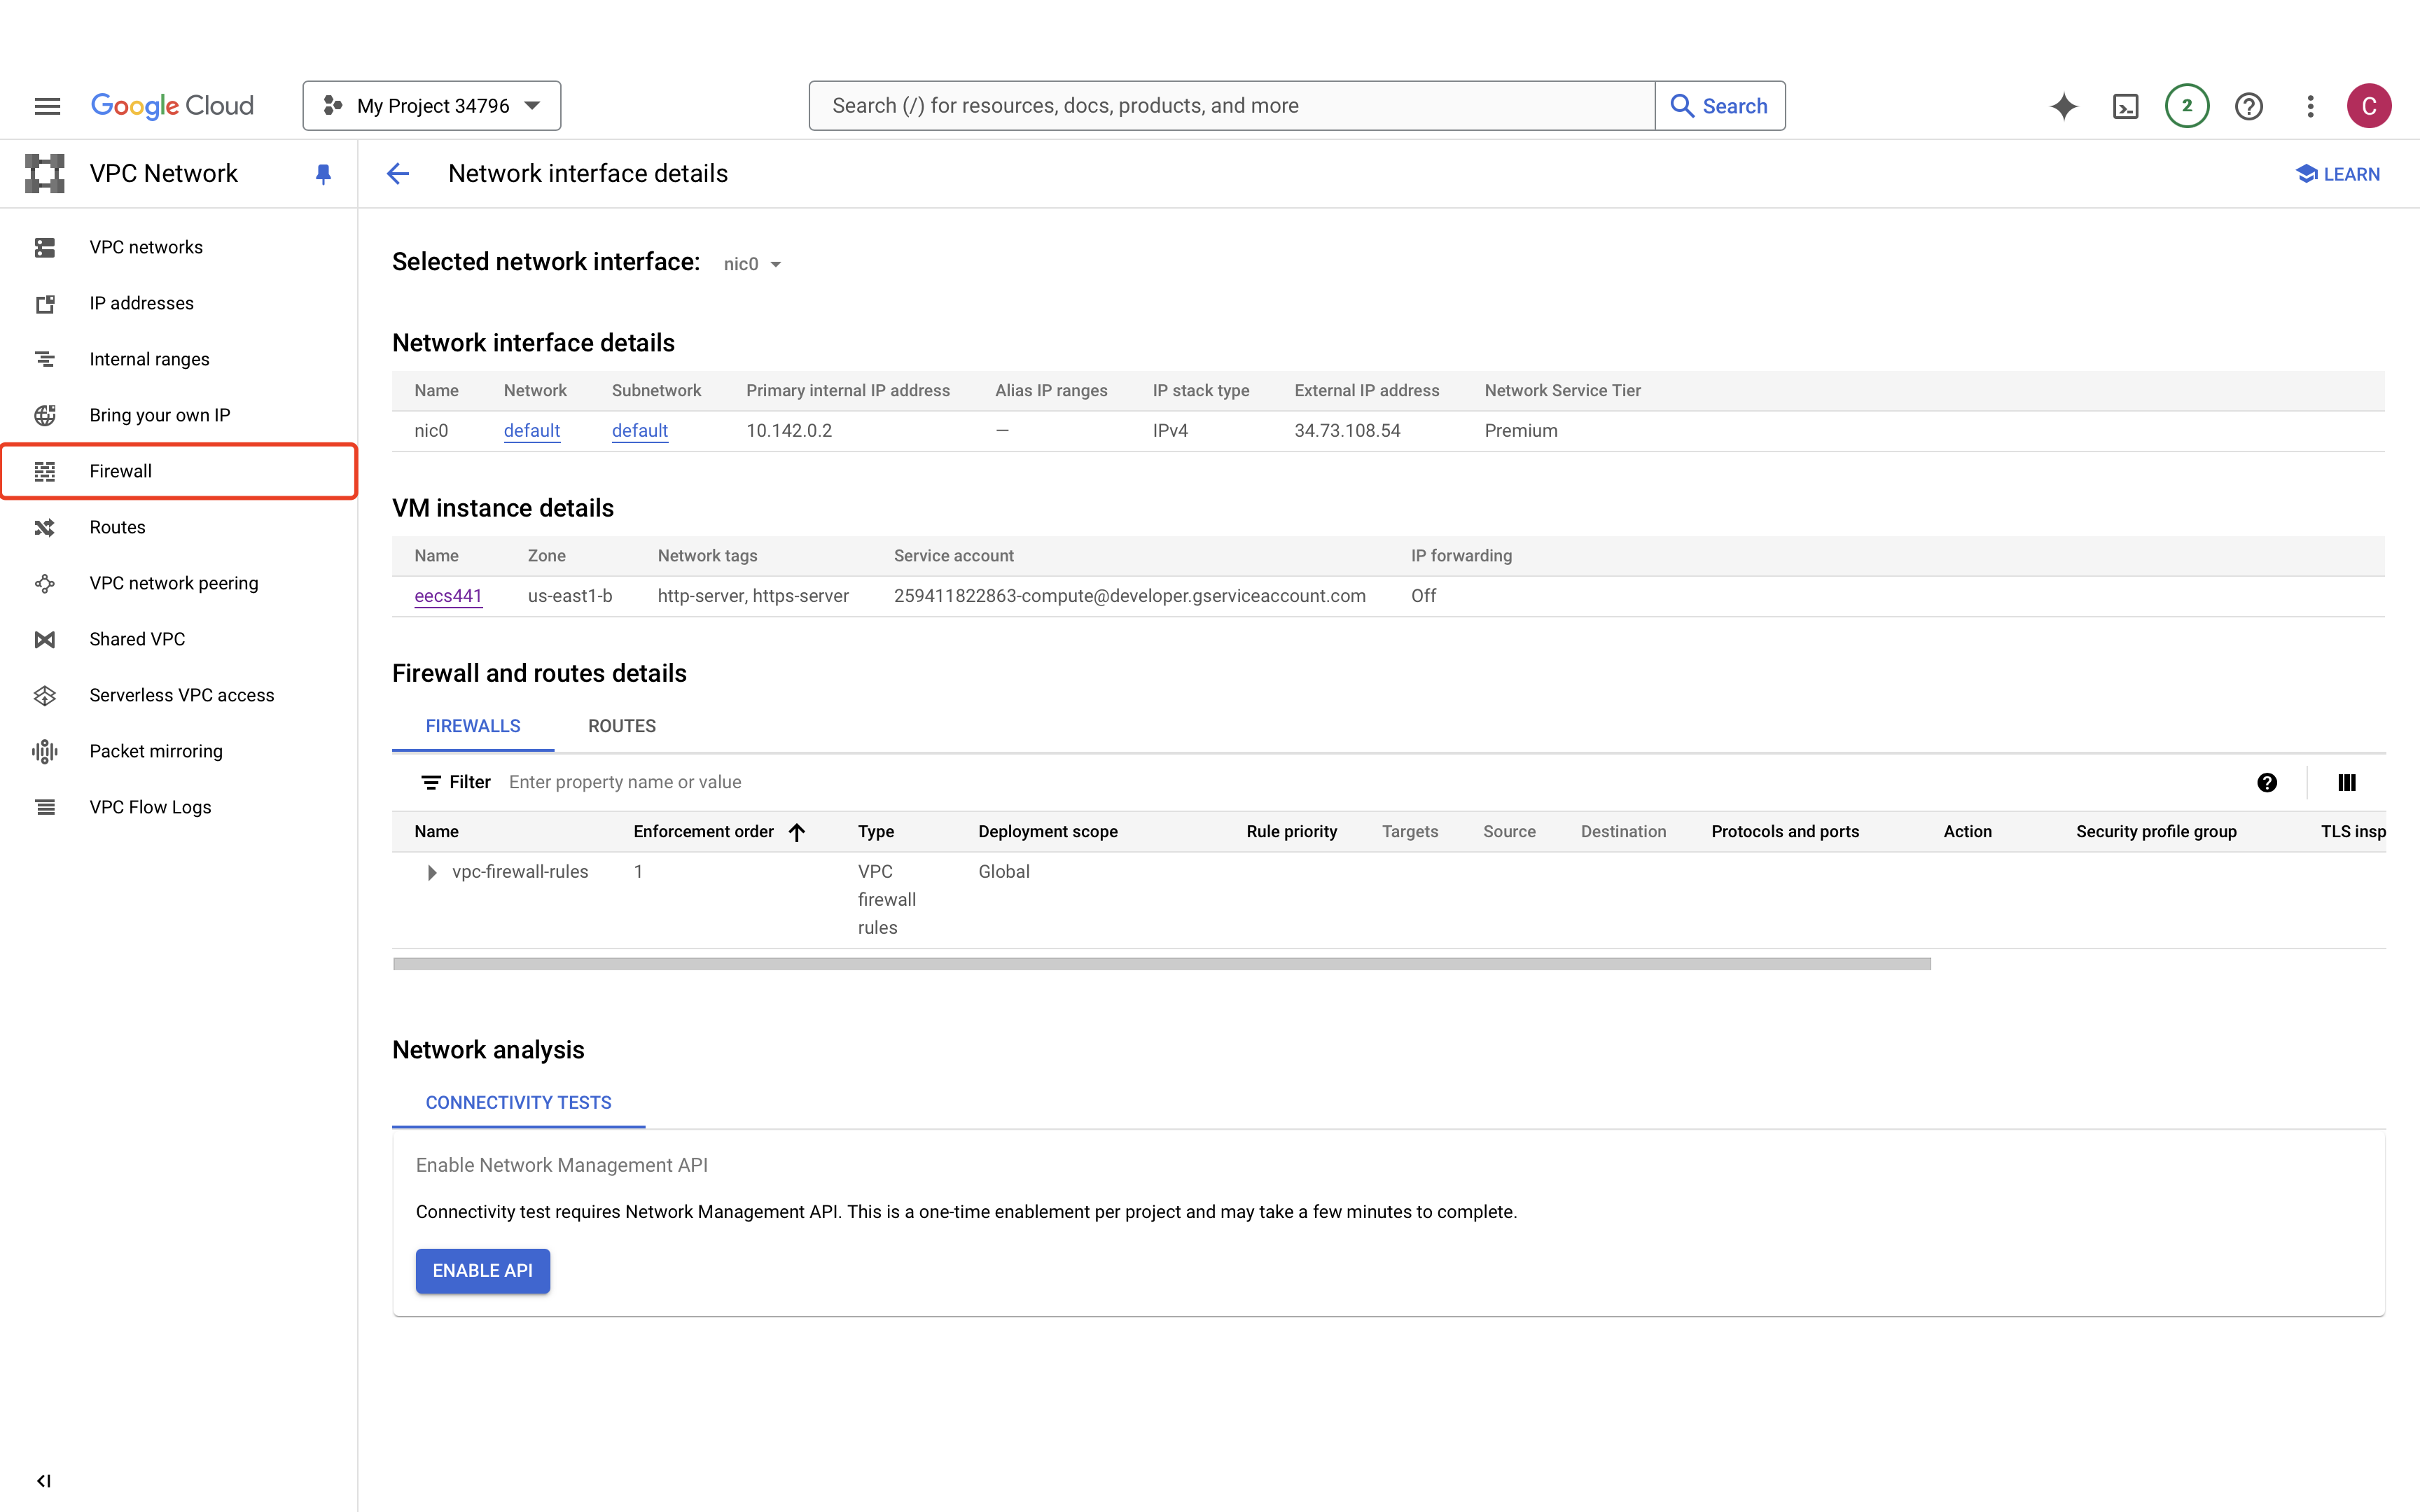
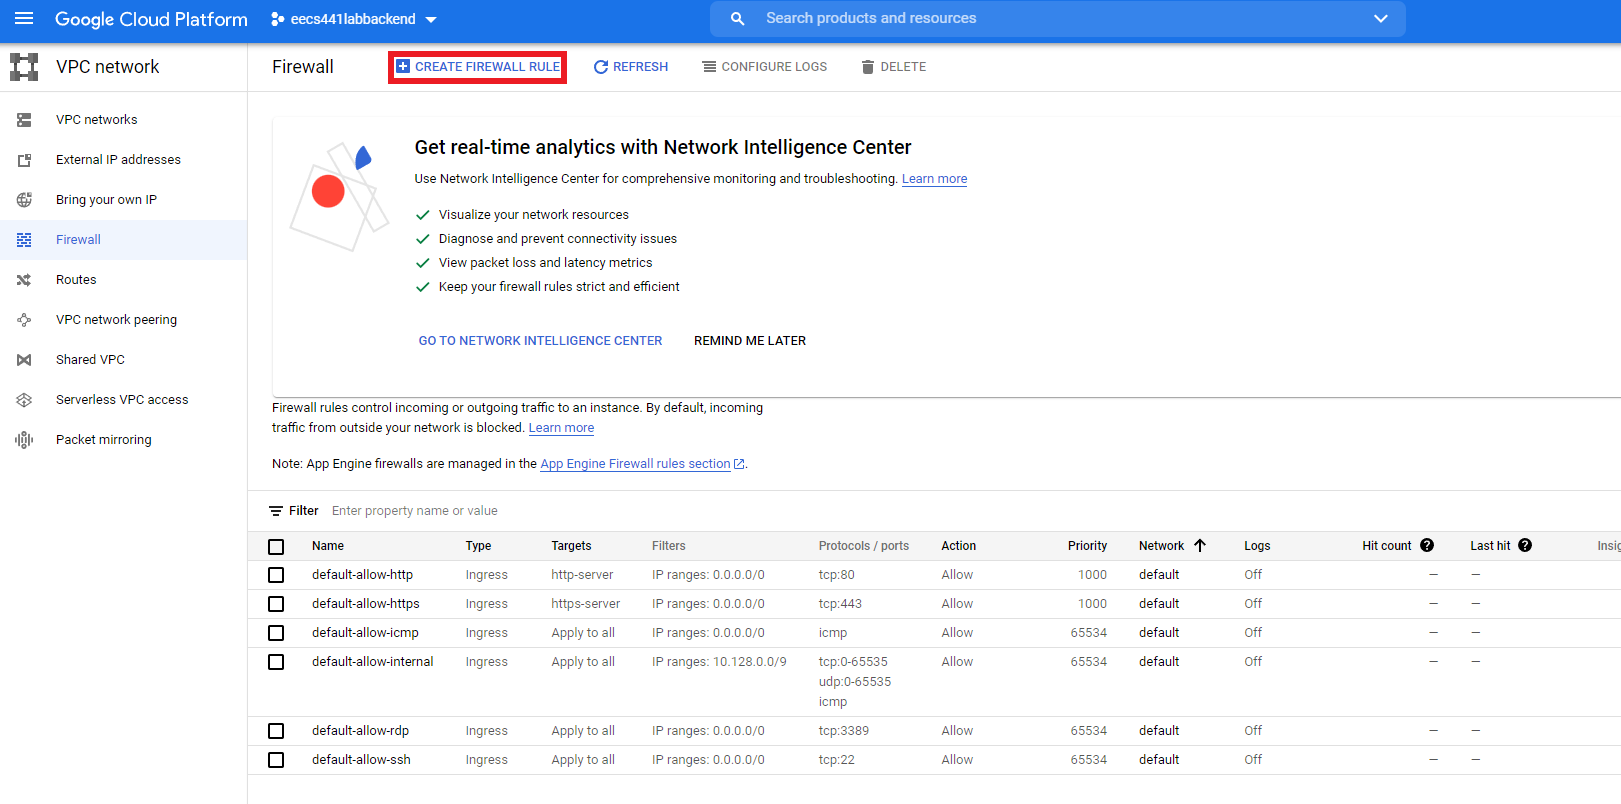
Create a firewall rule.
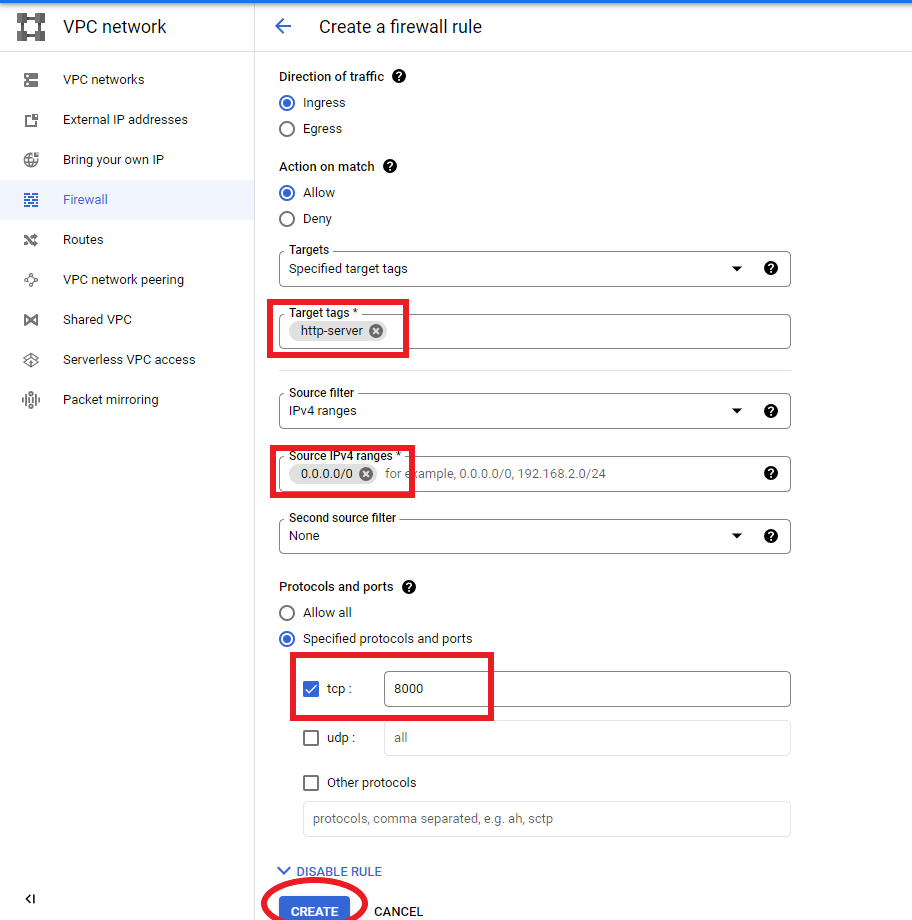
Give your rule a name. Scroll down to “Targets”. Enter “http-server” into the “Target tags” box. Enter 0.0.0.0/0 into the source IPv4 ranges box. Enter port 8000 into the tcp box. Press “CREATE”.
ssh to instance
To build your back end as user ubuntu, please do the following:
First generate a public/private key pair for user “ubuntu”:
laptop$ ssh-keygen -C ubuntu
when ssh-keygen prompts you for the file in which to save the key, enter “eecs441.pem”. It will then
prompt you for a passphrase. Leave it empty. Hit return or enter, twice. You should see output similar to this:
Your identifcation has been saved in eecs441.pem
Your public key has been saved in eecs441.pem.pub
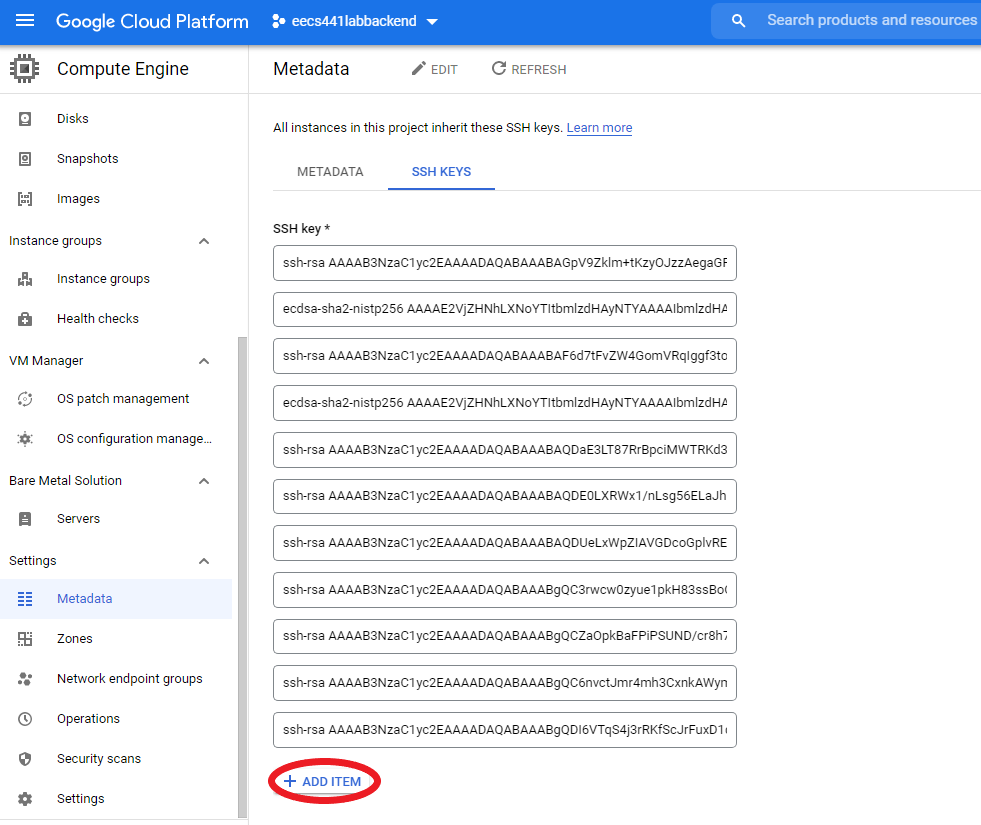
Go to GCP Metadata page, open the SSH KEYS tab and click on EDIT.

On the edit page, click + ADD ITEM, copy and paste the content of your “eecs441.pem.pub” to the empty box that
+ ADD ITEM brought up, and hit the blue SAVE button.
Your SSH KEYS tab should now list “ubuntu” under Username with its corresponding public key:

Keep both your “eecs441.pem.pub” and “eecs441.pem” in a safe place you can easily remember, for example, YOUR_LABSFOLDER:
laptop$ mv eecs441.pem YOUR_LABS_FOLDER
laptop$ mv eecs441.pem.pub YOUR_LABS_FOLDER
laptop$ cd YOUR_LABS_FOLDER
laptop$ chmod 400 eecs441.pem
To ssh to your instance, change folder to YOUR_LABS_FOLDER and ssh to your GCP instance as user “ubuntu” using the generated private key.
laptop$ cd YOUR_LABS_FOLDER
laptop$ ssh -i eecs441.pem ubuntu@YOUR_SERVER_IP
where YOUR_SERVER_IP always refers to the external IP address you’ve noted down earlier.
Stop instance
DO NOT STOP YOUR INSTANCE. Please leave your E2 instance running for grading purposes. Stopping your instance will change its alloted IP address and undo some of the customizations you’ve done following this spec. When we’re done with all the labs, after lab3 has been graded, in about 2.5 months, and if you don’t need your instance for your course project, then you can stop your instance, to avoid using your GCP credits.
GCP should have given you the minimum of 90 days and $300 of credit upon signing up. That is, if your E2 runs more than 3 months and is not eligible for free tier after that (this should not happen anyways) you will get billed a small amount.
Head to your E2 dashboard. Select “Compute Engine”.
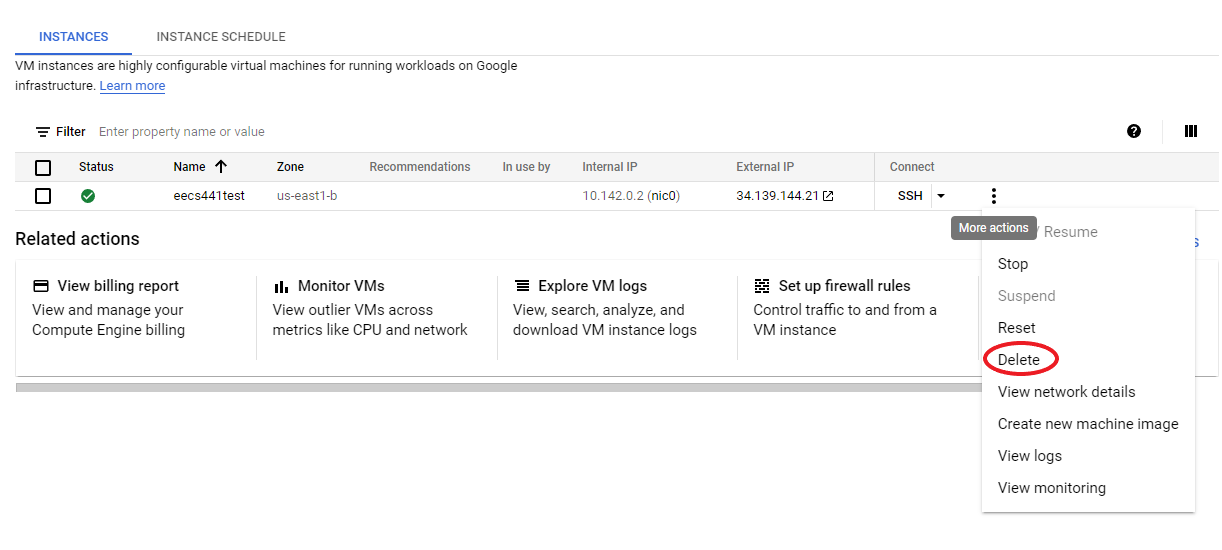
When you are completely done with your E2, delete it to ensure you are not charged. A day or two later, ensure that there are no charges for your E2 at all.
Web server
The following are based on DigitalOcean’s How To Set Up Django with Postgres, Nginx, and Gunicorn on Ubuntu 20.04 though the instructions have been customized to the specifics of our Chatter project, especially when it comes to directory and variable naming, for the sake of narrative consistency across all our labs.
Installing packages
We next need to install and setup the following packages using the apt package manager:
- Python 3.8 or later
- PostgreSQL (latest version)
- Nginx (latest version)
We will later use the Python package manager pip to install:
- Django 3.1.3 or later
- Gunicorn (latest version)
Before we start, we first ensure that you have the latest apt package manager’s index. Then we download and install the packages and set python3 to be your default python:
server$ sudo apt update
server$ sudo apt install python3-pip python3-dev python3-venv libpq-dev postgresql postgresql-contrib nginx curl
server$ sudo ln -s /usr/bin/python3 /usr/bin/python
Troubleshooting python
To verify that python3 is setup correctly, enter:
server$ python --version
# output:
Python 3.8.10
If you get any error message, try:
server$ sudo update-alternatives --install /usr/bin/python python /usr/bin/python3 1
# output:
update-alternatives: using /usr/bin/python3 to provide /usr/bin/python (python) in auto mode
server$ sudo update-alternatives --list python
# output:
/usr/bin/python3
server$ python --version
# output:
Python 3.8.10
Installing updates
Every time you ssh to your server, you will see something like:
N updates can be installed immediately.
if N is not 0, run the following:
server$ sudo apt update
server$ sudo apt upgrade
Failure to update your packages could lead to the lab back end not performing correctly and also make you vulnerable to security hacks.
If you see *** System restart required *** when you ssh to your server, please run:
server$ sync
server$ sudo reboot
Your ssh session will be ended at the server. Wait a few minutes for the system to reboot before you ssh to your server again.
PostgreSQL
-
Log into an interactive Postgres (
psql) session as userpostgres:server$ sudo -u postgres psqlYou may receive the message: “could not change directory to “/root”: Permission denied”. You can safely ignore this message.
Your command-line prompt should change to
postgres=#. -
Create a database for your project:
CREATE DATABASE chatterdb; -
Connect to the database you just created:
\connect chatterdb\connectmay be shortened to\c.Your command-line prompt should change to
chatterdb=#. -
Create a database user for your project. Make sure to select a secure password.
CREATE USER chatter WITH PASSWORD 'chattchatt';TIP: Forgetting to do this is a common cause of getting HTTP error code
500 Internal Server Error.All SQL commands must end with a
;. -
Use SQL commands from here to do what you need, e.g., creating tables, deleting all entries from a table (last command), etc.:
CREATE TABLE chatts (username varchar(255), message varchar(255), time timestamp DEFAULT CURRENT_TIMESTAMP); INSERT INTO chatts VALUES ('testuser1', 'Hello world'); SELECT * from chatts; TRUNCATE TABLE chatts;TIP: Trying to send
messagelonger than 255 characters is another common cause of getting HTTP error code500 Internal Server Error. -
You can issue the
\dtcommand to list all tables:\dt List of relations Schema | Name | Type | Owner --------+--------+-------+---------- public | chatts | table | postgres (1 rows) -
Next give user
chatteraccess to administer the new database. Your Django project will be known aschatterto the postgres database:GRANT ALL PRIVILEGES ON ALL TABLES IN SCHEMA public TO chatter; -
When you are finished, exit PostgreSQL:
\qor hit
Ctl-d(^d).
Clone your 441 GitHub repo to your back end server
We need to clone your 441 GitHub repo so that we can push your
back-end files for submission:
- First, on your browser, navigate to your
441GitHub repo - Click on the green
Codebutton and copy the URL to your clipboard by clicking the clipboard icon next to the URL - Then on your back-end server:
  server$ cd ~
  server$ git clone <paste the URL you copied above> 441
If you haven’t, you would need to create a personal access token to use HTTPS Git.
If all goes well, your 441 repo should be cloned to ~/441. Check that:
server$ ls ~/441
shows the content of your 441 git repo, including your lab1 front end.
Python virtual environment
We next install Python within a virtual environment for easier management.
-
First confirm that your installed python is of version 3.8 or higher:
server$ python --versionIf your shell doesn’t recognize the command or the output doesn’t say
Python 3.8or higher, you’d need to switch your python to version 3.8 or higher. If you don’t know how to switch to a different version of python, try this tutorial. -
Create and change into a directory where we can keep our project files:
server$ mkdir ~/441/chatter server$ cd ~/441/chatter -
Within the project directory, create a Python virtual environment:
server$ python -m venv envThis will create a directory called
envwithin yourchatterdirectory. Inside, it will install a local version of Python and a local version ofpip. We can use this to install and configure an isolated Python environment for our project.Note: for this and subsequent labs, we will assume your folders/directories are named using the “canonical” names listed here. For example, we will always refer to the project directory as
~/441/chatterand the directory where the python virtual environment is housed as~/441/chatter/env, without further explanations, from this lab to lab3. If you prefer to use your own naming scheme, you’re welcome to do so, but be aware that you’d have to map your naming scheme to the canonical one in all the labs. -
Activate your virtual environment:
server$ source env/bin/activateYour prompt should change to indicate that you are now operating within a Python virtual environment. It will look something like this:
(env) ubuntu@YOUR_SERVER_IP:~/441/chatter$.Henceforth we will shorten the prompt to just
(env):chatter$to indicate being inside the python virtual environment. -
Within your activated virtual environment, install
django,gunicorn, and thepsycopg2PostgreSQL adaptor using the local instance ofpip:(env):chatter$ pip install django gunicorn psycopg2-binaryYou should now have all of the software packages needed to start a Django project.
You can check whether Django is installed and which version is installed with:
server$ python -m django --version
Django web framework
-
Create a Django project:
(env):chatter$ django-admin startproject routing ~/441/chatterAt this point your project directory (
~/441/chatter) should have the following content:~/441/chatter/env/: the virtual environment directory we created earlier.~/441/chatter/manage.py: the Django project management script.~/441/chatter/routing/: the Django project package. This should contain theasgi.py,__init__.py,settings.py,urls.py, andwsgi.pyfiles.
-
Edit the project settings:
(env):chatter$ vi routing/settings.pyTo edit a file, use your favorite editor, such as
nanoorvi(orvimornvim). In this and all subsequent labs, we will assumevibecause it has the shortest name 😊. You can replaceviwith your favorite editor every time you see it.Nanohas on-screen help and may be easier to pick up.At the top of the file add:
import osNext locate the
ALLOWED_HOSTSdirective. This defines a list of addresses or domain names clients may use to connect to the Django server instance. Any incoming requests with a Host header that is not in this list will raise an exception. Django requires that you set this to prevent a certain class of security vulnerability.In the square brackets, list the IP addresses or domain names that are associated with your Django server. Each item should be listed in single quotes, with entries separated by a comma. In the snippet below, a few commented out examples are provide as examples. Those with a period prepended to the beginning of an entry serves an entire domain and its subdomains.
Note: Be sure to include ‘localhost’ as one of the options, for testing. You can also add ‘127.0.0.1’, the IP address indicating localhost. Some online examples may use it instead of ‘localhost’.
. . . # The simplest case: just add the domain name(s) and IP addresses of your Django server # ALLOWED_HOSTS = [ 'example.com', '203.0.113.5'] # To respond to 'example.com' and any subdomains, start the domain with a dot # ALLOWED_HOSTS = ['.example.com', '203.0.113.5'] # ALLOWED_HOSTS = ['your_server_domain_or_IP', 'second_domain_or_IP', . . ., 'localhost'] ALLOWED_HOSTS = ['YOUR_SERVER_IP', 'localhost', '127.0.0.1']YOUR_SERVER_IPwill be your external IP address. Don’t list your internal IP address nor your DNS.It is a common bug not to replace
YOUR_SERVER_IPwith your external IP address in the above file.Next find the
DATABASESconfiguration. The default configuration in the file is for a SQLite database. We want to use a PostgreSQL database for our project, so we need to change the settings to our PostgreSQL database information. We tell Django to use thepsycopg2adaptor we installed withpip. We need to give the database name, the database username, the database user’s password, and then specify that the database is located on the local computer. You can leave thePORTsetting as an empty string:DATABASES = { 'default': { 'ENGINE': 'django.db.backends.postgresql', 'NAME': 'chatterdb', 'USER': 'chatter', 'PASSWORD': 'chattchatt', 'HOST': 'localhost', 'PORT': '', } }Scroll to the bottom of the file and add a setting indicating where the static files should be placed. The Nginx web server is optimized to serve static files really fast, calling your python code to serve dynamic content only when necessary. Here we’re telling Django to put static files for Nginx in a directory called
staticin the base project directory (~/441/chatter/static/):STATIC_URL = '/static/' STATIC_ROOT = BASE_DIR / 'static' # added lineSave and close the
settings.pyfile when you’re done. -
We can now migrate Django’s administrative database schema to our PostgreSQL database using the management script (and the exptected output):
(env):chatter$ ./manage.py makemigrations # output: No changes detected (env):chatter$ ./manage.py migrate # output: Operations to perform: Apply all migrations: admin, auth, contenttypes, sessions Running migrations: No migrations to apply. -
Create an administrative user for the project:
(env):chatter$ ./manage.py createsuperuserYou can use your jaccount@sjtu.edu.cn, and choose and confirm a password.
-
Collect all static content into the static directory we configured:
(env):chatter$ ./manage.py collectstatic
# output:
128 static files copied to '/home/ubuntu/chatter/static'.
Testing Nginx
Aliyun(Recommended)
To run and test your development server:
(env):chatter$ ./manage.py runserver 0.0.0.0:8000
AWS
Following the initial server setup guide, you should have a ufw firewall
protecting your server. In order to test our back end, we now allow access to
port 8000 which we’ll be using for testing:
(env):chatter$ sudo ufw allow 8000
To run and test your development server:
(env):chatter$ ./manage.py runserver YOUR_SERVER_DNS:8000
You MUST use YOUR_SERVER_DNS not YOUR_SERVER_IP with runserver. Though you can use either when accessing the test server from a browser as per below.
GCP
To run and test your development server:
(env):chatter$ ./manage.py runserver 0.0.0.0:8000
In your web browser on your laptop, visit http://YOUR_SERVER_IP:8000/.
You should see the default Django index page:
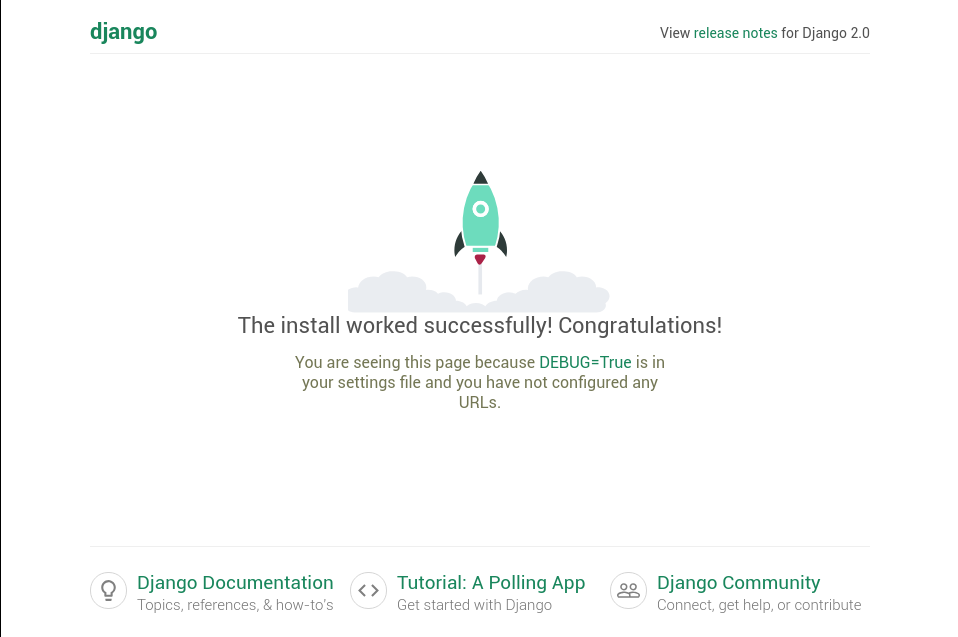
When you are satisfied, hit Ctl-C in server’s terminal window to shut down the development server.
Testing Gunicorn
-
The last thing we want to do before leaving our virtual environment is test Gunicorn to make sure that it can serve the application. We can do this by entering our project directory and using
gunicornto load the project’s WSGI (Web Server Gateway Interface) module:(env):chatter$ gunicorn --bind 0.0.0.0:8000 routing.wsgiThis will start Gunicorn on the same interface that the Django development server was running on. You should see output similar to this:
[2022-07-21 21:43:14 -0400] [32224] [INFO] Starting gunicorn 20.0.4 [2022-07-21 21:43:14 -0400] [32224] [INFO] Listening at: http://0.0.0.0:8000 (32224) [2022-07-21 21:43:14 -0400] [32224] [INFO] Using worker: sync [2022-07-21 21:43:14 -0400] [32227] [INFO] Booting worker with pid: 32227 -
When you are done testing, hit
Ctl-Cin theserver’s terminal window to stop Gunicorn. -
We’re done configuring the Django application. Exit the virtual environment:
(env):chatter$ deactivate
System-level setup
Configuring Gunicorn
We have tested that Gunicorn can interact with our Django application, we now implement
a more robust way of starting and stopping the application server. For this, we’ll rely on
systemd service and socket files.
The Gunicorn socket will be created at boot and will listen for connections. When a
connection occurs, systemd will automatically start the Gunicorn process to handle
the connection.
-
Start by creating and opening a
systemdsocket file for Gunicorn with sudo privileges:server$ sudo vi /etc/systemd/system/gunicorn.socket -
Inside, we will create a
[Unit]section to describe the socket, a[Socket]section to specify the socket location, and an[Install]section to make sure the socket is created at the right time:[Unit] Description=gunicorn socket [Socket] ListenStream=/run/gunicorn.sock [Install] WantedBy=sockets.targetSave and close the file when you are finished.
-
Next, create and open a
systemdservice file for Gunicorn, withsudoprivileges. The service filename must match the socket filename, except for the extension:server$ sudo vi /etc/systemd/system/gunicorn.service -
Enter the following into your
gunicorn.servicefile (ReplaceUSERNAMEwithrooton Aliyun andubuntuon AWS and GCP. ReplacePATH_TO_FOLDERwith/rooton Aliyun and/home/ubuntuon AWS and GCP):[Unit] Description=gunicorn daemon Requires=gunicorn.socket After=network.target [Service] User=USERNAME Group=www-data WorkingDirectory=PATH_TO_FOLDER/441/chatter ExecStart=PATH_TO_FOLDER/441/chatter/env/bin/gunicorn \ --access-logfile - \ --workers 3 \ --bind unix:/run/gunicorn.sock \ routing.wsgi:application [Install] WantedBy=multi-user.targetWith that, our
systemdservice file is complete. Save and close it. -
We can now start and enable the Gunicorn socket. This will create the socket file at
/run/gunicorn.socknow and at boot. When a connection is made to that socket,systemdwill automatically start thegunicorn.serviceto handle it:server$ sudo systemctl start gunicorn.socket server$ sudo systemctl enable gunicorn.serviceWe can confirm that the operation was successful by checking for the socket file.
server$ file /run/gunicorn.sock
# output:
/run/gunicorn.sock: socket
Testing socket
-
To test the socket activation mechanism, send a connection to the socket through
curl:server$ curl --unix-socket /run/gunicorn.sock localhost -
You should see the HTML output from your application in the terminal. This indicates that Gunicorn was started and was able to serve your Django application. You can also verify that the Gunicorn service is running with:
server$ systemctl status gunicornwhich should output something like:
● gunicorn.service
    Loaded: loaded (/etc/systemd/system/gunicorn.service; disabled; vendor preset: enabled)
    **Active: active (running)** since Wed 2022-05-27 16:47:07 UTC; 18s ago
  Main PID: 22195 (gunicorn)
    Tasks: 4 (limit: 1152)
    CGroup: /system.slice/gunicorn.service
            ├─22195 /home/ubuntu/chatter/env/bin/python /home/ubuntu/chatter/env/bin/gunicorn --access-logfile - --workers 3 --bind unix:/run/gunicorn.sock routing.wsgi:application
            ├─22211 /home/ubuntu/chatter/env/bin/python /home/ubuntu/chatter/env/bin/gunicorn --access-logfile - --workers 3 --bind unix:/run/gunicorn.sock routing.wsgi:application
            ├─22213 /home/ubuntu/chatter/env/bin/python /home/ubuntu/chatter/env/bin/gunicorn --access-logfile - --workers 3 --bind unix:/run/gunicorn.sock routing.wsgi:application
            └─22215 /home/ubuntu/chatter/env/bin/python /home/ubuntu/chatter/env/bin/gunicorn --access-logfile - --workers 3 --bind unix:/run/gunicorn.sock routing.wsgi:application

May 27 16:47:07 ubuntu-s-1vcpu-1gb-nyc1-01 systemd[1]: Started gunicorn.service.
May 27 16:47:08 ubuntu-s-1vcpu-1gb-nyc1-01 gunicorn[22195]: [2022-05-27 16:47:08 +0000] [22195] [INFO] Starting gu
May 27 16:47:08 ubuntu-s-1vcpu-1gb-nyc1-01 gunicorn[22195]: [2022-05-27 16:47:08 +0000] [22195] [INFO] Listening a
May 27 16:47:08 ubuntu-s-1vcpu-1gb-nyc1-01 gunicorn[22195]: [2022-05-27 16:47:08 +0000] [22195] [INFO] Using worke
May 27 16:47:08 ubuntu-s-1vcpu-1gb-nyc1-01 gunicorn[22195]: [2022-05-27 16:47:08 +0000] [22211] [INFO] Booting wor
May 27 16:47:08 ubuntu-s-1vcpu-1gb-nyc1-01 gunicorn[22195]: [2022-05-27 16:47:08 +0000] [22213] [INFO] Booting wor
May 27 16:47:08 ubuntu-s-1vcpu-1gb-nyc1-01 gunicorn[22195]: [2022-05-27 16:47:08 +0000] [22215] [INFO] Booting wor
lines 1-18
Make sure Gunicorn’s status reported on the third line is
Active: active (running).TIP: Should you need to debug any of your Django python code later in the term,
systemctl status gunicornalso shows error messages from your python code, including any debug printouts from your code. The commandsystemctl status gunicornis by far the most useful go-to tool to diagnose back-end server problem.Troubleshooting
-
If the output from
curlor the output ofsystemctl statusindicates that a problem occurred, check the logs for additional details:server$ sudo journalctl -u gunicorn -
If the systemctl status command indicated that an error occurred or if you do not find the
/run/gunicorn.sockfile, it’s an indication that the Gunicorn socket was not created correctly. Check the Gunicorn socket’s logs:server$ sudo journalctl -u gunicorn.socket
Take another look at your
/etc/systemd/system/gunicorn.socketfile and fix any problems found before continuing.-
You can also check your
/etc/systemd/system/gunicorn.servicefile for problems. If you make changes to the/etc/systemd/system/gunicorn.servicefile, you’d need to reload the daemon to reinitialize the service configuration and restart the Gunicorn process:server$ sudo systemctl daemon-reload server$ sudo systemctl restart gunicorn
Make sure you troubleshoot any apparent issues before continuing.
-
Nginx2Gunicorn
Now that Gunicorn is set up, we need to configure Nginx to pass traffic to it.
-
Start by creating and opening a web site configuration file we’ll call
chatterin Nginx’ssites-availabledirectory:server$ sudo vi /etc/nginx/sites-available/chatter -
Inside, open up a new server block. We will start by specifying that the server will listen on the normal port 80 and that it should respond to YOUR_SERVER_IP (replace
YOUR_SERVER_IPwith your external IP andPATH_TO_FOLDERwith path to the folder441/chatteras before):server { listen 80; server_name YOUR_SERVER_IP; location = /favicon.ico { access_log off; log_not_found off; } location /static/ { root PATH_TO_FOLDER/441/chatter; } location / { include proxy_params; proxy_pass http://unix:/run/gunicorn.sock; } }It is a common bug not to replace
YOUR_SERVER_IPwith your external IP address in the above file. -
Save and close the file. Now, we can enable the file by linking it to the
sites-enableddirectory:server$ sudo ln -s /etc/nginx/sites-available/chatter /etc/nginx/sites-enabled -
Test your Nginx configuration for syntax errors:
server$ sudo nginx -t # output: nginx: the configuration file /etc/nginx/nginx.conf syntax is ok nginx: configuration file /etc/nginx/nginx.conf test is successful -
If no errors are reported, go ahead and restart Nginx:
server$ sudo systemctl restart nginx -
Finally, we need to open up our firewall to normal traffic on port 80:
server$ sudo ufw allow 'Nginx Full' -
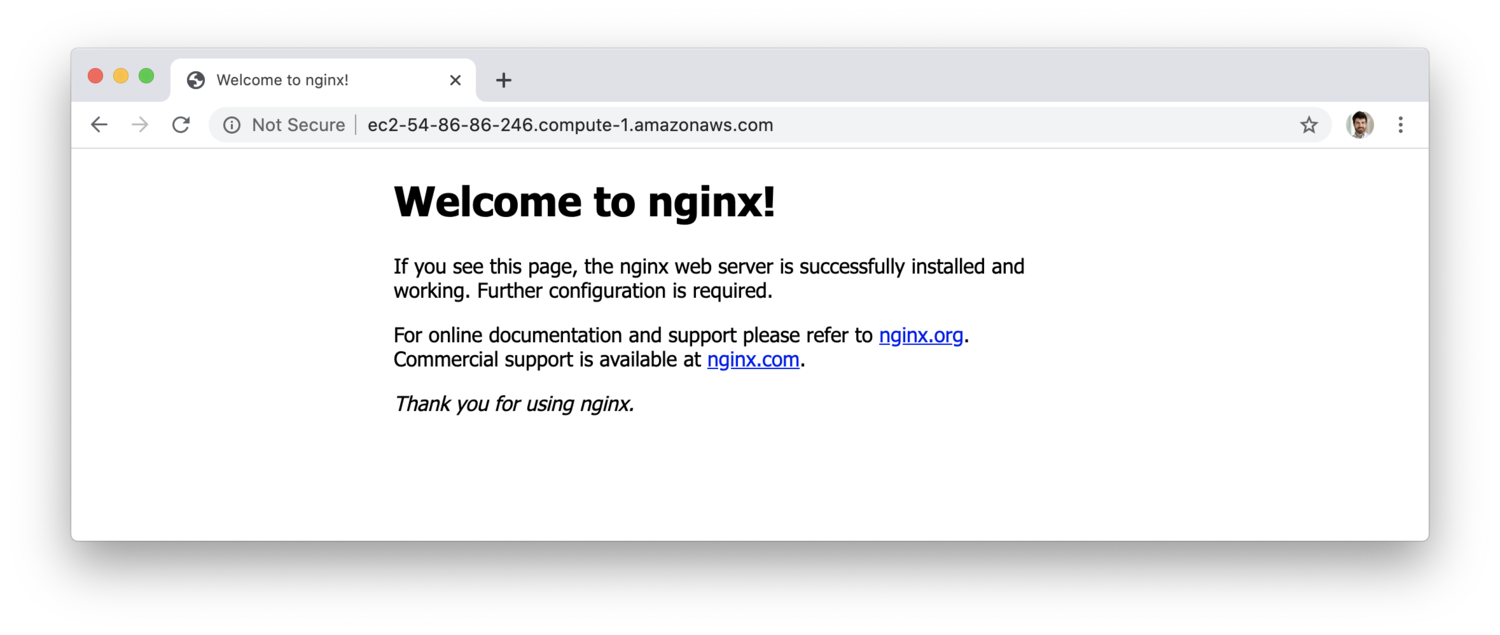
You should now be able to, on your browser, browse
http://YOUR_SERVER_IP/to view the Django default page as before, except now served through gunicorn.Troubleshooting
If this last step does not show your application, consult DigitalOcean’s tutorial and search for “Troubleshooting Nginx and Gunicorn”.
Summary: configuration files
In summary, here are the configuration files for the three packages we rely on to provide our back-end service:
Nginx: web server that listens on port 80
file: /etc/nginx/sites-enabled/chatter, if modified run:
server$ sudo nginx -t
server$ sudo systemctl restart nginx
Gunicorn: serves Django project
file: /etc/systemd/system/gunicorn.service, if modified run:
server$ sudo systemctl daemon-reload
server$ sudo systemctl restart gunicorn
Django: framework to route HTTP requests to your python code
directory: ~/441/chatter/routing/, in particular urls.py (see below). If modified run:
server$ sudo systemctl restart gunicorn
Server-side HTTPS
Begining in 2017, Apple required apps to use HTTPS, the secure version of HTTP. In Aug. 2018, with the release of Android Pie (API level 28), Android also defaulted to blocking all cleartext (HTTP) traffic. To support HTTPS, we need to enable it on the hosting server.
Obtaining a public key
To that end, we must first obtain a public key signed by a Certification Authority (CA). Since obtaining such a certificate usually requires a host with a fully qualified domain name (FQDN), such as www.sjtu.edu.cn, which your server does
not have, we have decided to be our own CA and generate and use a self-signed certificate in this course. Typically, a self-signed certificate is used only during development.
Starting with iOS 13 (and macOS 10.15 Catalina), Apple added some security requirements that all server certificates must comply with. To support both iOS and Android clients, a back-end server must thus comply with these security requirements also.
-
To generate a self-signed certificate that satisfies the new requirements, you first need to add them to the openssl configuration file on the server:
server$ cd /etc/ssl server$ sudo cp openssl.cnf selfsigned.cnf -
Open
selfsigned.cnf(withsudo), search for the labelv3_caand in the[v3_ca]section add the following two lines:extendedKeyUsage = serverAuth subjectAltName = IP:YOUR_SERVER_IP # or DNS:YOUR_SERVER_FQDNDue to a bug in
openssl, it is CRUCIAL that the above two lines be added in the[v3_ca]section and not outside of it or in any other section of the file.DNS instead of IP
If your server has a fully qualified domain name (FQDN, e.g.,
eecs441.eecs.umich.eduand not the public DNS AWS assigned you), you can use it instead, tagging it withDNSinstead ofIP. If you specify your IP address as thesubjectAltName, you can only access your server using its IP address, not by its FQDN, and vice versa. -
Next, search for
copy_extensionsinselfsigned.cnfand uncomment it:# Extension copying option: use with caution. copy_extensions = copy -
Now create a self-signed key and certificate pair with OpenSSL using the following command:
server$ sudo openssl req -x509 -days 100 -nodes -newkey rsa:2048 -config selfsigned.cnf -keyout private/selfsigned.key -out certs/selfsigned.certYou will be asked to fill out a series of prompts, which will look something like:
Country Name (2 letter code) [AU]:CN State or Province Name (full name) [Some-State]:Shanghai Locality Name (eg, city) []:Shanghai Organization Name (eg, company) [Internet Widgits Pty Ltd]:SJTU Organizational Unit Name (eg, section) []:JI Common Name (e.g. server FQDN or YOUR name) []:YOUR_SERVER_IP Email Address []:admin@your_domain.comThe most important information is
Common Name (e.g. server FQDN or YOUR name). Make sure to use YOUR_SERVER_IP address.FQDN
You can use your FQDN if you have specified an FQDN as
subjectAltNameabove. But if you’re on AWS, you must use YOUR_SERVER_IP and not YOUR_SERVER_DNS because the DNS provided by AWS is too long for Nginx. -
Verify that the generated certificate has the right entries:
server$ sudo openssl x509 -text -in certs/selfsigned.cert -nooutIt must have the following lines:
X509v3 extensions: X509v3 Extended Key Usage: TLS Web Server Authentication X509v3 Subject Alternative Name: IP Address:YOUR_SERVER_IP # or DNS:YOUR_SERVER_FQDN
Congrats! You have generated a public-key and put it inside a self-signed certificate! Now to use it.
HTTPS web server
Adapted from Self-Signed SSL Cert.
Our next step is to modify our Nginx configuration to use the new key and certificate files.
-
Go to the
/etc/nginx/sites-availabledirectory and edit thechatterserver configuration file you created earlier:server$ cd /etc/nginx/sites-available server$ sudo vi chatter -
In your configuration file, update the listen statement to use port
443andssl, and provide pointers to our self-signed certificate and key, as follows. First update the listen statement:server { listen 443 ssl; listen [::]:443 ssl; # add support for IPv6 # . . . } -
Now, add the following pointers directly under the updated listen statements.
ssl_certificate /etc/ssl/certs/selfsigned.cert; ssl_certificate_key /etc/ssl/private/selfsigned.key; ssl_protocols TLSv1.2; ssl_ciphers ECDHE-RSA-AES256-GCM-SHA512:DHE-RSA-AES256-GCM-SHA512:ECDHE-RSA-AES256-GCM-SHA384:DHE-RSA-AES256-GCM-SHA384:ECDHE-RSA-AES256-SHA384;Your updated
chatterserver configuration file should now look something like this:server { listen 443 ssl; listen [::]:443 ssl; # add support for IPv6 ssl_certificate /etc/ssl/certs/selfsigned.cert; ssl_certificate_key /etc/ssl/private/selfsigned.key; ssl_protocols TLSv1.2; ssl_ciphers ECDHE-RSA-AES256-GCM-SHA512:DHE-RSA-AES256-GCM-SHA512:ECDHE-RSA-AES256-GCM-SHA384:DHE-RSA-AES256-GCM-SHA384:ECDHE-RSA-AES256-SHA384; server_name YOUR_SERVER_IP; location = /favicon.ico { access_log off; log_not_found off; } # . . . }It is a common bug not to replace
YOUR_SERVER_IPwith your external IP address in the above file. -
So that visitors to your web site who accidentally entered
httpinstead ofhttpswouldn’t be confronted with an error message, we will automatically redirect them tohttps. In your server configuration file, create a second server block after the closing bracket of the first server block (in the code, replaceYOUR_SERVER_IPwith yours):# . . . server { listen 80; listen [::]:80; # IPv6 server_name YOUR_SERVER_IP; return 302 https://$server_name$request_uri; # temporary redirect }Now save and close the file.
-
To enable the new server setup, first check to make sure we don’t have any syntax error in the configuration file:
server$ sudo nginx -t # output: nginx: the configuration file /etc/nginx/nginx.conf syntax is ok nginx: configuration file /etc/nginx/nginx.conf test is successful -
Now restart Nginx so that it can reinitialize with the new server configuration:
server$ sudo systemctl restart nginxBe sure to do this every time you make changes to the
chatterserver configuration file. -
To test, you can use
curl:laptop$ curl --insecure https://YOUR_SERVER_IP/or, from your Chrome browser on your laptop, browse to
https://YOUR_SERVER_IP/. It will warn you that “Your connection is not private”. Click theAdvancedbutton. Then bravely clickProceed to YOUR_SERVER_IP (unsafe). You should see the Nginx rocket.On macOS, Safari won’t allow you to visit the site, you have to use Chrome.
HTTPS redirect
-
You can verify that your redirect for HTTP to HTTPS functions correctly by accessing
http://YOUR_SERVER_IP/(note use ofhttpnothttps). Again, you must do this from a Chrome browser orcurl. -
If your redirect worked correctly, to allow only encrypted traffic, modify your server configuration to make the redirect permanent. In your configuration file find
return 302and change it toreturn 301:return 301 https://$server_name$request_uri; # permanent redirectSave and close the file. Once you have verified that you have no syntax errors, restart nginx.
Congratulations! Your host is all set up for the rest of the term! Now to implement the
Chatter back end.
Chatter back end
We will be creating a python app to serve as Chatter back end.
Start by creating the model-view-controller (MVC) framework expected by Django for all python projects:
server$ cd ~/441/chatter
server$ source env/bin/activate
(env):chatter$ ./manage.py startapp app
(env):chatter$ deactivate
This will create a directory ~/441/chatter/app with the necessary python files in it.
In your ~/441/chatter project directory, you should now have two directories that were
created by Django:
~/441/chatter/routing/created withstartprojectearlier. It contains the Django web framework for your app. We will be modifyingsettings.pyandurls.pyin this directory.~/441/chatter/app/that we just created withstartapp. It contains your app’s domain/business logic and views and controllers. We will be modifyingviews.pyin this directory.
These are distinct directories and both must be retained (don’t delete or merge them!).
Chatter’s API
Chatter is a simple CRUD app. We have previously created a chatts table in
our PostgreSQL database to hold
submitted chatts. It consists of three columns: username, message, and
time, with time being automatically filled in by the database
when an entry is added. We associate a username with each message in a
chatt. The getchatts API is for retrieving posted chatts (HTTP GET).
To create and post a chatt, the front end will use the postchatt API (HTTP POST).
Chatter doesn’t provide “replace” (HTTP PUT) and “delete” (HTTP DELETE) functions.
To start with, chatter has only two APIs:
getchatts: query the database and use HTTP GET to retrieve all foundchattspostchatt: use HTTP POST to post achattas JSON object
The protocol handshakes:
url
<- request
-> response

/getchatts/
<— HTTP GET {}
—> { list of chatts } 200 OK

/postchatt/
<- HTTP POST { username, message }
—> {} 200 OK
Data formats
The getchatts API will send back all accumulated chatts in the form of a JSON object with the key being “chatts” and the value being an array of string arrays. Each string array consists of three elements “username”, “message”, and “timestamp”. For example:
{
    "chatts": [["username0", "message0", "timestamp0"],
               ["username1", "message1", "timestamp1"],
               ...
              ]
}
Each element of the string array may have a value of JSON null or the empty string ("").
To post a chatt with the postchatt API, the front-end client sends a JSON object
consisting of “username” and “message”. For example:
{
   "username": "ubuntu",
   "message": "Hello world!"
}
Both APIs will be implemented in ~/441/chatter/app/views.py.
Adding getchatts
Add to ~/441/chatter/app/views.py:
from django.http import JsonResponse, HttpResponse

def getchatts(request):
    if request.method != 'GET':
        return HttpResponse(status=404)
    response = {}
    response['chatts'] = ['Replace Me', 'DUMMY RESPONSE'] # **DUMMY response!**
    return JsonResponse(response)
Routing getchatts
In ~/441/chatter/routing/urls.py add:
from app import views
and add to the urlpatterns array:
path('getchatts/', views.getchatts, name='getchatts'),
Your urls.py should now look like this:
from django.contrib import admin
from django.urls import path
from app import views

urlpatterns = [
    path('getchatts/', views.getchatts, name='getchatts'),
    path('admin/', admin.site.urls),
]
Testing getchatts
Everytime you make changes to either views.py or urls.py, you MUST restart Gunicorn:
server$ sudo systemctl restart gunicorn
Test getchatts with:
laptop$ curl --insecure https://YOUR_SERVER_IP/getchatts/
or by browsing, on Chrome, to https://YOUR_SERVER_IP/getchatts/.
You should see displayed:
{"chatts": ["Replace Me", "DUMMY RESPONSE"]}
Retrieving chatts
Add to app/views.py:
from django.db import connection
We will use the database cursor to retrieve chatts. We will
add the following to your python getchatts(request) function:
    cursor = connection.cursor()
    cursor.execute('SELECT * FROM chatts ORDER BY time DESC;')
    rows = cursor.fetchall()
The following shows where to add the above code to getchatts(). Once
you have retrieved all the rows from the database, you need to insert it
into the response dictionary to be returned to the front end. Don’t
forget to replace the dummy response above with the rows retrieved from
the database.
def getchatts(request):
    if request.method != 'GET':
        return HttpResponse(status=404)

    cursor = connection.cursor()
    cursor.execute('SELECT * FROM chatts ORDER BY time DESC;')
    rows = cursor.fetchall()

    response = {}
    response['chatts'] = rows       # <<<<< NOTE: REPLACE dummy response WITH chatts <<<
    return JsonResponse(response)
Adding postchatt
Django wants CSRF (cross-site request forgery) cookies by default, since we’re
not implementing it, we ask for exemption. In views.py add:
from django.views.decorators.csrf import csrf_exempt
import json

@csrf_exempt
def postchatt(request):
    if request.method != 'POST':
        return HttpResponse(status=404)
    json_data = json.loads(request.body)
    username = json_data['username']
    message = json_data['message']
    cursor = connection.cursor()
    cursor.execute('INSERT INTO chatts (username, message) VALUES '
                   '(%s, %s);', (username, message))
    return JsonResponse({})
For Python-PostgreSQL interaction, see Passing parameters to SQL queries.
Once we have the view define, we need to tell Django how to route
to it. In routing/urls.py add the following entry to the urlpatterns array:
path('postchatt/', views.postchatt, name='postchatt'),
As before, everytime you make changes to either app/views.py or routing/urls.py, you need
to restart Gunicorn:
server$ sudo systemctl restart gunicorn
Testing postchatt
with curl
To test HTTP POST (or HTTP PUT or other) requests, we can again use curl:
laptop$ curl -X POST -d '{ "username": "Test", "message": "Hello World" }' --insecure https://YOUR_SERVER_IP/postchatt/
wth Postman
We can’t test using a browser unfortunately. Instead, we could use Postman, which has a nice graphical interface and is free. The instructions for Postman in this and subsequent labs are intended for the desktop version of Postman. If you’re proficient with the web version, you can use the web version.
To test with Postman, first disable Preferences > SSL certificate verification
in Postman. Your certificate wasn’t signed by a trusted certification authority, it was self signed.
-
Then in the main Postman screen, next to the
Launchpadtab, click the+tab. You get a newUntitled Requestscreen. You should seeGETlisted underUntitled Request. -
Click on
GETto show the drop down menu and selectPOST. -
Enter
https://YOUR_SERVER_IP/postchatt/in the field next toPOST. -
Below that there’s a menu with
Bodybeing the fourth element. Click onBody. -
You should now see a submenu under
Body. Click onraw. -
At the end of the submenu, click on
TEXTand select it withJSONin the drop down menu. -
You can now enter the following in the box under the submenu:
{
    "username": "Postman",
    "message": "Ring! Ring!"
}
and click the big blue
Sendbutton.If everything works as expected, the bottom pane of Postman should say to the right of its menu line,
Status: 200 OKand the pane should simply display{}. -
You can create a new request in Postman to do
GETwithhttps://YOUR_SERVER_IP/getchattsand click the big blueSendbutton. It should return something like:{ "chatts": [ [ "Postman", "Ring! Ring!", "2022-07-22T17:33:25.947" ] ] }
with HTTPie
If you’re familiar with HTTPie, you can also use it to test from the command line:
laptop$ echo '{ "username": "weepie", "message": "Yummy!" }' | http --verify=no POST https://YOUR_SERVER_IP/postchatt/
# output:
HTTP/1.1 200 OK
Connection: keep-alive
Content-Length: 2
Content-Type: application/json
Date: Wed, 22 Jul 2022 17:45:53 GMT
Server: nginx/1.14.0 (Ubuntu)
X-Content-Type-Options: nosniff
X-Frame-Options: DENY

{}
The --verify=no option is to tell HTTPie to not try to verify our self-signed certificate. Incidentally, you can also use HTTPie to test getchatts:
laptop$ http --verify=no https://YOUR_SERVER_IP/getchatts/
# output:
HTTP/1.1 200 OK
Connection: keep-alive
Content-Length: 116
Content-Type: application/json
Date: Wed, 22 Jul 2022 17:46:32 GMT
Server: nginx/1.14.0 (Ubuntu)
X-Content-Type-Options: nosniff
X-Frame-Options: DENY

{
    "chatts": [
        [
            "Postman",
            "Ring! Ring!",
            "2022-07-22T17:33:25.947"
        ],
        [
            "weepie",
            "Yummy!",
            "2022-07-22T17:45:53.177"
        ]
    ]
}
Preparing self-signed certificate for the front-end
For your Chatter front end to communicate with your back end, you need to install your self-signed certificate
on your device (or emulator or simulator). Some versions of the front-end OS require the certificate to be in
binary (DER) format. To convert the certificate to the DER format do (Replace USERNAME with root on Aliyun and ubuntu on AWS and GCP):
server$ cd ~/441/chatter
server$ sudo openssl x509 -inform PEM -outform DER -in /etc/ssl/certs/selfsigned.cert -out selfsigned.crt
server$ sudo chown USERNAME selfsigned.crt
That is all we need to do to prepare the back end. Before you return to work on your front end, wrap up your work here by submitting your files to GitHub.
Back-end submission guidelines
We will only grade files committed to the main branch. If you use multiple branches, please merge them all to the main branch for submission.
Navigate to your back end folder:
server$ cd ~/441/chatter
server$ cp /etc/nginx/sites-enabled/chatter nginx-site
and tell git to add the files we’ve added or changed:
server$ git add selfsigned.crt nginx-site app/views.py routing/urls.py routing/settings.py
You can check git status by running:
server$ git status
You should see the newly added files.
Commit the new changes to the local repo:
server$ git commit -m "lab1 back end"
and push them to the remote GitHub repo:
server$ git push
If git push fails due to other new changes made to the remote repo, you must run git pull first. Then you may have to resolve any conflicts before you can git push again.
Go the GitHub website to confirm that your back-end files have been uploaded to your GitHub repo.
You can now return to complete the front end: Android | iOS.
Resources and References
Setup:
- Ubuntu setup
- Nginx+Gunicorn+Django+PostgreSQL setup
- AWS Services You Should Know When Deploying Your Django App
- GCP Instructions to set up ssh access with public key pair.
Intro:
- Django introduction
- PostgreSQL tutorial
- Postman or HTTPie
- To read more about how nginx, gunicorn, and django work together:
HTTPS, SSL, TLS
Working with self-signed certificate
- New self-signed SSL Certificate for iOS 13
- Self-Signed SSL Certificate for Nginx
- Connecting mobile apps (iOS and Android) to backends for development with SSL
- How to do the CHMOD 400 Equivalent Command on Windows
| Prepared for EECS 441 by Tiberiu Vilcu, Wendan Jiang, Alexander Wu, Benjamin Brengman, Ollie Elmgren, Luke Wassink, Yibo Pi, and Sugih Jamin | Last updated May 13th, 2023 |