Chatter with Images Back End
DUE Tue, 06/24, 11:59pm (Beijing Time)
Welcome to Lab 2! We’ll start by learning how to configure the Chatter backend to store images and videos. We will not be storing these in the postgres database itself, but rather we will store each image/video in its own file. In the postgres database, we will store a url pointing to these files. So that you can start work on lab2 while we’re still grading your lab1, we will create a database table and set of url routes separate from those of lab1.
Install updates
Every time you ssh to your server, you will see something like:
N updates can be applied immediately.
if N is not 0, run the following:
server$ sudo apt update
server$ sudo apt upgrade
Failure to update your packages could lead to the lab back end not performing correctly and also make you vulnerable to security hacks.
If you see *** System restart required *** when you ssh to your server, please run:
server$ sync
server$ sudo reboot
Your ssh session will be ended at the server. Wait a few minutes for the system to reboot before you ssh to your server again.
Modified Chatter API data formats
Our previous Chatter app only associates a user’s username with their message. In this lab, we allow user to post an image and video with their chatt. To that end, we will modify our back-end APIs and database to hold the new data.
As in previous lab, the chatts retrieval API will send back all accumulated chatts in the form of a JSON object consisting of a dictionary entry with key "chatts" and value being an array of string arrays. In addition to the three elements "username", "message", and "timestamp", each string array now carries two additional elements which are the urls where the image and video data are stored on the server respectively:
{
    "chatts": [["username0", "message0", "timestamp0", "imageurl0", "videourl0"],
               ["username1", "message1", "timestamp1", "imageurl1", "videourl1"],
               ...
              ]
}
Each element of the array may have a value of JSON null or the empty string ("").
To post a chatt, the client correspondingly sends a JSON object consisting of "username", "message", "image", and "video" (not urls!). If a chatt carries no image and/or video, since we’re using multipart/form-data encoding instead of JSON, the key "image" and/or "video" may be omitted or the value set to the empty string ("") or null. For example:
{
   "username": "YOUR_JACCOUNT",
   "message": "Hello world!",
   "image": "",
   "video": ""
}
In Postman, to set the value of
"image"to the empty string, set the field type toTextin the drop-down menu. To set it tonull, set the field type toFilebut don’t select any file.
Database table
If you’re not sure how to perform any of the database-related operations below, please consult the PostgreSQL section of lab1’s back-end spec:
- Log into an interactive PostgreSQL (
psql) session as userpostgres - Connect to the
chatterdbdatabase - Create a new table called
imagesand give userchatteraccess:CREATE TABLE images (username varchar(255), message varchar(255), time timestamp DEFAULT CURRENT_TIMESTAMP, imageurl text, videourl text); GRANT ALL PRIVILEGES ON ALL TABLES IN SCHEMA public TO chatter;Be sure you add the “imageurl” column first, followed by the “videourl” column. The front-end
getChatts()expects this ordering of the two columns. - You can issue the
\dtcommand to list all tables and confirm that you now have a newimagestable - To verify your newly created table, enter:
SELECT * FROM images;Make sure you get back the following result (though perhaps more stretched out):
 username |  message | time | imageurl | videourl
----------+----------+------+----------+----------
(0 rows)
If so congratulations! You have successfully added the
imagestable! - Exit PostgreSQL
Accommodating large media files
By default, Django sets a maximum data upload size of 2.5 MB. To reconfigure Django to allow 10 MB per upload, and to specify where to store the media files, add the following lines to the end of your ~/441/chatter/routing/settings.py:
MEDIA_URL = 'https://YOUR_SERVER_IP/media/'
MEDIA_ROOT = BASE_DIR / 'media'
DATA_UPLOAD_MAX_MEMORY_SIZE = 10485760
Replace YOUR_SERVER_IP with your server’s IP address.
We next tell Nginx where to look for the media file when presented with https://YOUR_SERVER_IP/media/. Since Nginx also limits maximum client upload size to 1 MB, we will raise this limit at the same time. Edit your Nginx website configuration file:
server$ sudo vi /etc/nginx/sites-enabled/chatter
and add the following lines to the first server block (not the second, redirection block) by replacing PATH_TO_FOLDER with /root in Aliyun and /home/ubuntu in AWS and GCP:
server {
    ...
    client_max_body_size 10M;
    location ^~ /media {
        alias PATH_TO_FOLDER/441/chatter/media;
    }
}
On both Android and iOS front end, the
Google Photosapp is the easiest way to find out the size of your image and video files.
Now we need to create the media directory and set permissions to allow Nginx access:
server$ mkdir ~/441/chatter/media
server$ chmod a+rx ~ ~/441 ~/441/chatter ~/441/chatter/media
Editing views.py
Now we edit views.py to handle image and video uploads. First, add the following imports and postimages() function to your views.py:
import os, time
from django.conf import settings
from django.core.files.storage import FileSystemStorage

@csrf_exempt
def postimages(request):
    if request.method != 'POST':
        return HttpResponse(status=400)

    # loading form-encoded data
    username = request.POST.get("username")
    message = request.POST.get("message")

    if request.FILES.get("image"):
        content = request.FILES['image']
        filename = username+str(time.time())+".jpeg"
        fs = FileSystemStorage()
        filename = fs.save(filename, content)
        imageurl = fs.url(filename)
    else:
        imageurl = None

    if request.FILES.get("video"):
        content = request.FILES['video']
        filename = username+str(time.time())+".mp4"
        fs = FileSystemStorage()
        filename = fs.save(filename, content)
        videourl = fs.url(filename)
    else:
        videourl = None

    cursor = connection.cursor()
    cursor.execute('INSERT INTO images (username, message, imageurl, videourl) VALUES '
                   '(%s, %s, %s, %s);', (username, message, imageurl, videourl))

    return JsonResponse({})
If image and/or video are posted alongside chatt, both image and video data is not stored in the postgres database but in the back-end filesystem. The filename of the image/video file is turned into a URL, and the URL is then stored in the postgres database alongside the chatt’s username and message.
Next, make a copy of your getchatts() function inside your views.py file and name the copy getimages(). In getimages(), replace the chatts table in the SELECT statement with the images table: SELECT * FROM images ORDER BY time DESC;. This statement will retrieve all data we need (including our new image and video urls).
Save and exit views.py.
Routing for new urls
For the newly added getimages() and postimages() functions, so that Django knows how to forward the new APIs to the right python functions, add the following new routes to the urlpatterns array in ~/441/chatter/routing/urls.py:
    path('getimages/', views.getimages, name='getimages'),
    path('postimages/', views.postimages, name='postimages'),
Save and exit urls.py and restart both Nginx and Gunicorn:
server$ sudo nginx -t
server$ sudo systemctl restart nginx
server$ sudo systemctl restart gunicorn
Testing image and video upload
To test your backend with Postman, configure the header and body of your POST request in Postman like the following:
- Create
POSTrequest in Postman.Be sure to include the trailing
/inpostimages/. Django cannot carry POSTed data when redirecting frompostimagestopostimages/(see Django POST URL error).Please review lab1 back-end spec if you don’t recall how to create
POSTrequest in Postman. -
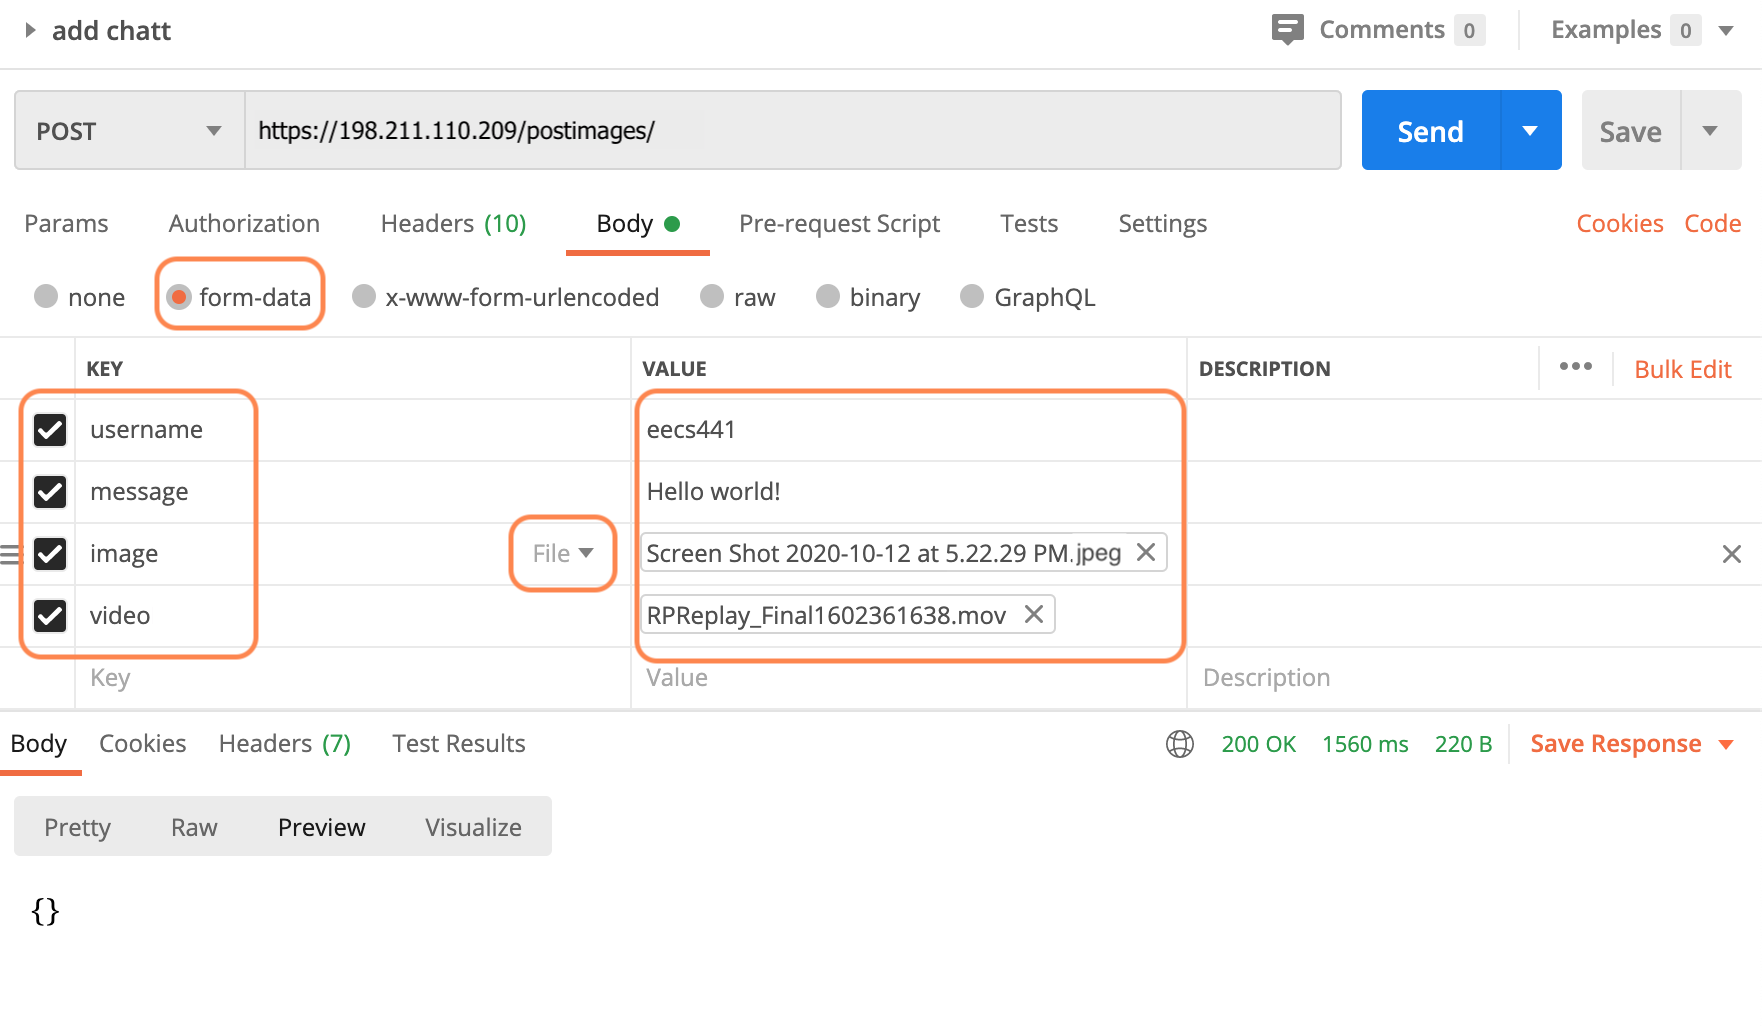
Go to the
Body > form-dataof the request and enter the keys you want, as shown in this screenshot. After you have finalized entering each key (e.g., by clicking on another field), you can hover your mouse to the right of eachkeyfield to reveal a dropdown menu. (The menu will not show if the field is still in text entry mode.) SelectFileas an option for both image and video, and upload your own image (.jpegonly) and/or video (.mp4only and not larger than 10 MB) from your laptop. -
Click
Send. -
Next do a
getimages/request within Postman as you did in lab1. You should see the image and video URLs associated with yourchattabove in the returned JSON. -
You can click on each of the URLs, which will generate a new
GETrequest page. - Click
Sendin this newGETrequest page and the image/video should load within Postman.
And you’re done with the back end!
Submission guideline
- Commit new changes to the local repo with:
  server$ cd ~/441/chatter
  server$ cp /etc/nginx/sites-enabled/chatter nginx-site
  server$ git commit -m "lab2 back end"
and push new changes to the remote GitHub repo with:
server$ git push - If
git pushfails due to new changes made to the remote repo, you will need to rungit pullfirst. Then you may have to resolve any conflicts before you cangit pushagain.
Once you are done with the back end, we’ll move on to the front end.
References
- How to Limit File Upload Size in Nginx
- Serving Static Content
- Understanding Nginx Server and Location Block Selection Algorithms
- Loading form-encoded data in python
- Simply save file to folder in Django
- Django MEDIA_URL and MEDIA_ROOT
- Django Request.FILES
- How to Upload Files With Django
- Using Postman to send multipart/form-data request
| Prepared for EECS 441 by Wendan Jiang, Tianyi Zhao, Ollie Elmgren, Benjamin Brengman, Alexander Wu, Yibo Pi, and Sugih Jamin | Last updated: June 2nd, 2025 |