Images SwiftUI
Cover Page
DUE Mon, 03/19, 2 pm
The goals of this lab are threefold: first, to introduce you to integration of UIKit APIs with SwiftUI; two, to use UIKit’s UIImagePickerController to add and manipulate images and videos in Chatter; and three, to use Alamofire to upload multipart/form-data asynchronously.
Images and videos can be uploaded to the server either by picking one from the device’s photo library or by taking a picture/video with the device’s camera. On the posting screen, we will want a button to access the album and one for taking photo and video, and a preview of the images to be posted. On the main screen showing the chatt timeline, we will want posted images and videos to be downloaded and displayed alongside their corresponding chatts.
Accessing the camera requires access to a physical device. The iPhone simulator does not simulate the camera.
Expected behavior
Post an image and a video:
DISCLAIMER: the video demo shows you one aspect of the app’s behavior. It is not a substitute for the spec. If there are any discrepancies between the demo and the spec, please follow the spec. The spec is the single source of truth. If the spec is ambiguous, please consult the teaching staff for clarification.
Setting up the back end
If you haven’t modified your back end to handle image and video, please go ahead and do so now:
Once you’ve updated your back end, return here to continue work on your front end.
Preparing your GitHub repo
- On your laptop, navigate to
YOUR_LABSFOLDER/ - Unzip your
chatter.zipthat you created as part of the audio lab - Rename the newly unzipped
chatterfolder imagesIf there’s a
DerivedDatafolder in yourimages/swiftUIChatter/, delete it - Push your local
YOUR_LABSFOLDER/repo to GitHub and make sure there’re no git issues<summary>git push</summary>- Open GitHub Desktop and click on
Current Repositoryon the top left of the interface - Click on your
441GitHub repo - Add Summary to your changes and click
Commit to master(orCommit to main) - Since you have pushed your back end code, you’ll have to click
Pull Originto synch up the repo on your laptop - Finally click on
Push Originto push changes to GitHub
- Open GitHub Desktop and click on
![]() Go to the GitHub website to confirm that your folders follow this structure outline:
Go to the GitHub website to confirm that your folders follow this structure outline:
  441
    |-- # files and folders from other labs . . .
    |-- images
        |-- swiftUIChatter
            |-- swiftUIChatter.xcodeproj
            |-- swiftUIChatter
    |-- # files and folders from other labs . . .
If the folders in your GitHub repo does not have the above structure, we will not be able to grade your labs and you will get a ZERO.
Requesting permissions
Your app must first request user’s permission to access the device’s camera, photo library, and mic. As you did in the audio lab, add justifications for requesting the following three permissions:
-
Privacy - Microphone Usage Description, -
Privacy - Photo Library Usage Description, and -
Privacy - Camera Usage Description.
As with the audio lab, when you try to access the photo library, camera, or mic, iOS will automatically check for access permission and, if it is your app’s first attempt to access any of these, iOS will automatically prompt the user for permission.
UIImagePickerController
We will be using iOS’s UIImagePickerController to access the photo library and camera. UIImagePickerController is a UIKit API that manages the system interfaces for taking pictures, recording videos, and retrieving items from the user’s media library. UIImagePickerController also manages user interactions—such as image repositioning, zooming, cropping, and video head and tail trimming.
PhotosPicker
Apple introduces the PhotosPicker API for SwiftUI with iOS 16. While using PhotosPicker to select images from the photo library is rather straitghtforward, loading video with PhotosPicker is a rather involved process. Further, PhotosPicker can only load images and videos from the photo library, not take picture nor record video from the camera. Photos loaded with PhotosPicker still relies on UIKit’s UIImage(data:) to convert the format to one SwiftUI’s Image(uiImage:) can display.
UIImagePickerController, on the other hand, is an older UIKit API. Compared to PhotosPicker, its handling of panoramic images is not as reliable and, without additional library, it cannot access PHLivePhoto objects (video and audio before and after taking LivePhotos). For this lab, what UIImagePickerController can do outweighs what it cannot do.
To use UIImagePickerController, we first wrap it in a UIViewControllerRepresentable bridge that SwiftUI uses to work with UIKit controllers. Create a new Swift file called Media and put the following in the file:
import SwiftUI
import UIKit
import AVKit

struct ImagePicker: UIViewControllerRepresentable {
    @Environment(\.dismiss) private var dismiss
    @Binding var sourceType: UIImagePickerController.SourceType?
    @Binding var image: UIImage?
    @Binding var videoUrl: URL?
}
We pass bindings (pointers) to sourceType, image, and videoUrl in instantiating ImagePicker. The property sourceType tells UIImagePickerController whether we want to pick from the photo library or use the camera. The resulting photo and/or video URL will be stored in the properties image and videoUrl respectively for the caller to access. The property dismiss allows us to grab the code to dismiss UIKit ViewController provided by SwiftUI from the environment.
Conformance to the UIViewControllerRepresentable protocol requires implementation of two methods: makeUIControllerViewController() and updateUIViewController(). The makeUIViewController() method is called by SwiftUI only once to initialize the UIKit ViewController, whereas updateUIViewController() will be called everytime there’s a state change in the enclosing SwiftUI view that must be communicated to and reflected by the UIKit ViewController. In our case, makeUIViewController() creates a UIKit UIImagePickerController(), sets some parameters of the picker, and returns it. We do not allow users to modify the picker once created, so our updateUIViewController() is empty. Add the following code inside your ImagePicker struct above:
    func makeUIViewController(context: Context) -> UIImagePickerController {

        let picker = UIImagePickerController()
        picker.sourceType = sourceType ?? .camera
        picker.delegate = context.coordinator
        picker.allowsEditing = true
        picker.mediaTypes = ["public.image","public.movie"]
        picker.videoMaximumDuration = TimeInterval(5) // secs, there's a 10 MB upload limit
        picker.videoQuality = .typeLow

        return picker
    }

    func updateUIViewController(_ picker: UIImagePickerController, context: Context) { }
We allow user to pick either image ("public.image") or video ("public.movie") media types and to take either a photo or record a video. To enable image zooming and cropping and video head and tail trimming prior to posting, we set allowsEditing = true. You can change the videoMaximumDuration and videoQuality to different values. However, be mindful that so as not to run up a bill on your cloud-based back end server, and for a bearable wait time when uploading, our back-end server limits client upload size to 10 MB. Three seconds of video captured at 1960x1080 resolution can result in 3 MB of data.
A UIKit UIViewController could deliver events, such as success or cancellation, to the app using it. The app is required to implement callback functions to process these events. The required callback functions are usually documented in a delegation protocol that the app must adopt. UIImagePickerController defines such a callback delegation protocol called UIImagePickerControllerDelegate. To adopt this protocol in SwiftUI, we create a Coordinator that conforms to the protocol UIImagePickerControllerDelegate and define a makeCoordinator() method to instantiate the coordinator. Both Coordinator and makeCoordinator() are stipulated by the UIViewControllerRepresentable protocol. Add the following code inside your ImagePicker struct above:
    func makeCoordinator() -> Coordinator {
        Coordinator(self)
    }

    final class Coordinator: NSObject, UIImagePickerControllerDelegate, UINavigationControllerDelegate {

        let controller: ImagePicker
        init(_ controller: ImagePicker) {
            self.controller = controller
        }

        func imagePickerControllerDidCancel(_ picker: UIImagePickerController) {
            controller.dismiss()
        }
    }
In initializing the coordinator, we associate it with the controller it is helping to coordinate. The coordinator in this case adopts the UIImagePickerControllerDelegate. UIKit was built as an Objective-C class, requiring the coordinator to be declared a class, not a struct, and the class must be part of the Objective-C object hierarchy, i.e., be a subsclass of the top-level class, NSObject. The protocol UIImagePickerControllerDelegate stipulates that classes conforming to it must provide implementation of two methods, imagePickerController(_:didFinishPickingMediaWithInfor:) and imagePickerControllerDidCancel(_:). In the latter case, we simply call the UIKit ViewController dismissal method on our controller. Recall that we earlier grabbed this method from SwiftUI’s environment.
When the user has successfully selected an image or a video from the photo library or has successfully taken a photo or recorded a video clip, UIImagePickerController calls the imagePickerController(_:didFinishPickingMediaWithInfor:) callback function. If an image is returned, we put the image in the image variable passed to the controller. Depending on whether the image is edited, the delegate needs to retrieve it either as originalImage or editedImage. If the retrieval is succesful, we resize the image before storing it in the image variable. Add the following partial method inside your Coordinator class:
        func imagePickerController(_ picker: UIImagePickerController, didFinishPickingMediaWithInfo info:[UIImagePickerController.InfoKey : Any]) {
            if let mediaType = info[UIImagePickerController.InfoKey.mediaType] as? String {
                if mediaType  == "public.image" {
                    controller.image = (info[UIImagePickerController.InfoKey.editedImage] as? UIImage ??
                                       info[UIImagePickerController.InfoKey.originalImage] as? UIImage)?
                        .resizeImage(targetSize: CGSize(width: 150, height: 181))!
If video is returned, we simply store its URL videoUrl. Complete the above method:
                } else if mediaType == "public.movie" {
                    controller.videoUrl = info[UIImagePickerController.InfoKey.mediaURL] as? URL
                }
            }
            controller.dismiss()
        }
We now implement the function .resizeImage(targetSize:) as an extension to the UIImage class. Add the following code to your Media file outside the ImagePicker class.
extension UIImage {
    func resizeImage(targetSize: CGSize) -> UIImage? {
        // Figure out orientation, and use it to form a rectangle
        let ratio = (targetSize.width > targetSize.height) ?
            targetSize.height / size.height :
            targetSize.width / size.width

        let newSize = CGSize(width: size.width * ratio, height: size.height * ratio)
        let rect = CGRect(x: 0, y: 0, width: newSize.width, height: newSize.height)

        // Do the actual resizing to the calculated rectangle
        UIGraphicsBeginImageContextWithOptions(newSize, false, 1.0)
        draw(in: rect)
        let newImage = UIGraphicsGetImageFromCurrentImageContext()
        UIGraphicsEndImageContext()

        return newImage
    }
}
VideoView
Whereas SwiftUI provides the Image and AsyncImage UI elements to view images, we have to define VideoView to view videos with controllable playback. Add the following definition of VideoView to your Media file:
struct VideoView: View {
    let videoUrl: URL
    @State private var isPlaying = false

    var body: some View {
        let videoPlayer = AVPlayer(url: videoUrl)
        let playedToEnd = NotificationCenter.default.publisher(
            for: .AVPlayerItemDidPlayToEndTime, object: videoPlayer.currentItem)

        VideoPlayer(player: videoPlayer)
            .onTapGesture {
                isPlaying ? videoPlayer.pause() : videoPlayer.play()
                isPlaying.toggle()
            }
            .onReceive(playedToEnd) { _ in
                videoPlayer.seek(to: .zero)
            }
    }
}
VideoPlayer for SwiftUI is still rather new. Its playback control is rather rudimentary and finicky. “Rudimentary” in that the API allows you to play, pause, and perform seek on a video clip, but to be notified when playback has ended, you must rely on the NotificationCenter API. Here we use the Combine state management version of the NotificationCenter. Subscribing to a Combine publisher from a SwiftUI View is relatively simple: add the onReceive(_:perform:) modifier to the View subscribing to the publisher, as we did above. VideoPlayer’s playback control is “finicky” in that when put in a List, such as in ChattListRow as we do later, the video player doesn’t show its controls, though you can still play and pause the video by tapping on it.
PostView
To capture image and/or record video for posting with a chatt, we want to add a number of buttons at the bottom of PostView. We first declare image and videoUrl state variables to hold the image/video URL to be posted. We also define an isPresenting variable to control the presentation of ImagePicker. The variable sourceType will be passed to ImagePicker to tell it whether user would like to select from the photo album or use the camera. Add the following to your PostView struct, after the existing properties:
    @State private var image: UIImage? = nil
    @State private var videoUrl: URL? = nil

    @State private var isPresenting = false
    @State private var sourceType: UIImagePickerController.SourceType? = nil
As you did in the audio lab, add a bottomBar toolbar-item inside the .toolbar{} modifier of VStack in PostView, right below the existing ToolbarItem { } block. This time, however, since we we want to show multiple buttons in the bottomBar, we use ToolbarItemGroup { } instead of ToolbarItem { }:
            ToolbarItemGroup(placement: .bottomBar) {
                CameraButton()
                AlbumButton()
            }
Here’s the definition of CameraButton(). Add it inside your PostView struct:
    @ViewBuilder
    func CameraButton() -> some View {
        Button {
            sourceType = .camera
            isPresenting.toggle()
        } label: {
            Image(systemName: "iphone.rear.camera")
                .padding(EdgeInsets(top: 0, leading: 60, bottom: 20, trailing: 0))
                .scaleEffect(1.2)
        }
    }
We use @ViewBuilder function to build the button so that we can access properties of PostView without passing them in. To tell UIImagePickerController to use the camera, we set the sourceType to .camera (notice the dot in front of camera), then we toggle isPresenting to trigger the presentation of UIImagePicker. The camera button uses the included “iphone.rear.camera” icon.
TODO 1/3:
Provide a definition of AlbumButton() along the line of the camera button, except:
- use the “photo.on.rectangle.angled” icon, and
- specify
.photoLibraryas the source type (notice the dot beforephotoLibrary).
Outside the VStack of PostView, add the following modifier to present the ImagePicker if isPresenting has been toggled to true by either CameraButton or AlbumButton:
        .fullScreenCover(isPresented: $isPresenting) {
            ImagePicker(sourceType: $sourceType, image: $image, videoUrl: $videoUrl)
        }
To view the image/video ImagePicker returns, add the following HStack block inside the VStack block of your PostView, below the TextEditor and its modifier(s):
            HStack (alignment: .top) {
                if let videoUrl {
                    VideoView(videoUrl: videoUrl)
                        .scaledToFit()
                        .frame(height: 181)
                        .padding(.leading, 18)
                }
                Spacer()
                if let image {
                    Image(uiImage: image)
                        .scaledToFit()
                        .frame(height: 181)
                        .padding(.trailing, 18)
                }
            }
            Spacer().frame(maxHeight: .infinity)
The last line prevents username and message from being pushed off the top of the screen by the virtual keyboard by making the Spacer() height stretchy, depending on available screen real estate.
TODO 2/3:
As in the audio lab, add another modifier to VStack to allow user to dismiss the virtual keyboard to reveal the bottomBar after editing the message field.
You should now be able to launch ImagePicker and VideoView from your PostView and to test your image capture and video recording and playback! Make sure that:
(1) when you tap the photo album you are able to choose an image or video from your phone’s photo library, and (2) when you tap the camera button, you can take a photo or video, and (3) you can preview the selected/captured photo and/or video. You need a physical device to test the camera.
You can’t send any chatt yet, we’ll work on that next.
Chatt
In Chatt.swift, append these two new members to Chatt’s list of properties to hold the image and video URLs:
    @OptionalizedEmpty var imageUrl: String?
    @OptionalizedEmpty var videoUrl: String?
Both imageUrl and videoUrl use the same OptionalizedEmpty property wrapper we used in the audio lab to guard against various forms of empty URL. Copy the OptionalizedEmpty property wrapper from the audio lab to Chatt.swift.
ChattStore
We will use Alamofire, a third-party SDK, to upload image and video using multipart/form-data representation/encoding.
A web page with a form to fill out usually has mutiple fields (e.g., name, address, net worth, etc.), each comprising a separate part of the multi-part form. Data from these multiple parts of the form is encoded using HTTP’s multipart/form-data representation. One advantage of using multipart/form-data encoding, instead of JSON for example, is that binary data can be sent as is, not encoded into a string of printable characters. Since we don’t have to encode the binary data into character string, we can also stream directly from file to network without having to first load the whole file into memory, allowing us to send much larger files. We use the multipart/form-data encoding instead of JSON to send images and videos in this lab.
The references section include links to a number of articles showing how to upload multipart/form-data using URLSession instead of Alamofire. You will need more detailed knowledge of the HTTP protocol to use URLSession to send multipart/form-data.
Alamofire and Swift Package Manager (SPM)
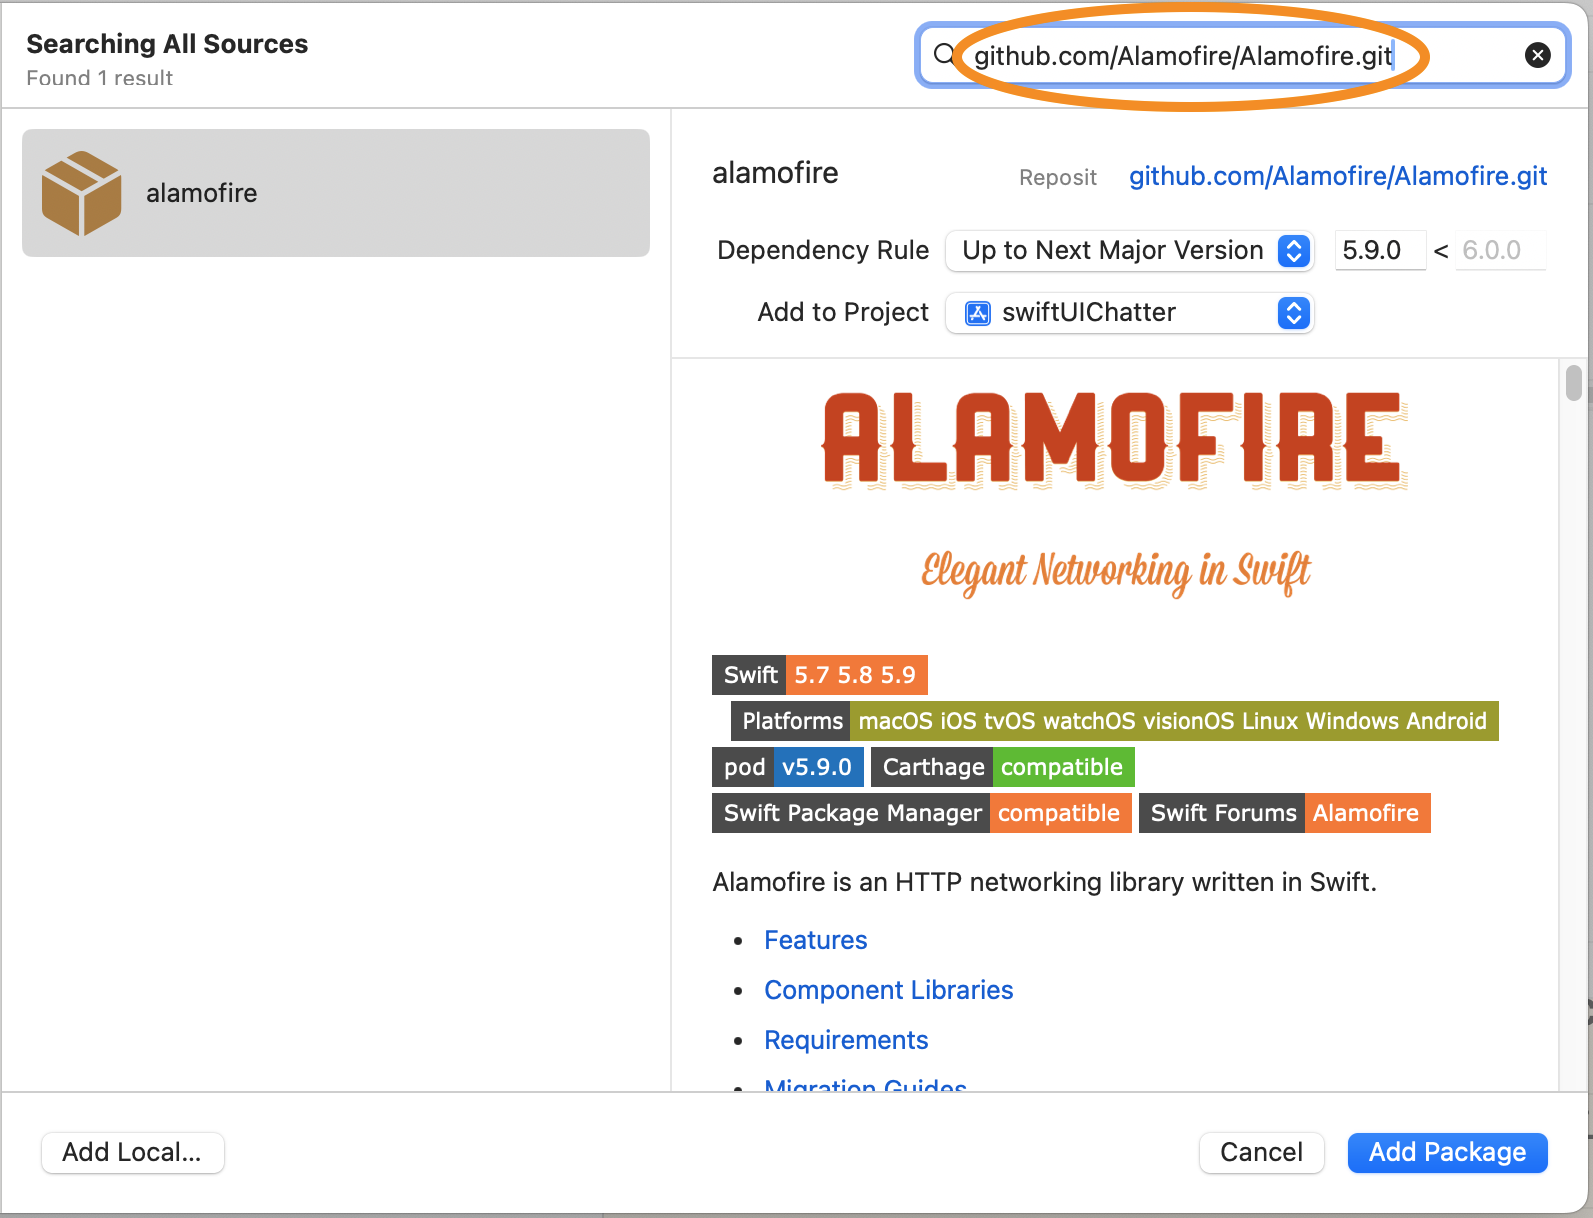
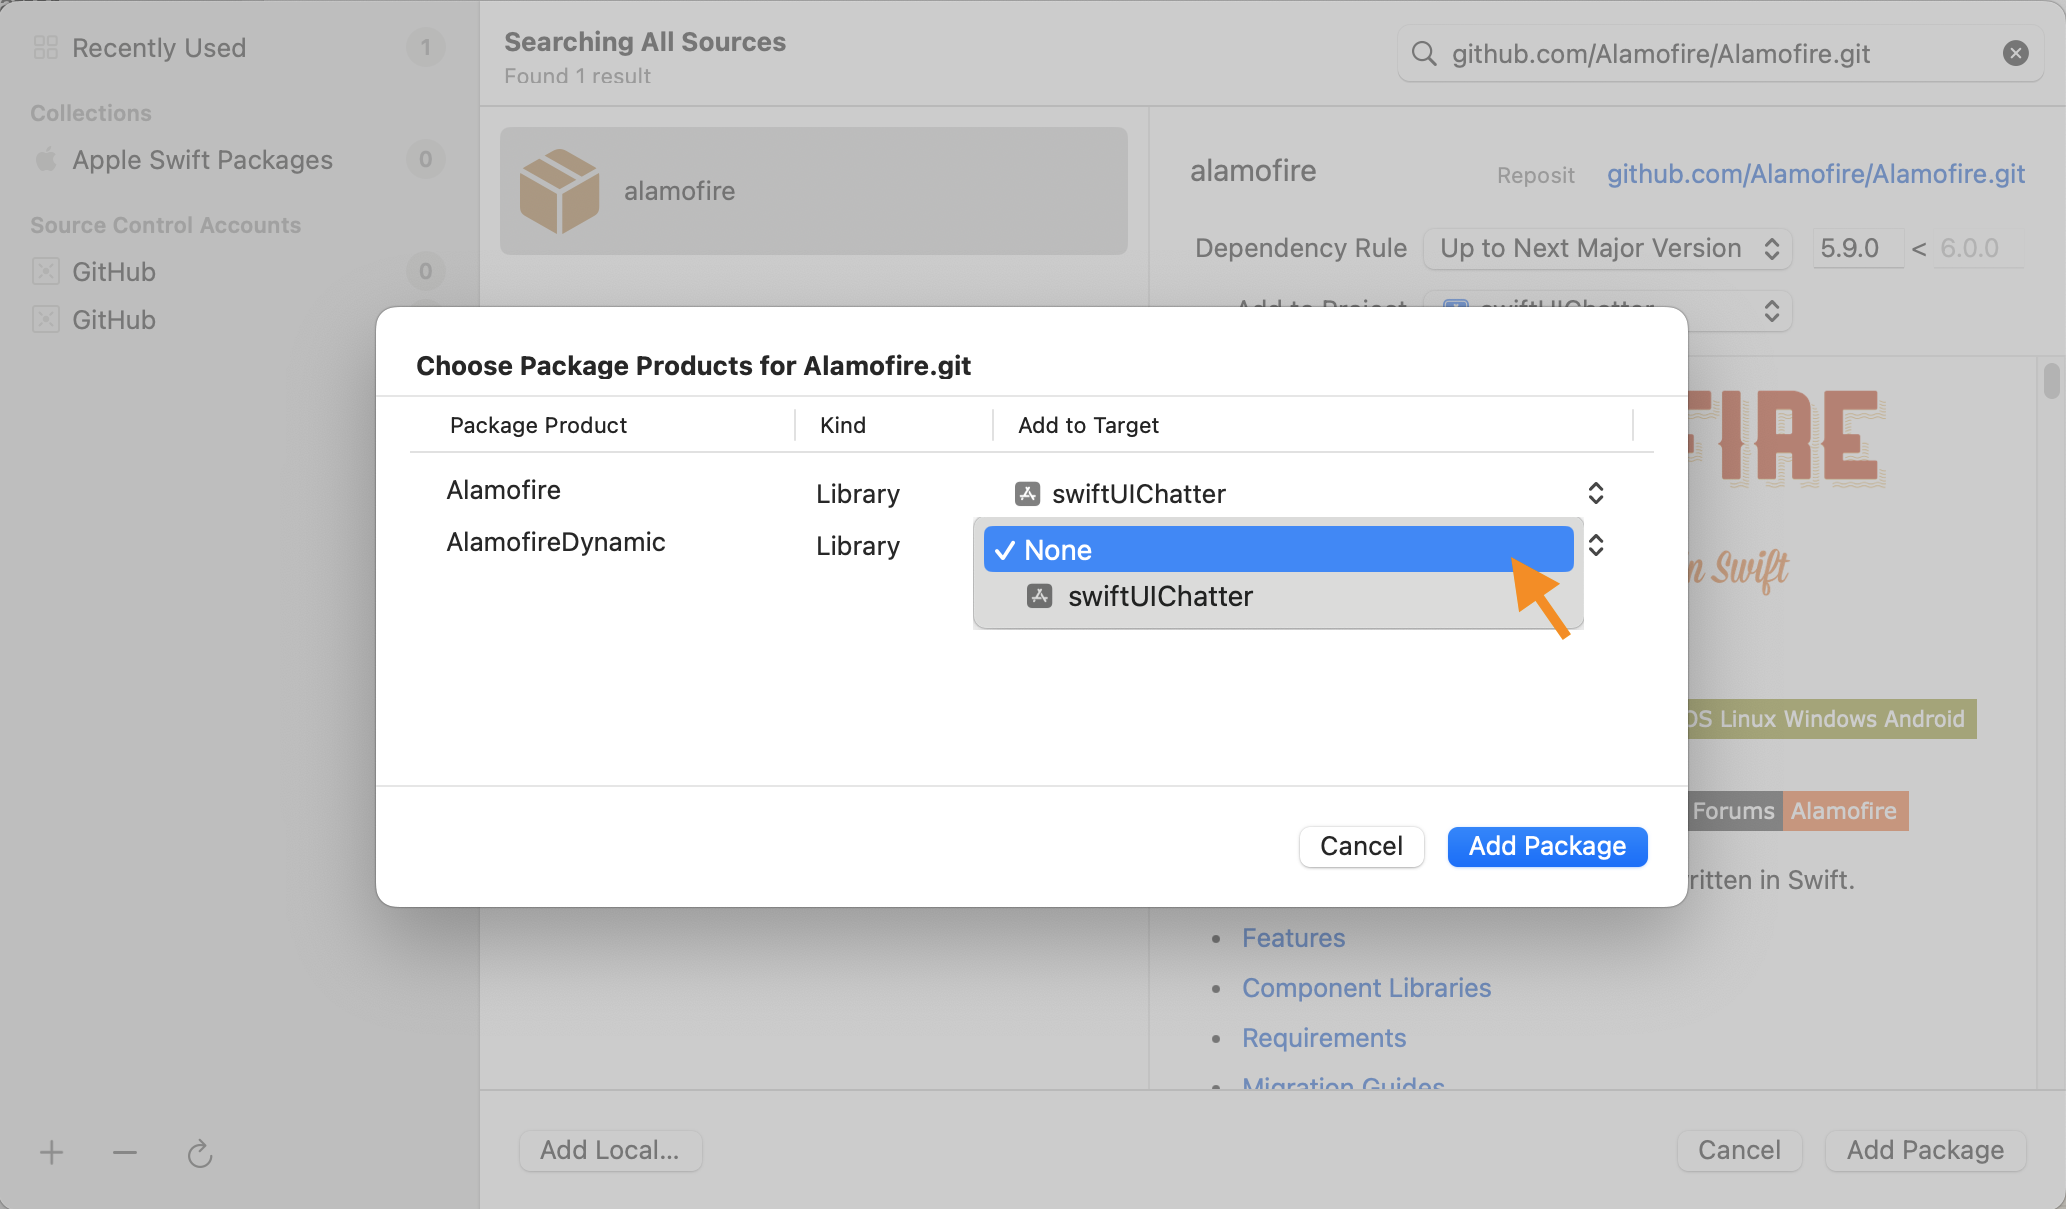
We add Alamofire to our Xcode project using Apple’s Swift Package Manager. In Xcode, with your project loaded, select File > Add Package Dependencies.... In the search box at the upper left of the dialog box, enter the URL: https://github.com/Alamofire/Alamofire.git and click the Add Package button (screenshot). When the Choose Package Products for Alamofire.git window pops up, choose None for AlamofireDynamic (screenshot) and choose Add Package [thanks to A. Kovalenko ‘W24].
Alamofire is added to your project!
To remove a package and No such file or directory: AlamofireDynamic.framework
Occasionally Xcode loses track of installed package and pops up a No such module <PackageName>. Or your project fails to build or crashes with the error message, No such file or directory: '/Users/YOURUSERNAME/Library/Developer/Xcode/DerivedData/swiftUIChatter-SOMERANDOMSTRING/Build/Products/Debug-iphoneos/PackageFrameworks/AlamofireDynamic.framework/AlamofireDynamic'.
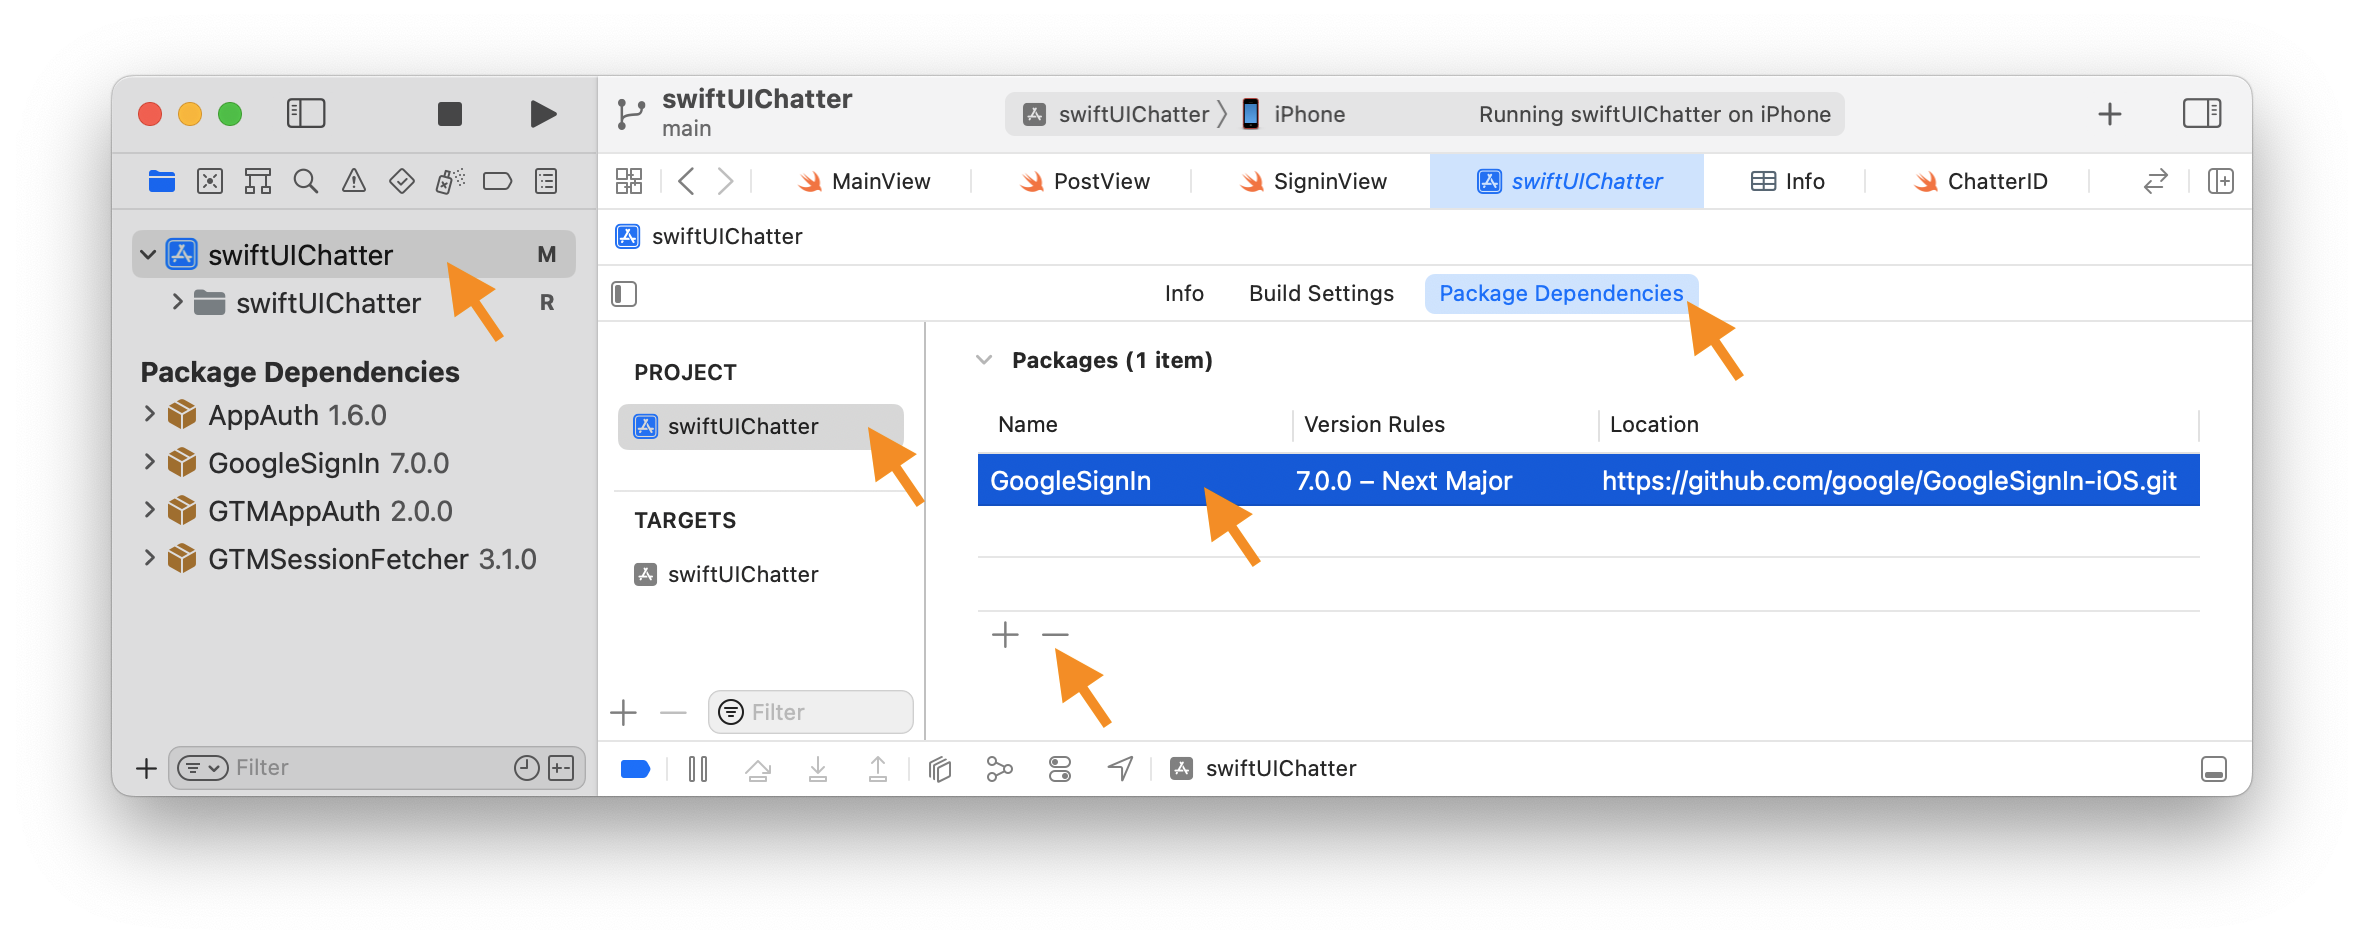
First remove the package (e.g., Alamofire) from your project (screenshot):
- On the left navigator pane, click on your project.
- In the project editor that shows up, on the left side under
PROJECT, click your project, - Select the
Package Dependenciestab, - Select the package to delete,
- Click the minus (
-) sign below the list of packages, and - Click the
Removebutton on the dialog box that shows up.
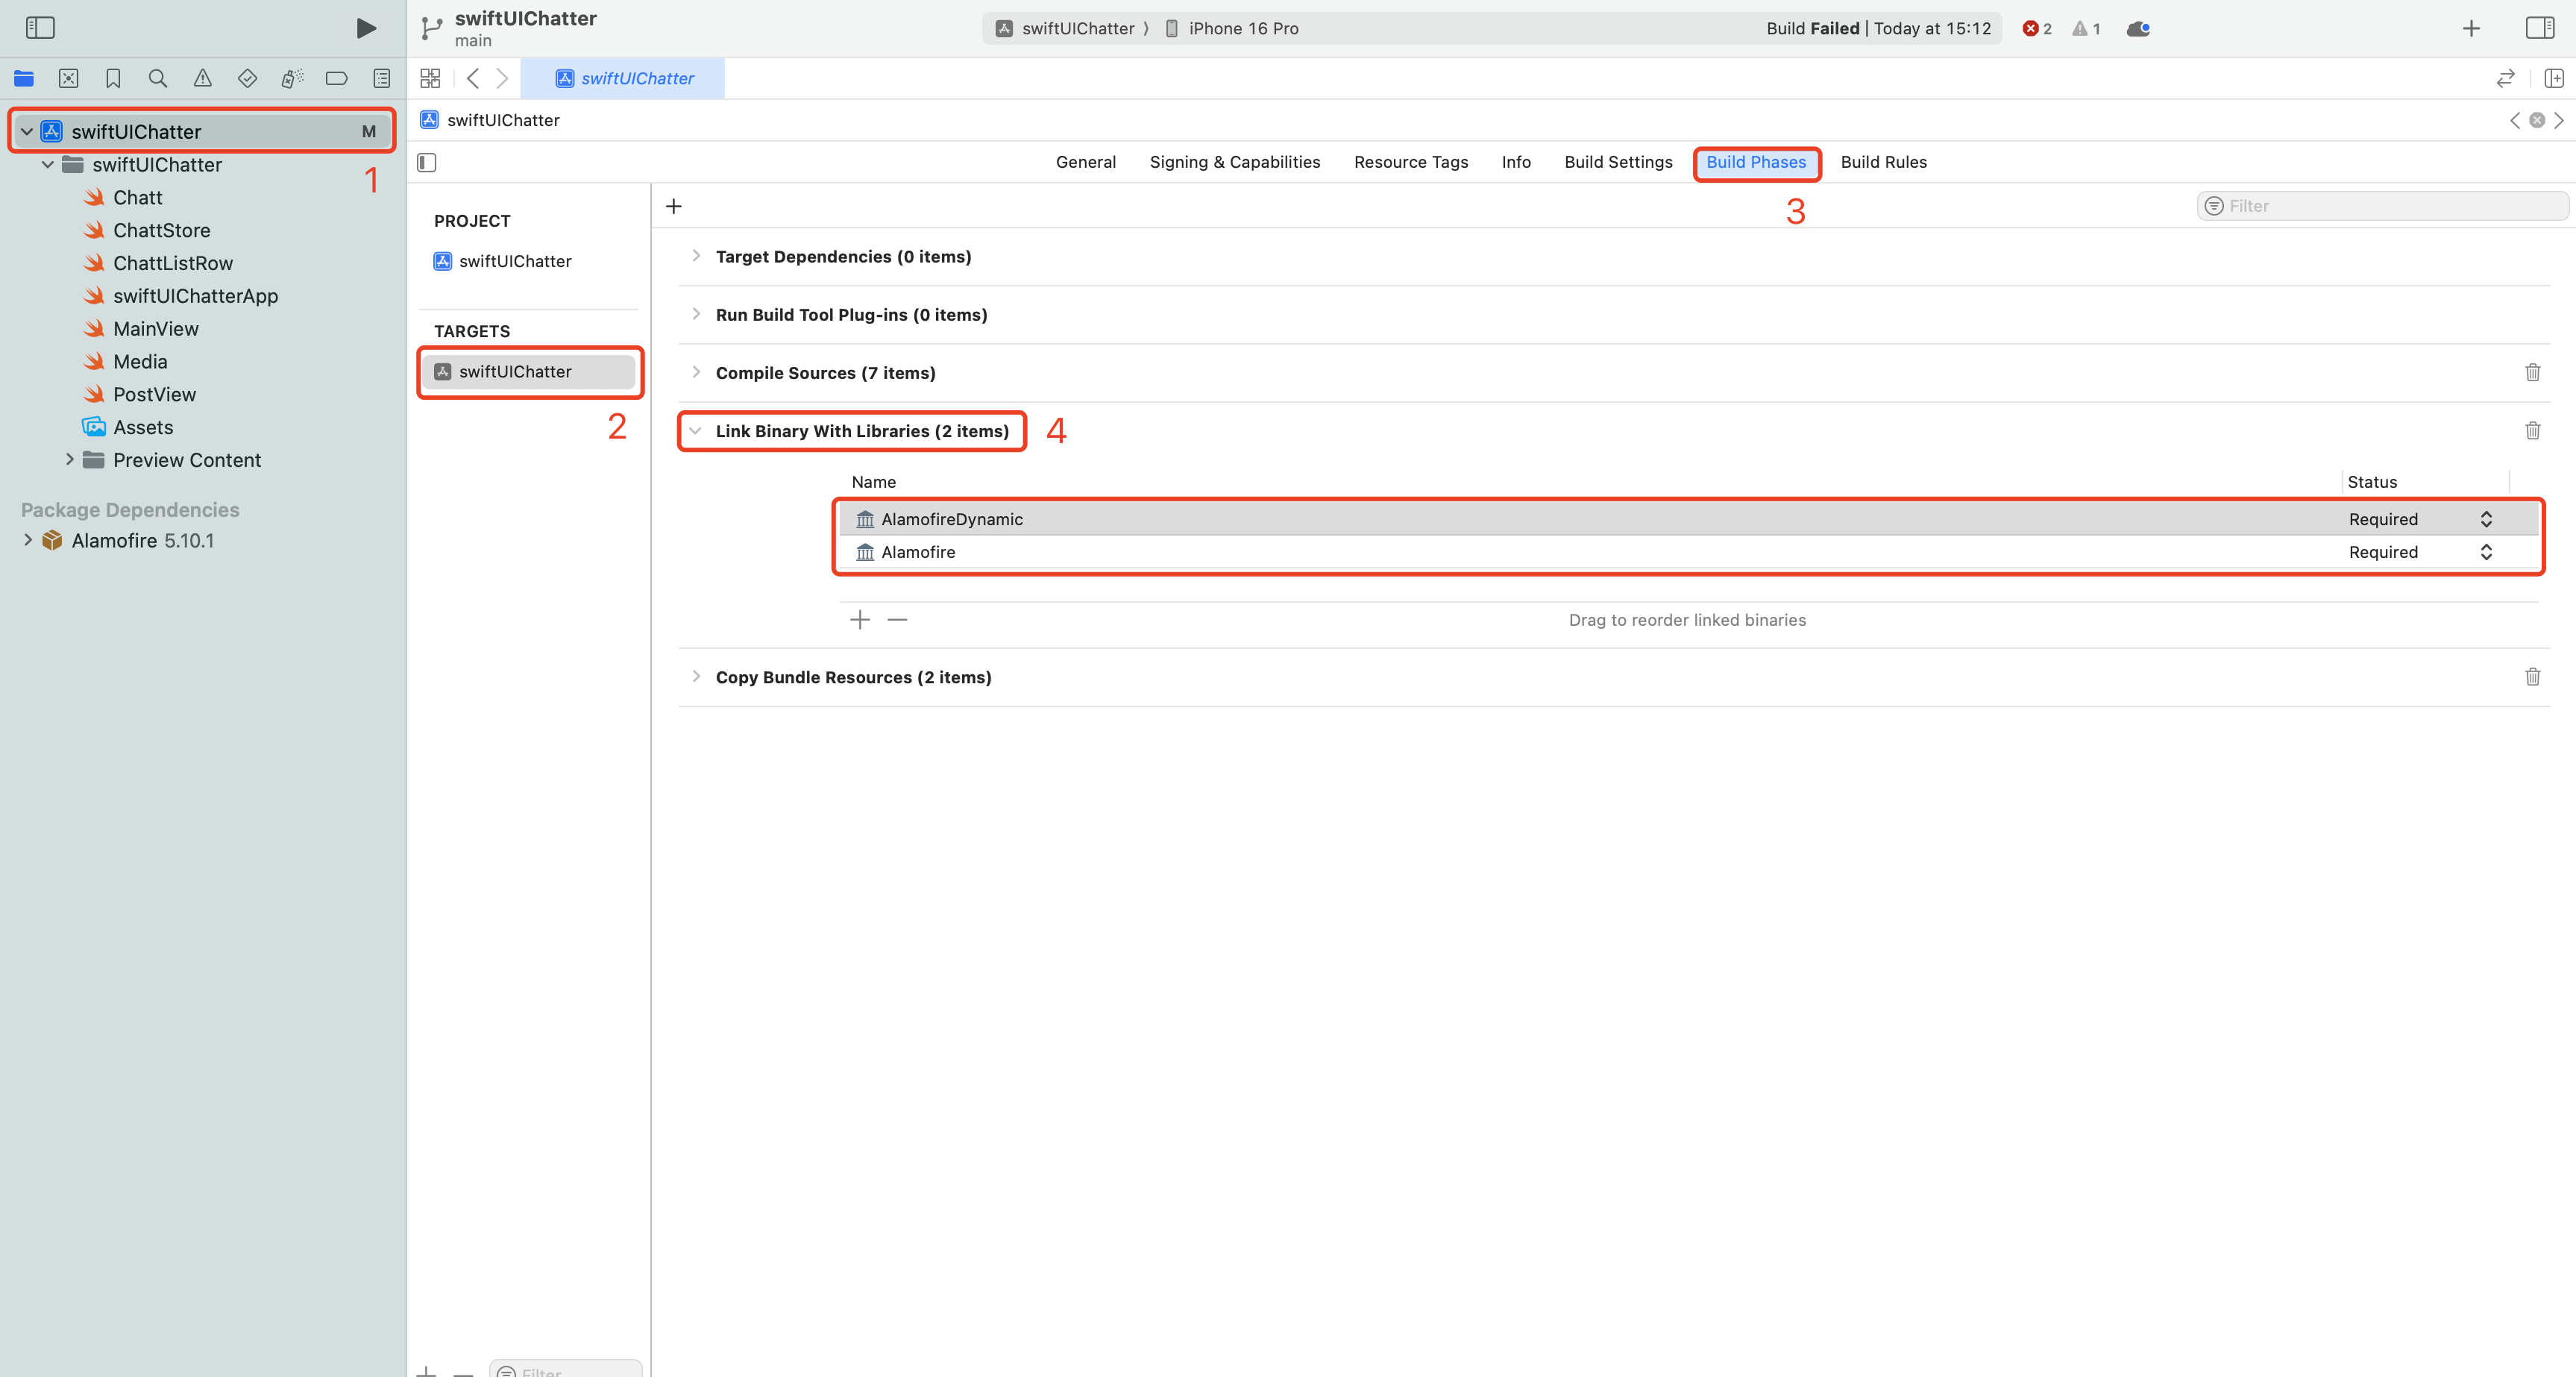
Then remove any linked libraries associated with the package (e.g., Alamofire & AlamofireDynamic) (screenshot):
- Staying on the project editor pane, on the left side under
TARGET, click your project, - Select the
Build Phasestab, - Expand the
Link Binary With Librariesdrop down menu item. - Select the linked libraries, e.g.,
AlamofireorAlamofireDynamic, to delete, - Click the minus (
-) sign below the list of libraries, - Click the
Removebutton on the dialog box that shows up. -
Repeat steps 5 to 7 until all linked libraries, e.g., all
Alamofireand allAlamofireDynamiclibraries, are deleted.
From Xcode’s top menu bar, select Product > Clean Build Folder.
Then reinstall the package.
![]() In the case of Alamofire, be sure to choose
In the case of Alamofire, be sure to choose None for AlamofireDynamic when the Choose Package Products for Alamofire.git shows up.
In the Chatter lab we used a serial queue to synchronize accesses to the isRetrieving variable that limits on-going backend retrieval to one per frontend. In this lab, we replace the use of the serial queue with the lock feature provided by the underlying OS, OSAllocatedUnfairLock(), to guarantee mutually exclusive accesses to isRetrieving.
At the top of your ChattStore.swift, add:
import Alamofire
import UIKit
import os
Next, replace the property synchronized with:
private let mutex = OSAllocatedUnfairLock()
Unfairmeans the lock is not necessarily granted in the order requests come in.
then replace your postChatt(_:) method with:
    func postChatt(_ chatt: Chatt, image: UIImage?, videoUrl: URL?) async -> Data? {
        guard let apiUrl = URL(string: "\(serverUrl)postimages/") else {
            print("postChatt: Bad URL")
            return nil
        }

        return try? await AF.upload(multipartFormData: { mpFD in
            if let username = chatt.username?.data(using: .utf8) {
                mpFD.append(username, withName: "username")
            }
            if let message = chatt.message?.data(using: .utf8) {
                mpFD.append(message, withName: "message")
            }
            if let jpegImage = image?.jpegData(compressionQuality: 1.0) {
                mpFD.append(jpegImage, withName: "image", fileName: "chattImage", mimeType: "image/jpeg")
            }
            if let videoUrl {
                mpFD.append(videoUrl, withName: "video", fileName: "chattVideo", mimeType: "video/mp4")
            }
        }, to: apiUrl, method: .post).validate().serializingData().value
    }
We are using the asynchronous version of the Alamofire upload() method. The code constructs the “form” to be uploaded as comprising:
- a part named “username” whose field contains the username obtained from in-memory data with UTF-8 encoding,
- a part named “message”, constructed similarly, then comes
- a part named “image” with in-memory data that has been JPEG encoded (no compression in this case). The “filename” is simply how the data is tagged, it can be any string, it doesn’t represent any actual “file”. The “mimeType” documents the encoding of the data (though it doesn’t seem to be used for anything), finally,
- the last part is named “video”, the data is not in memory, but rather must be retrieved from the
videoUrl.
Upon the (asynchronous) completion of upload, the response is validated using Alamofire’s built-in validate() method, which, by default, considers only HTTP response with status code between 200-299 as valid. This range can be changed in the call to validate(). All cases that pass validate() causes update() to return a .success and everything else is grouped as .failure. The response can be awaited as a Swift DataTask, created by Alamofire’s serializingData(), which upon completion returns its value as Swift Data.
We now convert getChatts() to use Alamofire and OSAllocatedUnfairLock. We have decided to use Alamofire’s callback-based API here. The download operation is still asynchronous, we simply provide a callback function for Alamofire to execute upon completion of its request() API:
    func getChatts() {
        guard let apiUrl = URL(string: "\(serverUrl)getimages/") else {
            print("getChatts: bad URL")
            return
        }

        // only one outstanding retrieval
        mutex.withLock {
            guard !self.isRetrieving else {
                return
            }
            self.isRetrieving = true
        }

        AF.request(apiUrl, method: .get).responseData { response in
            defer {
                self.mutex.withLock {
                    self.isRetrieving = false
                }
            }
            guard let data = response.data, response.error == nil else {
                print("getChatts: NETWORKING ERROR")
                return
            }
            if let httpStatus = response.response, httpStatus.statusCode != 200 {
                print("getChatts: HTTP STATUS: \(httpStatus.statusCode)")
                return
            }
            guard let chattsReceived = try? JSONSerialization.jsonObject(with: data) as? [[String?]] else {
                print("getChatts: failed JSON deserialization")
                return
            }
            var idx = 0
            var _chatts = [Chatt]()
            for chattEntry in chattsReceived {
                if (chattEntry.count == self.nFields) {
                    _chatts.append(Chatt(username: chattEntry[0],
                                            message: chattEntry[1],
                                            id: UUID(uuidString: chattEntry[2] ?? ""),
                                            timestamp: chattEntry[3],
                                            altRow: idx % 2 == 0,
                                            imageUrl: chattEntry[4],
                                            videoUrl: chattEntry[5]))
                    idx += 1
                } else {
                    print("getChatts: Received unexpected number of fields: \(chattEntry.count) instead of \(self.nFields).")
                }
                self.chatts = _chatts
            }
        }
    }
PostView
TODO 3/3:
Since postChatt(_:image:videoUrl:) is now an asynchronous function, modify your SubmitButton() in PostView to call postChatt(_:image:videoUrl:) inside a Task { } similar to way we did it in the signin lab. You are not required to present any alert dialog on error. Chatt in this lab has two additional fields, both of which you will set to nil when calling postChatt(_:image:videoUrl:); instead, pass the values of PostView’s image and videoUrl properties to postChatt(_:image:videoUrl:) as parameter arguments.
Depending on your upload bandwidth, uploading video can take a long time. You will also likely see a large number of warnings in Xcode console. As long as your app doesn’t crash, you can safely ignore these warnings for this lab.
With the updated PostView(), you can now take or select images and videos and send them to your Chatter back end! Since we haven’t worked on image/video download, you can verify this by inspecting the content of your chatts table in the postgres database at the backend.
ChattListRow
If a chatt contains a video URL, the video player will be shown, and when clicked, it will play back the video. If the chatt has an image URL, the image will be downloaded asynchronously using AsyncImage(). Add the following HStack of UI elements inside your VStack, below the display of the chatt’s message:
            HStack(alignment: .top) {
                if let urlString = chatt.videoUrl, let videoUrl = URL(string: urlString) {
                    VideoView(videoUrl: videoUrl)
                        .scaledToFit()
                        .frame(height: 181)
                }
                Spacer()
                if let urlString = chatt.imageUrl, let imageUrl = URL(string: urlString) {
                    AsyncImage(url: imageUrl) {
                        $0.resizable()
                    } placeholder: {
                        ProgressView()
                    }
                    .scaledToFit()
                    .frame(height: 181)
                }
            }
Congratulations, you’ve successfully added the ability to access your device’s photo library or camera, upload/download images and videos to/from your back-end server, and display images and play back video in your app!
Submission guidelines
We will only grade files committed to the master or main branch. If you use multiple branches, please merge them all to the master/main branch for submission.
multi
Ensure that you have completed the back-end part and have pushed your changes to your back-end code to your 441 GitHub repo.
Push your images lab folder to your GitHub repo as set up at the start of this spec.
git push
- Open GitHub Desktop and click on
Current Repositoryon the top left of the interface - Click on your
441GitHub repo - Add Summary to your changes and click
Commit to master(orCommit to main) - If you have a team mate and they have pushed changes to GitHub, you’ll have to click
Pull Originand resolve any conflicts - Finally click
Push Originto push changes to GitHub
![]() Go to the GitHub website to confirm that your front-end files have been uploaded to your GitHub repo under the folder
Go to the GitHub website to confirm that your front-end files have been uploaded to your GitHub repo under the folder images. Confirm that your repo has a folder structure outline similar to the following. If your folder structure is not as outlined, our script will not pick up your submission, you will get ZERO point, and you will further have problems getting started on latter labs. There could be other files or folders in your local folder not listed below, don’t delete them. As long as you have installed the course .gitignore as per the instructions in Preparing GitHub for EECS 441 Labs, only files needed for grading will be pushed to GitHub.
  441
    |-- # files and folders from other labs . . .
    |-- images
        |-- swiftUIChatter
            |-- swiftUIChatter.xcodeproj
            |-- swiftUIChatter
    |-- # files and folders from other labs . . .
Verify that your Git repo is set up correctly: on your laptop, grab a new clone of your repo and build and run your submission to make sure that it works. You will get ZERO point if your lab doesn’t open, build, or run.
IMPORTANT: If you work in a team, put your team mate’s name and uniqname in your repo’s README.md (click the pencil icon at the upper right corner of the README.md box on your git repo) so that we’d know. Otherwise, we could mistakenly think that you were cheating and accidentally report you to the Honor Council, which would be a hassle to undo. You don’t need a README.md if you work by yourself.
Review your information on the Lab Links sheet. If you’ve changed your teaming arrangement from previous lab’s, please update your entry. If you’re using a different GitHub repo from previous lab’s, invite eecs441staff@umich.edu to your new GitHub repo and update your entry.
References
- Apple’s UIImagePickerController
- Base64
- Resizing Images
- UIImage conversion with Base64
- Crop Box Apple Documentation
- Crop Box Implementation Example
- Determine if the access to photo library is set or not - PHPhotoLibrary
- How to check if the user gave permission to use the camera?
Package Management
- Managing package dependencies with Swift Package Manager in Xcode
- Swift Package Index: Package Collections
Image and video download and play back
- How to load a remote image from a Url
- AsyncImage
- How to play movies with VideoPlayer
- How to detect when AVPlayer video ends playing?
- onReceive(_:perform:)
- Controls with AVPlayer
- VideoPlayer
- AVPlayer
- AVPlayerViewController
- JPEG Formats - Progressive vs. Baseline
- Progressive JPEGs and green Martians
ImagePicker
PhotosPicker
- How to let users select pictures using PhotosPicker
- How to use the SwiftUI PhotosPicker
- How to let users import videos using PhotosPicker
- Bringing Photos picker to your SwiftUI app
- Selecting Photos and Videos in iOS
- PhotosPicker
Multipart/form-data
- Upload Data using Multipart
- Understanding HTML Form Encoding: URL Encoded and Multipart Forms
- RESTful API Tutorial: How to Upload Files to a Server
- RFC7578: Returning Values from Forms: multipart/form-data
- How to Upload Data to a Server: Multipart/Form-Data HTTP Requests in Swift
- Uploading images and forms to a server using URLSession
- Upload image to server using URLSessionUploadTask
- Multipart Request with URLSession and async/await in Swift
Alamofire
- How to parse JSON response from Alamofire API in Swift?
- Send POST parameters with MultipartFormData using Alamofire, in iOS Swift
- Alamofire Multipart with parameters : upload Image from UIImagePickerController Swift
- Alamofire 5 Tutorial for iOS
- Alamofire References
- Alamofire Documentation
- Alamofire MultipartFormData
- Alamofire Uploading MultipartFormData
- Using Alamofire with Swift Concurrency
- Pros and Cons Alamofire Concurrency vs Regular or suggested method
- Evolution of handling API response with Alamofire
| Prepared for EECS 441 by Ollie Elmgren, Wendan Jiang, Benjamin Brengman, Tianyi Zhao, Alexander Wu, Nowrin Mohamed, Chenglin Li, Yibo Pi, and Sugih Jamin | Last updated: April 20th, 2024 |