Chatter Swift
Cover Page
DUE Sun, 06/08, 11:59pm (Beijing Time)
In this lab you’ll learn how to retrieve textual chatts from a back-end server and how to post to it. You will familiarize yourselves with the iOS app development environment and the basics of the platform. You’ll learn some Swift syntax and language features that may be new to you. And you will be introduced to AutoLayout, iOS’s constraint-based layout mechanism, as used in the Storyboard. Let’s get started!
Expected behavior
Posting a new chatt:
Right click on the gif and open in a new tab to get a full-size view.
To view the gif again, hit refresh on your browser (in the new tab where the gif is opened).
 |
Preliminaries
If you don’t have an environment set up for iOS development, please read our note on Getting Started with iOS Development first.
Before we start, you’ll need to prepare a GitHub repo to submit your labs. Please follow the instructions in Preparing GitHub for VE441 Labs and then return here to continue.
Creating an Xcode project
Video: You must follow the project settings and naming conventions in this lab for grading purposes. You may use this video as a reference to complete setting up the UI part, but notice that this video may use different naming conventions. After completing the UI part, you will still need to return here to complete the code for the lab.
Depending on your version of Xcode, the video and screenshots in this and subsequent lab specs may not look exactly the same as what you see on screen.
In the following, please replace “YOUR_JACCOUNT” with your jAccount. Apple will complain if your Bundle Identifier is not globally unique. Using your jAccount is one way to generate a unique bundle ID.
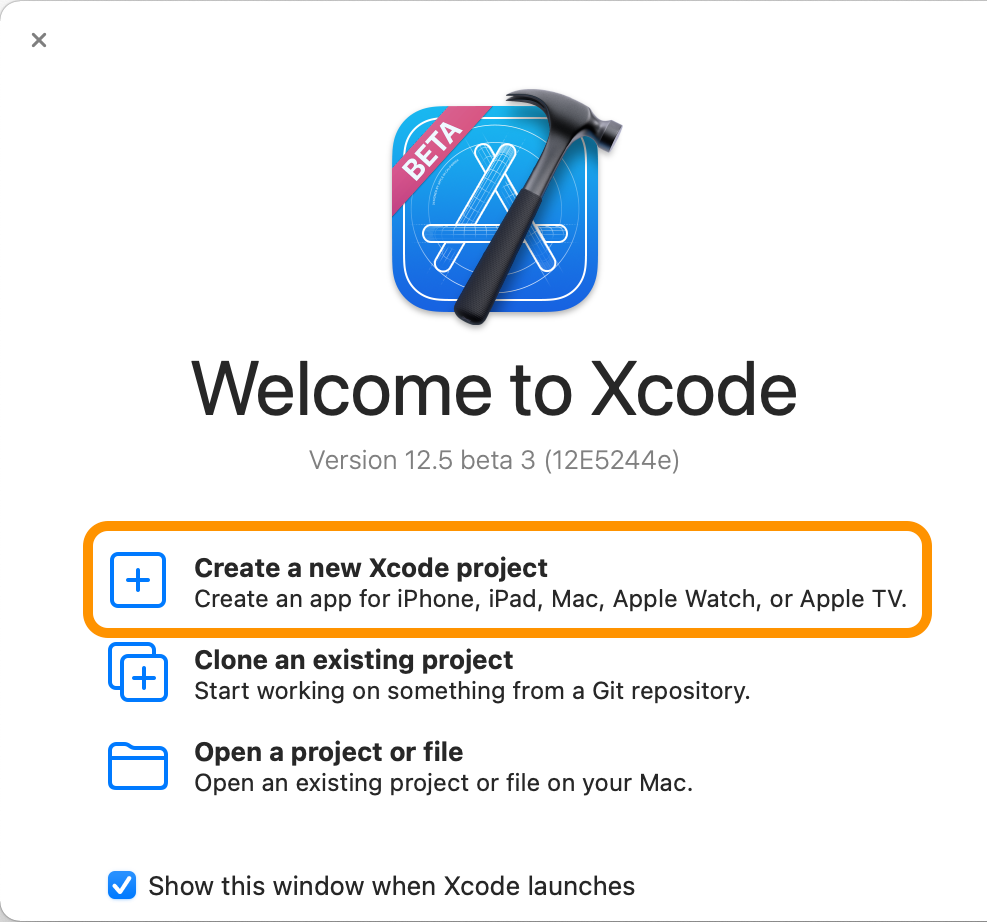
- Click
Create a new Xcode projectin “Welcome to Xcode” screen (screenshot) - Select
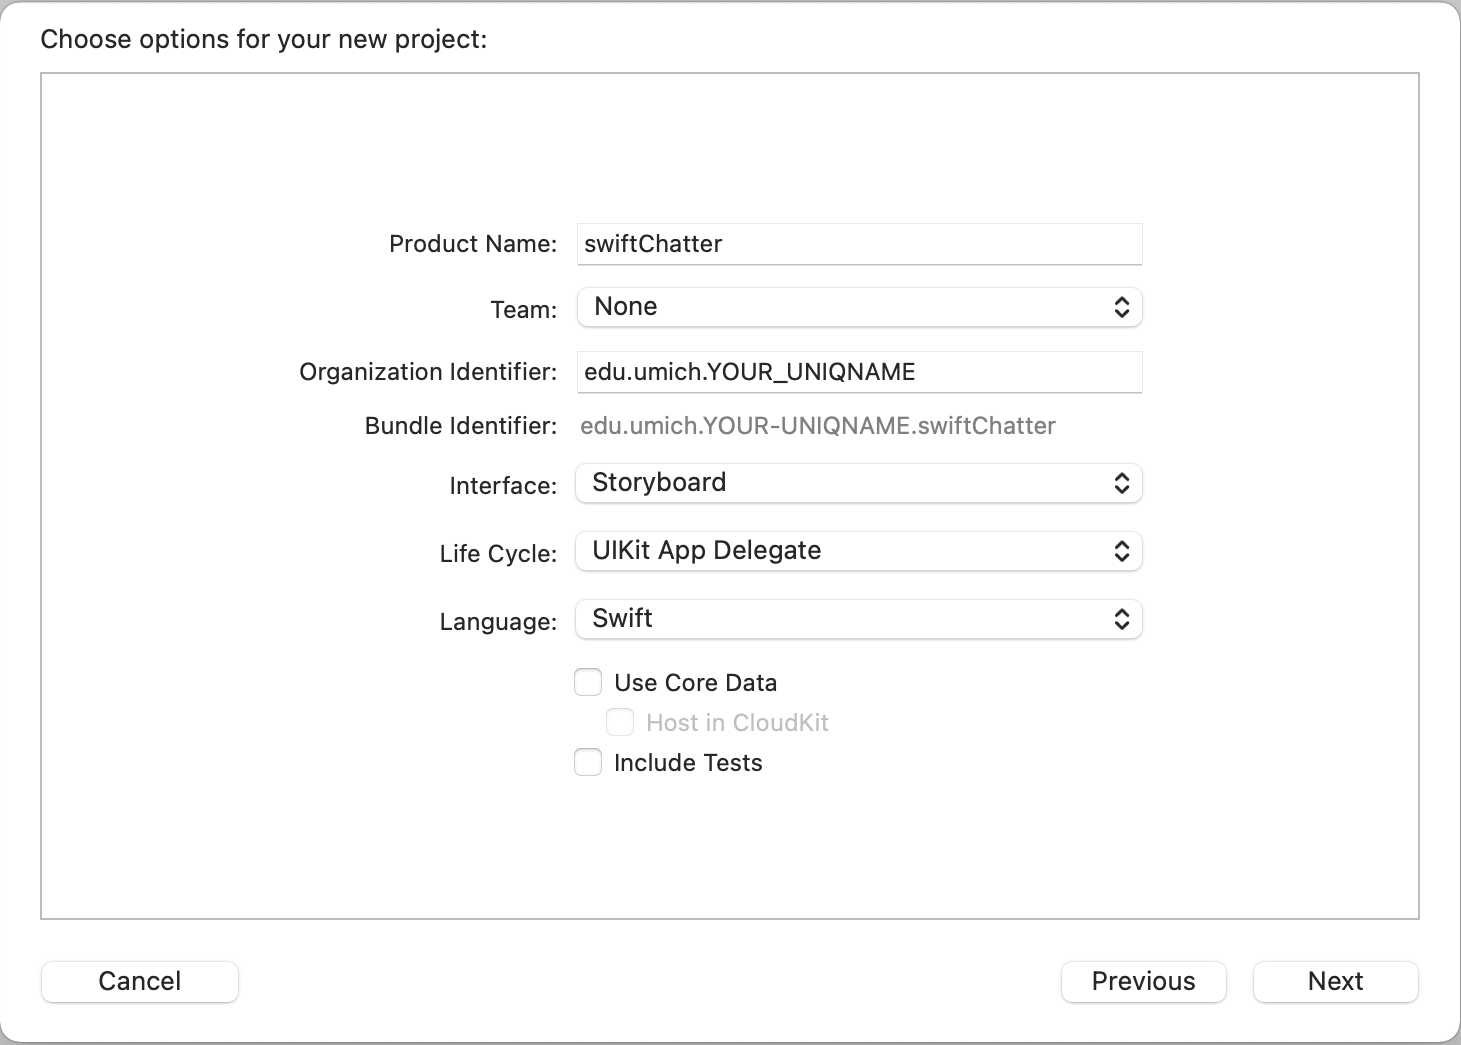
iOS > App(notMultiplatform > App, normacOS > App) and clickNext(screenshot) - Enter
Product Name: swiftChatter Team: Noneif you don’t have one yet, otherwise choose your Personal Team
Organization Identifier: cn.edu.sjtu.YOUR_JACCOUNTInterface: Storyboard (screenshot)Language: Swift- Leave the boxes unchecked, click
Next - On the file dialog box that pops up, put your
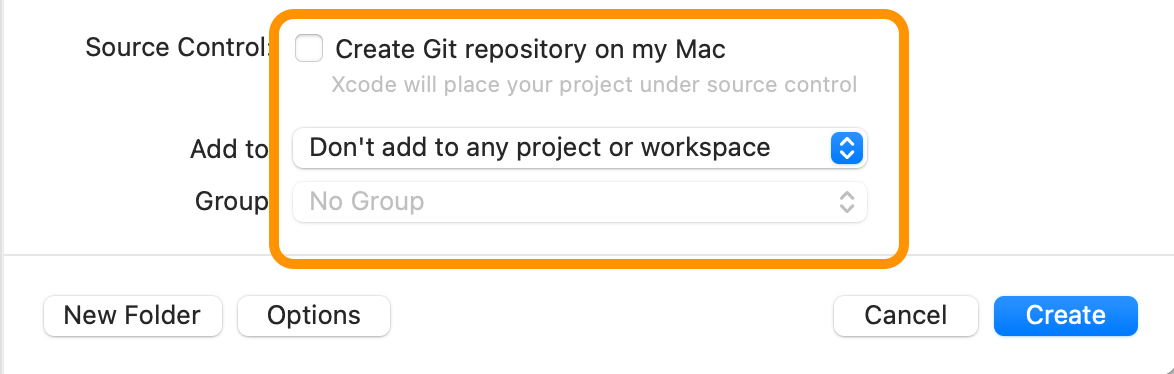
swiftChatterfolder inYOUR_LABSFOLDER/lab1/swiftChatter/where
YOUR_LABSFOLDERis the folder of your choosing where you want to put all your 441 labs. LeaveCreate Git repository on my Macunchecked (screenshot). We will add the files to GitHub using GitHub Desktop instead, later.
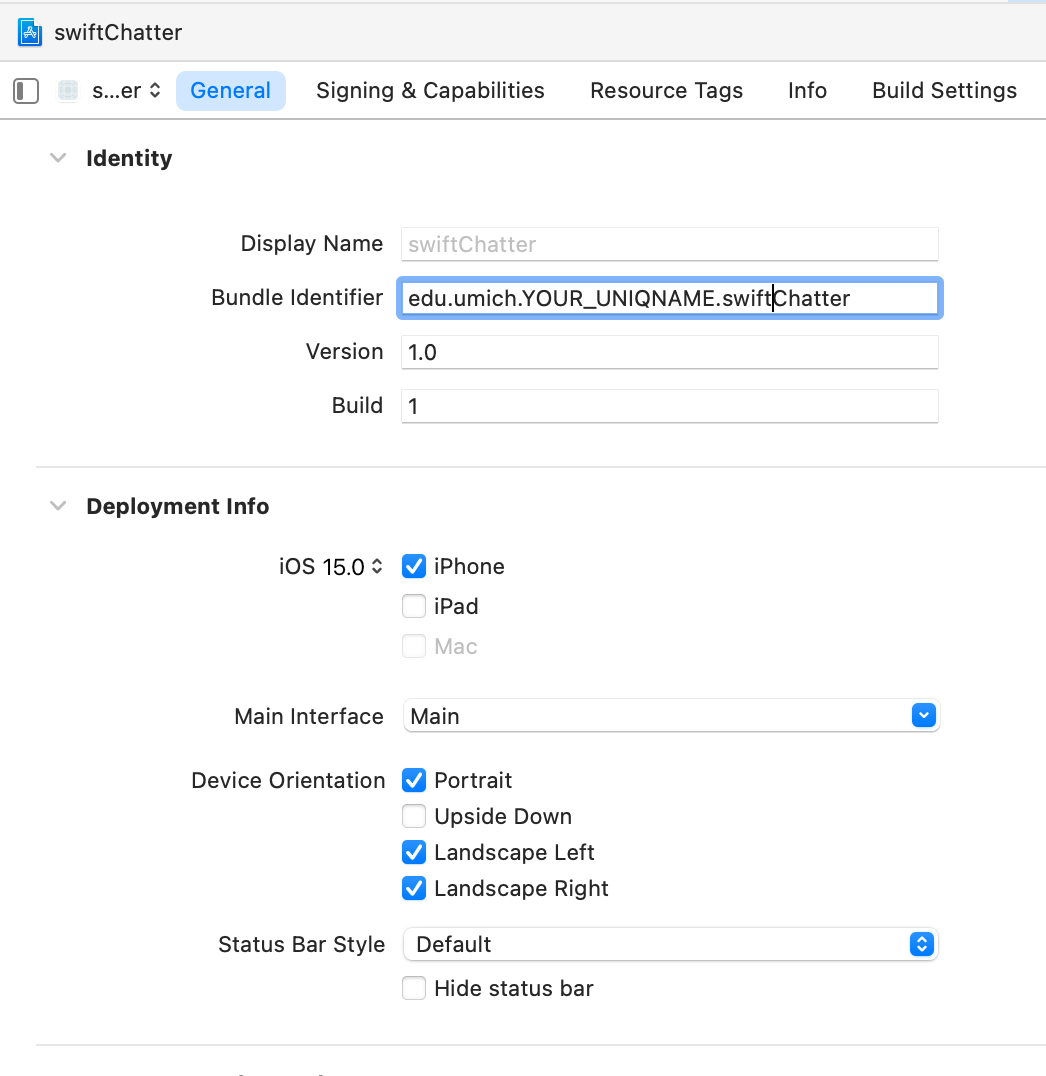
Once the project is created, Xcode should show the General settings for your project in its middle pane by default (if not, navigate to your project editor (top line of Xcode left pane showing your Product Name) and click on the General tab). In the Identity section, confirm that your Bundle identifier is cn.edu.sjtu.YOUR_JACCOUNT.swiftChatter.
Next in the Deployment info section, using the up-down selector, choose the iOS version that your whole team is running (at least 15.0). Check the box for iPhone only, not both with iPad, unless you want your app to run on both (screenshot).
If you selected None for Team above, click on the Signing & Capabilities tab (up top, next to the General tab). You will need to specify a Team. If you don’t yet have an Apple Developer account, please create one now (it’s free) using your Apple ID. In the drop down menu next to Team select Add an Account, sign in using your Apple ID and follow prompts to create one.
Your Xcode project file will be in YOUR_LABSFOLDER/lab1/swiftChatter/swiftChatter.xcodeproj and the rest of your project files will be in YOUR_LABSFOLDER/lab1/swiftChatter/swiftChatter.
Xcode project structure
AppDelegate[.swift]: app lifecycleSceneDelegate[.swift]: scene lifecycle, mostly useful for multi-window iPadOS apps; not very relevant to iPhone appsViewController[.swift]: we will split this up into one file per ViewController, see belowMain[.storyboard]: default UI views layoutLaunchScreen[.storyboard]: your splash screen, shown when app opens, before it’s fully loadedInfo[.plist]: meta data about your app, including user permissions
The file name extensions between brackets are no longer shown in the latest version of Xcode.
While we can put all of our MassiveViewControllers in ViewController.swift, it gets quite unwieldy scrolling through a large file looking for a class or method in latter labs. So we will put each ViewController class in its own file. In this course we will shorten ViewController to VC in all ViewController class and file names. We will also name the ViewController for the main screen MainVC.
Chatter
The Chatter app consists of two views: one to write and post a chatt to the server, and another, the main view, to show retrieved chatts. It is cheaply inspired by Twitter. And it has a live back-end API already:
  https://47.110.152.27/getchatts/
  https://47.110.152.27/postchatt/
These HTTP requests are served by a back end server with IP 47.110.152.27 for testing your front-end. You will create your own back end later in the lab.
Storyboard
For this lab, we will be using Xcode’s Storyboard to construct your Views. Storyboard’s Interface Builder helps lay out your UI. UI elements are added to a Storyboard by drag-and-drop.
Views and View Controllers
A View determines the layout of your UI elements, for example: Table View, Collection View, Page View, or just plain View, etc. Different types of Views have different built-in tools, for example:
- a
Table Viewdisplays a scrollable list of rows - an
Image Viewknows how to display an image - a plain
Viewis a blank canvas
A View Controller is represented in the Storyboard as a container that holds a certain type of View, facilitating management of that View, for example:
- a
Table View Controllerprovides aTable Viewwith a prototypeTable View Cellused to display each row of the table. - each
View Controlleron the Storyboard must be linked to view controller code that implements the actions needed to operate on the UI elements in itsView.
Here’s a depiction of a simple view hierarchy comprising multiple UI elements: Label, Button, and View:
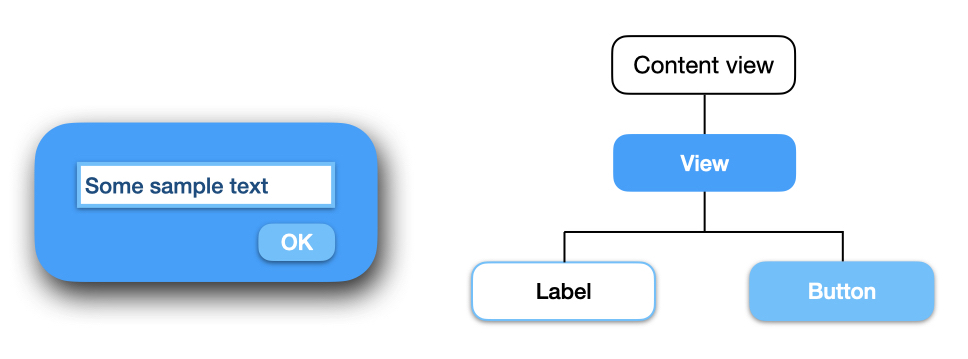
Consult Apple’s documentation for detailed discussion on view hierarchy.
Auto Layout
The layout of a view hierarchy, i.e., how various UI elements (labels, buttons, tables, text fields, text boxes, images, etc.) are placed, is computed by iOS’s Auto Layout, a constraint-based layout system. It sizes, resizes, positions, and repositions all UI elements as necessary based on available screen real estate and the constraints associated with each UI element. For example, the UI elements of an app are first sized and positioned according to the screen size of the device and then resized and repositioned upon change of orientation.
For Auto Layout to work, it needs to know four things about each UI element:
- the \(x\)- and
- \(y\)-coordinates of one of the element’s corners or its center,
- the element’s width,
- and its height.
As for the height and width of a UI element, according to Apples’ documentation, Auto Layout Guide:
- Auto Layout can derive the sizes of
Labels,Buttons,Text Fields, andSwitches based on their contents (intrinsic content size), so you don’t need to provide them, though practically, depending on your use case, you want to explicitly size one or both dimensions. For example, to force line wrap, you have to specify a width. Text Views andImage Views also have intrinsic content sizes, but the rules that apply to these are more complex and varying, and, again, you practically may just have to explicitly size them to get the behavior you want.Sliders only have intrinsic width, so you need to provide the height.- And finally,
Views and all its subclasses, such asTable Views, do not have intrinsic content size, so you must always provide these.
The coordinate system for an iPhone screen has its origin (0,0) at the upper left corner of the screen (relative to orientation). X positive grows to the right and y positive grows down.
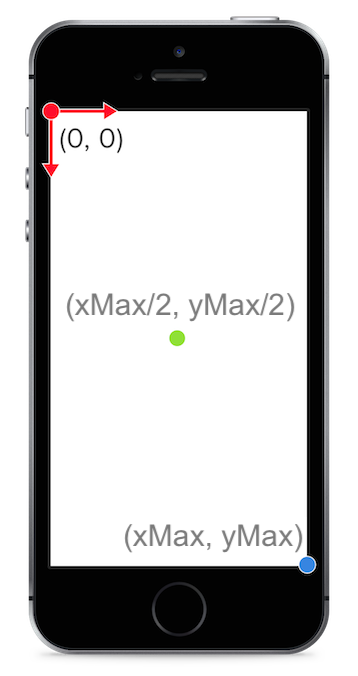
Different iPhone models have different screen sizes (max \(x\)- and \(y\)-coordinates) as listed in Apple’s Screen Geometry table.
Not all of the area on a screen (inside a superview) is always usable. After discounting rounded corners, status bar, notches, sensor housing, home indicator, navigation bar, etc., we’re left with the so-called Safe Area. When laying out UI elements, we usually want to leave some margin around a superview/safe area so that our UI elements don’t run smack into the edges of the view. When specifying constraint Relative to Margin, we are using only the area inside the safe area with a uniform margin all around. We want to lay out our UI elements within this area.
To learn more about Auto Layout, consult Frame based layout vs. Auto Layout using constraint and Notes from the margins.
Let’s design our screens!
Main view
Video: working with the Storyboard can be very confusing when you first started.
If you got lost here, we suggest you follow along the video for this part of the spec. While we show you how to set the Auto Layout constraints numerically in this spec, the video shows you a more graphical approach. You can choose your preferred method.
Open up the Main Storyboard by clicking on it in Xcode’s navigation (left) pane.
- Click on the
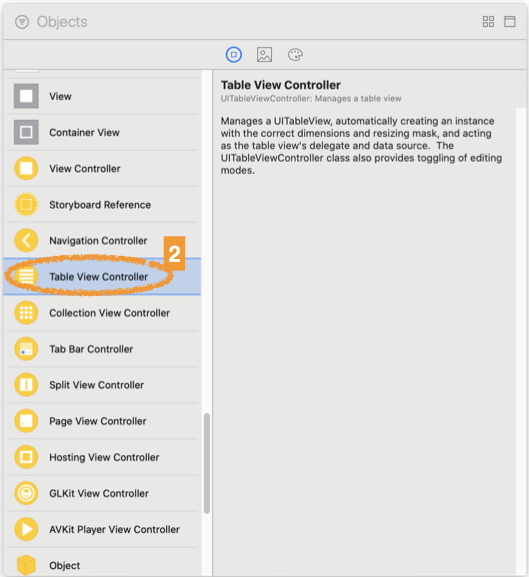
+sign at upper right of the main window, or select on main menuView > Show Library(⇧⌘L), to see the library of available UI elements. Hold down the option key to make the library window persistent. - Drag and drop a
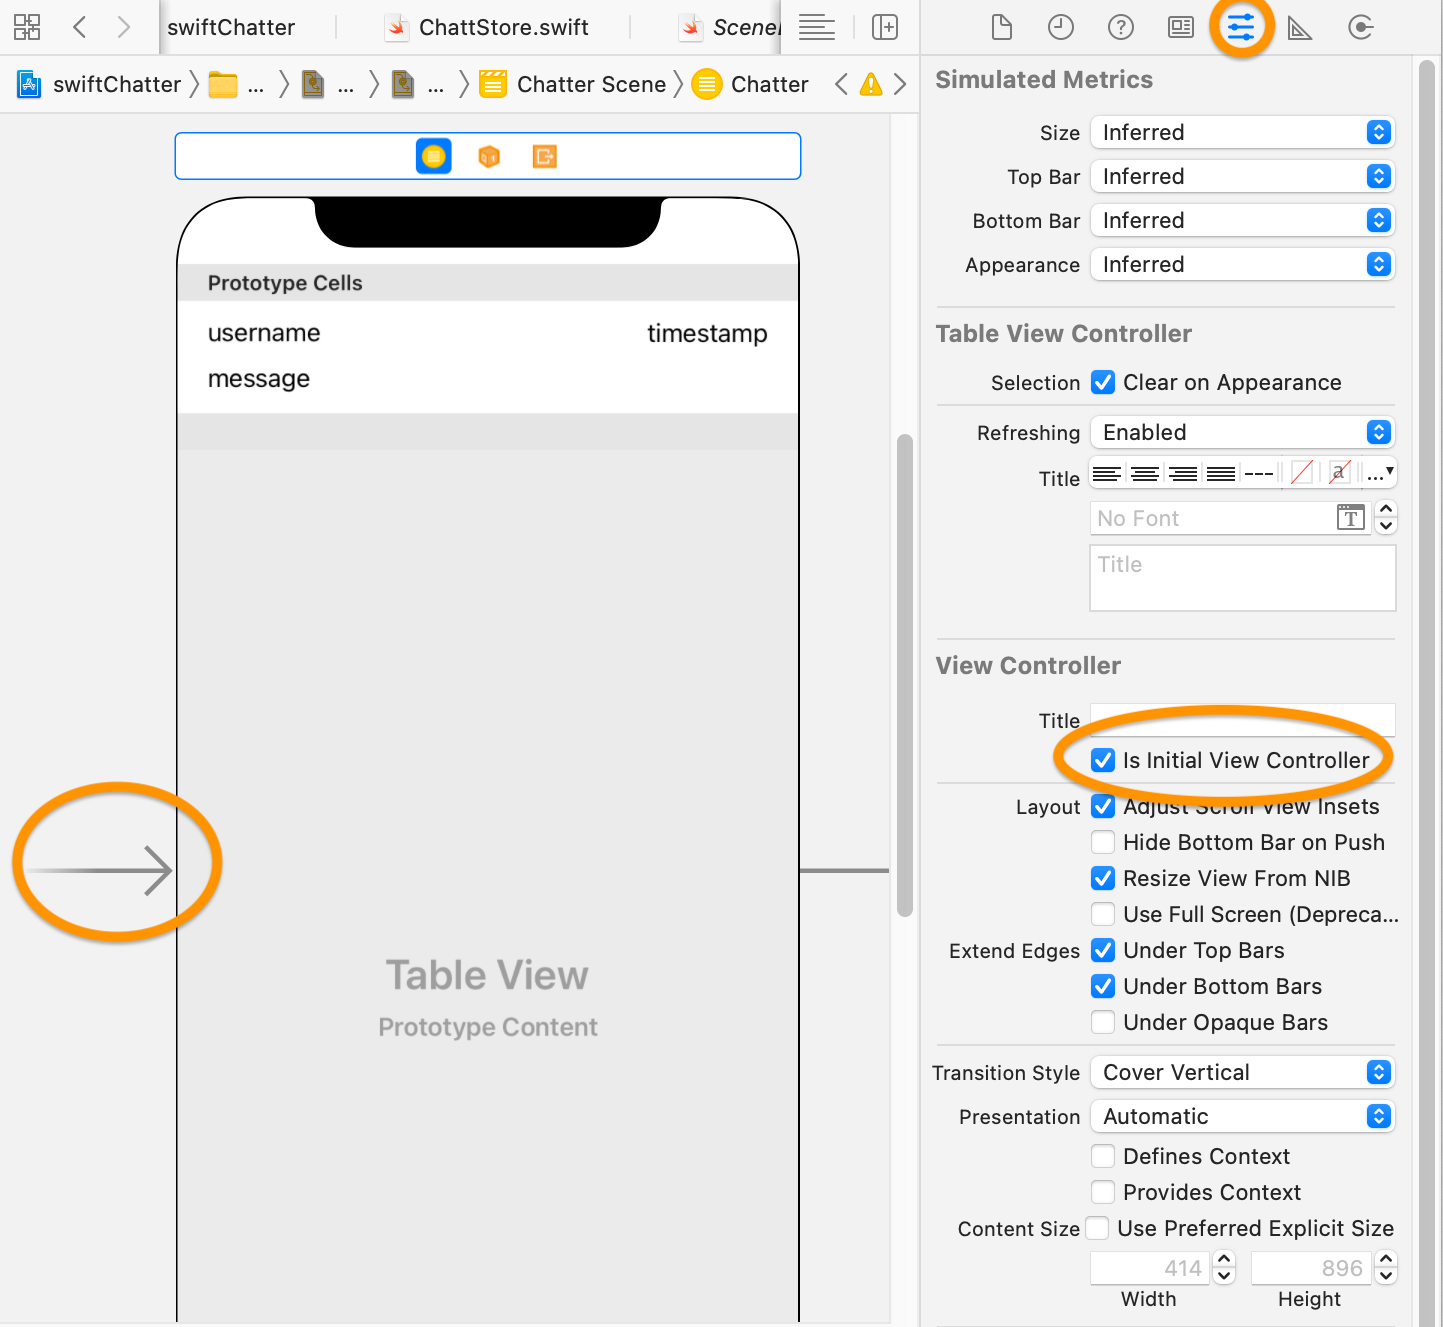
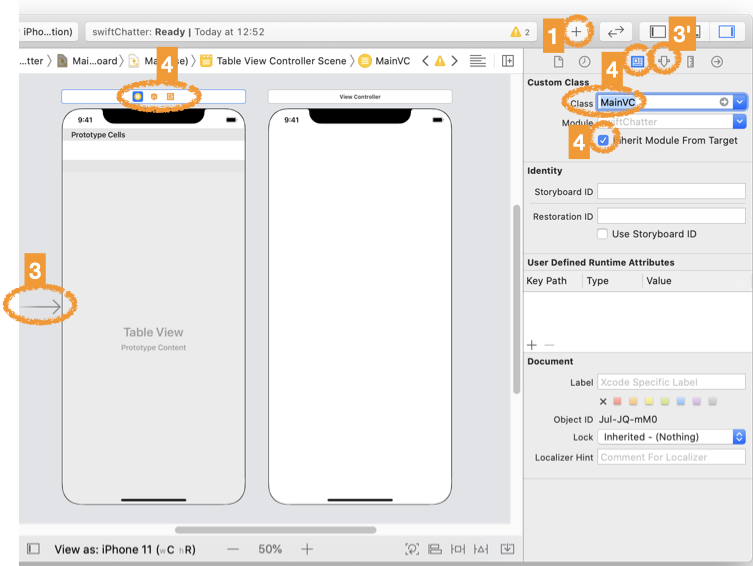
TableViewControlleronto the Storyboard (screenshot). - Move
Storyboard Entry Pointarrow to point to the newTableViewController(screenshot).If you accidentally deleted the entry point arrow on your Storyboard, click on the view controller you want to be the entry point. In its
Attributes InspectorcheckIs Initial View Controllerunder itsTitle. - Click on the top bar of the
TableViewController, then on itsIdentity inspector(4th button on right pane), set itsClassto “MainVC”, click to checkInherit Module From Targetbox (screenshot).
We’ll work on Post view next because it’s simpler and we can introduce the controls one by one. We’ll return to finish up Main view afterwards.
Post view
- Click on the bar above the original View Controller, in its
Identity Inspectorset itsClasstoPostVCand checkInherit Module From Target(screenshot)Don’t forget to check
Inherit Module From Target. Not checking it is a common bug, causing the app to crash when you try to segue from the Main view to Post view. - With
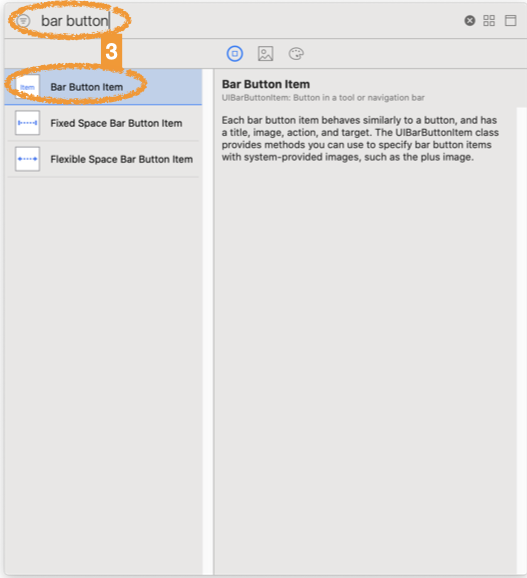
PostVCselected, on main menu clickEditor > Embed In > Navigation Controller. - Add
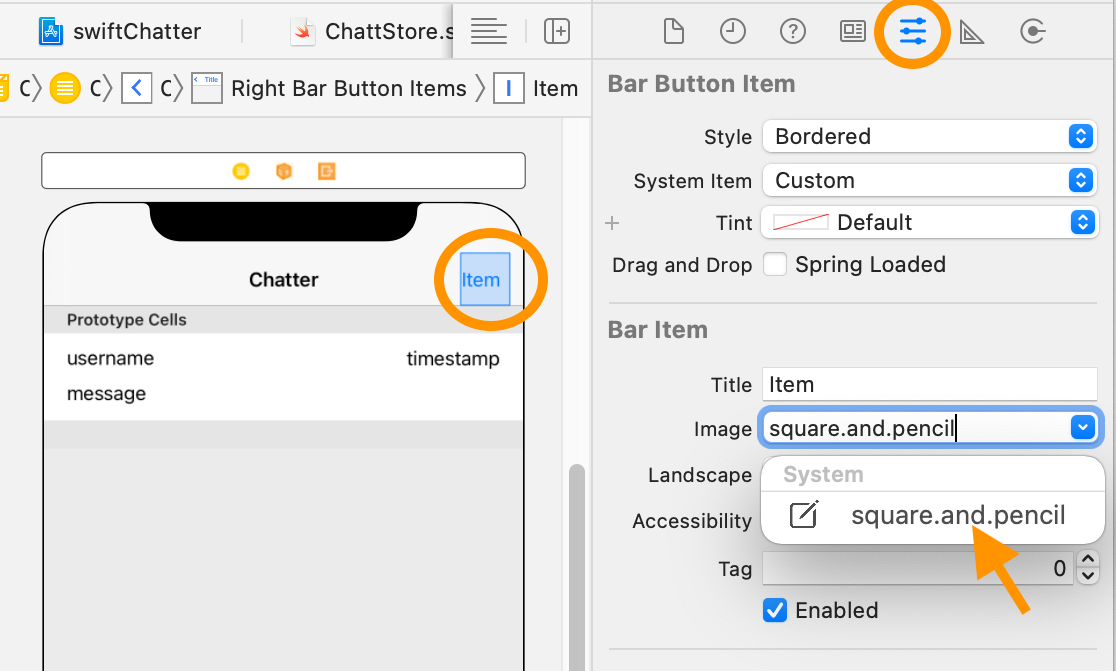
Bar Button Itemto the top right ofPostVCon its navigation bar (screenshot) - With the new button selected, open up the “Attribute Inspector” (top menu of Xcode’s right pane, third icon from the right).
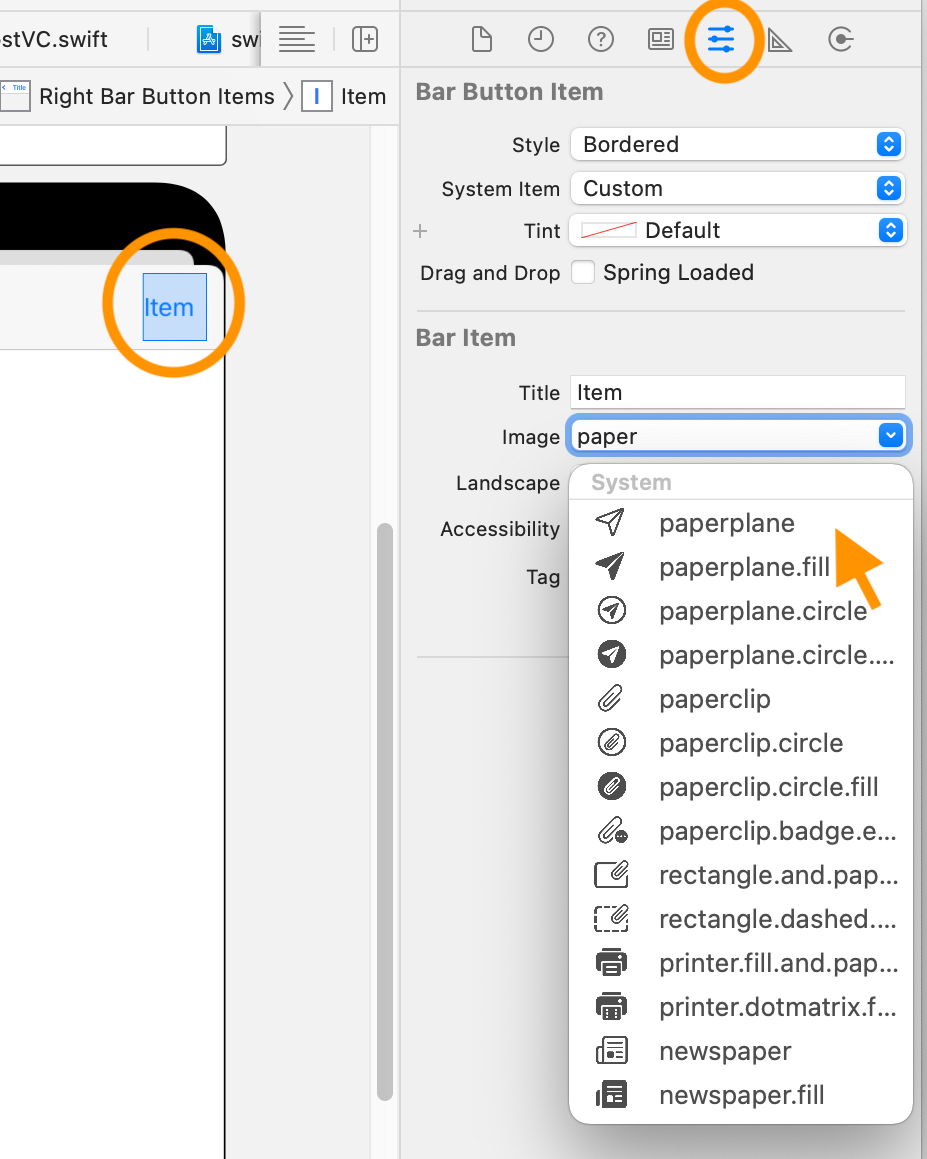
- In the
Bar Itemsection, in theImagefield enterpaperplaneand click on the item that shows up in the drop down menu (screenshot). - In the
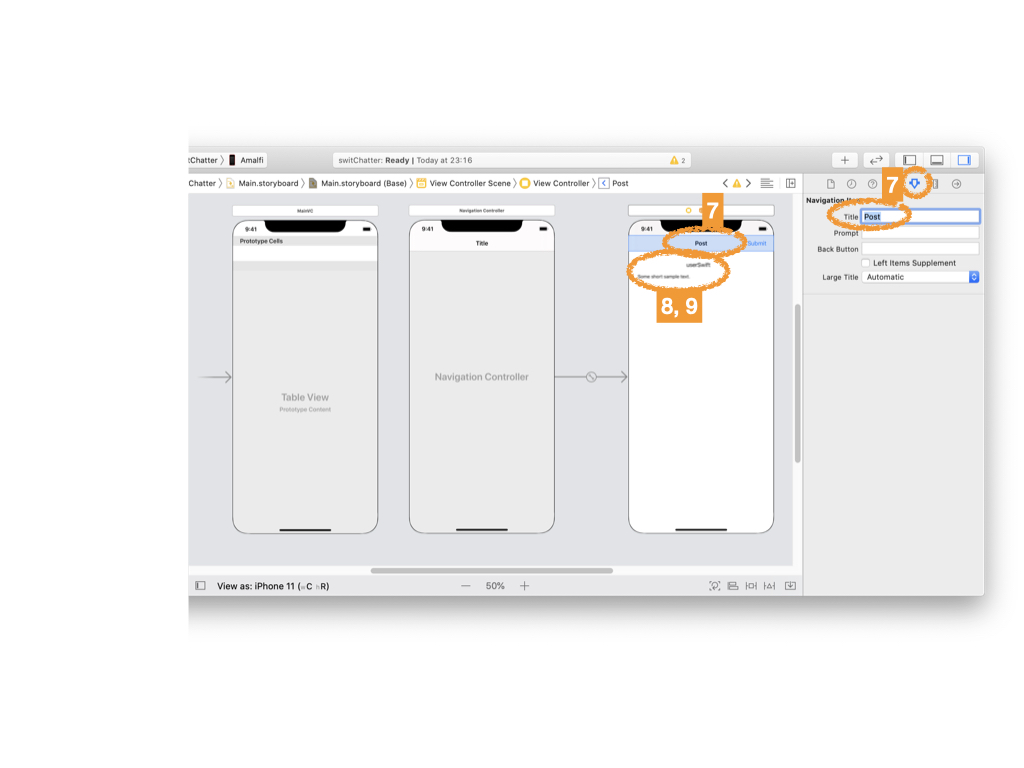
Titlefield above theImagefield, enter “Submit” to replace “Item” - Add a title to
PostVCby clicking on the top navigation bar and in itsAttributes Inspector > TitleenterPost(screenshot). - Now add a
Labelfrom the object library to the top center ofViewbelow the navigation bar, under the “Post” title you just entered, and type in YOUR_JACCOUNT, this will be your “username” for this app. - Add a
Text Viewfrom the object library to top left ofViewunder the username label and enter some short sample text.
Chatt table cell layout
We now return to finish up the Main view (screenshot):
- Click on the
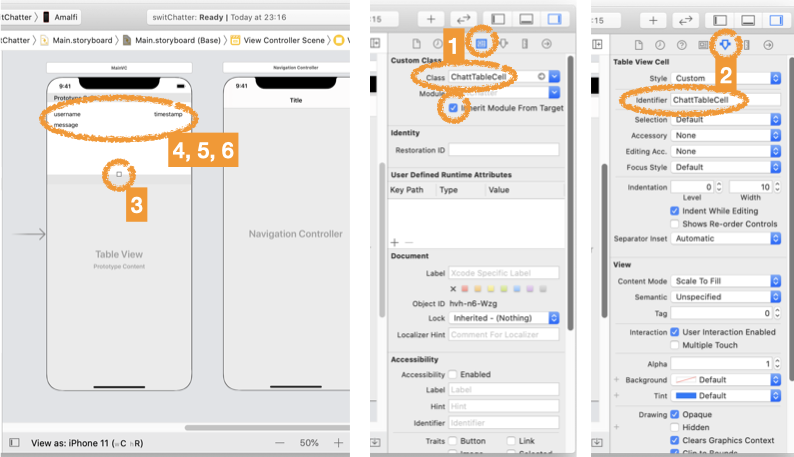
Table View Cellin the Document Outline or select thePrototype CellinMainVCin Storyboard. Under itsIdentity Inspectorrename itsClassto “ChattTableCell” and checkInherit Module From Target, - Under its
Attributes Inspectorset itsIdentifierto “ChattTableCell” also. - Drag the prototype cell to resize it vertically, to make room for the following labels.
-
Add a
Labelforusernameto top left ofChattTableCell; replace the text “Label” with “username”. -
Add a
Labelfortimestampto top right ofChattTableCell; replace the text with “timestamp” - Add another
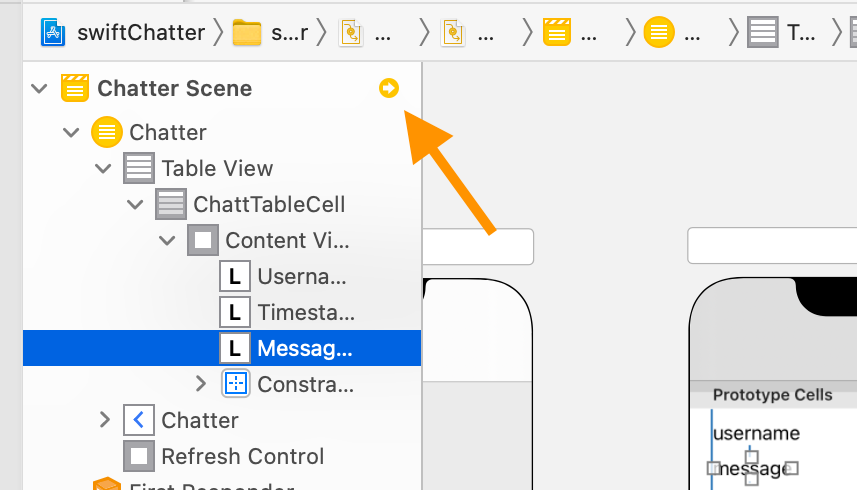
Labelfor message to bottom left; replace the text with “message”. With theMessage Labelstill selected, open itsAttributes InspectorsetLinesto 0 andLine BreaktoWord Wrap(see figure). This tells Auto Layout to allocateMessage Labelas many lines as necessary to hold its content. We also force the content to wrap around if it’s longer than the label’s width.
Adding constraints
We now provide layout constraints for the three labels we have created on the MainVC ViewController:
Apple’s documentation, Working with Contraints in Interface Builder, explains Storyboard’s UI for setting constraints and shows how to set the constraints graphically, along the lines shown in our video tutorials.
Username Label: (screenshot)- click on the label to select it,
- click on the
Add New Constraintsicon at the lower right of Xcode’s middle pane, third one from the right, - click on the top constraint and set the value to 0,
- click on the leading (left) constraint and set the value to 0,
- confirm that
Constrain to marginsis checked, and - click the
Add 2 Constraintsbutton.
If your locale has a language that reads left to right,
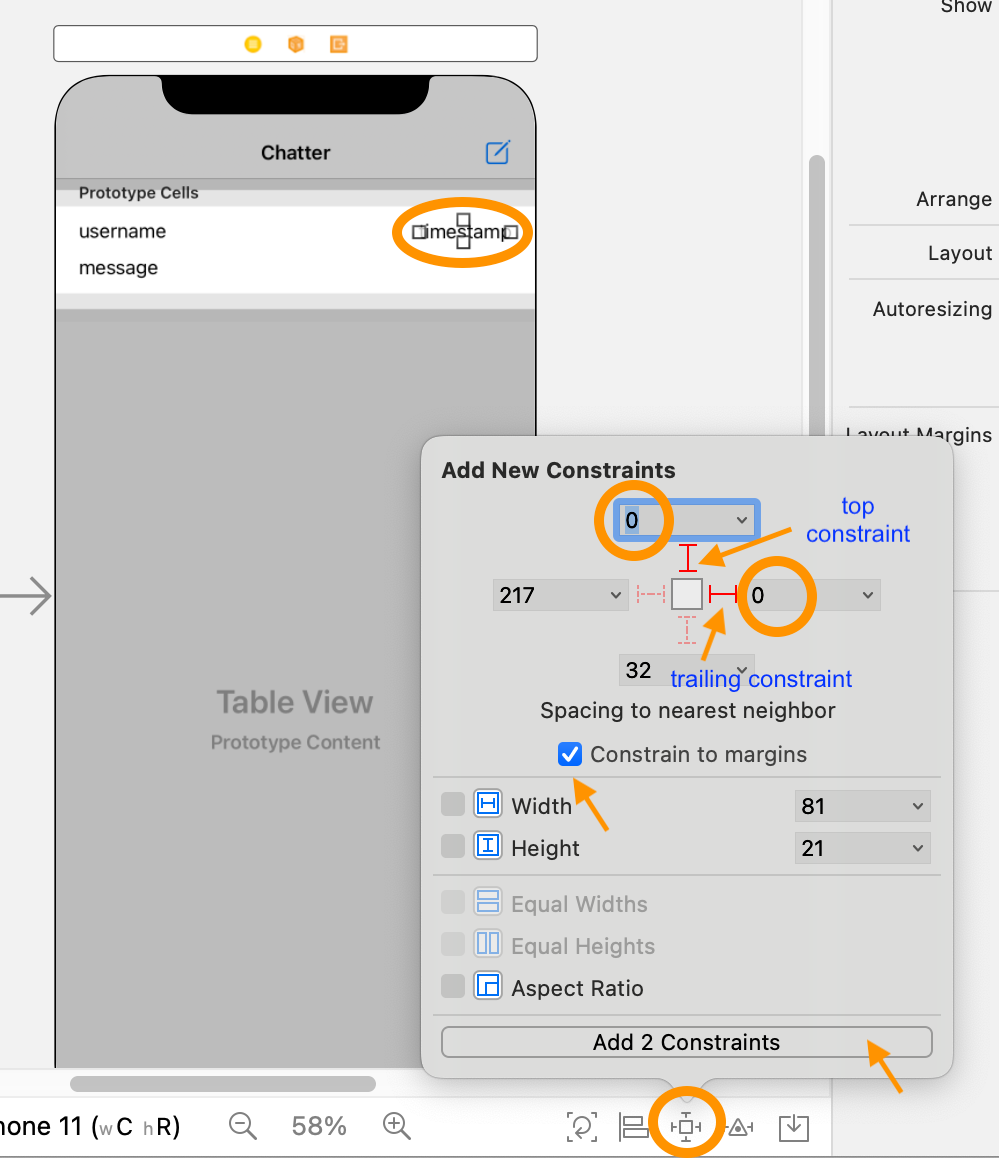
leadingis the same asleft, otherwise for languages read right to left,leadingis the same asright. Converselytrailing. Most of the time you would useleadingandtrailing, reservingleftandrightfor when you need to explicitly refer to physical-world left or right, e.g., when giving direction.Timestamp Label: (screenshot)- click on the label to select it,
- click on the
Add New Constraintsicon at the lower right of Xcode’s middle pane, third one from the right, - click on the top constraint and set the value to 0,
- click on the trailing (right) constraint and set the value to 0,
- confirm that
Constrain to marginsis checked, and - click the
Add 2 Constraintsbutton.
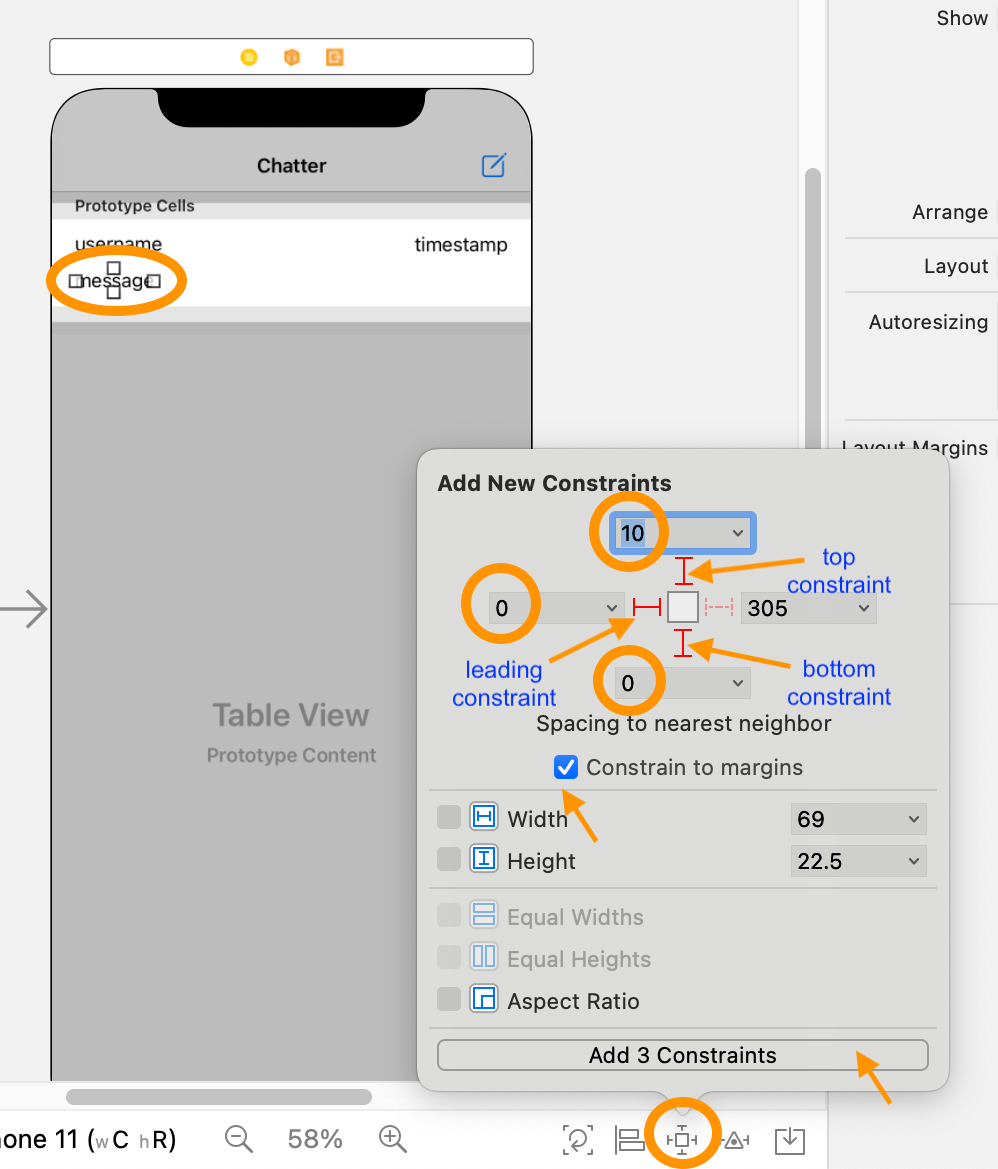
Message Label: (screenshot)- click on the label to select it,
- click on the
Add New Constraintsicon at the lower right of Xcode’s middle pane, third one from the right, - click on the top constraint and set the value to 10,
- click on the leading constraint and set the value to 0,
- click on the bottom constraint and set the value to 0,
- confirm that
Constrain to marginsis checked, and - click the
Add 3 Constraintsbutton.
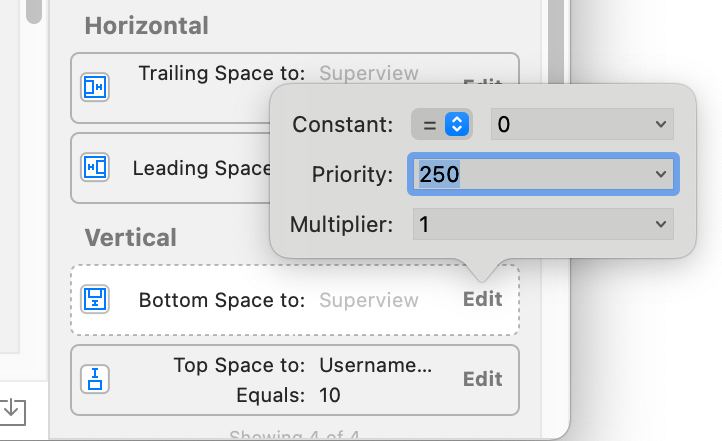
- Set priority:
- with the message label still selected, open up the “Size Inspector” (top menu of Xcode’s right pane, second icon from the right)
- in the
Verticalsection, on theBottom Space to:constraint, clickEdit(screenshot) - change the
Priority:from 1000 to 250 (screenshot)
-
Take care of warnings:
Auto Layout now has enough constraints to layout your view, however, Interface Builder may ask for additional constraints. For example, without specifying the width of the
Message Label, line break will not trigger for very long lines and the width of the label can go off the trailing edge of the View.- click on white on yellow warning arrow next to your
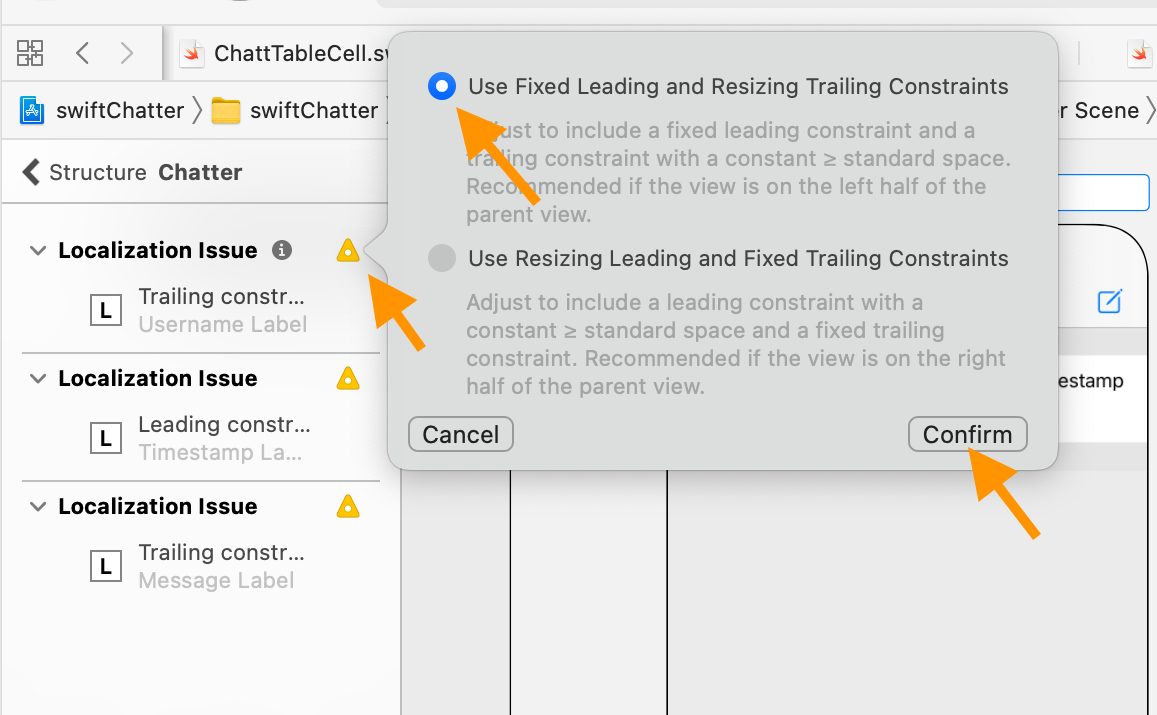
Chatter Scene(screenshot) - when the list of warnings come up, click on the first yellow triangle to bring up the dialog box with suggested fixes (screenshot)
- confirm that “Use Fixed Leading and Resizing Trailing Constraints” is checked
- click
Confirm - the second warning should go away as the above addressed both “missing” constraints
- do the same again for the remaining and last warning
- click on white on yellow warning arrow next to your
That should do it for MainVC!
We now move on to PostVC, in which we only have two UI elements to set constraints for:
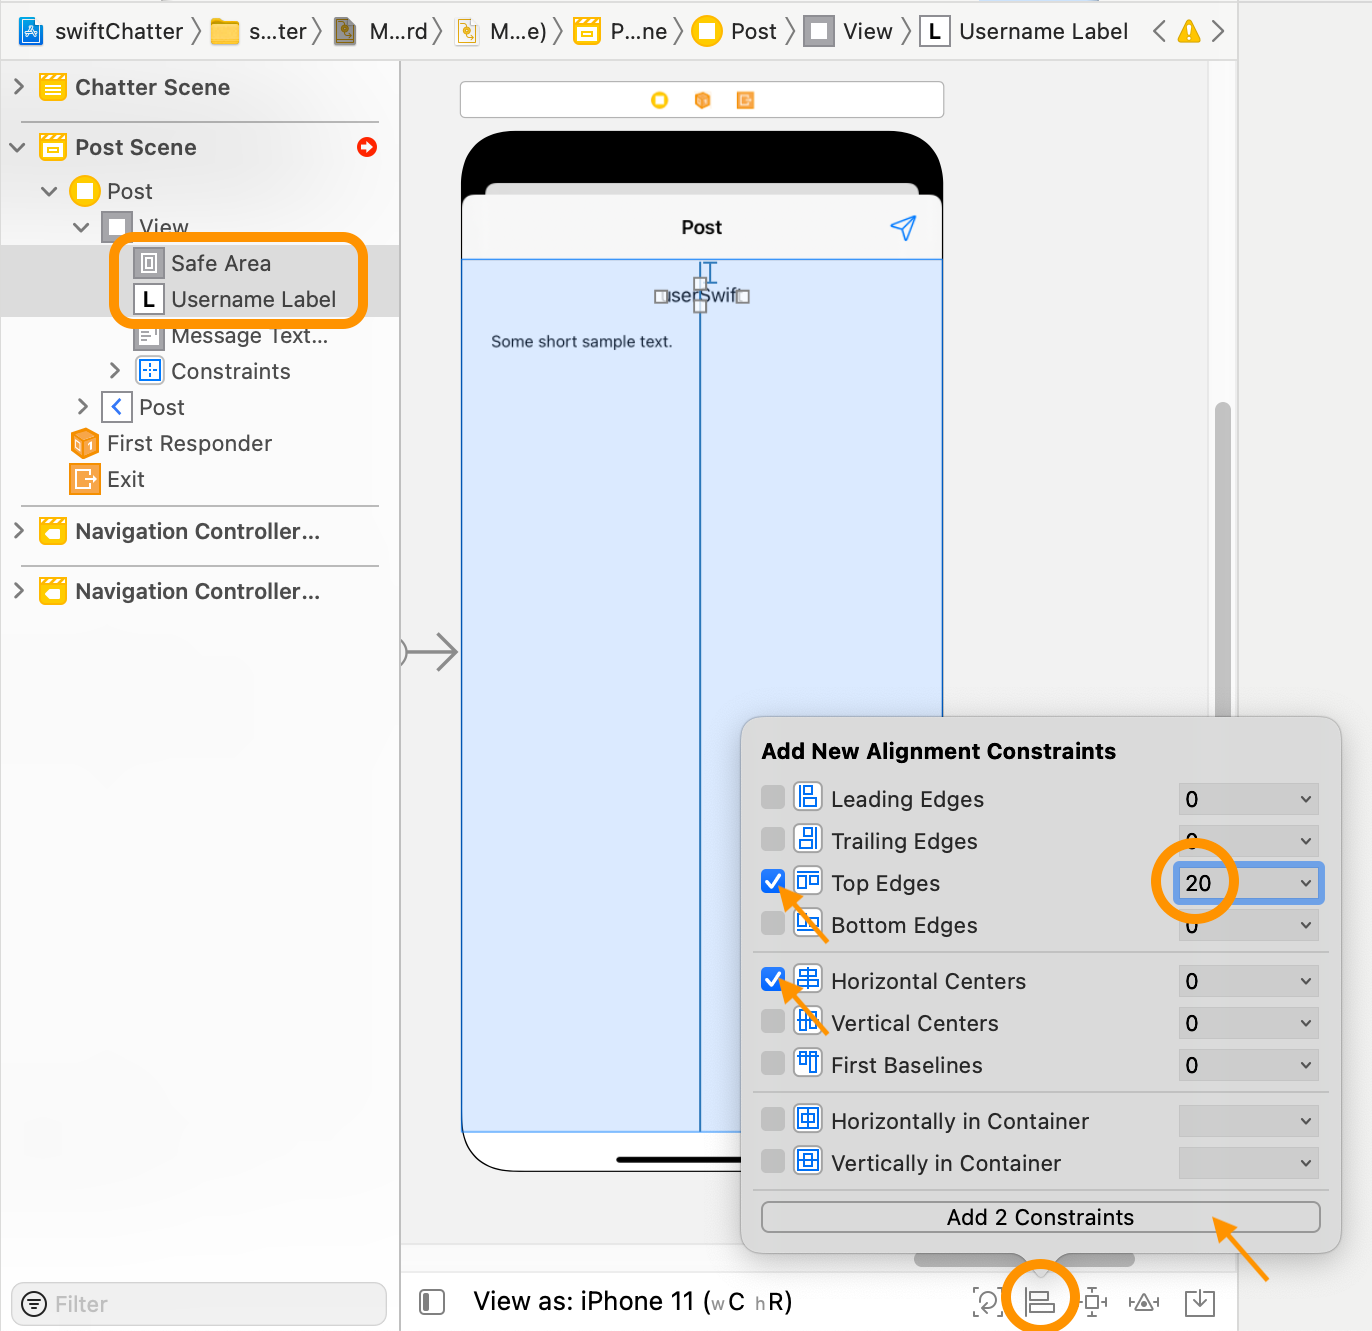
Username Label: (screenshot)- click on the label to select it,
- on the “Document Outline Pane”, click
Safe Areawhile holding down the shift key such that both theSafe AreaandUsername Labelare selected, - click on the
Alignicon at the lower right of Xcode’s middle pane, fourth one from the right, - check
Top Edgesand set the value to 20, - check
Horizontal Centersand leave the value at 0, - click the
Add 2 Constraintsbutton.
Message Text View:- click on the
Message Text Viewto select it, - click on the
Add New Constraintsicon at the lower right of Xcode’s middle pane, third one from the right, - click on the top constraint and set the value to 20,
- click on the leading constraint and set the value to 16,
- click on the bottom constraint and set the value to 16,
- click on the trailing constraint and set the value to 16,
- confirm that
Constrain to marginsis checked, - click the
Add 4 Constraintsbutton.
- click on the
- Set priority:
- with the
Message Text Viewstill selected, open up the “Size Inspector” (top menu of Xcode’s right pane, second icon from the right) - in the
Horizontalsection, on theAlign Trailing to:constraint, clickEdit - change the
Priority:from 1000 to 250 - in the
Verticalsection, on theAlign Bottom to:constraint, clickEdit - change the
Priority:from 1000 to 250
- with the
You’ll find that, until you get the hang of it, setting Auto Layout constraints is the most frustrating, hair-pulling part of iOS development, especially when Xcode keeps on complaining about conflicting constraints.
We won’t be grading you on how beautiful your UI looks, all the constraints suggested in this and all subsequent labs are to help you get around Xcode’s complaints about conflicting constraints. You’re free to design your UI differently, so long as all the required UI elements are visible on the screen and functioning as specified.
Debugging TIPs
Xcode’s Debug > View Debugging > Show View Frames shows you the frame of each UI element so that you see how they overlap.
This web site tries to explain the often times perplexing Xcode Storyboard error messages.
Navigation between views
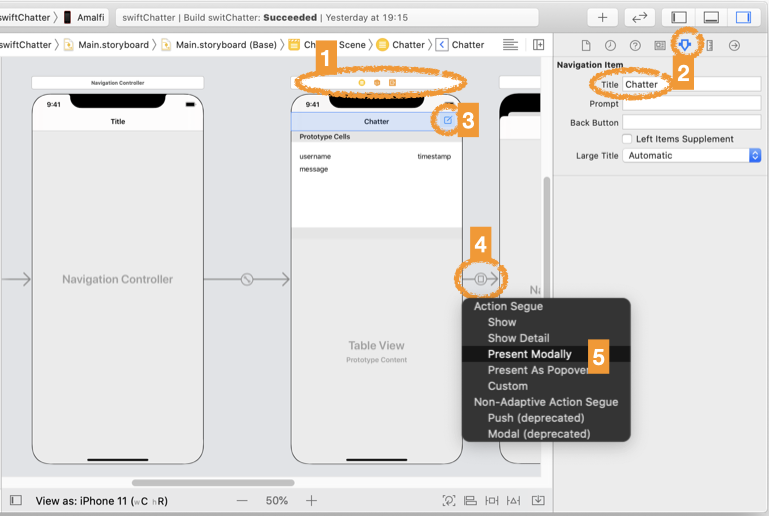
- With
TableViewControllerselected, on main menu clickEditor > Embed In > Navigation Controller(screenshot). - Give
MainVCthe titleChatterin the same way you gavePostVCthe titlePost. - Add
Bar Button Itemto the top right ofTableViewController’s navigation bar. - With the new button selected, open up the “Attribute Inspector” (top menu of Xcode’s right pane, third icon from the right).
- In the
Bar Itemsection, in theImagefield, entersquare.and.penciland click on the item that shows up in the drop down menu (screenshot). - In the
Titlefield above theImagefield enter “Compose” to replace “Item” - Hold down the
controlkey while you drag (^drag) from this newComposebutton to the navigation controller in whichPostVCis embedded. - On the small dialog box that pops up, choose
Action Segue > Present Modally. This determines your presentation and transition style between views.Present Modallymeans pop up the next view from the bottom of the screen, which can then be dismissed by pulling down the next view.
Posting and retrieving chatts
We are done with the UI layout and navigation. Let’s move on to code for posting and retrieving chatts.
Chatt struct
To post a chatt with the posttchatt API, Chatter backend server expects a JSON object consisting of “username” and “message”. For example:
{
   "username": "YOUR_JACCOUNT",
   "message": "Hello world!"
}
Chatter’s getchatts API will send back all accumulated chatts in the form of a JSON object with the key being “chatts” and the value being an
array of string arrays. Each string array consists of three elements
“username”, “message”, and “timestamp”. For example:
{
    "chatts": [["username0", "message0", "timestamp0"],
               ["username1", "message1", "timestamp1"],
               ...
              ]
}
Each element of the string array may have a value of JSON null or the empty string ("").
Create a new Swift file:
- Right click on the
swiftChatterfolder on the navigator pane - Select
New File... - Choose an
iOS > Swift Filetemplate and clickNext. - Name the file
Chattand clickCreate. - Place the following struct definition for
Chattin the newly created file:
struct Chatt {
    var username: String?
    var message: String?
    var timestamp: String?
}
ChattStore as Model
We will declare a ChattStore object to hold our array of chatts. ChattStore will serve as the Model of our app, following the Model-View-Controller architecture. Since the chatts are retrieved from the Chatter back-end server and sent to the same back-end server when the user posted a chatt, we will keep the network functions to communicate with the server as methods of this class also.
Create another Swift file, call it ChattStore, and place the following ChattStore class in it:
import Foundation

final class ChattStore {
    static let shared = ChattStore() // create one instance of the class to be shared
    private init() {}                // and make the constructor private so no other
                                     // instances can be created
    private(set) var chatts = [Chatt]()
    private let nFields = Mirror(reflecting: Chatt()).children.count

    private let serverUrl = "https://47.110.152.27/"
}
Once you have your own back-end server set up, you will replace
47.110.152.27with your server’s IP address.
The first two lines of the class make it a singleton object, meaning that there will ever be only one instance of this class when the app runs. Since we want only a single copy of the chatts data, we make this a singleton object.
The chatts array will be used to hold the chatts retrieved from the back-end server. While we want chatts to be readable outside the class, we don’t want it modifiable outside the class, and so have made its “setter” private. The code Mirror(reflecting: Chatt()).children.count uses introspection to look up the number of properties in the Chatt type. We store the result in the variable nFields for later validation use.
Posting chatt
Add the following method to your ChattStore class above:
    func postChatt(_ chatt: Chatt) {
        let jsonObj = ["username": chatt.username,
                       "message": chatt.message]
        guard let jsonData = try? JSONSerialization.data(withJSONObject: jsonObj) else {
            print("postChatt: jsonData serialization error")
            return
        }

        guard let apiUrl = URL(string: serverUrl+"postchatt/") else {
            print("postChatt: Bad URL")
            return
        }

        var request = URLRequest(url: apiUrl)
        request.httpMethod = "POST"
        request.httpBody = jsonData

        URLSession.shared.dataTask(with: request) { data, response, error in
            guard let _ = data, error == nil else {
                print("postChatt: NETWORKING ERROR")
                return
            }
            if let httpStatus = response as? HTTPURLResponse, httpStatus.statusCode != 200 {
                print("postChatt: HTTP STATUS: \(httpStatus.statusCode)")
                return
            }
        }.resume()
    }
We first assemble together a Swift dictionary comprising the key-value pairs of data we want to post to the server. To post it, we create a URLSession task with the appropriate POST URL. We can’t just post the Swift dictionary as is though. The server may not, and actually is not, written in Swift, and very likely will have a different memory layout for various data structures. Presented with a chunk of binary data, the server will not know that the data represents a dictionary, nor how to reconstruct the dictionary in its own dictionary layout. To post the Swift dictionary, therefore, we call JSONSerialization.data(withJSONObject:) to encode the Swift dictionary into a serialized JSON object that the server will know how to parse.
Once the URLSession task is created, we call the task’s .resume() method to submit it to the OperationQueue of URLSession for asynchronous execution.
Swift Codable
Instead of encoding/decoding between JSON and Swift data ourselves, we could use Swift Codable protocol. This would, however, require every field of each entry to be a key-value pair, as opposed to an array of values with no key, as we have when we do getChatts(_:) later. Given the small number of fields per entry in our data, the current approach seems to work as well.
PostVC
Now we create the PostVC class. Rename the file /swiftChatter/ViewController.swift to PostVC.swift. Inside the file rename the class from ViewController to PostVC and make the class final.
Switch back to Main.storyboard. We now create a class member variable in PostVC for each of its UI element:
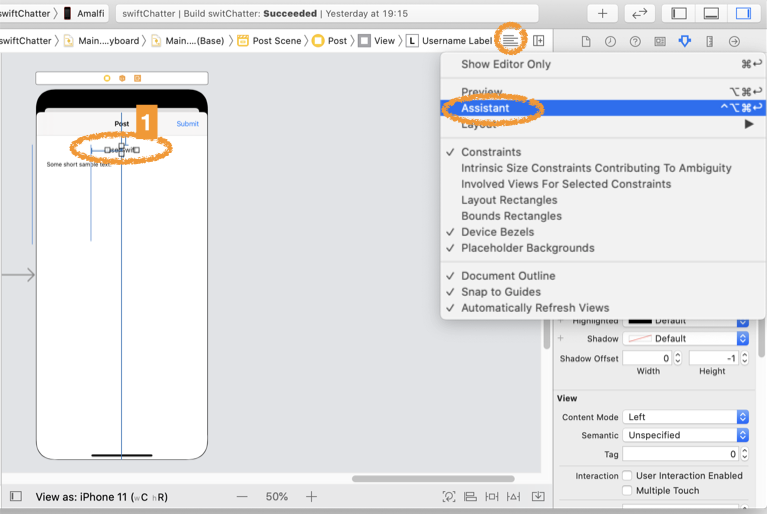
- With your
Username Labelselected, pull up the Assistant Editor. It should loadPostVC.swiftautomatically (screenshot).If it doesn’t, you can hold the option key and click on the file in the left/navigator pane to manually bring it up.
-
Ctl-drag
Username Labelfrom under thePost Sceneto thePostVCclass (put it belowviewDidLoad()). -
In the popup window, leave the
ConnectionasOutlet, name itusernameLabel, leaveTypeandStorageper default, and clickConnect. The resulting@IBOutletvariable allows you to access the content of the UI element.IBstands for Interface Builder, a part of Storyboard that used to be a stand-alone product. -
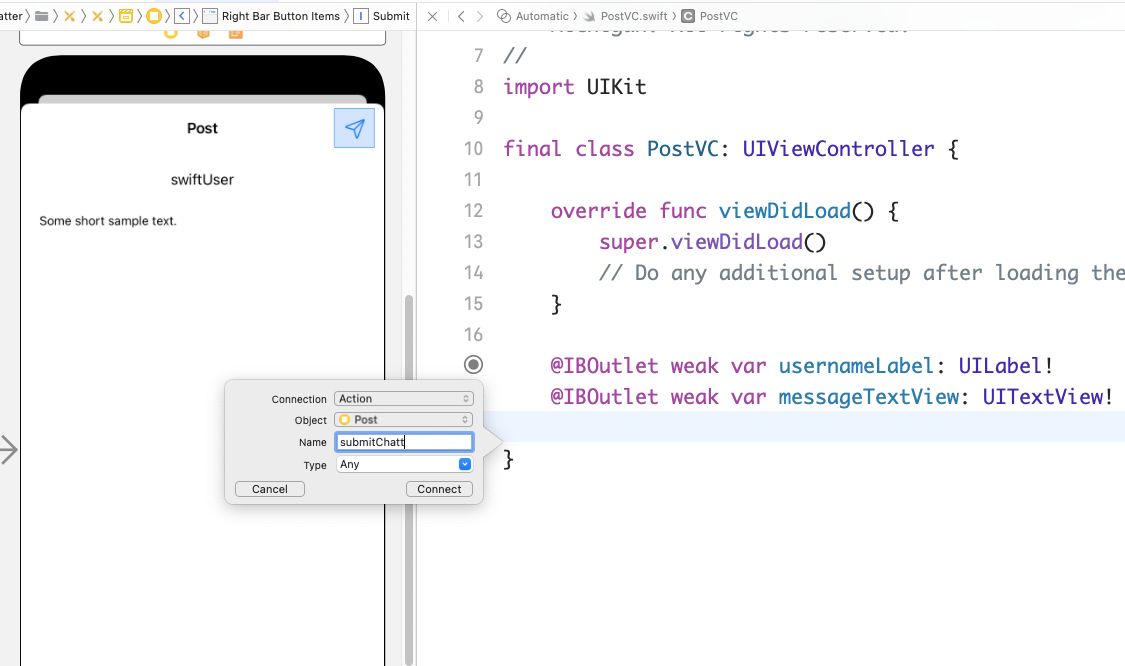
Ctl-drag
Message TextViewtoPostVCand name the variablemessageTextView. - Ctl-drag the
Submitbutton toPostVC, but this time in the popup window, chooseActionfrom theConnectiondrop down menu, name the connectionsubmitChattand clickConnect(screenshot).
You should now have the following two @IBOutlets and one @IBAction defined in your PostVC class:
    @IBOutlet weak var usernameLabel: UILabel!
    @IBOutlet weak var messageTextView: UITextView!

    @IBAction func submitChatt(_ sender: Any) {}
Be wary of renaming UI element variables: references can get broken (filled vs. empty circle to the left of the @IB annotations).
Insert the following as the body of submitChatt(_:):
        ChattStore.shared.postChatt(Chatt(username: usernameLabel.text,
                                     message: messageTextView.text))

        dismiss(animated: true, completion: nil)
Retrieving chatts
ChattTableCell
We want to display the chatts retrieved from the backend in a timeline view. First we define what each row contains. Create another Swift file, ChattTableCell.swift and replace the templated content with:
import UIKit

final class ChattTableCell: UITableViewCell {

    @IBOutlet weak var usernameLabel: UILabel!
    @IBOutlet weak var timestampLabel: UILabel!
    @IBOutlet weak var messageLabel: UILabel!
}
The three @IBOutlet will have empty circles to their left.
Switch back to Main.storyboard. Choose the Content View of the ChattTableCell under Chatter Scene and fire up the Assistant Editor. It should load the ChattTableCell.swift file automatically.
Drag (without ctl) the empty circle of usernameLabel to the corresponding UI button to activate the link. Do the same for the remaining two empty circles.
MainVC
Create another Swift file, MainVC.swift and replace the templated content with a class to accompany our TableViewController UI element in the Storyboard.
import UIKit

final class MainVC: UITableViewController {

    override func viewDidLoad() {
        super.viewDidLoad()

        // setup refreshControler here later
    }
}
Setting up the tableView
A UITableViewController requires a number of methods to be defined in its view controller: to set constants, to handle events. Add the following to the MainVC class:
    // MARK:- TableView handlers

    override func numberOfSections(in tableView: UITableView) -> Int {
        // how many sections are in table
        return 1
    }

    override func tableView(_ tableView: UITableView, numberOfRowsInSection section: Int) -> Int {
        // how many rows per section
        return ChattStore.shared.chatts.count
    }

    override func tableView(_ tableView: UITableView, didSelectRowAt indexPath: IndexPath) {
        // event handler when a cell is tapped
        tableView.deselectRow(at: indexPath as IndexPath, animated: true)
    }
Since we will have only one type of data in the table, namely chatts, we will put them all under one tableView section. Hence we set the numberOfSections(in:) method to return 1. The tableView(_:numberOfRowsInSection:) method returns the number of chatts in the chatts array we declared earlier in ChattStore. The method tableView(_:didSelectRowAt:) toggles cell selection and highlighting when the user taps it.
Finally add the following tableView(_:cellForRowAt) method to populate each cell with data from each row of the chatts array defined in ChattStore:
    override func tableView(_ tableView: UITableView, cellForRowAt indexPath: IndexPath) -> UITableViewCell {
        // populate a single cell
        guard let cell = tableView.dequeueReusableCell(withIdentifier: "ChattTableCell", for: indexPath) as? ChattTableCell else {
            fatalError("No reusable cell!")
        }

        let chatt = ChattStore.shared.chatts[indexPath.row]
        cell.backgroundColor = (indexPath.row % 2 == 0) ? .systemGray5 : .systemGray6
        cell.usernameLabel.text = chatt.username
        cell.messageLabel.text = chatt.message
        cell.timestampLabel.text = chatt.timestamp
        return cell
    }
Congratulations! You have set up a tableView to show ChattTableCells containing chatts. Next we need to retrieve the chatts from the Chatter back end and show them on the timeline on the main screen.
getChatts(_:)
Add the following getChatts(_:) method to the ChattStore class in ChattStore.swift:
    func getChatts(completion: ((Bool) -> ())?) {
        guard let apiUrl = URL(string: serverUrl+"getchatts/") else {
            print("getChatts: Bad URL")
            return
        }

        var request = URLRequest(url: apiUrl)
        request.httpMethod = "GET"

        URLSession.shared.dataTask(with: request) { data, response, error in
            var success = false
            defer { completion?(success) }

            guard let data = data, error == nil else {
                print("getChatts: NETWORKING ERROR")
                return
            }
            if let httpStatus = response as? HTTPURLResponse, httpStatus.statusCode != 200 {
                print("getChatts: HTTP STATUS: \(httpStatus.statusCode)")
                return
            }

            guard let jsonObj = try? JSONSerialization.jsonObject(with: data) as? [String:Any] else {
                print("getChatts: failed JSON deserialization")
                return
            }
            let chattsReceived = jsonObj["chatts"] as? [[String?]] ?? []
            self.chatts = [Chatt]()
            for chattEntry in chattsReceived {
                if chattEntry.count == self.nFields {
                    self.chatts.append(Chatt(username: chattEntry[0],
                                        message: chattEntry[1],
                                        timestamp: chattEntry[2]))
                } else {
                    print("getChatts: Received unexpected number of fields: \(chattEntry.count) instead of \(self.nFields).")
                }
            }
            success = true // for completion(success)
        }.resume()
    }
To retrieve chatts, we create a URLSession.shared.dataTask() with the appropriate GET URL. The server will return the chatts as a JSON object. In the completion handler to be invoked when the response returns, we call JSONSerialization.jsonObject() to decode the serialized JSON from the return response into Swift dictionary.
As when posting a chatt, once the URLSession task is created, we call the task’s .resume() method to submit it to the OperationQueue of URLSession for asynchronous execution.
Pull-down to refresh
The list of retrieved chatts is not automatically refreshed. We implement a pull-down to refresh feature instead.
Navigate to Main.storyboard. In MainVC’s Attributes Inspector, under the Table View Controller section, set Refreshing to Enabled.
Then in MainVC, add the following refreshTimeline(_:) method:
    private func refreshTimeline(_ sender: UIAction?) {
        ChattStore.shared.getChatts { success in
            DispatchQueue.main.async {
                if success {
                    self.tableView.reloadData()
                }
                // stop the refreshing animation upon completion:
                self.refreshControl?.endRefreshing()
            }
        }
    }
To retrieve chatts on app launch, and to set up the pull-down to refresh controller, add the following code inside viewDidLoad() of MainVC, below the comment, // setup refreshControler here later:
        // setup refreshControler here later
        refreshControl?.addAction(UIAction(handler: refreshTimeline), for: UIControl.Event.valueChanged)

        refreshTimeline(nil)
Congratulations! You are now ready for testing!
Installing the test server certificate for testing purposes
Since the test server (47.110.152.27) does not have a fully qualified domain name (FQDN), such as www.sjtu.edu.cn, we need to use a self-signed certificate (you will create a self-signed certificate for your own back end server in Chatter Back End). Typically, a self-signed certificate is used only during development.
Download a copy of test_server_selfsigned.crt and install it onto your iOS. You can install on either the simulator or the device for testing.
On iOS simulator
Drag test_server_selfsigned.crt on your laptop and drop it on the home screen of your simulator. That’s it!
To test the installation, launch a web browser on the simulator and access your server
at https://47.110.152.27/getchatts/.
You can use ADVTrustStore to list and remove installed certificates on your simulator.
On iOS device
AirDrop test_server_selfsigned.crt to your iPhone or email it to yourself.
Then on your device:
WARNING: DO ALL 10 STEPS: IT IS A COMMON ERROR TO MISS THE LAST THREE STEPS!
- If you emailed the certificate to yourself, view your email and tap the attached
test_server_selfsigned.crt. iOS will tell you,Profile Downloaded. If you AirDropped it, just continue to next step. - Go to
Settings > General > VPN & Device Managementand tap on the profile with47.110.152.27. - At the upper right corner of the screen, tap
Install. - Enter your passcode.
- Tap
Installat the upper right corner of the screen again. - And tap the somewhat dimmed out
Installbutton. - Tap
Doneon the upper right corner of screen. - Go back to
Settings > General - Go to
[Settings > General > ]About > Certificate Trust Settings - Bravely slide the toggle button next to
47.110.152.27to enable full trust of your self-signed certificate
To test the installation, launch a web browser on your device and access your server at https://47.110.152.27/getchatts/.
You can retrace your steps to remove the certificate when you don’t need it anymore.
If you run into problem using HTTPS on your device, the error code displayed by Xcode may help you debug. This post has a list of them near the end of the thread.
Run and test to verify and debug
You should now be able to run your front end against the provided back end on 47.110.152.27.
If you’re not familiar with how to run and test your code, please review the instructions in Getting Started with iOS Development. There is no special instructions to run lab1 on the iOS simulator.
Completing the back end
Once you’re satisfied that your front end is working correctly, switch to the back-end spec below to build your own back end:
With your back end completed, return here to prepare your front end to connect to your back end via HTTPS.
Installing your self-signed certificate
Download a copy of selfsigned.crt to YOUR_LABSFOLDER on your laptop. Enter the following commands for Aliyun:
laptop$ cd YOUR_LABSFOLDER
laptop$ scp root@YOUR_SERVER_IP:441/chatter/selfsigned.crt selfsigned.crt
Enter the following commands for AWS and GCP:
laptop$ cd YOUR_LABSFOLDER
laptop$ scp -i eecs441.pem ubuntu@YOUR_SERVER_IP:441/chatter/selfsigned.crt selfsigned.crt
Then install selfsigned.crt onto your own iOS as before. To test the installation, launch a web browser on your simulator or device and access your server at https://YOUR_SERVER_IP/getchatts/.
Finally, change the serverUrl property of your ChattStore class from 47.110.152.27 to YOUR_SERVER_IP. Build and run your app and you should now be able to connect your mobile front end to your back end via HTTPS.
Front-end submission guidelines
We will only grade files committed to the main branch. If you use multiple branches, please merge them all to the main branch for submission.
Push your front-end code to the same GitHub repo you’ve submitted your back-end code:
- Open GitHub Desktop and click on
Current Repositoryon the top left of the interface - Click on the GitHub repo you created at the start of this lab
- Add Summary to your changes and click
Commit to mainat the bottom of the left pane - Since you have pushed your back end code, you’ll have to click
Pull Originto synch up the repo on your laptop - Finally click
Push Originto push all changes to GitHub
Go the GitHub website to confirm that your front-end files have been uploaded to your GitHub repo under the folder lab1. Confirm that your repo has a folder structure outline similar to the following. dIf your folder structure is not as outlined, our script will not pick up your submission and, further, you may have problems getting started on latter labs. There could be other files or folders in your repo not listed below, don’t delete them. As long as you have installed the course .gitignore as per the instructions in Preparing GitHub for VE 441 Labs, you should be fine.
  441
    |-- chatter
        |-- app
        |-- nginx-site
        |-- routing
        |-- selfsigned.crt
    |-- lab1
        |-- swiftChatter
            |-- swiftChatter.xcodeproj
            |-- swiftChatter
Verify that your Git repo is set up correctly: on your laptop, grab a new clone of your repo and build and run your submission to make sure that it works. You will get ZERO point if your lab doesn’t build, run, or open.
IMPORTANT: If you work in team, put your name, your teammates’ names and jAccounts in your repo’s Readme.md (click the pencil icon at the upper right corner of the Readme.md box on your git repo) so that we’d know. Otherwise, we could mistakenly thought that you were cheating and accidentally report you to the Honor Council, which would be a hassle to undo.
Invite ve441staff.2025@gmail.com to your GitHub repo. Enter your name, your jAccount (and those of your team mate’s) and the link to your lab’s GitHub repo on the Lab Link Survey. The request for teaming information is redundant by design.
Possible improvements
We will add features to Chatter in subsequent labs, but the following are left as “exercise for the readers”:
- Error handling
- Ability to cancel or edit posting
- Refresh only new
chatts, don’t load everything again
References
General iOS and Swift
Auto Layout
- Frame based layout VS Auto Layout using constraint
- Working with Contraints in Interface Builder
- Why Mobile Menus Belong at the Bottom of the Screen
Layout debugging
Networking
- URLSession
- URLSessionTask
Working with JSON
- Swift Tip: String to Data and Back for use in
getChatts(_:) - Convert array to JSON in swift for use in
postChatt()
- Swift Tip: String to Data and Back for use in
| Prepared for 441 by Tiberiu Vilcu, Yibo Pi, and Sugih Jamin | Last updated: May 13th, 2025 |