Chatter with Images Swift
DUE Tue, 06/24, 11:59pm (Beijing Time)
Welcome to the front end for Lab 2! In this lab, we will be using iOS’s UIImagePickerController to add and manipulate images and videos in Chatter. We will also implement the Observer pattern using Swift’s property observer and iOS’s NotificationCenter to automate chatts timeline update when a new list is downloaded. We assume that you have completed the back end server setup, which is described in a separate spec.
The iPhone simulator does not simulate a camera, so you’ll need a physical device to complete this lab.
Expected behavior
Post an image and a video:
Right click on the gif and open in a new tab to get a full-size view. To view the gif again, please hit refresh on the browser (in the tab where the gif is opened).
 |
Uploading images and videos
Images and videos can be uploaded to the server either by picking one from the device’s photo album or by taking a picture/video with the device’s camera. Images will be downloaded and displayed with given chatts. On the posting screen, we will want a button to access the album and one for taking photo and video, and a preview of the image to be posted. On the Main screen showing the chatt timeline, we will want posted images to show up alongside their corresponding chatts and a button to play back any posted video. Let’s get started.
Preparing your GitHub repo
- On your laptop, navigate to
YOUR_LABSFOLDER/ - Create a zip of your
lab1folder - Rename your
lab1folder lab2If there’s
DerivedDatafolder in yourlab2/swiftChatter/folder, delete it. - Push your local
YOUR_LABSFOLDER/repo to GitHub and make sure there’re no git issues
Third-party SDKs and Swift Package Manager (SPM)
We will be using two third-party SDKs in this lab: SDWebImage, to help with image downloading, and Alamofire, to help with multipart/form-data upload. Both of these SDKs can be added using Apple’s Swift Package Manager.
First we install SDWebImage. Load your lab1 project into Xcode. Then select File > Add Packages.... In the search box at the upper left of the Apple Swift Packages dialog box, enter the URL: https://github.com/SDWebImage/SDWebImage.git and click the Add Package button (screenshot).
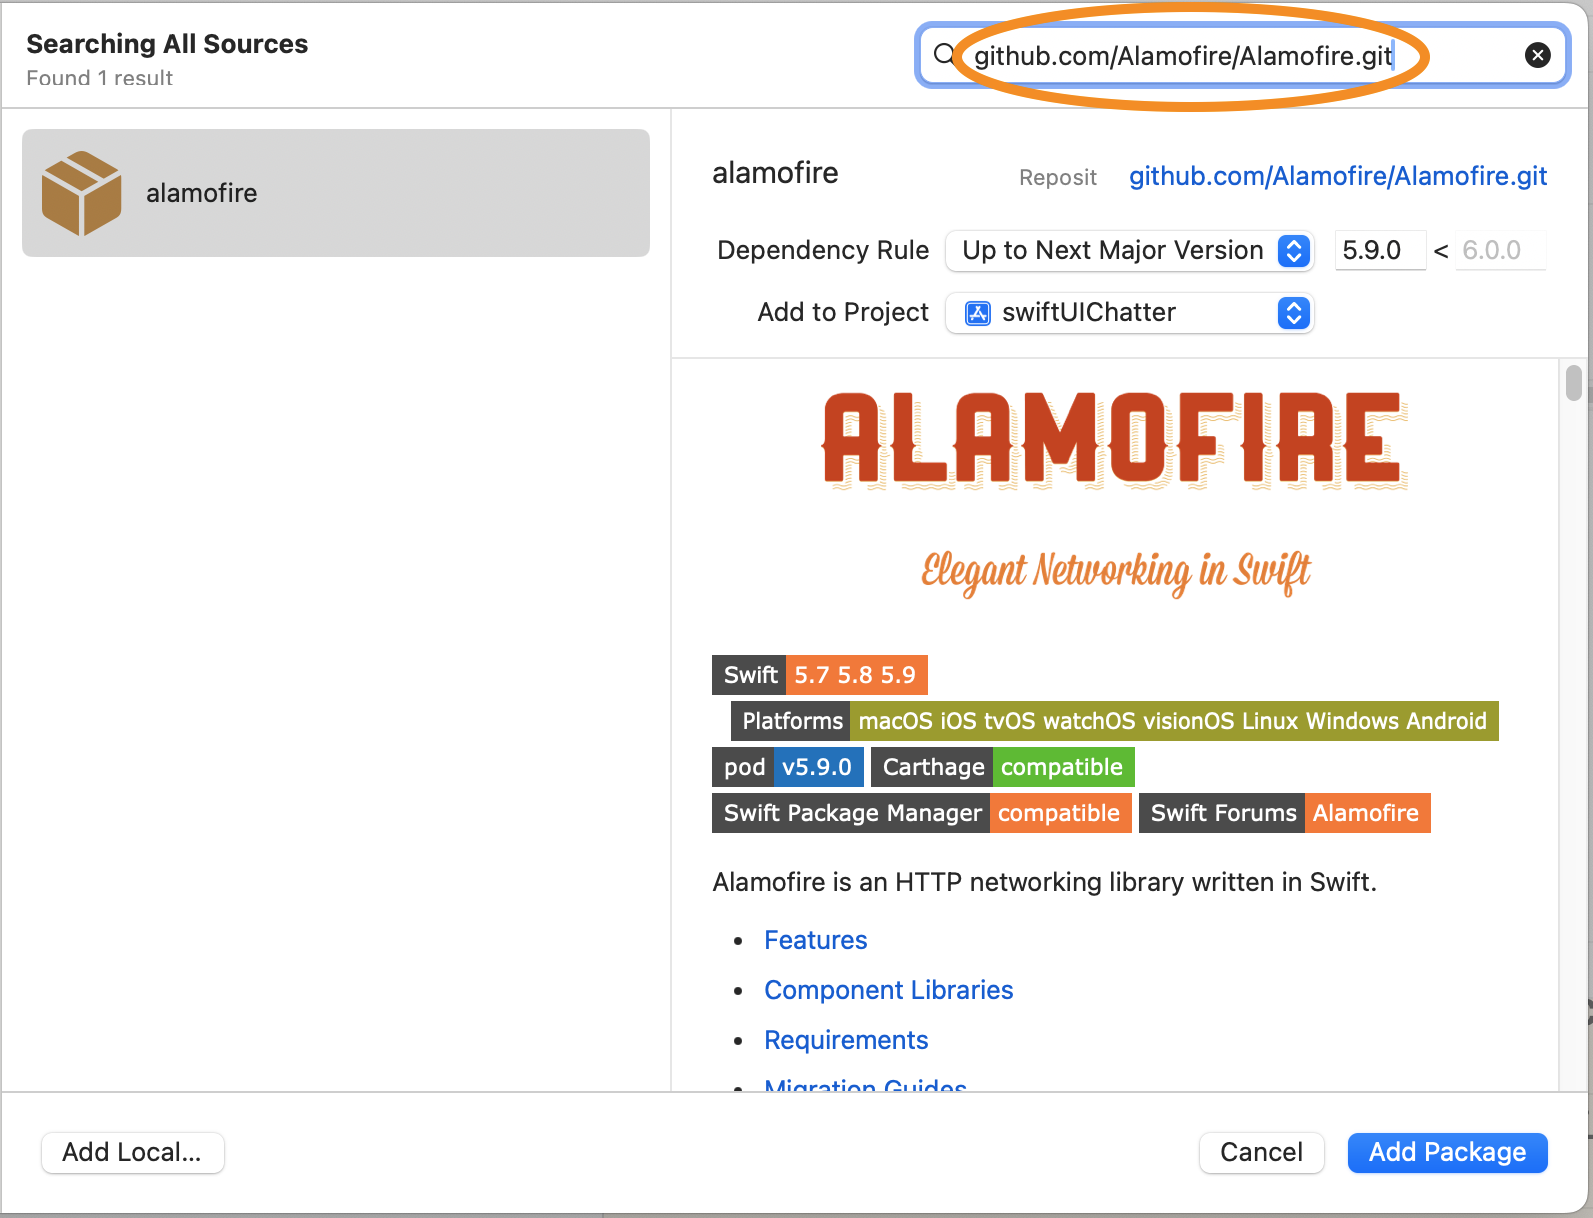
Repeat the process, but this time add Alamofire using the URL: https://github.com/Alamofire/Alamofire.git. The two packages are added to your project!
For this Lab we recommmend to select Alamofire v5.9.1 and SDWebImages v5.15.5. Be aware that other versions might lead to errors during compilation.
To remove a package
Occasionally Xcode looses track of already installed package dependency and pops up “No such module
- On the left navigator pane, click on your project.
- In the project editor that shows up, on the left side under
PROJECTclick on your project, - Select the
Package Dependenciespane, - Select the package to delete,
- Click the minus (
-) sign below the list of packages, and - Click the
Removebutton on the dialog box that shows up.
Then reinstall the package.
Requesting permissions
Your app must first request user’s permission to access the device’s camera, photo album, and mic. Navigate to the file swiftChatter/Info. Right click on the empty space and select Add Row. Select App Category in the drop down menu. Then enter Privacy - Microphone Usage Description (overwriting App Category:) and in the Value field to the right enter the reason you want to access the mic, for example, “to record audio chatt”. What you enter into the value field will be displayed to the user when seeking their permission (screenshot). Repeat the process and give justification to request permission for two more privacy-protected features: Privacy - Photo Library Usage Description and Privacy - Camera Usage Description.
When you try to access the photo library, camera, or mic, iOS will automatically check access permission and, if it is your app’s first attempt to access these, iOS will also automatically prompt the user for permissions.
Manual permission
Permission checking and request can be done manually. However, if you let iOS do it (by adding a Privacy entry in Info, as we did above), and the user grants permission, the operation simply proceeds. Whereas if you do it manually, the user would have to re-initiate the operation.
Main.storyboard
Video: as with lab0, we have recorded a video showing you how to work with Xcode, especially the Storyboard editor. You may want to follow along the video as you complete setting up the UI. The video only shows the UI part, you’ll still need to return here to complete the code for the lab. Depending on your version of Xcode, the screens in the video may not look exactly the same as what you see on your Xcode.
UI for posting
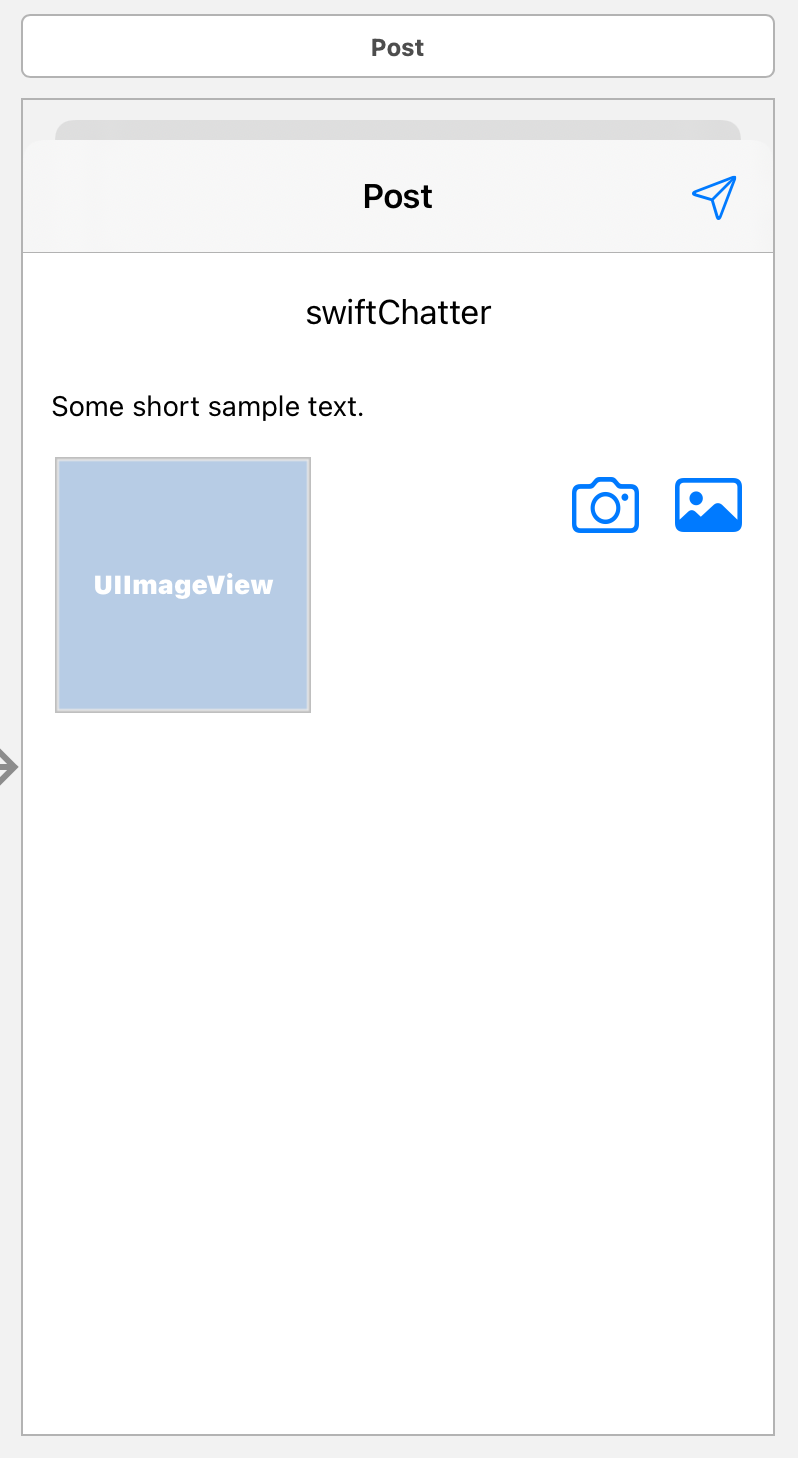
Under the Post Scene we want to add an image preview (photo only, no video) and two buttons, one for getting a photo or video from an album, and the other for taking a picture or video with the camera.
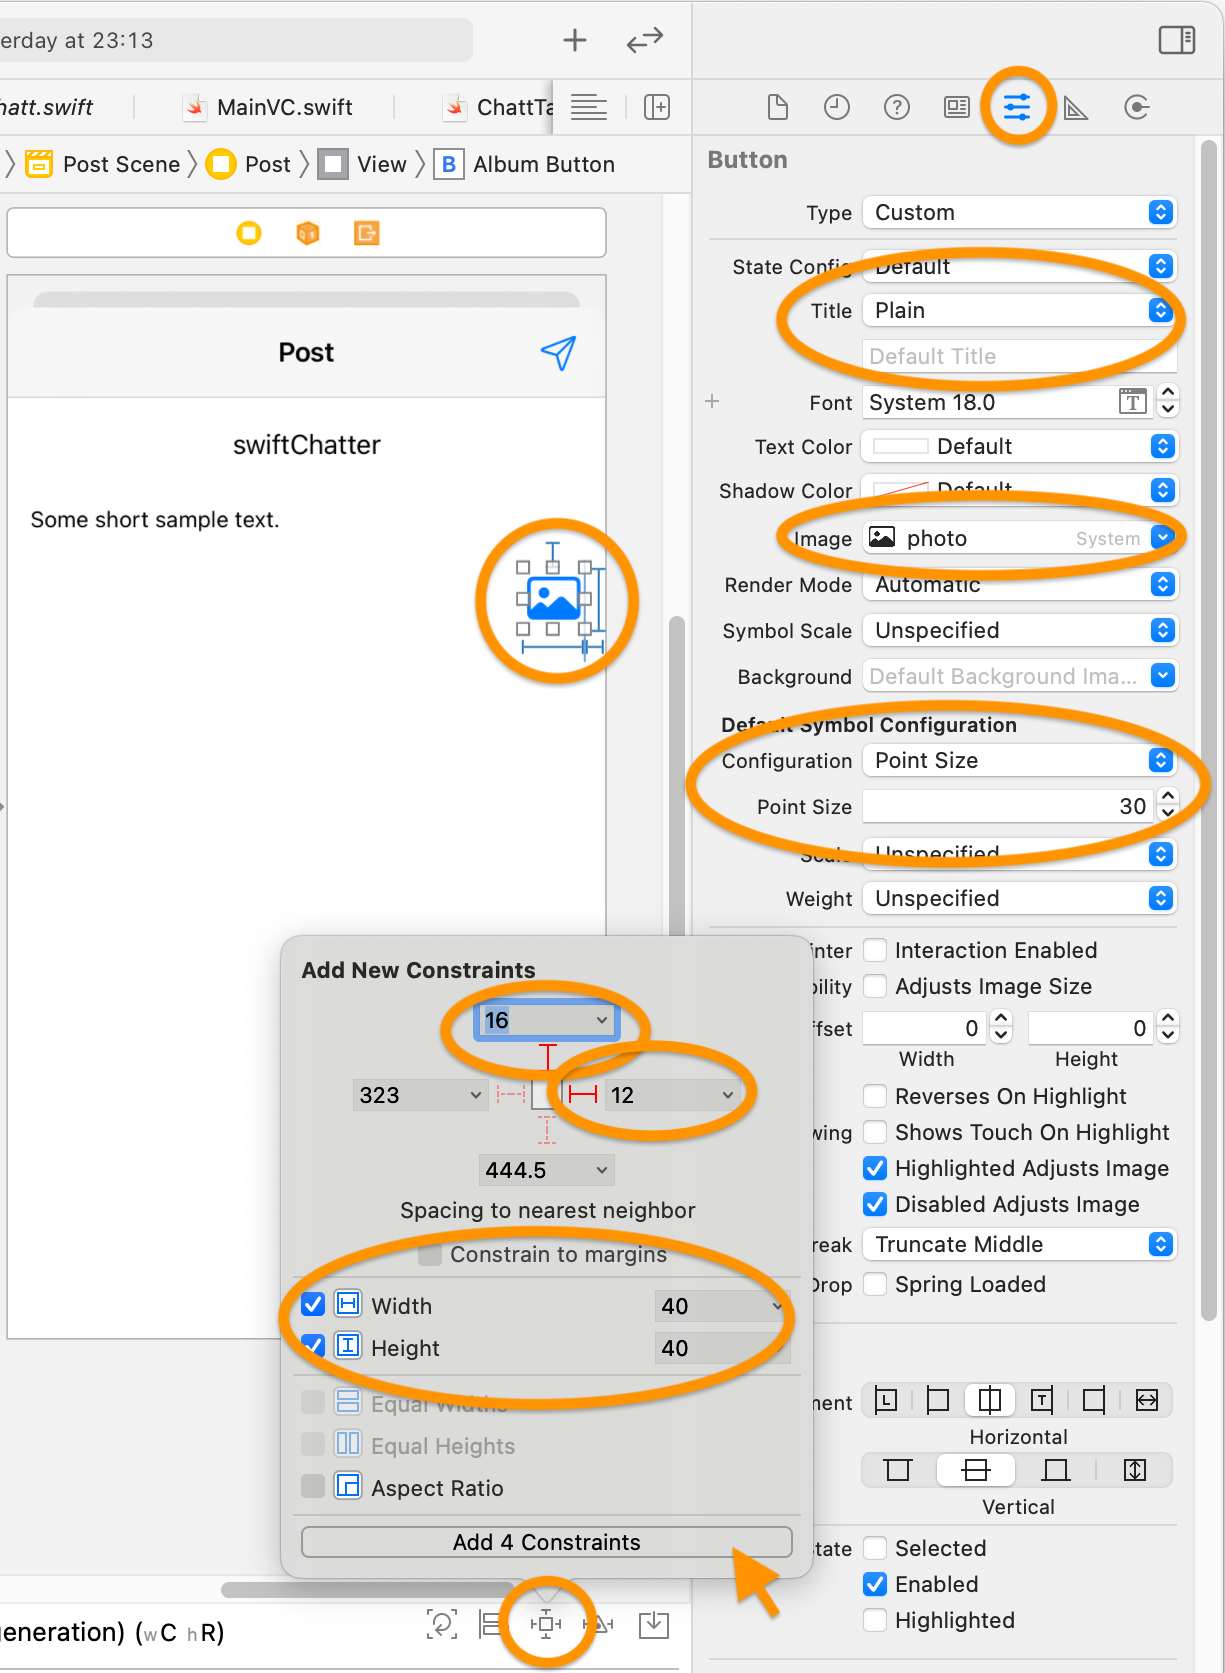
Let us first add the album button (screenshot):
- In your project’s
Main.storyboard, click on the+sign at upper right of the main window,or select on main menuView > Show Library(⇧⌘L). - Add a
Buttonto yourPost Scene(drop it any where below theMessage Text View, don’t worry about exact placement for now) - In the
Identity Inspector, in theDocumentsection, enter “Album Button” in theLabelfield. - We want this button to display as an icon. Go to its
Attribute Inspector, click on the field next toImage(eight item down), enter “photo”, and click on the “photo” icon in the drop-down menu (don’t hit return). - In the third field from the top, confirm that the
TitleisPlainand in the fourth field, right below theTitle, delete the text there until you see the greyed out placeholder “Default Title” (otherwise the title text will show up in white font across your icon). - In the
Default Symbol Configurationsection, the first item saysConfiguration. Set it toPoint Size, then set the point size (next item down) to 30. When setting the size of a button, make sure it is big enough for users to tap easily.
We now work on the constraints for Album Button. Recall that Auto Layout requires four pieces of information about each UI element:
- the \(x\)- and
- \(y\)-coordinates of one of the element’s corners,
- the element’s width,
- and its height.
Let’s set these four pieces of information about the Album Button:
- With the
Album Buttonselected, click on theAdd New Constraintsicon on the bottom right (third from right) of the Interface Builder pane. - Set the top constraint to 16.
- Set the trailing (right) constraint to 12.
- Set the width and height both to 40.
- Click the button
Add 4 Constraints. - Double check in the
Size Inspectorthat the trailing edge is set against the trailing safe area and the top edge is set against the bottom of theMessage Text View(screenshot).
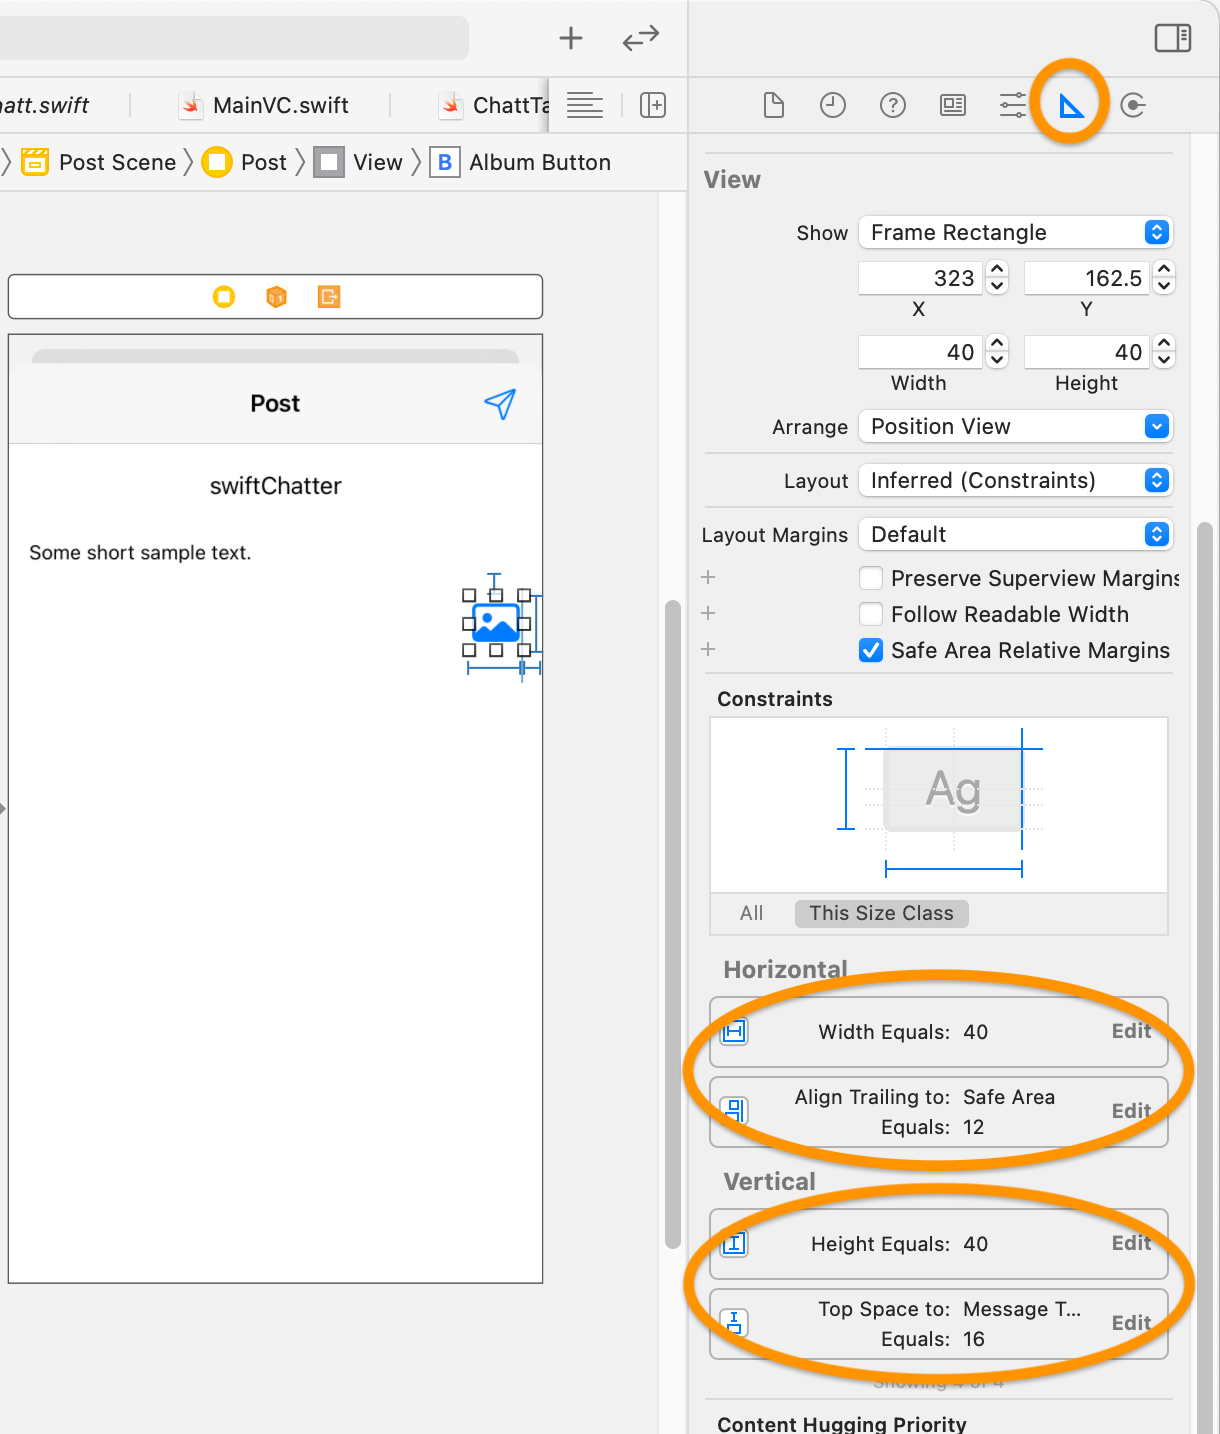
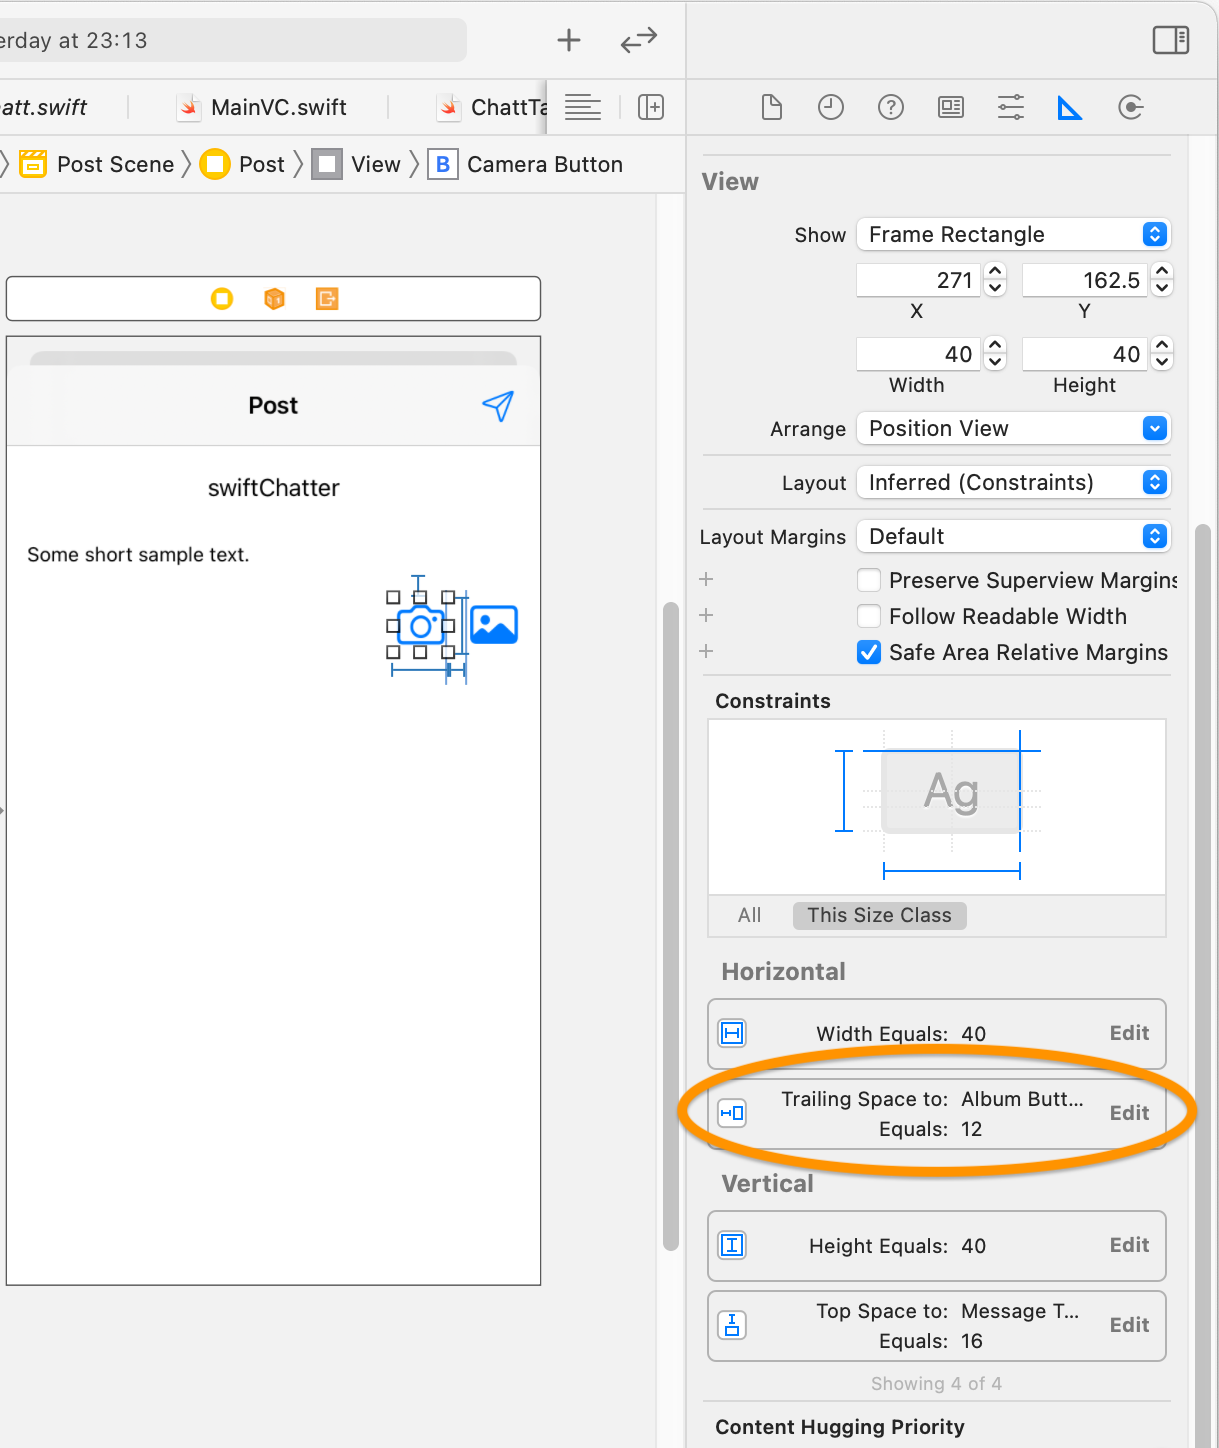
Next we add the camera button: repeat the process above except we’ll label the button Camera Button and we’ll give it the icon camera. Give it the same four constraints as we did the Album Button. This time though you should confirm that Interface Builder has correctly set the trailing edge of Camera Button against the leading (left) edge of Album Button (screenshot).
To show a preview of the image to be posted, from the Object Library add an Image View to the left of your Camera Button, below the Message Text View. With the Image View selected, click the Add New Constraints icon and add these four constraints:
- Set the top constraint to 12.
- Set the leading (left) constraint to 16
- Set the width and height both to 128
- Click
Add 4 Constraints - In the
Size Inspectorpane, confirm that the top edge is constrained against the bottom ofMessage Text Viewand the leading edge is constrained against leading Safe Area.
Your Post Scene could now look something like this screenshot.
UI for viewing
Now, on your Chatter Scene, click on ChattTableCell to select it on the storyboard layout pane, drag down the bottom of ChattTableCell to increase its height.
From the Object Library, add an Image View to ChattTableCell below Message Label. Set the following five constraints (screenshot):
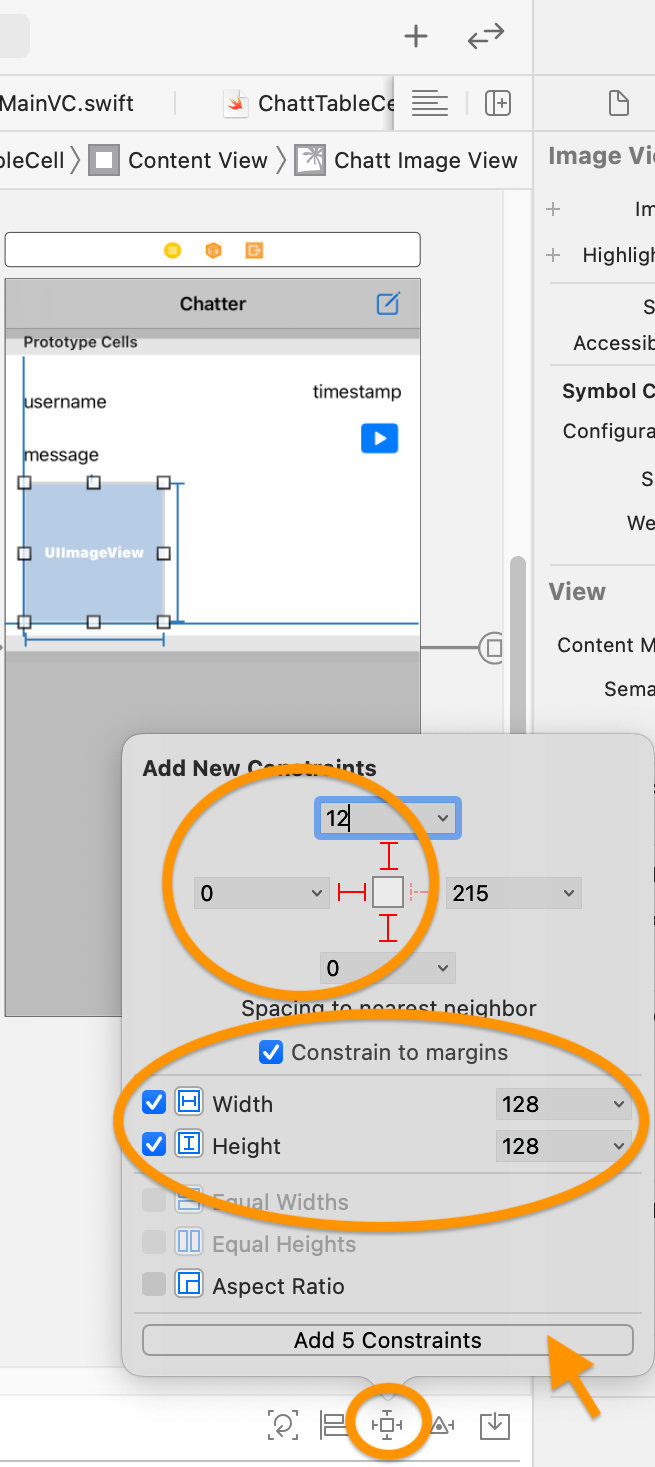
- Top edge to bottom of Message Label: 8
- Leading edge to SuperView leading: 0 (check
Constrain to margins) - Bottom edge to SuperView bottom: 0
It is important to constrain the SuperView bottom against the bottom of Image View, to prevent ChattTableCell assumimng its default height.
- Both width and height set to 128
Unless you force set the width and height of Image View (set priority of both to 1000), downloaded images may expand to fill your cell.
- In the
Size Inspectorpane, confirm that the top edge is constrained against the bottom ofMessage Text Viewand the leading edge is constrained against leading SuperView and the bottom edge is constrained against bottom SuperView.
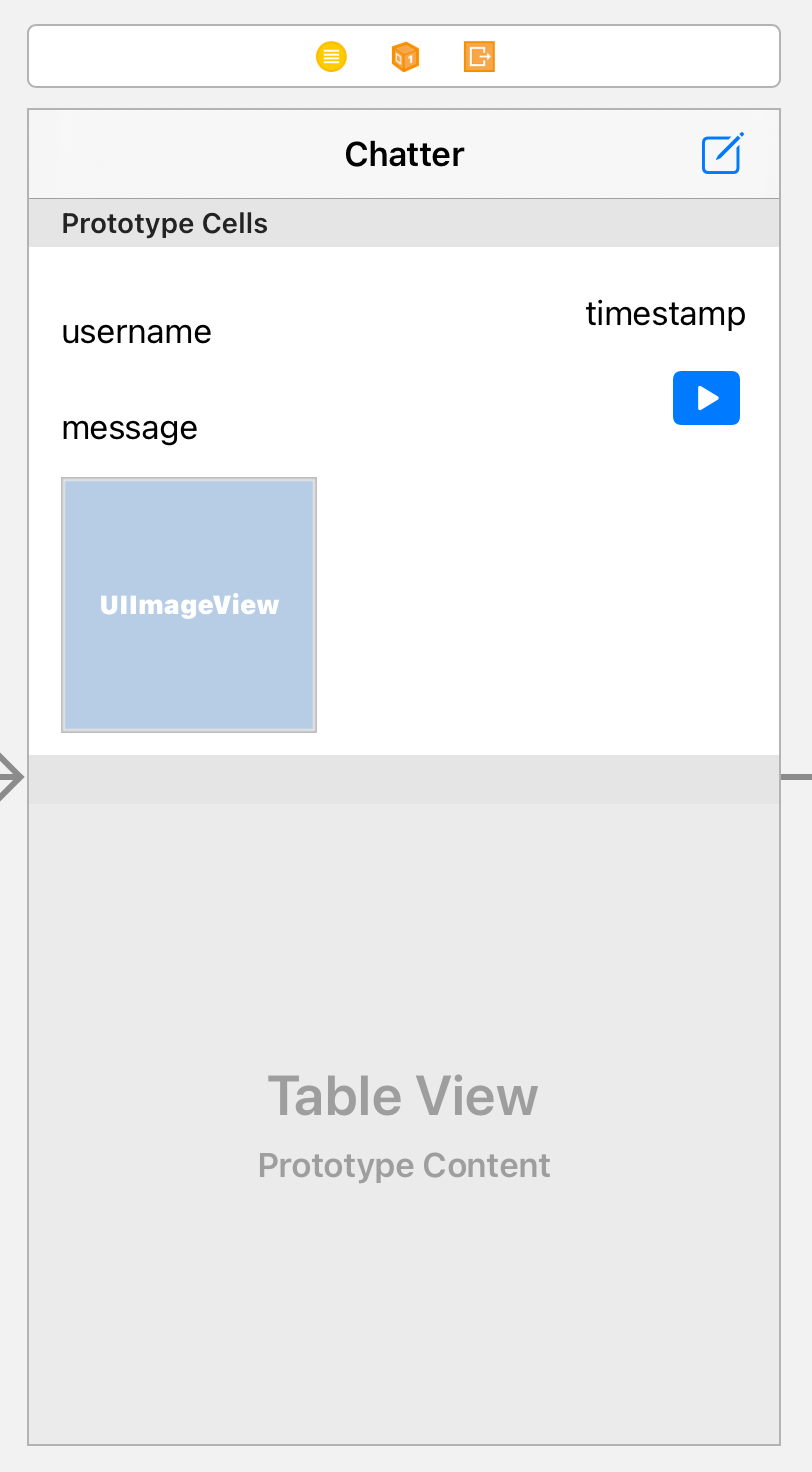
Next add the video button: repeat the process used to add the Album Button above, except we’ll label the button Video Button and we’ll give it the icon play.rectangle.fill. Give it the following four constraints:
- Set the top constraint to 12.
- Set the trailing (right) constraint to 0 (check
Constrain to margin) - Set the width and height both to 40
- Click
Add 4 Constraints - In the
Size Inspectorpane, confirm that the top edge is constrained against the bottom ofTimestamp Labeland the trailing edge is constrained against trailingSuperView Margin. - You may need to reduce the width of your
Message Labelto 250 and set its trailing edge to be≥ 0against the leading edge ofVideo Button.
Your Chatter Scene could now look something like this screenshot.
Connect UI with code
Now we want to create actions for all of these UI elements. Get ready for a lot of ^dragging (Ctl+drag)!
With your Image View selected, pull up the assistant editor (screenshot).
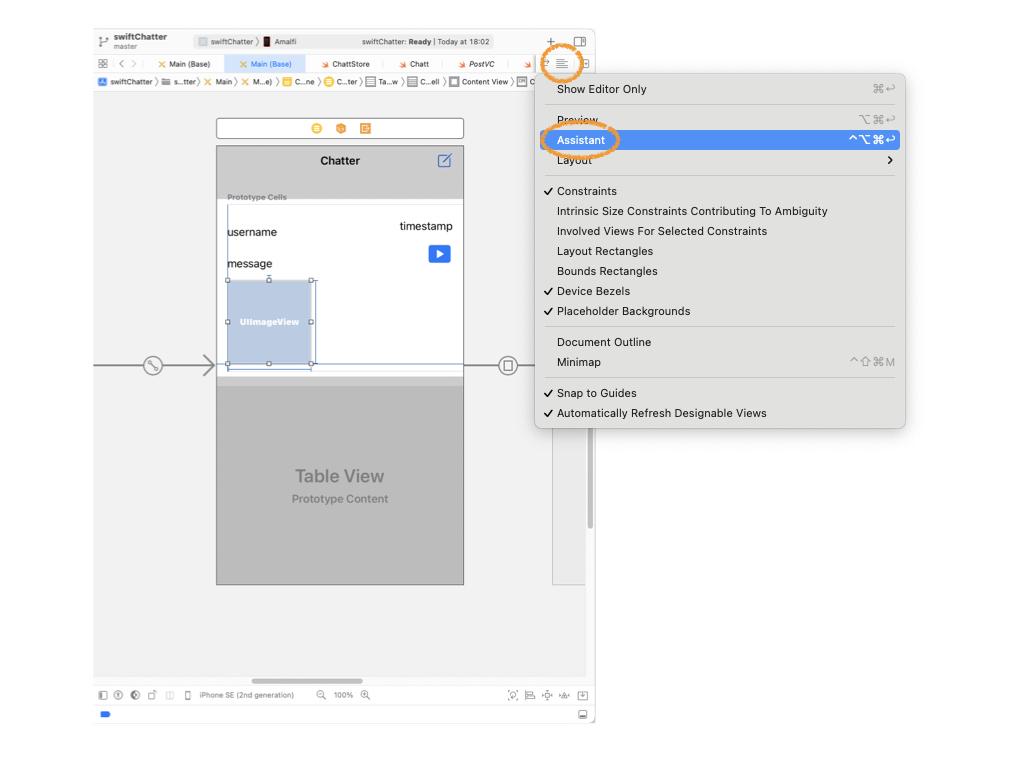
If the Assistant Editor is not showing your ChattTableCell.swift file, click on one of the file switcher at the upper right corner of the Assistant Editor (it may look like: < k >, depending on your Xcode version) until your ChattTableCell.swift shows up. Or you can hold down the option key and click on ChattTableCell.swift in the Navigation (leftmost) panel. If all else fails, sometimes restarting Xcode helps.
Make sure ChattTableCell.swift is loaded on your Assistant Editor. Now ^drag your Image View from your Chatter Scene to your ChattTableCell class. When the Connection box comes up, choose Outlet from the drop-down menu and name it chattImageView.
Next ^drag the Video Button into the ChattTableCell class. Create an @IBOutlet variable and name it videoButton. Now ^drag Video Button into the ChattTableCell class one more time, but this time to create Action connection and name it videoTapped. We will use the @IBOutlet variable to control the appearance and attributes of the button, while the @IBAction function specifies the action taken the button is tapped.
Move on to your Post Scene and select your PostImage View. The Assistant Editor should automatically load the PostVC.swift file as you click on Image View. Go ahead and ^drag Image View from the Post Scene to the PostVC class to create an @IBOutlet and name it postImage.
Finally, ^drag the Album Button from Post Scene to the PostVC class and create an @IBAction function called pickMedia. We will fill this function in later. Similarly, create an @IBAction function called accessCamera by ^dragging the Camera button from Post Scene to the PostVC class.
We are now done with the Storyboard work and can get on with the coding.
UIImagePickerController
We will be using iOS’s UIImagePickerController to access the photo album and camera. UIImagePickerController is an iOS class that manages the system interfaces for taking pictures, recording videos, and retrieving items from the user’s media library. UIImagePickerController also manages user interactions—such as image repositioning, zooming, cropping, and video head and tail trimming. To use it we declare PostVC to conform to two delegate protocols:
final class PostVC: UIViewController, UIImagePickerControllerDelegate, UINavigationControllerDelegate {
        private var videoUrl: URL?
Note that we also added the videoUrl property to hold the video URL.
We now add pickMedia(_:) and accessCamera(_:) methods to the PostVC class. The first launches UIImagePickerController specifying the photo library as the media source. The second launches it with the camera as the media source. In both cases, we limit the duration of video to 5 seconds.
    @IBAction func pickMedia(_ sender: Any) {
        presentPicker(.photoLibrary)
    }

    @IBAction func accessCamera(_ sender: Any) {
        if UIImagePickerController.isSourceTypeAvailable(.camera) {
            presentPicker(.camera)
        } else {
            print("Camera not available. iPhone simulators don't simulate the camera.")
        }
    }

    private func presentPicker(_ sourceType: UIImagePickerController.SourceType) {
        let imagePickerController = UIImagePickerController()
        imagePickerController.sourceType = sourceType
        imagePickerController.delegate = self
        imagePickerController.allowsEditing = true
        imagePickerController.mediaTypes = ["public.image","public.movie"]
        imagePickerController.videoMaximumDuration = TimeInterval(5) // secs
        imagePickerController.videoQuality = .typeHigh
        present(imagePickerController, animated: true, completion: nil)
    }
To allow user to pick either image or video file and to take either a photo or record a video, we set the imagePickerController to handle both "public.image" and "public.movie" media types. To enable image zooming and cropping and video head and tail trimming prior to posting, we set allowsEditing = true. You can change the videoMaximumDuration and videoQuality to a different value. However, be mindful that all three back-end servers have an upper limit of 10MB on client upload size.
UIImagePickerController will return the selected or recorded image/video through its delegates. If an image is returned, we want the delegate to put the image in the postImage: UIImageView we’ve created. Depending on whether the image is edited, the delegate needs to retrieve it either as originalImage or editedImage. If the retrieval is succesful, we resize the image before storing it in postImage.image.
    func imagePickerController(_ picker: UIImagePickerController, didFinishPickingMediaWithInfo info:[UIImagePickerController.InfoKey : Any]) {
        if let mediaType = info[UIImagePickerController.InfoKey.mediaType] as? String {
            if mediaType  == "public.image" {
                postImage.image = (info[UIImagePickerController.InfoKey.editedImage] as? UIImage ??
                                    info[UIImagePickerController.InfoKey.originalImage] as? UIImage)?
                    .resizeImage(targetSize: CGSize(width: 150, height: 181))
If UIImagePickerController returned video, we simply store the URL returned in videoUrl. Continue to complete the above method:
            } else if mediaType == "public.movie" {
                videoUrl = info[UIImagePickerController.InfoKey.mediaURL] as? URL
                // can convert to absoluteString ONLY after picker.dismiss
            }
        }
        picker.dismiss(animated: true, completion: nil)
    }
We also need to provide a delegate method to handle the case when UIImagePickerController cannot return any video/image:
func imagePickerControllerDidCancel(_ picker: UIImagePickerController) {
    picker.dismiss(animated: true, completion: nil)
}
We now implement the function .resizeImage(targetSize:) as an extension to the UIImage class. Create a new Swift file called Extensions.swift. We’ll assemble this and future extensions centrally in this file. For now put the following code in it:
import UIKit

extension UIImage {
    func resizeImage(targetSize: CGSize) -> UIImage? {
        // Figure out orientation, and use it to form the rectangle
        let ratio = (targetSize.width > targetSize.height) ?
            targetSize.height / size.height :
            targetSize.width / size.width

        let newSize = CGSize(width: size.width * ratio, height: size.height * ratio)
        let rect = CGRect(x: 0, y: 0, width: newSize.width, height: newSize.height)

        // Actually do the resizing to the calculated rectangle
        UIGraphicsBeginImageContextWithOptions(newSize, false, 1.0)
        draw(in: rect)
        let newImage = UIGraphicsGetImageFromCurrentImageContext()
        UIGraphicsEndImageContext()

        return newImage
    }
}
We can now test our app! Make sure that when you tap the Album Button you are able to choose an image from the Photo Library and that it previews. We can only test camera on a physical device, but that should be working now too! If your image ends up occluding some of the labels and icons on your Post Scene, you need to work on your layout constraints so that the elements do not end up overlapping. Most likely, you’d need to set the priority of the height and width constraints of your Image View to 1000.
Uploading
We first need to append these two new members to the end of Chatt class in Chatt.swift to hold the image and video URLs:
    @ChattPropWrapper var imageUrl: String?
    @ChattPropWrapper var videoUrl: String?
Both imageUrl and videoUrl use the ChattPropWrapper property wrapper. When there’s no valid URL associated with imageUrl and videoUrl, we want the value of these properties to be nil Strings. Unfortunately an empty value in a JSON object can sometimes be encoded as "null", i.e., a string with the characters n-u-l-l inside. The ChattPropWrapper converts "null" and the empty string "" into nil String. Add the following class to your Chatt.swift file:
@propertyWrapper
struct ChattPropWrapper {
    private var _value: String?
    var wrappedValue: String? {
        get { _value }
        set {
            guard let newValue = newValue else {
                _value = nil
                return
            }
            _value = (newValue == "null" || newValue.isEmpty) ? nil : newValue
        }
    }

    init(wrappedValue: String?) {
        self.wrappedValue = wrappedValue
    }
}
Back to PostVC, we next edit our submitChatt(_:) method to post the loaded image and/or video to our server along with our chatt. Replace the content of your submitChatt(_:) method with the following:
        let chatt = Chatt(username: self.usernameLabel.text,
                          message: self.messageTextView.text,
                          imageUrl: nil,
                          videoUrl: videoUrl?.absoluteString)

        ChattStore.shared.postChatt(chatt, image: postImage.image)

        dismiss(animated: true, completion: nil)
We will use the Alamofire SDK to upload the image/video using multipart/form-data representation/encoding.
When a web page has a form for user to fill out, such page usually has mutiple fields (e.g., name, address, networth, etc.), each comprising a separate part of the multi-part form. Data from these multiple parts of the form is encoded for sending by HTTP using the native multipart/form-data representation. One advantage of using this encoding instead of JSON is that binary data can be sent as is, not encoded into a string of printable characters. Since we don’t have to encode the binary data into character string, we can also stream directly from file to network without having to first load the whole file into memory, allowing us to send much larger files. These are the two reasons we use the multipart/form-data encoding instead of JSON in this lab.
At the top of your ChattStore.swift, replace:
import Foundation
with:
import UIKit
import Alamofire
then replace your postChatt(_:) method with:
    func postChatt(_ chatt: Chatt, image: UIImage?) {
        guard let apiUrl = URL(string: serverUrl+"postimages/") else {
            print("postChatt: Bad URL")
            return
        }

        AF.upload(multipartFormData: { mpFD in
            if let username = chatt.username?.data(using: .utf8) {
                mpFD.append(username, withName: "username")
            }
            if let message = chatt.message?.data(using: .utf8) {
                mpFD.append(message, withName: "message")
            }
            if let jpegImage = image?.jpegData(compressionQuality: 1.0) {
                mpFD.append(jpegImage, withName: "image", fileName: "chattImage", mimeType: "image/jpeg")
            }
            if let urlString = chatt.videoUrl, let videoUrl = URL(string: urlString) {
                mpFD.append(videoUrl, withName: "video", fileName: "chattVideo", mimeType: "video/mp4")
            }
        }, to: apiUrl, method: .post).response { response in
            switch (response.result) {
            case .success:
                self.getChatts()
                print("postChatt: chatt posted!")
            case .failure:
                print("postChatt: posting failed")
            }
        }
    }
The code constructs the “form” to be uploaded as comprising a part named “username” with the field containing the username as in-memory data with UTF-8 encoding. Next it appends a part named “message” constructed similarly. Then comes a part named “image” with in-memory data that has been JPEG encoded (no compression in this case). The “filename” is how the data is tagged, it can be any string. The “mimeType” documents the encoding of the data (though it doesn’t seem to be used for anything). The last part is named “video”, the data is not in memory, but rather must be retrieved from the videoUrl. Upon completion of upload, the response is processed in the provided closure. If the upload succeeded, we call getChatts() to retrieve the updated list of chatts before returning. At this point, Xcode will complain that we’re missing some arguments in our call to getChatts(). You can safely ignore this warning. We will update getChatts() shortly.
Depending on your upload bandwidth, uploading video can take a long time. Wait for the postChatt: chatt posted! to print out on your Xcode’s View > Debug Area > Active Console before trying to refresh your app’s time line to view the new chatt.
You will likely see a large number of warnings in Xcode console. As long as your app doesn’t crash, you can safely ignore these warnings for this lab.
With the updated PostVC, you can now take or select images and videos and send them to your Chatter back end! Since we haven’t worked on image/video download, you can verify this by inspecting the content of your chatts table in the postgres database at the backend.
Let’s move on to downloading images from your server to see them in your timeline.
Viewing posted images and videos
We are now at the final step! Getting the image and/or video from our server and showing them in the chatts!
Recall that MainVC presents retrieved chatts as a list. When the user taps on the video button of a chatt, MainVC must launch AVPlayer to play back the video. It does this by initializing a new instance of the AVPlayer with the URL of the video to be played back. The question is, how does MainVC know which chatt, which cell of the table, the user tapped on, and therefore which video URL to initialize AVPlayer with?
Which cell was tapped?
Following this stackoverflow posting, we will use a closure to let a cell execute code in the context of the TableView.
First in the ChattTableCell class, we create a variable to hold the closure:
var playVideo: (() -> Void)? // a closure
When a cell is tapped, we simply run its closure. Search your ChattTableCell for the @IBAction func videoTapped(_ sender: UIButton) that we created earlier when preparing the storyboard. Add the following code to the function:
self.playVideo?()
In summary, your ChattTableCell class should now contain these statements:
    var playVideo: (() -> Void)?  // a closure

    @IBAction func videoTapped(_ sender: UIButton) {
        self.playVideo?()
    }
Alternatives to closure
If you simply want to segue when a cell is tapped, you can use tableView(... didSelectRowAt indexPath: ...) and prepare(for seque:, sender:) as shown in this stackoverflow post. Unfortunately tableView doesn’t have similar provisioning for providing context when a button in a custom cell is tapped.
Instead of closure, you can register a delegate to obtain the tableView context. However, the use of closure is the more elegant solution.
Display images and playing back videos
Now we return to the MainVC.swift file and import AVKit and SDWebImage at the top of the file. These will allow us to use AVPlayer to play back video and to show downloaded images using progressive rendering respectively.
Progressive JPEG
“Progressive rendering” here is different from progressive JPEG. Progressive JPEG will first download and show a full, albeit low-resolution, version of the image. The resolution then improves over time as more and more data is downloaded. Progressive rendering is a kind of streaming download. You show parts of the image as soon as you have some partial data instead of waiting for the download to complete. However, the images used in his lab are so small, the effect is hardly noticable.
import AVKit
import SDWebImage
Next, under the tableView function with the following signature:
override func tableView(_ tableView: UITableView, cellForRowAt indexPath: IndexPath) -> UITableViewCell {
add the following code directly before the return cell line, to preview the retrieved image per chatt:
        if let urlString = chatt.imageUrl, let imageUrl = URL(string: urlString) {
            cell.chattImageView.sd_setImage(with: imageUrl, placeholderImage: UIImage(systemName: "photo"), options: [.progressiveLoad])
            cell.chattImageView.isHidden = false
        } else {
            cell.chattImageView.image = nil
            cell.chattImageView.isHidden = true
        }
The .sd_setImage(with:placeholderImage:options:) is the progressive rendering extension to UIImageView from the SDWebImage SDK. Note that unless you force set the width and height of your UIImageView (set priority of both to 1000) in your Storyboard, downloaded image may expand to fill your cell.
Hidden but not gone
When a UIView is hidden, it is not visible but the space it would otherwise occupy will simply be left blank. It would be nice if the unoccupied space could be removed also. Unfortunately iOS doesn’t support such a “gone” state. There are ways to achieve this, for example by setting the height of the UIView to be 0. Unfortunately it doesn’t work reliably, e.g., when fast scrolling a table view.
Now add the following code directly after the above, again before the return cell line:
        if let urlString = chatt.videoUrl, let videoUrl = URL(string: urlString) {
            cell.videoButton.isHidden = false // remember: cells are recycled and reused
            cell.playVideo = {
                let avPlayerVC = AVPlayerViewController()
                avPlayerVC.player = AVPlayer(url: videoUrl)
                if let player = avPlayerVC.player {
                    self.present(avPlayerVC, animated: true) {
                        player.play()
                    }
                }
            }
        } else {
            cell.videoButton.isHidden = true
            cell.playVideo = nil
        }
If a given chatt contains video, the videoButton will become visible, and when clicked, it will launch AVPlayerViewController with its AVPlayer initialized to the video’s url to play back. When there is no video, we explicitly hide the videoButton and set its playVideo to nil. Recall that table view cells are recycled and reused.
getChatts()
To implement the Observer pattern, we first define a couple of properties to use with the Notification Center and add property observer to our chatts array. At the same time, since we are using Alamofire to upload chatt in postChatt(_: image:), we could use Alamofire for download also. Replace your chatts property declaration and the getChatts(_:) method in ChattStore with:
    let propertyNotifier = NotificationCenter.default
    let propertyName = NSNotification.Name("ChattStore")
    private(set) var chatts = [Chatt]() {
        didSet {
            propertyNotifier.post(name: propertyName, object: nil)
        }
    }

    func getChatts() {
        guard let apiUrl = URL(string: serverUrl+"getimages/") else {
            print("getChatts: bad URL")
            return
        }

        AF.request(apiUrl, method: .get).responseData { response in
            guard let data = response.data, response.error == nil else {
                print("getChatts: NETWORKING ERROR")
                return
            }
            if let httpStatus = response.response, httpStatus.statusCode != 200 {
                print("getChatts: HTTP STATUS: \(httpStatus.statusCode)")
                return
            }

            guard let jsonObj = try? JSONSerialization.jsonObject(with: data) as? [String:Any] else {
                print("getChatts: failed JSON deserialization")
                return
            }
            let chattsReceived = jsonObj["chatts"] as? [[String?]] ?? []
            self.chatts = [Chatt]()
            for chattEntry in chattsReceived {
                if (chattEntry.count == self.nFields) {
                    self.chatts.append(Chatt(username: chattEntry[0],
                                     message: chattEntry[1],
                                     timestamp: chattEntry[2],
                                     imageUrl: chattEntry[3],
                                     videoUrl: chattEntry[4]))
                } else {
                    print("getChatts: Received unexpected number of fields: \(chattEntry.count) instead of \(self.nFields).")
                }
            }
        }
    }
Observer
We now implement the Observer for the chatts array. Add the following method to your MainVC class:
    @objc private func propertyObserver(_ event: NSNotification) {
        DispatchQueue.main.async {
            self.tableView.reloadData()
        }
    }
Once we have the observer defined, we register it in the viewDidLoad() method of MainVC:
        ChattStore.shared.propertyNotifier.addObserver(
            self,
            selector: #selector(propertyObserver(_:)),
            name: ChattStore.shared.propertyName,
            object: nil
        )
As of iOS 9.0, observers are automatically de-registered when no longer in scope.
Now that MainVC automatically updates the chatt timeline whenever the list changes, we don’t need to manually update it in refreshTimeline(). We still keep the function in case user wants to refresh the timeline, for example, to catch up with chatts posted by other users. Replace your refreshTimeline(_:) method with:
    private func refreshTimeline(_ sender: UIAction?) {
        ChattStore.shared.getChatts()

        // stop the refreshing animation upon completion:
        self.refreshControl?.endRefreshing()
    }
Finally, back in MainVC.viewDidLoad(), replace the call to refreshTimeline(nil) with a call to ChattStore.shared.getChatts(), which should then automatically update your screen with downloaded chatts (if any) on every app launch.
Congratulations, you’ve successfully added the ability to access your device’s photo album or camera, upload/download images and videos to/from your server, and display images and play back video in your app’s feed. We’re all done!
Submission guidelines
IMPORTANT: If you work in team, remember to put your team mate’s full name in lab2 folder’s README.md so that we’d know. Otherwise, we could mistakenly thought that you were cheating and accidentally report you to the Honor Council, which would be a hassle to undo.
If you’ve changed your teaming arrangement, from previous lab’s, please update your collaborators and README.md. If you’re using a different GitHub repo from previous lab’s, invite ve441staff.2025@gmail.com to your GitHub repo and update README.md.
We will only grade files committed to the main branch. If you use multiple branches, please merge them all to the main branch for submission.
Push your lab2 to its GitHub repo as set up at the start of this spec. Using GitHub Desktop to do this, you can follow the steps below:
- Open GitHub Desktop and click on
Current Repositoryon the top left of the interface - Click on your
441GitHub repo - Add Summary to your changes and click
Commit to main - If you have a team mate and they have pushed changes to GitHub, you’ll have to click
Pull Originand resolve any conflicts before pushing. - Finally click on
Push Originto push changes to GitHub
Go to GitHub website to confirm that your project files for lab2 have been uploaded to your GitHub repo under folder lab2.
Verify that your Git repo is set up correctly: clone your repo and build and run your submission to make sure that it works. You will get ZERO point if your lab doesn’t build, run, or open.
References
- Apple’s UIImagePickerController
- Base64
- Resizing Images
- UIImage conversion with Base64
- Upload image to server using URLSessionUploadTask
- Crop Box Apple Documentation
- Crop Box Implementation Example
- AVPlayer Example
- AVKit
- AVFoundation
- Determine if the access to photo library is set or not - PHPhotoLibrary
- How to check if the user gave permission to use the camera?
- iOS view visibility gone
Observer pattern
- Get hands-on with the Cocoa MVC pattern
- Observers in Swift – Part 1
- Property Observers
- NotificationCenter
- removeObserver(_:name:object:)
Image download
- SDWebImage 5.9.0 Docs
- SDWebImage Progressive Image Downloading
- JPEG Formats - Progressive vs. Baseline
- Progressive JPEGs and green Martians
Multipart/form-data
- Upload Data using Multipart
- Understanding HTML Form Encoding: URL Encoded and Multipart Forms
- RESTful API Tutorial: How to Upload Files to a Server
- RFC7578: Returning Values from Forms: multipart/form-data
Alamofire
- How to parse JSON response from Alamofire API in Swift?
- Send POST parameters with MultipartFormData using Alamofire, in iOS Swift
- Alamofire Multipart with parameters : upload Image from UIImagePickerController Swift
- Alamofire 5 Tutorial for iOS
- Alamofire References
- Alamofire Documentation
- Alamofire MultipartFormData
- Alamofire Uploading MultipartFormData
| Prepared for EECS 441 by Ollie Elmgren, Wendan Jiang, Benjamin Brengman, Tianyi Zhao, Alexander Wu, Yibo Pi, and Sugih Jamin | Last updated: April 7th, 2024 |